RCA WHP141 - WHP 141 - Headphones User manual

WHP141
* Range may vary by environment.
* La portée peut varier selon l’environnement.
* El rango puede variar según el ambiente.
Wireless Headphones
With 900 MHz Transmitter
Casque sans fil à
émetteur de 900 MHz
Audifonos Inalámbricos
Con Transmisor
de 900 MHz
Transmits stereo signal
even outside your home!
Émet un signal stéréo même à
l’extérieur de la maison !
¡Transmite una señal de estéreo
incluso fuera de su casa!
WHP141 US IB REVC_K.qxd 5/25/05 12:17 PM Page 1

HEADSET SAFETY
Follow these precautions to ensure safe usage of your wireless headphones.
1. These wireless headphones have been designed for residential use
and should not be used for industrial purposes. The headphones
should be installed and used in accordance with the instructions
contained in this manual.
2. Read through these instructions completely before installation.
Follow the instructions carefully and carry them out in the correct
order. Keep the manual on hand for future reference.
3. The power for this headphone system is delivered with batteries.
Before charging, read the instructions in this manual. Disconnect the
power supply from the cradle/transmitter before installing or
removing batteries.
4. Always leave easy access to the main power supply.
5. Disconnect the unit from the main power supply during storms, or if
you will be absent for a long period of time.
6. If you observe smoke or detect a burning odor, immediately
disconnect the device from the main power supply.
7. Never open the unit yourself; you may receive a severe electric
shock, leading to serious injury or even death. Take the unit to a
qualified service center when service is required.
8. Never push objects of any kind into the openings on the
cradle/transmitter. They may touch dangerous voltage points and
could cause a fire, serious electric shock or even death.
9. Protect the unit from dust, humidity and sources of excessive heat
(e.g., fireplace or radiator).
10. The power source should not be in contact with liquids or exposed
to the risk of dripping or splashing liquid. Be careful not to place the
power source or cradle/transmitter near any object containing liquid
(e.g., a vase, glass or bottle).
11. Do not expose the unit to direct sunlight. Its maximum ambient
temperature is 35° Celsius (95° Fahrenheit).
12. The ventilation should not be impeded by covering the unit with
any items, such as newspapers, tablecloths, curtains, etc.
13. No flame sources, such as lighted candles, should be placed on or
close to the cradle/transmitter.
14. This unit has been designed for use in a dry environment. If, for
exceptional reasons, you must utilize the unit out of doors (balcony,
veranda, etc.), take care to protect it from dampness (dew, rain or
splashes of liquid).
15. The maximum ambient humidity that the device supports is
85 percent. If the unit is cold and you wish to use it in a warm room,
wait until any condensation on the unit evaporates by itself before
you turn it on.
HEADSET SAFETY (continued)
16. Clean the unit with a soft cloth soaked in a neutral detergent. You
may damage the unit if you use an alcohol-based product. If you are
unsure if the detergent is alcohol-based, test the cleaning product on
the underside of the unit.
17. Unplug this product and take it to a qualified service center under
the following conditions:
a. If liquid has been spilled into the product.
b. If the product has been exposed to rain or water.
c. If the product does not operate normally when following the
operating instructions.
Audiovox declines all liability for any use that does not comply with
the instructions in this User’s Manual.
This device complies with Part 15 of the FCC Rules. Operation of this
device is subject to the following two conditions: (1) This device may
not cause harmful interference, and (2) this device must accept any
interference received, including interference that may cause undesired
operation.
WARNING
Modification of this device to receive cellular radio-telephone service
signals is prohibited under FCC rules and federal law.
Changes or modifications to this unit not expressly approved by the
party responsible for compliance could void the user’s warranty.
Keep your sales receipt to obtain warranty parts and service and for
proof of purchase. Attach it here and record the serial and model
numbers. These numbers are located on the product.
Model No. ____________________________________
Serial No. ____________________________________
Purchase Date: _________________________________
Dealer/Address/Phone: ____________________________
__________________________________________
WHP141 US IB REVC_K.qxd 4/25/07 11:42 AM Page 2

54
TABLE OF CONTENTS
Introduction.......................................................................... 5
Features ............................................................................... 5
Headphone Set Description ...................................................... 6
Supplied Accessories............................................................... 7
Battery Installation and Information
Installing the Rechargeable Batteries....................................... 7
Charging the Rechargeable Batteries....................................... 7
NiMH Rechargeable Battery Memory Effect ............................. 8
NiMH Natural Power Discharge ........................................... 8
NiMH Battery Warning ....................................................... 8
Connecting the Cradle/Transmitter ............................................ 8
Operation
Standard Usage ................................................................. 9
Maximum Performance....................................................... 9
Troubleshooting .....................................................................10
Specifications ........................................................................11
Warranty ..............................................................................11
INTRODUCTION
Congratulations on your purchase of this wireless headphone system.
The WHP141 utilizes wireless, radio frequency transmission. The
headphones and the cradle/transmitter incorporate Double Phase Lock
Loop (PLL) Technology, which locks in the frequency on three channels
for clear and stable radio transmission reception. This 900 MHz stereo
wireless headphone system features a compact design that enables you
to enjoy music and TV sound just about anywhere inside or outside
your home. It’s simple to connect this system to any sound source, such
as a DVD, DBS, CD, TV, VCR, stereo receiver or radio.
FEATURES
900 MHz RF technology lets you roam freely throughout your house
Operating distance up to 150ft/45m*
No line-of-sight limitations
Convenient power, volume and tuning controls located on headphones
Automatic Level Control (ALC) and Auto On/Off function
*Range may vary by environment.
WHP141 US IB REVC_K.qxd 5/25/05 12:17 PM Page 4

76
\HEADPHONE SET DESCRIPTION
For stand-alone functioning, it is recommended that your wireless
headphones be powered by rechargeable batteries. The rechargeable
batteries should be installed into the battery compartment and
recharged before use. (See Battery Installation and Information, page 7).
1 Rechargeable battery
compartment
2ON/OFF switch
3 Recharging input
4 Power LED
indicator light
5 Stereo LED indicator light
6VOLUME control
7CHANNEL switch
8 Charging LED indicator light
9 Audio Signal LED indicator light
10 Charging cable
11 DC IN power supply socket
12 CHANNEL switch
13 Audio input cable
SUPPLIED ACCESSORIES
This headphone system includes accessories that enable you to use your
wireless headphone set in a number of ways. (See section on Operation
and Standard Usage, page 9)
BATTERY INSTALLATION AND INFORMATION
Your wireless headphone unit requires two rechargeable AAA batteries.
Rechargeable batteries are uncharged when you purchase them. Before
you can use the wireless headphones, the batteries must be charged for
16 hours. Follow these steps to install and charge the batteries.
Installing the Rechargeable Batteries
Take care to follow these steps to correctly install the batteries.
1. On the right headphone, locate the battery compartment (1).
Use the finger depression on the compartment to turn the battery
compartment cover counterclockwise to remove the cover.
2. Insert two AAA rechargeable batteries, carefully following the
markings inside to ensure the batteries are inserted properly, with
the + and - ends in the correct positions.
3. Replace the battery compartment cover.
Charging the Rechargeable Batteries
To recharge the headset unit, follow the directions below. Note: The
cradle/transmitter on the WHP141 is not a recharging cradle, although
you may place the headset in the cradle during recharging.
Follow these steps to recharge the NiMH rechargeable batteries.
1. Make sure the ON/OFF switch (2), located on the right headphone,
is in the OFF position.
2. Connect the AC/DC main power adapter to the DC IN power
supply socket (11), located on the back of the cradle/transmitter.
3. Plug the adapter into an electrical outlet.
4. Connect the charging cable (10), located on the back of the
cradle/transmitter to the recharging input (3), located on the right
headphone. The headphones can either be placed in the
cradle/transmitter or placed next to the unit. If the headphones are
connected correctly, the charging LED indicator light on the
cradle/transmitter (8) illuminate.
Main power adapter
(AC/DC: 120 V ~ 60 Hz, 12 V = 150 mA)
3.5mm/.25 inch jack adaptor
1
2
3
4
5
6
7
9
8
10
11 12 13
WHP141 US IB REVC_K.qxd 5/25/05 12:17 PM Page 6

98
BATTERY INSTALLATION AND INFORMATION (continued)
5. Charge the rechargeable batteries for 16 hours before using the
headphones for the first time.
6. Battery charges last approximately eight hours before recharging
is necessary.
NiMH Rechargeable Battery Memory Effect
When an NiMH rechargeable battery is first used, it is important to fully
charge it and then allow it to discharge three times in order to maximize
the battery’s storage capacity. Avoid recharging the battery until it is
fully discharged. When a battery is recharged before it is completely
discharged, it develops a memory that will limit the amount of charge
in the future. This reduces the battery’s storage capacity for subsequent
charges and so reduces the amount of time your headphones can be
used before recharging is necessary.
NiMH Natural Power Discharge
Due to their chemical design, all rechargeable batteries incur some
degree of natural discharge. This means they automatically lose their
charge in varying degrees, and the battery’s capacity drops even when
not in use. The size of this power loss varies, depending on the battery’s
type, size, design, internal resistance and, most especially, the
temperature. The higher the temperature, the greater the power loss
through natural discharge.
NiMH Battery Warning
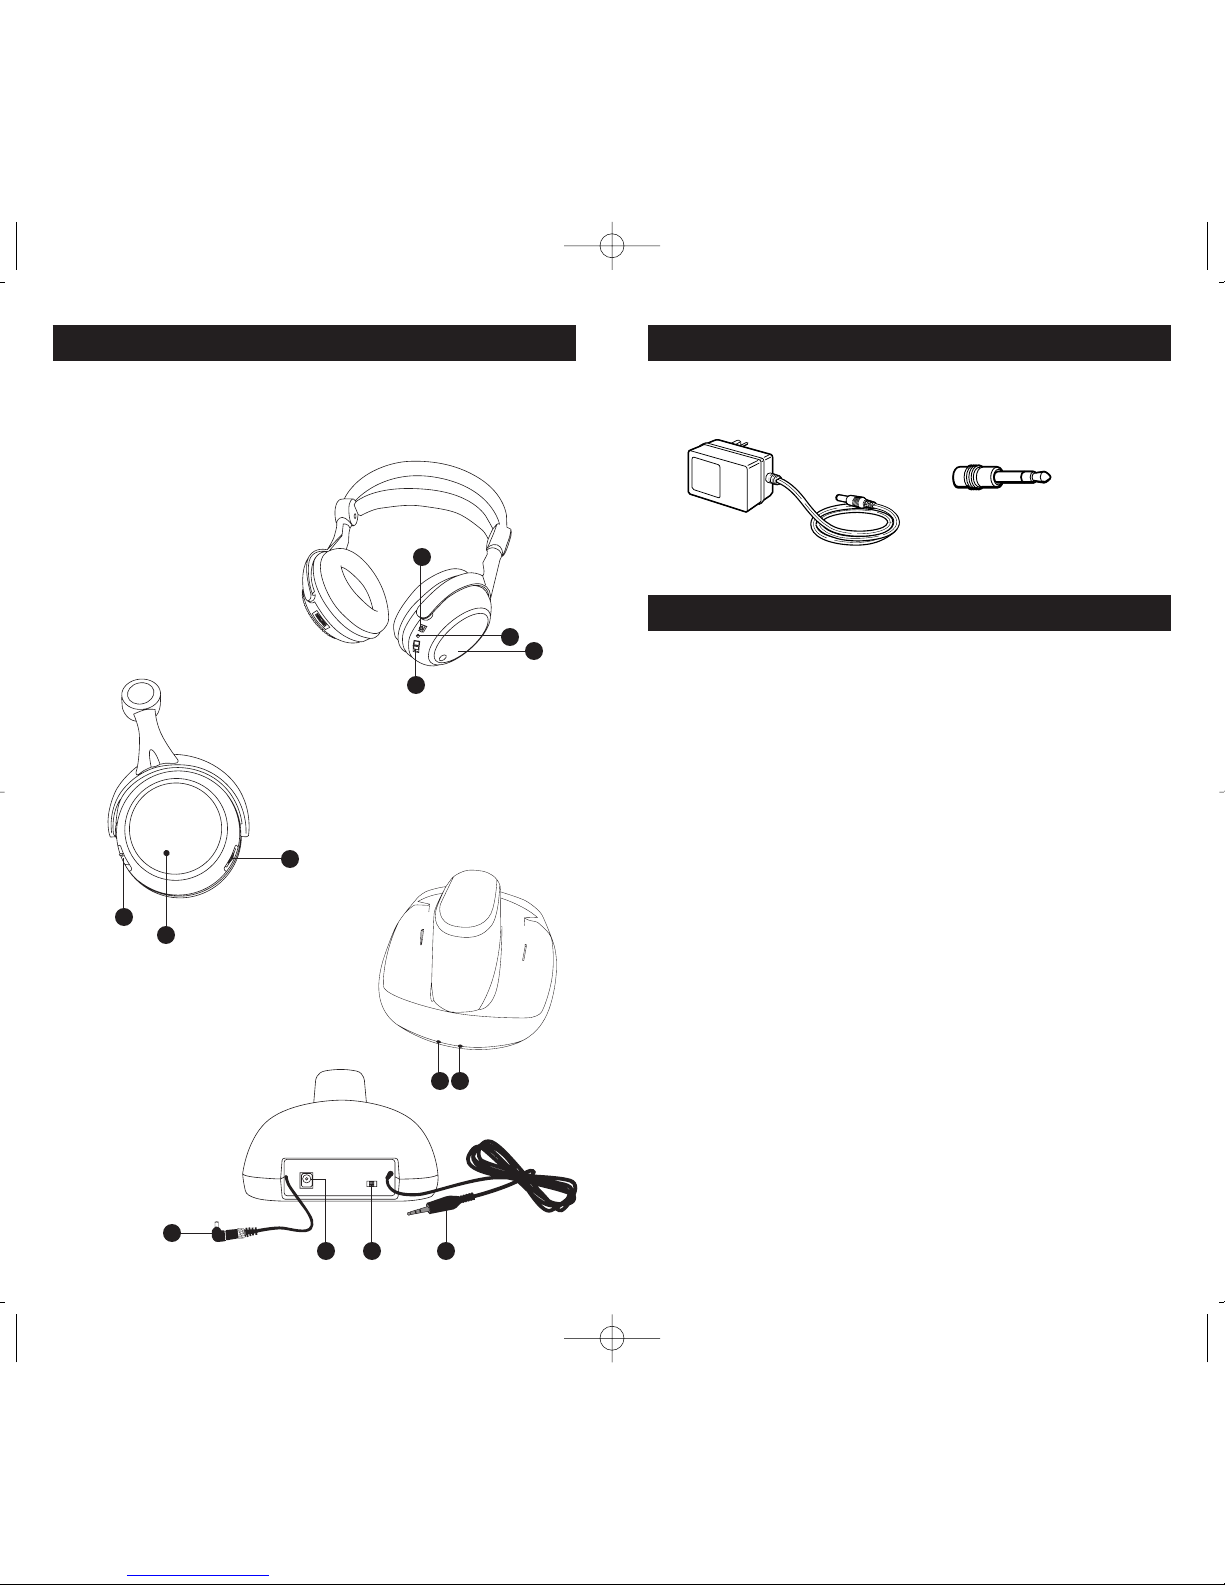
CONNECTING THE CRADLE/TRANSMITTER
Follow this quick setup guide to ensure trouble-free installation of your
headphones. To connect the cradle/transmitter to the audio source,
follow these steps.
1. Connect the AC/DC main power adapter to the DC IN power
supply socket (11) at the back of the cradle/transmitter. Then,
connect the adaptor to an electrical outlet. Important: This power
unit is intented to be correctly oriented in a vertical or floor mount position.
2. Insert the audio input cable (13), located on the back of the
cradle/transmitter into the headphone jack of your audio source
(e.g., stereo, TV, CD player, DVD, etc.).
3. The audio signal LED indicator light (9), located on the front of the
cradle/transmitter, illuminates as soon as you have connected the power
adapter to the outlet and the audio cable to an active signal source.
OPERATION
Standard Usage
1. Switch on the audio source (TV, DVD, CD player, etc.) to which the
cradle/transmitter is connected. If your audio source is a DVD or
CD player, start a disc.
Warning: The cradle/transmitter has an automatic function that
switches it off if it does not receive an audio signal for approximately
4 minutes. If the volume on the audio source is too low, the
cradle/transmitter also switches off after four minutes. This feature
was installed to comply with current legislation that reduces the
amount of radio emissions in the environment. To ensure that this
function is not accidentally triggered, set the audio source volume at
approximately 50 percent capacity. Consult your component user’s
manual for details on how to set the volume for headphones.
2. The cradle/transmitter is now ready to receive an audio signal.
The cradle/transmitter is activated automatically when receiving
an audio signal from the audio source.
3. Check to make sure the audio signal LED indicator light (9) on the
front of the cradle/transmitter is lit, indicating that the unit is ready.
4. Place the headphone ON/OFF switch (2), located on the right
headphone, to the ON position.
5. Check to make sure the stereo LED indicator light (5) on the left
headphone is lit, indicating a strong signal.
6. The cradle/transmitter and the headphones feature double phase lock
loops (PLL) for radio frequency transmissions. Select one of the three
channels on the back of the cradle/transmitter (12) and the corresponding
channel on the left headphone (7). Be sure that the same channel (1, 2
or 3) is selected on both the cradle/transmitter and the headphones.
The Phase Lock Loop (PLL) function automatically locks the chosen
channel, providing top-quality audio reception with no sound loss.
7. Before wearing headphones adjust the volume using the VOLUME
control (6), located on the left headphone, to a comfortable volume
level.
8. When you are through using the headphones, switch them off using
the ON/OFF switch (2), and place the audio source on standby.
Maximum Performance
When the audio source offers a variable volume output, maximum
performance can be achieved. Variable volume outputs include
headphone jacks, computer speakers and some TV RCA output jacks.
Variable Volume Output. When using an audio source with a variable
output jack, you can reduce any distortion and achieve maximum
performance by following these steps:
1. Set the volume of the audio source component to mid-level.
2. Adjust the headphone VOLUME control (6) until the desired result
is achieved.
WHP141 US IB REVC_K.qxd 4/25/07 1:17 PM Page 8
If you are using NiMH or NiCd batteries, the batteries will charge when the
headphones are powered with the AC power adapter. Do not power the
headphones with the AC power adapter if you installed alkaline or other non-
rechargeable batteries—this could cause the batteries to leak. Do not mix
batteries with different chemistry types (for example, a zinc battery with an
alkaline battery). Do not mix new and used batteries. Do not leave batteries
installed in the product when not in use for long periods. Respect the
environment and the law. Before disposing of rechargeable batteries, ask
your distributor if they can be recycled and whether or not the distributor
collects rechargeable batteries for recycling.
Other manuals for WHP141 - WHP 141 - Headphones
1
This manual suits for next models
1
Table of contents
Languages:
Other RCA Headphones manuals

RCA
RCA WHP140 Installation guide

RCA
RCA WHP160 User manual

RCA
RCA WHR120RS Installation guide

RCA
RCA 900 MHz User manual

RCA
RCA WHP151 User manual

RCA
RCA WHP140 User manual

RCA
RCA WHP145 User manual

RCA
RCA HP59MIC User manual

RCA
RCA HP350 Use and maintenance manual

RCA
RCA WHP141 - WHP 141 - Headphones User manual