Parts no# of TV Stand: RR0732R24001
Press the [INPUT] button on remote
control to display input list. Use up/down
arrow to highlight TV, AV, Component,
HDMI1, HDMI2, Roku, USB, input and
press OK to choose.
Select Input
INPUT
USB
Roku
Move Select
Source Select
TV
AV
Component
HDMI 1
HDMI 2
OK
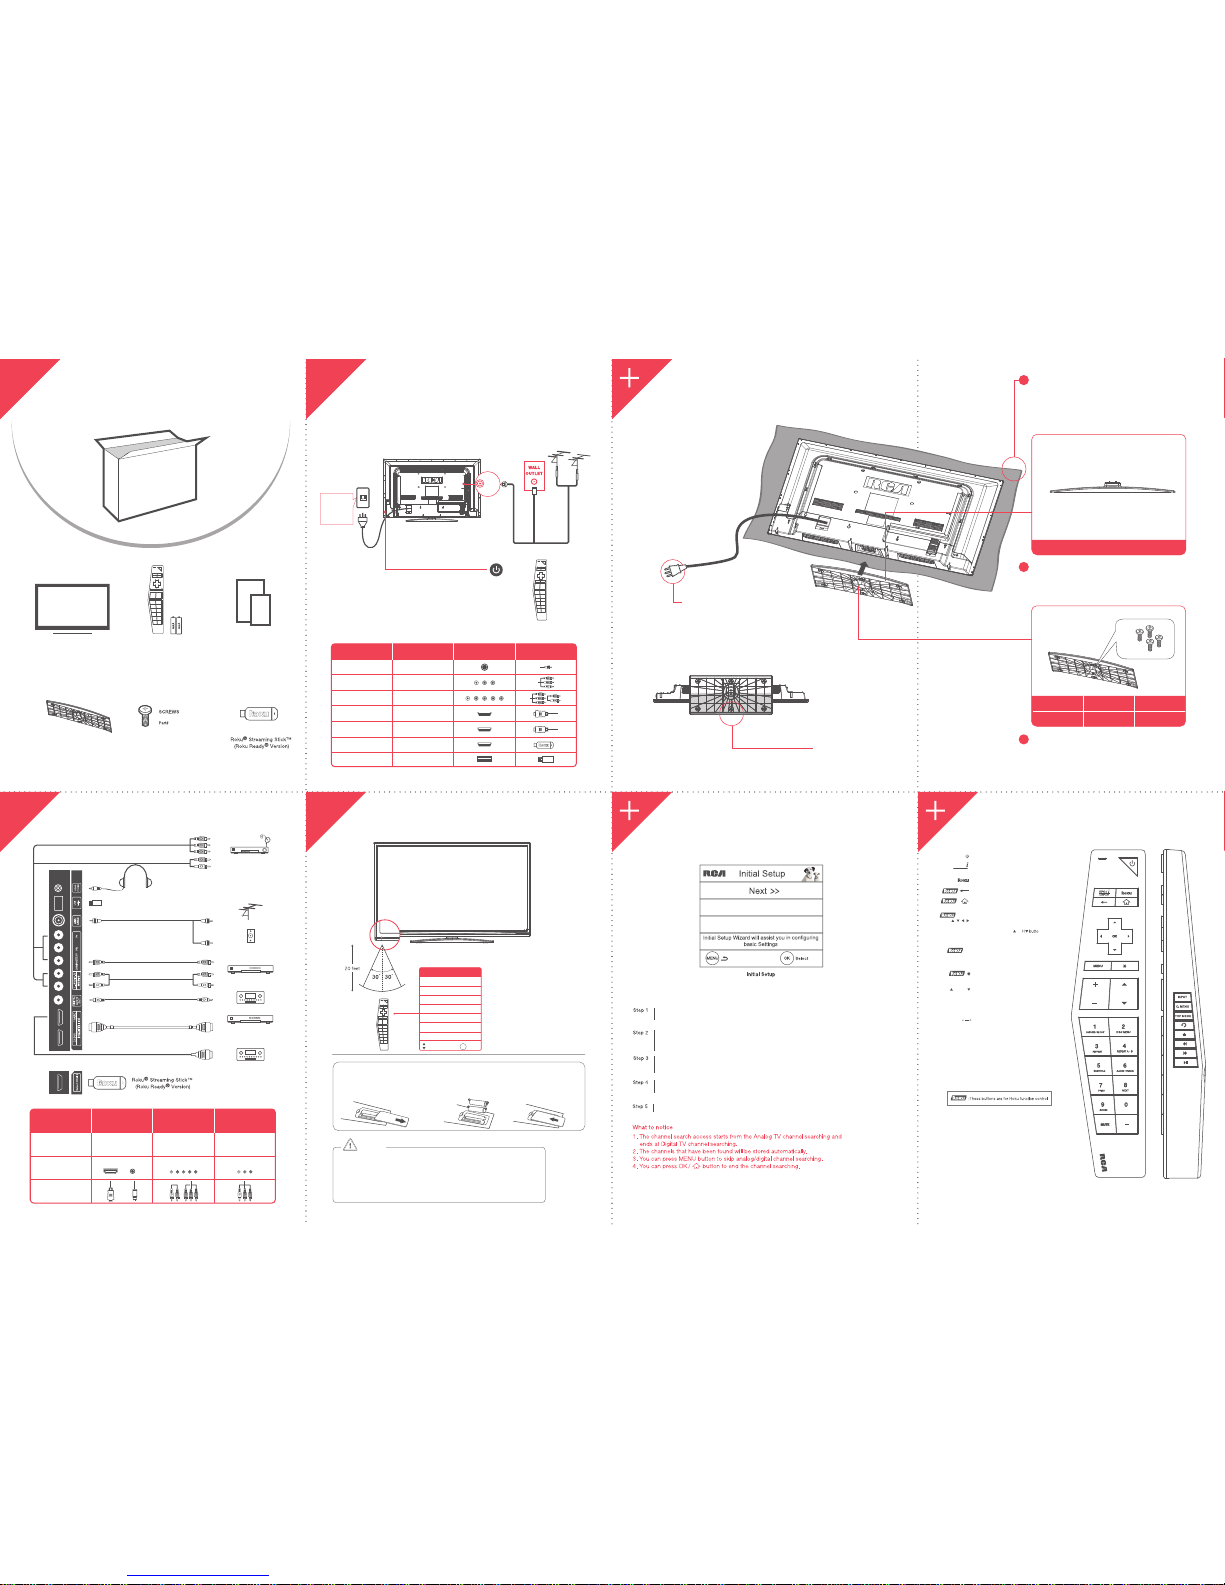
QUICK START GUIDE
1. Use an antenna cable to connect the ATSC/NTSC
signal to the LED TV's TV CABLE terminal.
2. Connect the TV to the power outlet.
Press the power button on the side
of your TV or POWER on your remote control
to turn on the TV.
Power on remote control
STAND INSTALLATION GUIDE
Checking Accessories Initial Installation and Selection Input Source
2
Pedestal Screws
M4 x 12mm
Quantity
4pcs
Part#
RS01TM412H
Please take note of the base direction:
1
3
If it is the first time you turn on your TV, or you have done Clear Channel List option
the initial setup menu appears automatically.
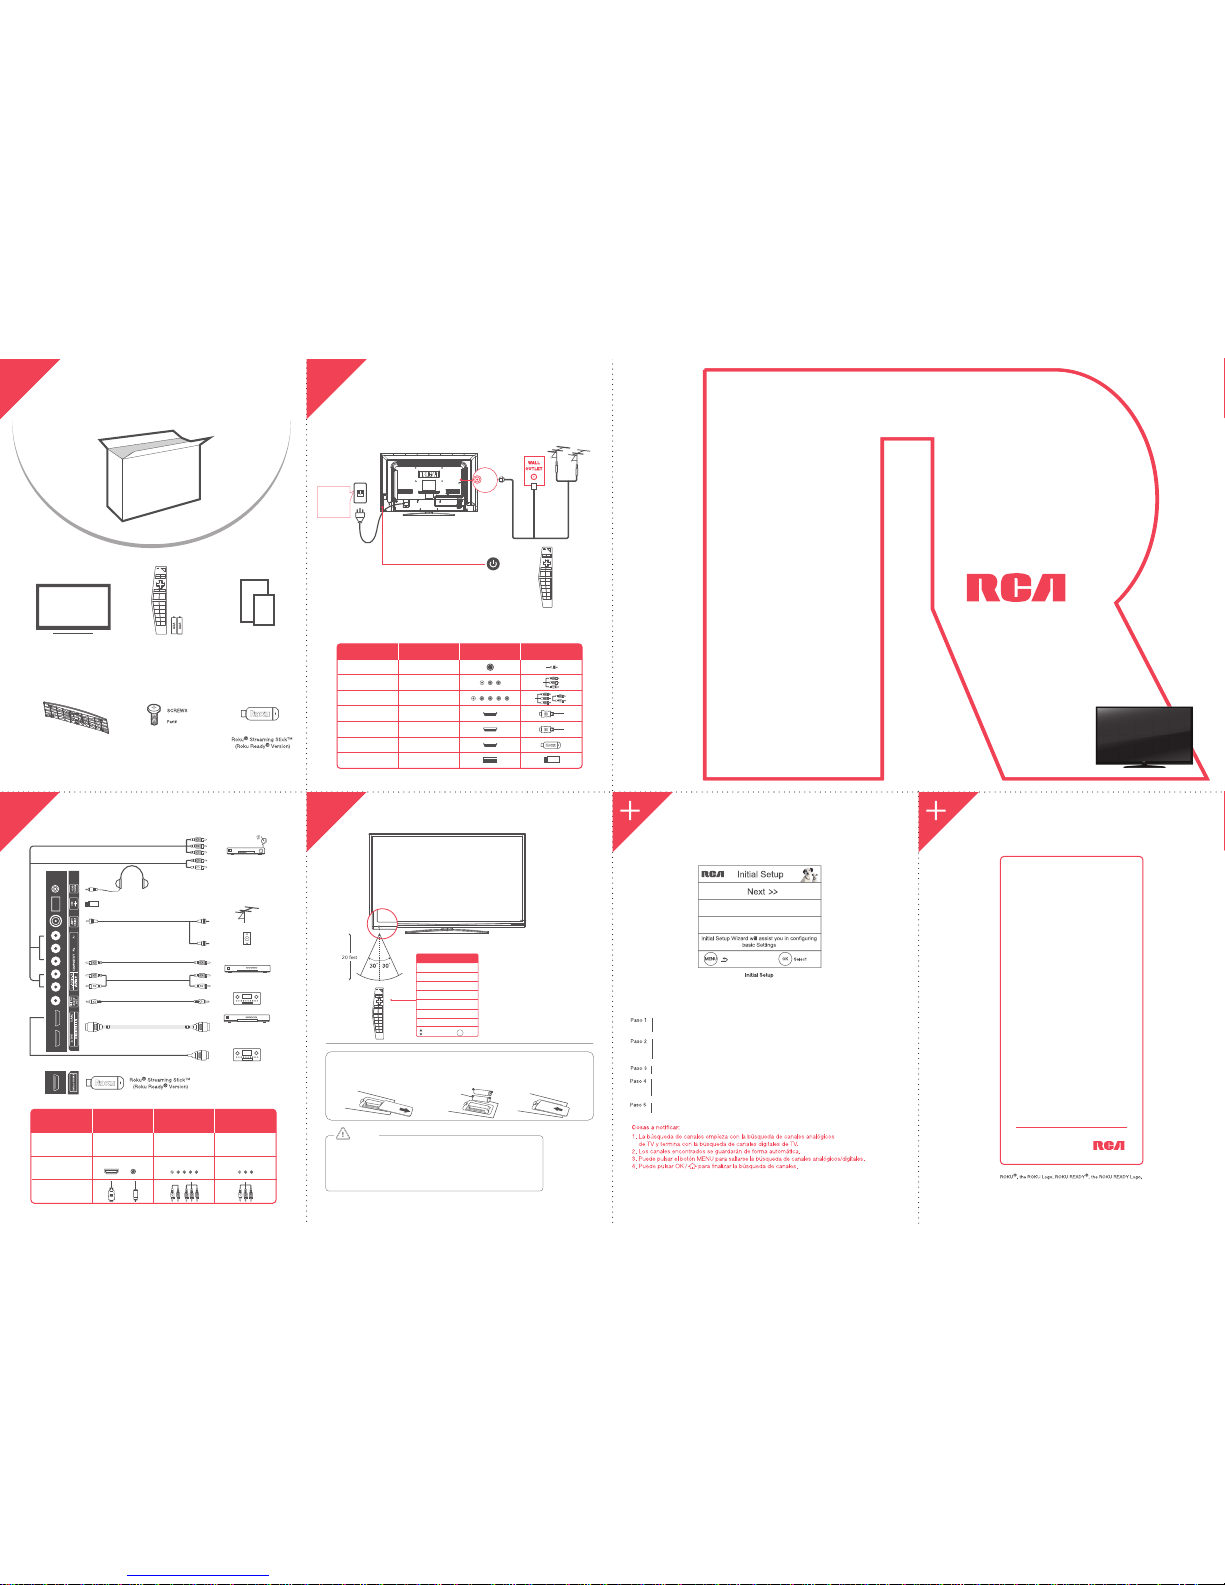
English
LEARNING ABOUT
REMOTE CONTROL
Connect the TV to the power AC 100-120V 60Hz
(Connect after all the other connections have been made.)
Step1QUICK START GUIDE
Installation Guide
Step2
QUICK START GUIDE
Select Input Source and Initial Setup
Step4INITIAL SETUP
25 6
3 4
LED TV(stand separated from cabinet)
User’s manual
PART NO.: RE20QP228
+
Quick Start Guide
Stand Installation Guide
Patent Card
Remote Control & Batteries
1
HDMI DTV/TV COMPONENT AV
CONNECTION ADVICE
PICTURE QUALITY
CONNECTION TYPE
CONNECTOR IMAGE
BEST
HIGHEST DIGITAL
QUALITY PICTURE
GOOD
ANALOG HD
QUALITY PICTURE
COMPATIBLE
LOW RESOLUTION
NOT RECOMMENDED
QUICK START GUIDE
Connecting External Devices View of Side Connection
Step3
1.
Put Batteries in the Remote
3. Replace the cover.Remove the battery compartment
cover from the back of the remote
control by lifting the cover.
Insert 2AAA batteries, making
sure the polarities(+and-) are
aligned correctly.
2.
CAUTION
• Used batteries should be recycled.
• Keep out of children`s reach.
• Do not use new and old batteries together.
• Change both the batteries at the same time.
• When not using the remote control for a long time, remove the batteries from the unit.
7 8
Power on TV
Connect after
all the other
connections
have been
made
TV Stand TV Stand Screws
RS01TM412H
M4 x 12mm, 4pcs
Cable TV
Antenna
AC 100-120V
60Hz or
ANT
75Ω
Match the locating poles of the TV stand to the locating holes
of the TV set completely.
Insert four M4 screws (all same in size) and tighten them.
* Note: the keys not listed are for other purpose,
they are not available for this TV model.
The TV is packaged with the TV
stand separated from the cabinet.
To setup the TV table stand, please
carry out the installation
according to the instructions below.
Place the TV faced down on a soft cloth or cushion
to prevent the panel from being damaged. The panel
can be scratched easily, so please:
·Choose an absolutely flat surface to place the TV on.
·Use soft cloth or cushion to face the TV panel.
·Do not put TV on the table directly.
Always unplug the AC cord first
when installing/removing the stand.
Longer side
The bottom view of the TV
(Front cabinet faces down)
INPUT SOURCE
TV
AV
Component
HDMI 1
HDMI 2
Roku Roku
USB
SELECTED JACKS
ANT 75
Audio L/R, Video In
Component(Y Pb Pr R L)
HDMI 1
HDMI 2
USB
SELECTED JACKS PLUGS
Ω
AV-VIDEO
AV-AUDIOCOMPOSITE-AUDIO
COMPOSITE-VIDEO
COMPONENT-AUDIO
COMPONENT-VIDEO
Headphone
USB Media Play/Service Use
Wall socket, Antenna or CATV box(ANT Cut)
FOR HOME THEATER SYSTEM
Pr
Pb
Y
R
L
R
L
R
L
TV cable Box
Satellite Receiver
DVD Player
AV EQUIPMENT
VIDEO GAME SET
Satellite antenna cable
Antenna
Cable (Wall Outlet)
HOME THEATER SYSTEM
HOME THEATER SYSTEM
DVD Player
TV cable Box
Game & AV Device
HDMI
Side input
Bottom input
Return
Please select Menu Language, press the up/down arrow select the language you need.
Available languages: English, Spanish and French.
Please select the TV installation mode, press the up/down arrow select the mode you need:
Home, Retail. If you select Home mode, the next option is step three. If you select Retail
mode, please refer the step four.
Please choose between Power Saving and Dynamic mode. You can save more
energy with Power Saving.
To choose your TV tuner signal type, press the up/down arrow select the signal type: Air, Cable.
Note: please select TV signal type according to the antenna or cable closed circuit TV you use.
If you accomplish the initial setup, the TV will search channels Automatically.
CH( )or CH( )
Arrows
( / / / )
Turns th
Shortcut to Roku Input
e TV on or off.POWER ( )
Use these buttons to enter numbers.Numeric Buttons
To enter a digital channel with a sub-
channel, enter the main channel; then, press
this button to enter the sub-channel and press
OK.
Uses the four arrows to highlight
different items in the TV menu or
change the value. The up/down arrow
can also work as CH /C n,
and the left/right arrow can also work
as VOL-/VOL+ button.
Enter and confirm button.OK
Return to previous screen.
Accesses the Main Menu, or return
to the upper level of a sub-menu.
MENU
Increase/Decrease the volume of your TV.VOL+ or VOL-
Scans up or down through the current
channel list. Press once to change the
channel up or down; press and hold
to continue changing channels.
MUTE Reduces the TV volume
to its minimum level.
Press again to restore the volume.
MUTE
Accesses the available input channels
(TV, AV, Component, HDMI 1/2, USBRoku, ).
Use the arrows to highlight options,
and press OK to select.
INPUT
Return to Roku Home screen
and exits the current menu or function.
Shows Electronic Program Guide and
Displays the DVD information.
EPG /
View more options of Roku mode.
DISPLAY