RDZ PC 300 Plus User manual

Regulation
Regolazione
PC 300 Plus
Control Panel
USER MANUAL
MANUALE UTENTE
UC 300-M/MHE, UC 360-MHE, UC 500-MVHE Electronic Controller
Centralina Elettronica UC 300-M/MHE, UC 360-MHE, UC 500-MVHE
FAE0CD000AB.01
11/2018
bit.ly/rdzwebsite

DISPOSAL - SMALTIMENTO
In base aquanto previsto dalleseguenti direttive
europee 2011/65/UE, 2012/19/UE e 2003/108/
CE, relative alla riduzione dell’uso di sostanze
pericolose nelle apparecchiature elettriche ed
elettroniche,nonché allosmaltimentodei riuti.
Il simbolo del cassonetto barrato riportato sull’apparecchiatura
indica che il prodotto alla ne della propria vita utile deve essere
raccolto separatamente dagli altri riuti.
L’utente dovrà, pertanto, conferire l’apparecchiatura giunta
a ne vita agli idonei centri di raccolta dierenziata dei riuti
elettronici ed elettrotecnici, oppure riconsegnarla al rivenditore
che, a fronte di acquisto di apparecchio equivalente, è tenuto
al ritiro gratuito del prodotto da smaltire.
L’adeguata raccolta differenziata per l’avvio successivo
dell’apparecchiatura dismessa al riciclaggio, al trattamento e allo
smaltimento ambientale compatibile contribuisce ad evitare
possibili eetti negativi sull’ambiente e sulla salute e favorisce
il riciclo dei materiali di cui è composta l’apparecchiatura.
Lo smaltimento abusivo del prodotto da parte dell’utente
comporta l’applicazione delle sanzioni previste dalla vigente
normativa in materia.
In accordance with the provisions of the following
European directives 2011/65/EU, 2012/19/EU
and 2003/108/EC, regarding reducing the use of
hazardous substances in electrical and electronic
equipment, in addition to waste disposal.
The crossed out wheelie bins symbol on the equipment indicates
that, at the end of its useful life, the product must be collected
separately from general waste.
Therefore, at the end of its useful life, the user must take the
equipment to a designated electrical and electronic waste
collection point , or return it to the dealer that, against the purchase
of an equivalent appliance, it is obliged to collect the product for
disposal free of charge.
Appropriate differentiated waste collection for subsequent
recycling, treatment and environment-friendly disposal of
the discarded equipment helps preventing possible negative
environmental and health eects and encourages recycling of the
component materials of the equipment.
Illegal disposal of the product by the user entails the application
of sanctions provided by the regulations in force.

3
INDEX - INDICE
Description Descrizione Pag.
Disposal Smaltimento 3
1Description Descrizione 4
1.1 Display description Descrizione display 4
1.2 Description and features of the keys Descrizione e funzionalità tasti 6
1.3 Operating menu icons Icone menu funzionamento 7
2Function menu Menu funzionamento 8
2.1 On - O Accensione e spegnimento 8
2.2 Function mode Modalità di funzionamento 9
2.3 Alarms Allarmi 10
3Main menu Menu principale 10
3.1 Main screenshot overview Riepilogo maschere menu principale 11
3.2 Temperature detected in the room Temperatura rilevata in ambiente 13
3.3 Humidity detected in the room Umidità rilevata in ambiente 13
3.4 Manual temperature setpoint Setpoint manuale di temperatura 14
3.5 Manual humidity setpoint Setpoint manuale di umidità 15
3.6 Setpoint of calculated temperature Setpoint di temperatura calcolato 16
3.7 Setpoint of calculated Humidity Setpoint di umidità calcolato 16
3.8 Outdoor temperature detected Temperatura esterna rilevata 17
3.9 Room Air quality detected Qualità dell’ aria ambiente rilevata 17
3.10 Room Air quality Set Set Qualità dell’ aria ambiente 18
4Conguration menu Menu congurazione 19
4.1 Contrast Contrasto 20
4.2 Date Data 21
4.3 Hour Ora 22
4.4 Season Setting Set Stagione 23
4.5 Summer air supply temperature set Set temperatura mandata aria estiva 24
4.6 Winter air supply temperature set Set temperatura mandata aria invernale 25
4.7 Supply air ow set Set portata aria di immissione 26
4.8 Other readings Altre letture 27
5Programming Programmazione 28
5.1 Activation for temperature programming Attivazione programmazione temperatura 30
5.2 Activation for humidity programming Attivazione programmazione umidità 31
5.3 Temperature programming Programmazione temperatura 32
5.4 Humidity programming Programmazione umidità 34
5.5 Renewal programming Programmazione Rinnovo 36
5.6 Economy programming Programmazione Economy 38
6Alarms Allarmi 40

4
1.1 DISPLAY DESCRIPTION DESCRIZIONE DISPLAY
1DESCRIPTION - DESCRIZIONE
Centralina elettronica programmabile atta alla gestione delle
unità UC 300-M/MHE, UC 360-MHE, UC 500-MVHE. Provvista
di sonda di temperatura e umidità per il controllo della
funzionalità di temperatura, deumidicazione,integrazione
e rinnovo estivo ed invernale.
Tramite il display è possibile impostare tutti i parametri della
macchina e visualizzare lo stato di funzionamento.
Grazie all’utilizzo della centralina PC 300 PLUS è possibile
gestire l’unità di trattamento aria in modo autonomo.
Inoltre, prevedendo una sonda esterna opzionale, il sistema
potrà garantire anche la funzionalità FREE-COOLING Estivo/
Invernale e FREE-HEATING.
L’installazione su frutto a 3 moduli.
Programmable electronic controller used to manage UC
300-M/MHE, UC 360-MHE, UC 500-MVHE units. It is equipped
with temperature/humidity sensor to manage temperature,
dehumidication, and winter/summer renewal and integration
functions.
On the display you can set all the parameters of the unit or check
the function status. PC 300 PLUS makes is possible to manage the
air handling unit autonomously.
Moreover, if you connect the optional external sensor, the system
can manage Summer/Winter FREE-COOLING and FREE-HEATING
functions .
Embedded installation into a 3-module box.
Dalla maschera principale del display è possibile visualizzare le
seguenti informazioni:
Menu Principale: visualizzazione della temperatura e
dell’umidità ambiente rilevate dalla sonda (sempre visibili),
visualizzazione dei setpoint temperatura e umidità (umidità
solo in stagione Estiva), rilevazione temperatura esterna (con
sonda esterna congurata), rilevazione e set della qualità aria
(con sonda QA congurata). Possibilità di editare manualmente
i setpoint di temperatura e umidità ( umidità solo in stagione
Estiva ) (vedi capitolo menu principale).
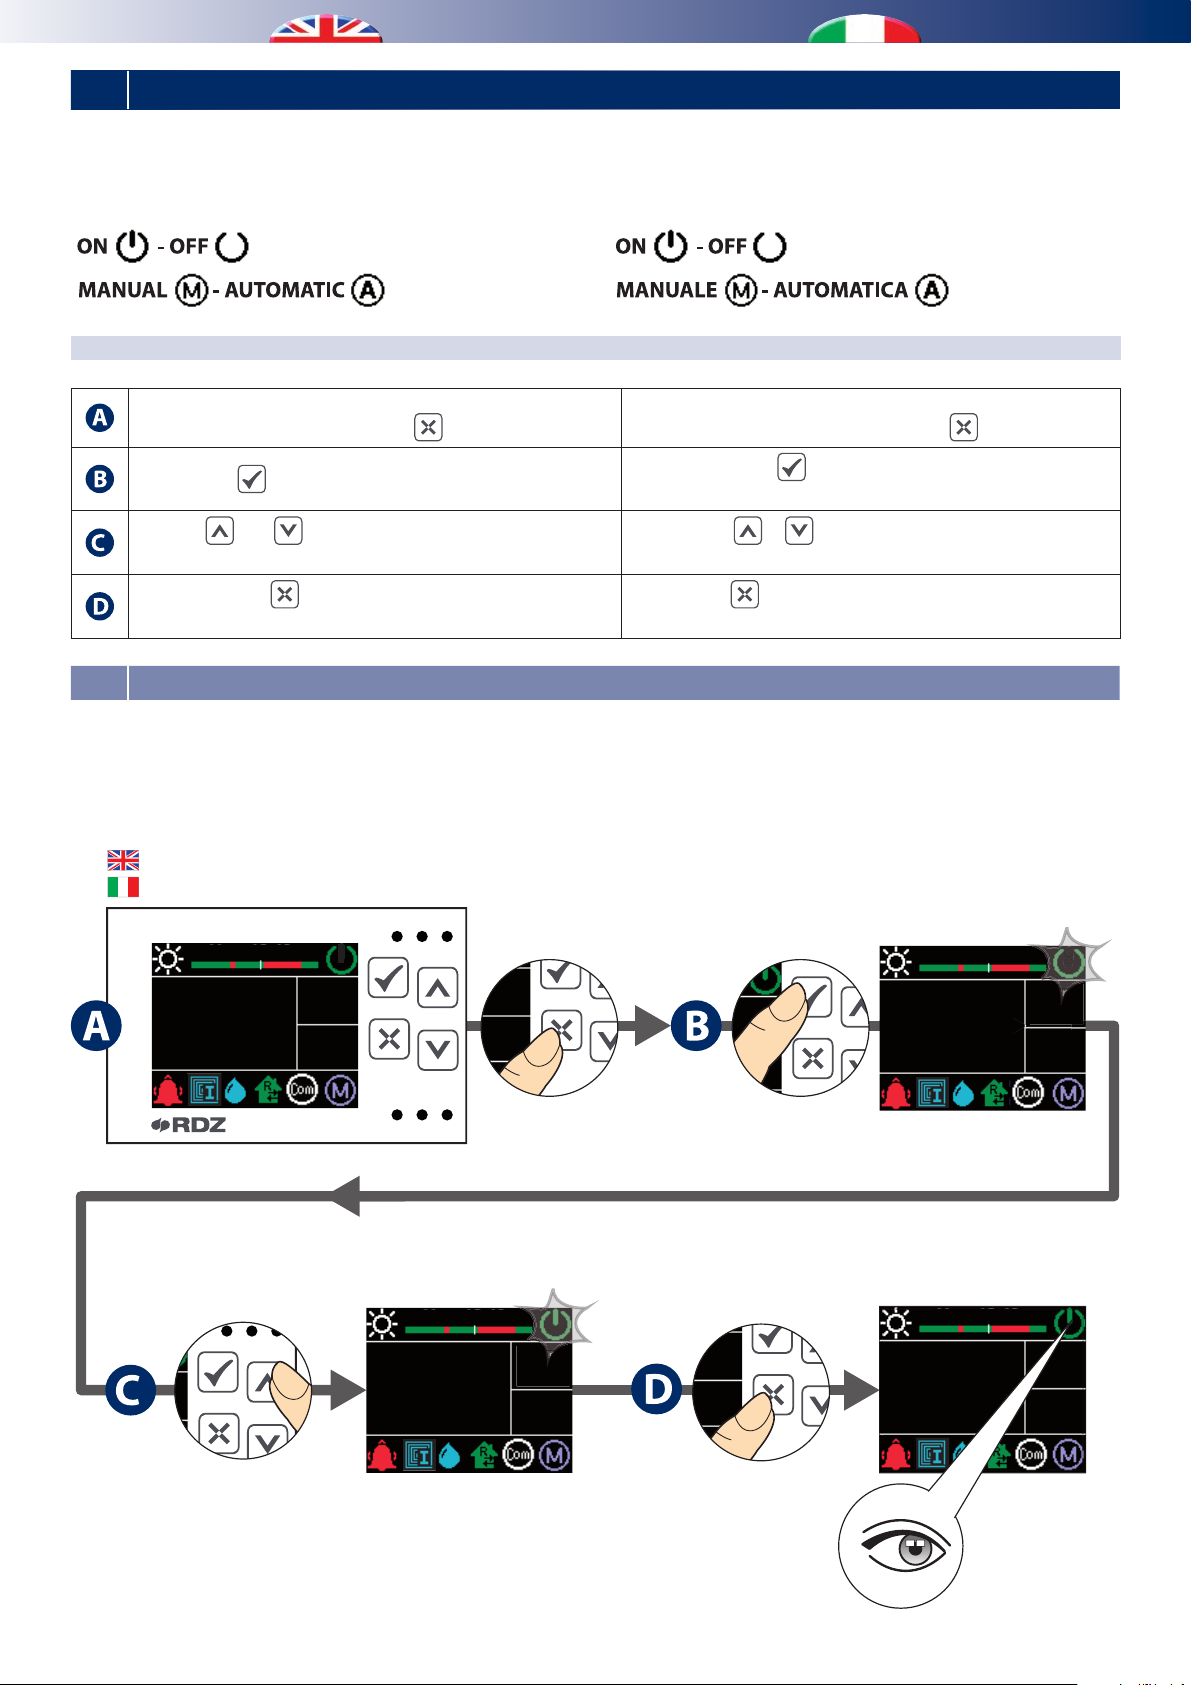
Menu Funzionamento (Pressione del tasto ):
visualizzazione e modica dello stato ON-OFF, indicazione del
tipo di funzionamento MANUALE-AUTOMATICA e indicazione
presenza allarmi (icona visualizzabile solo se allarme attivo) vedi
capitoli Icone menu funzionamento, Menu funzionamento
e Allarmi
Tramite la pressione dei tasti laterali (singolarmente o in
combinazione fra loro) si possono inoltre visualizzare il Menu
Congurazione , il Menu ExtraCong. e il Menu PortCong.
(vedi capitoli relativi)
LEGENDA DISPLAY
The display main page shows the following information:
Main Menu shows the room temperature and humidity detected
by the probe (always visible); it shows the temperature and
humidity setpoints (humidity in Summer season only), as well as
the outside temperature (if the external probe is connected) and
air quality setting+reading (if AQ probe is connected). It also allows
the user to manually edit the temperature and humidity setpoints
(humidity in Summer season only) (see Main Menu chapter)
Operation Menu (Key pressing ): it shows and enables the
modication of the ON_OFF status; it also shows the MANUAL-
AUTOMATIC operation and the presence of any alarms (the symbol
can be displayed only if the alarm is active);
see chapter Operation Menu Symbols, Operation Menu and
Alarms
Moreover, by pressing the side keys (individually or together), one
can display the Conguration Menu, the ExtraCong. Menu and
the PortCong. Menu (see the corresponding chapters).
DISPLAY KEY
H L M N O
G
F
E
BA C D
I

5
N.B.
Nei campi L, M, Nse le icone visualizzate sono di colore
Rosso indica comunicazione assente con la macchina.
N.B.
In L, M, Nfiels, if symbols are red, it means lack of
communication with the air handling unit.
11Description Descrizione
B
-Day and Hour visualization Visualizzazione Giorno e Orario
C-
Day Temperature Programm. Programm. Giornaliera Temperatura
5 2 4
5 2 4
D
2Indication of system OFF Funzionamento impianto OFF
2Indication of system ON Funzionamento impianto ON
E
-Main Field Campo Principale
F
-Visualizzazione Temperatura in Ambiente Visualizzazione Temperatura in Ambiente
G
-Visualizzazione Umidità in Ambiente Visualizzazione Umidità in Ambiente
H
4Alarm icon (active only if there are errors) Icona allarme (attiva solo in presenza di errori)
I
35Temperature request Chiamata di temperatura
35
Temperature request +
Integration request
Chiamata di temperatura +
Chiamata di integrazione
1SYNOPTIC ON (blinking) SINOTTICO Attivo (lampeggiante)
L
5Active Dehumidication operating mode Modalità di funzionamento Deumidicazione attiva
2Active Remote Dehumidication operating mode Modalità di funzionamento
Deumidicazione Remota attiva
6
Active Dehumidication + Active Remote
Dehumidication operating mode
Modalità di funzionamento Deumidicazione attiva +
Deumidicazione Remota attiva
M
2Active Ventilation operating mode Modalità di funzionamento Ventilazione attiva
2Active Renewal operating mode Modalità di funzionamento Rinnovo attiva
2Active Boost operating mode Modalità di funzionamento Boost attiva
2Active Free Cooling operating mode Modalità di funzionamento Free Cooling attiva
2Active Free Heating operating mode Modalità di funzionamento Free Heating attiva
N1Active Comfort operating mode Modalità di funzionamento Comfort attiva
2Active Economy operating mode Modalità di funzionamento ECO attiva
O
Manuale mode operating mode Modalità di funzionamento Manuale
4Temperature programming on Programmazione della temperatura attiva
5Dehumidication programming on Programmazione della deumidicazione attiva
1
Temperature programming on +
Dehumidication programming on
Programmazione della temperatura attiva +
Programmazione della deumidicazione attiva
ICON DESCRIPTION - DESCRIZIONE ICONE
A
System operating in WINTER mode - Funzionamento modalità INVERNALE
System operating in SUMMER mode - Funzionamento modalità ESTATE
Icons Colors Legend
Legenda Colori Icone
1White - Bianco 4 Red - Rosso
2Green - Verde 5 Light Blue - Celeste
3Orange - Arancione 6 Blue - Blu

6
1.2 DESCRIPTION AND FEATURES OF THE KEYS DESCRIZIONE E FUNZIONALITA’TASTI
Key - Tasto Description - Descrizione
SET
Press the key briey:
- To conrm the edited values (Enter)
- To access submenus
• It browses through the 2 icons of the operating menu
and display the number of alarms (if any)
• On the chrono page, you can:
- copy parameters on the next day
- browse through the 3 setpoint levels
If the key is pressed and held down (> 5 sec):
From the main menu, one can access the Conguration
Menu.
Pressione breve del tasto:
- Per confermare i valori in modica (Enter)
- Per accedere ai sottomenu
• Permette la navigazione fra le 2 icone del menu
funzionamento e la visualizzazione del numero di
allarmi (se presente)
• Dalla maschera crono, permette:
- la copia dei parametri al giorno successivo
- la navigazione fra i 3 livelli di set
Pressione prolungata del tasto (> 5 sec):
Dal menu principale, si ha l’accesso al Menu
Congurazione.
ESC
Press the key briey:
- To exit editing (Reset)
- To go back to the upper menu
• From the main menu, you can edit parameters in the
operating menu.
Pressione breve del tasto:
- Per uscire dalle operazioni in modica (Reset)
- Per ritornare al menu superiore
• Dal menu principale permette l’ accesso alla modica
dei parametri nel menu funzionamento.
UP
SU
Press the key briey:
• To scroll up the elds in the menu being displayed
• To increase the value of the eld being edited
• In the operating menu, with flashing icons on the
display, you can select the desired mode.
• In the alarm page, alarm reset request.
Pressione breve del tasto:
• Scorrimento verso l’alto dei campi presenti nel menu in
visualizzazione
• Incremento del valore del campo in modica
• Nel menu funzionamento, con icone lampeggianti sul
display, permette la scelta della modalità desiderata
• Nella pagina allarme, richiesta reset allarme
DOWN
GIÙ
Press the key briey:
• To scroll down the elds in the menu being displayed
• To decrease the value of the eld being edited
• In the operating menu, with flashing icons on the
display, you can select the desired mode.
• In the alarm page, alarms scrolling.
Pressione breve del tasto:
• Scorrimento verso il basso dei campi presenti nel menu
in visualizzazione
• Decremento del valore del campo in modica
• Nel menu funzionamento, con icone lampeggianti sul
display, permette la scelta della modalità desiderata
• Nella pagina allarme, scorrimento allarmi
+
If the keys are pressed and held down (> 5 sec):
Access to the password page to enter the ExtraCong
Menu (*)
Pressione prolungata dei tasti (> 5 sec):
Si accede alla pagina password per entrare nel Menu
ExtraCong (*)
+
If the keys are pressed and held down (> 5 sec):
Access to the password page to enter the PortCong
Menu (*)
Pressione prolungata dei tasti (> 5 sec):
Si accede alla pagina password per entrare nel Menu
PortCong (*)
(*) Dopo l’ultima operazione, la password rimane memorizzata
nel dispositivo per 30 minuti.
(*) After the last operation, the password remains stored in the
device for 30 minutes

7
1.3 OPERATING MENU ICONS ICONE MENU FUNZIONAMENTO
In fase di modica le icone risulteranno a luce lampeggiante.
(*) Il colore dell’icona modalità Automatica identifica il
tipo di programmazione attiva: Rossa: Temperatura, Blu:
Deumidicazione, Bianco: attive entrambe.
During the editing stage, these icons are ashing.
(*) The colour of the symbol referring to the Automatic Mode
identies the type of setting that is currently active:
Red: Temperature, Blue: Dehumidication, White: both ON.
OPERATING MENU - MENU FUNZIONAMENTO
Icon - Icona Description Descrizione
Indication of system ON Indicazione funzionamento impianto in modalità ON.
Indication of system OFF Indicazione funzionamento impianto in modalità OFF.
Operation in MANUAL mode Indicazione funzionamento in modalità MANUALE
Operation in AUTOMATIC mode (*) Indicazione funzionamento in modalità AUTOMATICA (*)
Presence of alarm (the symbols can be displayed only if the
alarm is active or if it has not been reset).
Indicazione presenza allarme (icona visualizzabile solo
se allarme attivo o non azzerato)

8
2FUNCTION MENU - MENU FUNZIONAMENTO
Pressioni no al raggiungimento dell’icona
lampeggiante desiderata
Press briey the key until you reach
the desired ashing icon
Device o
Dispositivo spento
Set Temp
Temp Set
Pressione breve
Short press
(x 1)
0
5
Device on
Dispositivo acceso
22.1
Set Temp 25.0
Temp
Ven. 13:46
54.5
Umid
Pressione breve
Short press
25.0
Temp
54.5
Umid
(x 1)
Pressione breve
Short press
25.0
Temp
54.5
Umid
(x 1)
OFF
25.0
Temp
Ven. 13:46
54.5
Umid
ON
25.0
Temp
Ven. 13:46
54.5
Umid
p
mp
mp
22.1
Set Temp 25.0
Temp
Ven. 13:46
54.5
Umid
p
mp
mp
Pressione breve
Short press
25.0
Temp
54.5
Umid
(x 1)
2.1 ON / OFF ACCENSIONE E SPEGNIMENTO
Nel menu principale viene riportato lo stato di funzionamento
del sistema, mentre nel menu funzionamento è possibile
modicare le impostazioni:
The main menu displays the system operating status, while in the
operating menu it is possible to edit the settings:
STANDARD PROCEDURE FOR CHANGING PARAMETERS PROCEDURA STANDARD PER LA MODIFICA PARAMETRI
On the main screenshot the user can entering the function
menu by shortly pressing the key .
Dallaschermata principaleaccedereal menufunzionamento
tramite una pressione breve del tasto .
Press the key until you reach the desired ashing icon. Premere il tasto fino al raggiungimento dell’icona
lampeggiante desiderata
Use keys and to change the set values and select the
desired one.
Usare i tasti e per cambiare il valore impostato e
selezionare quello desiderato.
By using the key you can conrm your selection and go
back to main menu.
Con il tasto si conferma la scelta e si ritorna al menu
principale.
In modalità ON l’intero sistema risulterà acceso e seguirà i set
impostati (manuale o auto)
In modalità OFF l’intero sistema risulterà spento (resterà attiva
la sola funzione antigelo)
In ON mode, the whole system is on and will follow the selected
setpoint values (manual or auto)
In OFF mode, the whole system is o (only the antifreeze function
is active)

9
Auto.
25.0
Temp
Ven. 13:46
54.5
Umid
Pressioni no al raggiungimento dell’icona
lampeggiante desiderata
Press briey the key until you reach
the desired ashing icon
Device on
Dispositivo acceso
Set Temp
Temp Set
Pressione breve
Short press
(x 1)
0
5
Automatic Mode
Modalità Automatica
Pressione breve
Short press
25.0
Temp
54.5
Umid
(x 1)
Pressione breve
Short press
25.0
Temp
54.5
Umid
(x 1)
22.1
Set Temp 25.0
Temp
Ven. 13:46
54.5
Umid
Man.
25.0
Temp
Ven. 13:46
54.5
Umid
Auto.
25.0
Temp
Ven. 13:46
54.5
Umid
Pressione breve
Short press
25.0
Temp
54.5
Umid
(x 1)
5
.5
5
5
5
.5
5
TEMPERATURA E UMIDITA’
La gestione della Temperatura e dell’Umidità sono in funzione
dell’attivazione o meno delle rispettive programmazioni.
Il dispositivo può funzionare in modalità:
• Manuale, Automatica, Manuale + Automatica
a seconda dello stato di attivazione della programmazione di
Temperatura (On Prg T) e Umidità (On Prg U).
- Modalità MANUALE:
On Prg T =0.0 (OFF) , ON Prg U =0.0 (OFF), Icona “M”
I set di temperatura e di umidità sono in funzione dei parametri
impostati manualmente dall’operatore nel menu principale
(Set Temp / Set Umid).
- Modalità AUTOMATICA:
On Prg T =1.0 (ON) , ON Prg U =1.0 (ON)
Icona “A” di colore bianco.
In modalità Automatica lo stato della centralina seguirà lo stato
del crono della Temperatura e dell’ Umidità (Prg Temp / Prg
Umid) e i set calcolati di temperatura e umidità saranno quelli
dei rispettivi crono.
- Modalità MANUALE + AUTOMATICA:
On Prg T =1.0 (ON) , ON Prg U =0.0 (OFF)
Icona “A” di colore Rosso
On Prg T =0.0 (OFF) , ON Prg U =1.0 (ON)
Icona “A” di colore Blu.
Nel caso si imposti la centralina in modalità Manuale è sempre
possibile attivare singolarmente la programmazione della
temperatura e/o dell’umidità (vedi paragra 5.1 e 5.2).
TEMPERATURE AND HUMIDITY
Temperature and Humidity can be controlled in two dierent ways,
depending on the activation of the relevant programming.
The device can operate in:
• Manual Mode, Automatic Mode, Manual + Automatic Mode
according to the activation status for the Temperature schedule
(En Prg T) and for the Humidity one (En Prg H).
- MANUAL Mode:
En Prg T =0.0(OFF) , En Prg H =0.0 (OFF)
Identied by the symbol “M”
The temperature and humidity setpoint values depend on the
parameters set manually by the operator in the main menu (Temp
Set / Humid Set).
- AUTOMATIC Mode:
En Prg T =1.0 (ON) , En Prg H =1.0 (ON)
Identied by the symbol “A” in White colour
In Automatic mode, the status of the controller will be the same as
the temperature and humidity settings of the chrono mode (Temp
Prog / Humid Prog) and the calculated temperature and humidity
setpoint values will be the ones of the respective chrono modes.
- MANUAL + AUTOMATIC Mode:
En Prg T =1.0 (ON) , En Prg H =0.0 (OFF)
Identied by the symbol “A” in Red colour
En Prg T =0.0 (OFF) , En Prg H =1.0 (ON)
Identied by the symbol “A” in Blu colour
If the controller is set in Manual mode, the programming of the
temperature and/or humidity can always be activated separately
(see paragraphs 5.1 e 5.2).
2.2 FUNCTION MODE MODALITA’DI FUNZIONAMENTO

10
3MAIN MENU - MENU PRINCIPALE
MAIN MENU MENU PRINCIPALE
Label Description Etichetta Descrizione
Temp Set Manual temperature setpoint value Set Temp Setpoint manuale di temperatura
Calc Temp Setpoint of calculated temperature (°C)
Automatic Mode En Prg T = 1.0 Temp Calc Setpoint di temperatura calcolato (°C)
In modalità Automatica On Prg T = 1.0
Humid Set Manual humidity setpoint value Set Umid Setpoint manuale di umidità
Calc Humid Setpoint of calculated humidity (%)
Automatic Mode En Prg H = 1.0 Umid Calc Setpoint di umidità calcolato (%)
In modalità Automatica On Prg U = 1.0
Ext Temp Outdoor temperature detected by the probe
(if connected) Temp Est Temperatura Esterna rilevata dalla sonda
(se collegata)
Room AQ Air quality detected by the room sensor
(if congured) (%) QA Ambiente
Qualità dell’ aria rilevata dalla sonda
ambiente
(se congurata) (%)
Set AQ Air quality set by the user
(if probe congured) (%) QA Set Qualità dell’ aria impostata dall’utente
(se sonda congurata) (%)
Solo in caso di presenza allarme attivo (o non azzerato) verrà
visualizzata questa icona nel display.
Per informazioni e dettagli sugli allarmi fare riferimento al
capitolo dedicato (Capitolo 6).
If an alarm is detected (or not been reset), the display will show
this icon .
For further information and details about alarms, see Chapter 6.
2.3 ALARMS ALLARMI
Nel menu principale vengono riportate le informazioni
principali di funzionamento.
Le schermate vengono visualizzate in maniera dinamica
solo se le funzioni ad esse associate sono attive. “Temp Calc”
e “Umid Calc” vengono visualizzate solo se sono attive le
programmazioni di Temperatura “On Prg T“ e Umidità “On
Prg U“ e verranno nascoste quelle di set manuale “Set Temp”
e “Set Umid”.
Le maschere dell’umidità vengono visualizzate solo in stagione
Estiva, mentre quelle della sonda esterna e della sonda QA-A
solo se sono congurati i relativi sensori.
Attraverso i tasti e è possibile scorrere all’ interno del
menu. L’ultima informazione visualizzata resterà attiva no a
quando non verrà nuovamente premuto uno dei due tasti di
scorrimento.
All’interno del menu principale è possibile impostare il set di
temperatura e umidità in modalità manuale
The main menu reports the main operating information.
The screens are dynamically displayed only if the functions
associated to them are active. “Calc Temp” and “Calc Humid” are
displayed only if the Temperature “En Prg T“ and Humidity “En
Prg H“ settings are active and the manual settings “Temp Set”
and “Humid Set” will be hidden.
The humidity windows will be displayed in Summer season only,
while the ones of the external probe and the QA-A sensor will be
displayed only if the relevant sensors are connected.
The and keys allow to browse through the menu. The
most recent information displayed will remain active until one of
the two scroll keys is pressed again.
In the main menu it is possible to set the temperature and humidity
setpoint values in manual mode.

11
Manual Temperature Setpoint (°C)
Setpoint Manuale di Temperatura (°C)
Manual Humidity Setpoint (%)
Setpoint Manuale di Umidità (%)
Outside Temp. detected by the probe (°C)
Temp. Esterna rilevata dalla sonda (°C)
Air quality detected by the room sensor (%)
Qualità dell’ aria rilevata dalla sonda amb.te (%)
Air Quality set by the user (%)
Qualità dell’ aria impostata dall’utente (%)
Set Temp
Temp Set
Set Umid
Humid Set
Temp Est
Ext Temp
QA Ambiente
Room AQ
QA Set
Set AQ
Pressione breve
Short press
(x n°)
0
5
Pressione breve
Short press
(x n°)
0
5
Pressione breve
Short press
(x n°)
0
5
22.1
Set Temp 25.0
Temp
Ven. 13:46
54.5
Umid
Back to main page
Ritorno alla maschera principale
Set Temp
Temp Set
22.1
Set Temp 25.0
Temp
Ven. 13:46
54.5
Umid
50.0
QA Set 25.0
Temp
Ven. 13:46
54.5
Umid
50.0
Set Umid 25.0
Temp
Ven. 13:46
54.5
Umid
16.8
Temp Est 25.0
Temp
Ven. 13:46
54.5
Umid 48.0
QA Ambiente 25.0
Temp
Ven. 13:46
54.5
Umid
3.1 MAIN SCREENSHOT OVERVIEW RIEPILOGO MASCHERE MENU PRINCIPALE
RIEPILOGO CON MODALITA’ MANUALE
Dalla schermata principale, tramite pressioni brevi del tasto
o , è possibile visualizzare i setpoint e i valori rilevati di
temperatura e umidità.
MANUAL MODE MAIN SCREENSHOT OVERVIEW
On the main screenshot, by shortly pressing keys or , you
can check the setpoint values and the ones referring to temperature
and humidity detected in the room.

12
SetPoint of calculated temperature (°C)
SetPoint di Temperatura calcolato (°C)
SetPoint of calculated Humidity (%)
SetPoint di Umidità calcolato (%)
Outside Temp. detected by the probe (°C)
Temp. Esterna rilevata dalla sonda (°C)
Air quality detected by the room sensor (%)
Qualità dell’ aria rilevata dalla sonda amb.te (%)
Air Quality set by the user (%)
Qualità dell’ aria impostata dall’utente (%)
Temp Calc
Calc Temp
Umid Calc
Calc Humid
Temp Est
Ext Temp
QA Ambiente
Room AQ
QA Set
Set AQ
Pressione breve
Short press
(x n°)
0
5
Pressione breve
Short press
(x n°)
0
5
Pressione breve
Short press
(x n°)
0
5
21.7
Temp Calc 25.0
Temp
Ven. 13:46
54.5
Umid
Back to main page
Ritorno alla maschera principale
Temp Calc
Calc Temp
21.7
Temp Calc 25.0
Temp
Ven. 13:46
54.5
Umid
50.0
QA Set 25.0
Temp
Ven. 13:46
54.5
Umid
54.0
Umid Calc 25.0
Temp
Ven. 13:46
54.5
Umid
16.8
Temp Est 25.0
Temp
Ven. 13:46
54.5
Umid 48.0
QA Ambiente 25.0
Temp
Ven. 13:46
54.5
Umid
RIEPILOGO CON MODALITA’ AUTOMATICA
Le schermate vengono visualizzate in maniera dinamica solo
se le funzioni ad esse associate sono attive.
“Temp Calc” e “Umid Calc” vengono visualizzate solo se sono
attive le programmazioni di Temperatura“On Prg T“ e Umidità
“On Prg U“ e verranno nascoste quelle di set manuale “Set
Temp” e “Set Umid”.
AUTOMATIC MODE MAIN SCREENSHOT OVERVIEW
The screens are dynamically displayed only if the functions
associated to them are active.
“Calc Temp” and “Calc Humid” are displayed only if the
Temperature “En Prg T“ and Humidity “En Prg H“ settings are
active and the manual settings “Temp Set” and “Humid Set” will
be hidden.

13
3.2 TEMPERATURE DETECTED IN THE ROOM TEMPERATURA RILEVATA IN AMBIENTE
3.3 HUMIDITY DETECTED IN THE ROOM UMIDITA’RILEVATA IN AMBIENTE
VISUALIZZAZIONE TEMPERATURA INTERNA °C
Dalla schermata principale è sempre possibile visualizzare il
valore di temperatura rilevata in ambiente.
Etichetta: Temp
VISUALIZZAZIONE UMIDITÀ INTERNA %
Dalla schermata principale è sempre possibile visualizzare il
valore di umidità rilevata in ambiente.
Etichetta: Umid
DISPLAY OF ROOM TEMPERATURE °C
From the main screen you can always view the temperature value
in the room.
Label: Temp
DISPLAY OF ROOM HUMIDITY %
From the main screen you can always view the humidity value in
the room.
Label: Humid
22.1
Set Temp 25.0
Temp
Ven. 13:46
54.5
Umid
22.1
Set Temp 25.0
Temp
Ven. 13:46
54.5
Umid

14
3.4 MANUAL TEMPERATURE SETPOINT SETPOINT MANUALE DI TEMPERATURA
VISUALIZZAZIONE DEL SET TEMPERATURA °C
Dalla schermata principale, eseguire pressioni brevi del tasto
per visualizzare il valore di setpoint manuale di temperatura
(con programmazione temperatura non attiva On Prg T=0.0)
Etichetta: Set Temp
DISPLAY OF TEMPERATURE SETTING °C
On the main screenshot, shortly press the key to display the
manual temperature setpoint value (with non-active temperature
programming En Prg T=0.0)
Label: Temp Set
Main Page
Schermata Principale Green Color (modify mode)
Colore Verde (modica)
Set Temp
Temp Set
22.1
Set Temp 25.0
Temp
Ven. 13:46
54.5
Umid
24.5
Set Temp 25.0
Temp
Ven. 13:46
54.5
Umid
Pressione breve
Short press
25.0
Temp
54.5
Umid
(x 1)
Pressione breve
Short press
25.0
Temp
54.5
Umid
(x 1)
22.1
Set Temp 25.0
Temp
Ven. 13:46
54.5
Umid
29.8
29.9
....
30.0
12.1
12.2
12.0
....
24.5
Set Temp 25.0
Temp
Ven. 13:46
54.5
Umid
Set Temp
Temp Set
22.1
Set Temp 25.0
Temp
Ven. 13:46
54.5
Umid
CHANGE OF TEMPERATURE SETTING °C MODIFICA DEL SET TEMPERATURA °C
To edit the selected eld briey press ; the value selected
shall turn to green to notify the modication.
Per accedere alla modica del campo eseguire una pressione
breve del tasto il valore selezionato si colora di verde per
noticare l’ attivazione della fase di modica.
Use and to change the set value and select the desired
one.
Usare i tasti e per cambiare il valore impostato e
selezionare quello desiderato.
is used to conrm the change (Enter) and go back to the
home page.
Con il tasto si conferma la modica (Enter) e si ritorna
alla schermata principale.
If instead you want to go back to the previous page without
making any changes (Reset), press .
Se invece si desidera tornare alla schermata precedente
senza eseguire nessuna modica (Reset) premere il tasto .

15
3.5 MANUAL HUMIDITY SETPOINT SETPOINT MANUALE DI UMIDITA’
VISUALIZZAZIONE DEL SET UMIDITÀ %
Dalla schermata principale, eseguire pressioni brevi del tasto
per visualizzare il valore di setpoint manuale di umidità
impostato. Etichetta: Set Umid
N.B. : Valore visibile solo con dispositivo impostato in stagione
Estate e Programmazione Umidità non attiva On Prg U=0.0)
DISPLAY OF HUMIDITY SETTING %
On the main screenshot, shortly press the key to display the
manual setpoint humidity value. Label: Humid Set
N.B. : The value is visible only if the device is set in Summer mode
and with non-active humidity programming En Prg H=0.0.
Green Color (modify mode)
Colore Verde (modica)
Set Umid
Humid Set
64.0
Set Umid 25.0
Temp
Ven. 13:46
54.5
Umid
55.0
Set Umid 25.0
Temp
Ven. 13:46
54.5
Umid
Pressione breve
Short press
25.0
Temp
54.5
Umid
(x 1)
Pressione breve
Short press
25.0
Temp
54.5
Umid
(x 1)
64.0
Set Umid 25.0
Temp
Ven. 13:46
54.5
Umid
79.8
79.9
....
80.0
40.1
40.2
40.0
....
55.0
Set Umid 25.0
Temp
Ven. 13:46
54.5
Umid
Set Temp
Temp Set
Set Umid
Humid Set
Pressione breve
Short press
(x n°)
0
5
22.1
Set Temp 25.0
Temp
Ven. 13:46
54.5
Umid 50.0
Set Umid 25.0
Temp
Ven. 13:46
54.5
Umid
CHANGE OF HUMIDITY SETTING % MODIFICA DEL SET UMIDITÀ %
To edit the selected eld briey press ; the value selected
shall turn to green to notify the modication.
Per accedere alla modica del campo eseguire una pressione
breve del tasto il valore selezionato si colora di verde per
noticare l’ attivazione della fase di modica.
Use and to change the set value and select the desired
one.
Usare i tasti e per cambiare il valore impostato e
selezionare quello desiderato.
is used to conrm the change (Enter) and go back to the
home page.
Con il tasto si conferma la modica (Enter) e si ritorna
alla schermata principale.
If instead you want to go back to the previous page without
making any changes (Reset), press .
Se invece si desidera tornare alla schermata precedente
senza eseguire nessuna modica (Reset) premere il tasto .

16
3.7 SETPOINT OF CALCULATED HUMIDITY SETPOINT DI UMIDITÀ CALCOLATO
VISUALIZZAZIONE SETPOINT DELL’UMIDITÀ %
Dalla schermata principale, eseguire pressioni brevi del tasto
per visualizzare il valore di setpoint di umidità calcolato.
Etichetta: Umid Calc
N.B. : Valore visibile solo con dispositivo impostato in stagione
Estate e con programmazione umidità attiva (On Prg U = 1.0)
DISPLAY SETPOINT OF HUMIDITY CALCULATED %
On the main screenshot, shortly press the key to display the
setpoint of calculated humidity.
Label: Calc Humid
N.B. : The value is visible only if if the device is set in Summer mode
and with active humidity programming (En Prg H=1.0)
Temp Calc
Calc Temp
Umid Calc
Calc Humid
Pressione breve
Short press
(x n°)
0
5
21.7
Temp Calc 25.0
Temp
Ven. 13:46
54.5
Umid 54.0
Umid Calc 25.0
Temp
Ven. 13:46
54.5
Umid
3.6 SETPOINT OF CALCULATED TEMPERATURE SETPOINT DI TEMPERATURA CALCOLATO
VISUALIZZAZIONE SETPOINT DI TEMPERATURA °C
Dalla schermata principale, eseguire pressioni brevi del tasto
per visualizzare il valore di setpoint di temperatura calcolato.
Etichetta: Temp Calc
N.B. : Valore visibile solo con programmazione temperatura
attiva (parametro On Prg T = 1.0)
DISPLAY SETPOINT OF TEMPERATURE CALCULATED °C
On the main screenshot, shortly press the key to display the
setpoint of calculated temperature.
Label: Calc Temp
N.B. : The value is visible only if with active temperature
programming (En Prg T=1.0)
Temp Calc
Calc Temp
21.7
Temp Calc 25.0
Temp
Ven. 13:46
54.5
Umid

17
3.8 OUTDOOR TEMPERATURE DETECTED TEMPERATURA ESTERNA RILEVATA
* VISUALIZZAZIONE DEL VALORE °C
Dalla schermata principale, eseguire pressioni brevi del tasto
per visualizzare il valore di temperatura esterna rilevata
dalla sonda.
Etichetta: Temp Est
(*) Valore visibile solo con sonda congurata.
Nel caso di sonda temperatura esterna in allarme verranno
visualizzati i seguenti valori:
• -5 °C nella stagione INVERNO
• 30 °C nella stagione ESTATE
* DISPLAY OF THE VALUE°C
On the main screenshot, shortly press the key to display the
outdoor temperature detected by the sensor.
Label: Ext Temp
(*) The value is visible only with congured external probe.
In the case of external temperature sensor in alarm the display will
show the following values:
• -5 °C in WINTER
• 30 °C in SUMMER
Set Temp
Temp Set
Pressione breve
Short press
(x n°)
0
5
22.1
Set Temp 25.0
Temp
Ven. 13:46
54.5
Umid
Temp Est
Ext Temp
16.8
Temp Est 25.0
Temp
Ven. 13:46
54.5
Umid
3.9 ROOM AIR QUALITY DETECTED QUALITA’ DELL’ARIA AMBIENTE RILEVATA
* VISUALIZZAZIONE DEL VALORE %
Dalla schermata principale, eseguire pressioni brevi del tasto
per visualizzare il valore in percentuale della qualità dell’aria
rilevata dalla sonda.
Campo di lavoro: 0% (aria pulita) ÷ 100% (aria inquinata)
Etichetta: QA Ambiente
(*) Valore visibile solo con sonda congurata.
* DISPLAY OF THE VALUE %
On the main screenshot, shortly press the key to display the
temperature detected by the delivery probe.
Measuring range: 0% (clean air) ÷ 100% (polluted air)
Label: Room AQ
(*) The value is visible only with congured air quality probe.
Set Temp
Temp Set
Pressione breve
Short press
(x n°)
0
5
22.1
Set Temp 25.0
Temp
Ven. 13:46
54.5
Umid
QA Ambiente
Room AQ
32.0
QA Ambiente 25.0
Temp
Ven. 13:46
54.5
Umid

18
3.10 ROOM AIR QUALITY SET SET QUALITA’DELL’ARIA AMBIENTE
* VISUALIZZAZIONE DEL SET QUALITA ARIA %
Dalla schermata principale, eseguire pressioni brevi del tasto
per visualizzare il valore di setpoint di qualità dell’aria
impostato.
Etichetta: QA Set
(*) Valore visibile solo con sonda congurata.
* DISPLAY OF AIR QUALITY SETTING %
On the main screenshot, shortly press the key to display the
air quality setpoint value.
Label: Set AQ
(*) The value is visible only with congured air quality probe.
Green Color (modify mode)
Colore Verde (modica)
QA Set
Set AQ
30.0
QA Set 25.0
Temp
Ven. 13:46
54.5
Umid
28.0
QA Set 25.0
Temp
Ven. 13:46
54.5
Umid
Pressione breve
Short press
25.0
Temp
54.5
Umid
(x 1)
Pressione breve
Short press
25.0
Temp
54.5
Umid
(x 1)
30.0
QA Set 25.0
Temp
Ven. 13:46
54.5
Umid
88.0
89.0
....
90.0
11.0
12.0
10.0
....
28.0
QA Set 25.0
Temp
Ven. 13:46
54.5
Umid
Set Temp
Temp Set
QA Set
Set AQ
Pressione breve
Short press
(x n°)
0
5
22.1
Set Temp 25.0
Temp
Ven. 13:46
54.5
Umid 30.0
QA Set 25.0
Temp
Ven. 13:46
54.5
Umid
CHANGE OF AIR QUALITY SETTING % MODIFICA DEL SET DI QUALITÀ %
To edit the selected eld briey press ; the value selected
shall turn to green to notify the modication.
Per accedere alla modica del campo eseguire una pressione
breve del tasto il valore selezionato si colora di verde per
noticare l’ attivazione della fase di modica.
Use and to change the set value and select the desired
one.
Usare i tasti e per cambiare il valore impostato e
selezionare quello desiderato.
Campo di lavoro: 0% (aria pulita) ÷ 100% (aria inquinata)
is used to conrm the change (Enter) and go back to the
home page.
Con il tasto si conferma la modica (Enter) e si ritorna
alla schermata principale.
If instead you want to go back to the previous page without
making any changes (Reset), press .
Se invece si desidera tornare alla schermata precedente
senza eseguire nessuna modica (Reset) premere il tasto .

19
4CONFIGURATION MENU - MENU CONFIGURAZIONE
CONFIGURATION MENU MENU CONFIGURAZIONE
Label Description Etichetta Descrizione
Contrast It changes the display contrast Contrasto Permette di variare il contrasto del display
Tmp_Prog Changing the programming that controls
the temperature setpoint Prg_Temp Modifica della programmazione che
gestisce il set della temperatura
Hum_Prog Changing the programming that controls
the humidity setpoint Prg_Umid Modifica della programmazione che
gestisce il set dell’ umidità
Rin_Prog It manages renewal/recirculation on-o Prog_Rinn Gestisce la chiamata al rinnovo/ricircolo
Eco_Prog ItmanagesECOorCOMFORTfunctionality Prog_Eco Gestisce la funzionalità ECO o COMFORT
Date It changes the date on the device Data Permette di modificare la data del
dispositivo
Hour It changes the time on the device Ora Permette di modicare l’ora del dispositivo
Season It changes the season on the device Stagione Permette di modificare la stagione del
dispositivo
En Prg T This makes it possible to activate the
temperature programming only On Prg T Permettediattivarelasolaprogrammazione
della temperatura
En Prg H
This makes it possible activate the
humidity programming (only if the device
is set in Summer mode).
On Prg U
Permette di attivare la sola
programmazione dell umidità (solo con
dispositivo impostato in stagione Estate).
Model
Dehumidier model
10.0 model UC 300-M, 11.0 model UC
300-MHE, 13.0 model UC360-MHE, 12.0
model UC 500-MVHE
Modello
Modello del deumidicatore
10.0 macchina UC 300-M, 11.0 macchina
UC 300-MHE, 13.0 macchina UC360-MHE,
12.0 macchina UC 500-MVHE
SW Version Software version installed Versione SW Versione del software installata
SumInFlowT This makes it possible to set the air supply
temperature for the summer season TempMandEst Imposta la temperatura di mandata
dell’aria per la stagione estiva
WinInFlowT This makes it possible to set the air supply
temperature for the winter season TempMandInv Imposta la temperatura di mandata
dell’aria per la stagione invernale
AirFlowRoom Thismakesitpossibletosetthe percentage
for air ow rate to be sent into the room PortataAmb Imposta in percentuale la portata d’aria da
immettere in ambiente
MachineError Code for fail error in the unit ErrMacchina Codice errore guasti macchina
MachineAlarm Code for alarm error in the unit AllMacchina Codice errore allarmi macchina
AirDelivery
Tmp
Inow air temperature detected by the
unit (°C) Temp Man Ar Temperatura dell’aria di mandata rilevata
dalla macchina (°C)
Water Temp Inflow water temperature detected by
the unit (°C) Temp Acqua Temperatura dell’acqua rilevata in ingresso
dalla macchina (°C)
Conden Temp Gas condensation temperature in the
refrigerant circuit (°C) Temp Conde Temperatura rilevata di condensazione del
gas nel circuito frigorifero (°C)
Evapor Temp Gas evaporation temperature in the
refrigerant circuit (°C) Temp Evapor Temperatura rilevata di evaporazione del
gas nel circuito frigorifero (°C)
RpmFAN1 Speed of the inow fan detected by the
unit (Rpm) RpmFAN1 Velocità di rotazione del ventilatore di
immissione rilevata dalla macchina (Rpm)
RpmFAN2 Speed of the expulsion fan detected by
the unit (Rpm) RpmFAN2 Velocità di rotazione del ventilatore di
espulsione rilevata dalla macchina (Rpm)

20
Ritorno alla
Schermata Principale
Back to
Main Page
Contrasto
Contrast
Main Page
Schermata Principale
Set Temp
Temp Set
22.1
Set Temp 25.0
Temp
Ven. 13:46
54.5
Umid
Congurazione
Contrasto
Prg_Temp
Prg_Umid
Prog_Rinn
Prog_Eco
Contrasto
Conguration
Contrasto
Tmp_Prog
Hum_Prog
Rin_Prog
Eco_Prog
Contrast
Pressione lunga
Long press
25.0
Temp
54.5
Umid
(> 5 sec.)
Pressione breve
Short press
25.0
Temp
54.5
Umid
(x 1)
Pressione breve
Short press
25.0
Temp
54.5
Umid
(x 1)
Contrasto
8
8
9
...
10
2
3
1
...
Pressione breve
Short press
25.0
Temp
54.5
Umid
(x 1)
4.1 CONTRAST CONTRASTO
E’ possibile aumentare e diminuire il contrasto del display.You can increase and decrease the contrast on the display.
CHANGE OF DISPLAY CONTRAST MODIFICA CONTRASTO DISPLAY
On the main screenshot, long press the key (> 5 sec.) to
enter the conguration menu.
Dalla schermata principale, premere a lungo il tasto (>
5 sec.) per entrare nel menu congurazione.
The eld Contrast will appear as the rst item of the menu;
conrm it by pressing the key to display the present value
or to change it.
Il campo Contrasto comparirà come prima voce del menu,
confermare con il tasto per visualizzare il valore corrente
e accedere alla fase di modica.
You can increase or decrease the contrast value by shortly
pressing the keys or , then conrm by shortly pressing
the key .
Incrementare o diminuire il valore di contrasto tramite
pressioni brevi dei tasti o e confermare
successivamente con una pressione breve del tasto .
By using the key you can go back to the main page. Con il tasto si ritorna alla schermata principale.
Table of contents
Other RDZ Control Panel manuals
Popular Control Panel manuals by other brands

ICP DAS USA
ICP DAS USA TPD-430 quick start guide

UniPOS
UniPOS IFS7002 Service instructions for the staff

Riello
Riello RIELLOtech PRIME Installation, operation and maintenance manual

weintek
weintek cMT2166X Series Installation instruction

Vintage Air
Vintage Air 491241 manual

Tecnoalarm
Tecnoalarm TP16-256 Installer manual