RealWear HMT-1Z1 User manual

© 2018 RealWear Inc. All rights reserved.
Version 15 20180507
https://www.realwear.com/support
support@realwear.com


Safety Instructions HMT-1Z1 model T1100S
1Note
This document contains the safety instructions
necessary for the safe use of the HMT-1Z1 model
T1100S device in explosive and potentially explosive
atmospheres. Such areas or zones are referred to as
“ex-hazardous areas” in this document.
2Introduction
This document contains information and safety
regulations which are to be observed – without fail -
for safe operation of the device under the described
conditions. Non-observance of this information and
instructions can have serious consequences and / or
may violate regulations. Please read the manual and
these safety instructions before using the device. In
case of any translation or printing errors, the English
version shall apply.
3Application
3.1 ATEX & IECEx
The HMT-1Z1 model T1100S is approved for use in
zone 1, zone 2, zone 21 and zone 22 in accordance
with directives 2014/34/EU (ATEX) and the IECEx
System.
3.2 NEC & CEC
The HMT-1Z1 model T1100S is approved for use in
Division 1 and 2 Class I, II, III.
3.3 Manufacturer
i.safe MOBILE GmbH,
i_Park Tauberfranken 10
97922 Lauda-Koenigshofen; Germany
4Faults and Damage
Before entering ex-hazardous areas, the safety of the
device must be checked. If there is any reason to sus-
pect that the safety of the device has been compro-
mised, it must be withdrawn from use and removed
from any ex-hazardous areas immediately.
Measures must be taken to prevent any accidental
restarting of the device. The safety of the device may
be compromised, if, for example:
• Malfunctions occur.
• The housing of the device shows damage.
• The device has been exposed to excessive loads.
• The device has been stored improperly.
• Markings or labels on the device are illegible.
• Permitted limit values have been exceeded.
It is recommended that a device displaying errors or
for which an error is suspected be sent back to an
authorized service center to be checked.
5Ex-relevant / Intrinsic Safety Regulations
Use of this device assumes that the operator ob-
serves the conventional safety regulations and has
read and understood the user manual, safety instruc-
tions and safety certicate. The following additional
safety regulations must be complied with:
5.1 Charging and battery
• The device may only be charged outside
ex-hazardous areas using the i.safe PROTECTOR
1.0 USB-cable (or other equipment approved by
i.safe MOBILE GmbH.)
• The device may only be charged at temperatures
between +5°C and +40°C.
• The battery is not removable by the user.
5.2 Connections and covers
• Physical connections to other equipment are only
permitted outside ex-hazardous areas, using the
i.safe PROTECTOR 1.0 USB-cable (or other
equipment approved by i.safe MOBILE GmbH.)
• Inside ex-hazardous areas the covers of the Micro
USB connector and the Micro SD card slot must be
kept closed.
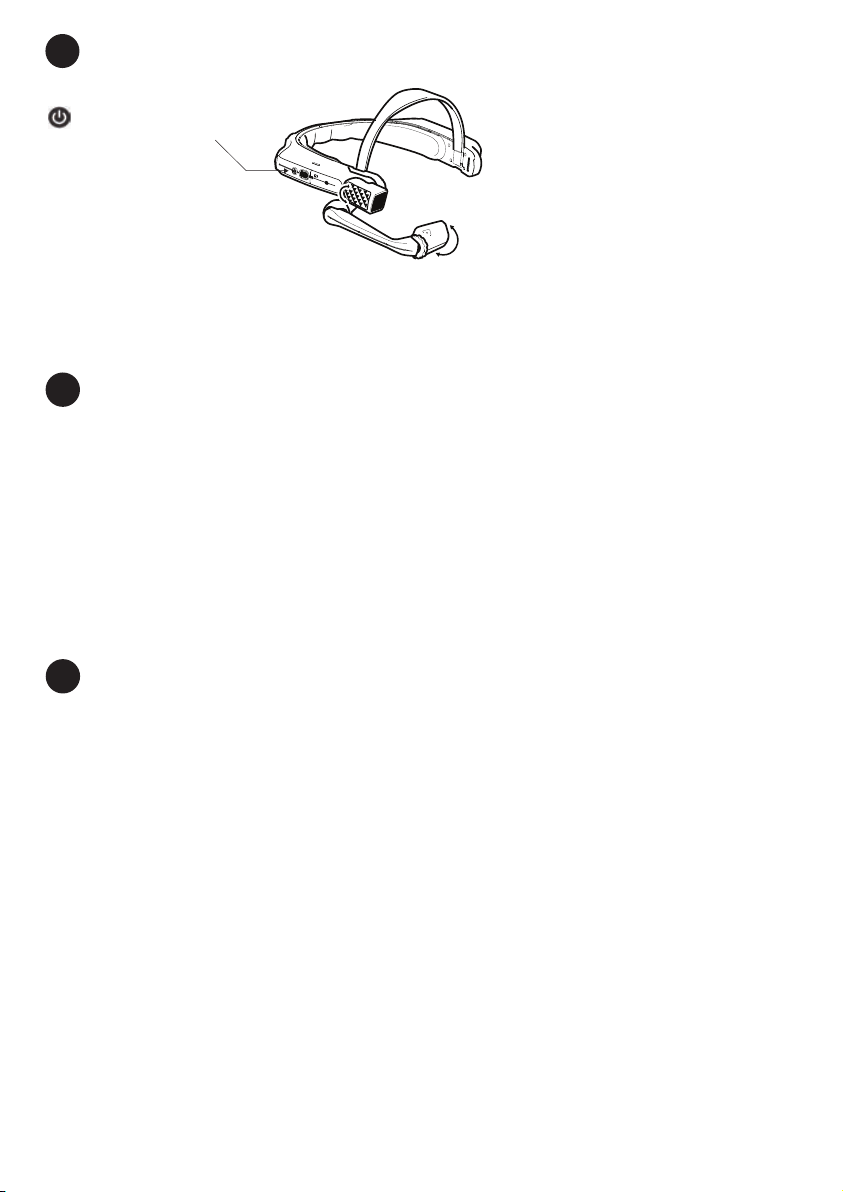
• The audio jack can be used to connect approved
headsets inside ex-hazardous areas.
• To ensure the integrity of ingress protection (IP),
check that all gaskets are present and functional.
• During charging any headset or accessory must be
unplugged from the audio jack.
5.3 Usage environments
• The device may not be taken into zones 0 or 20.
• The device may not be exposed to any aggressive
acids or alkalis.
• The device must be protected from impacts
with high impact energy, against excessive UV
emission and high electrostatic
charge processes.
• The permitted ambient operating temperature
range is -20°C to +60°C.
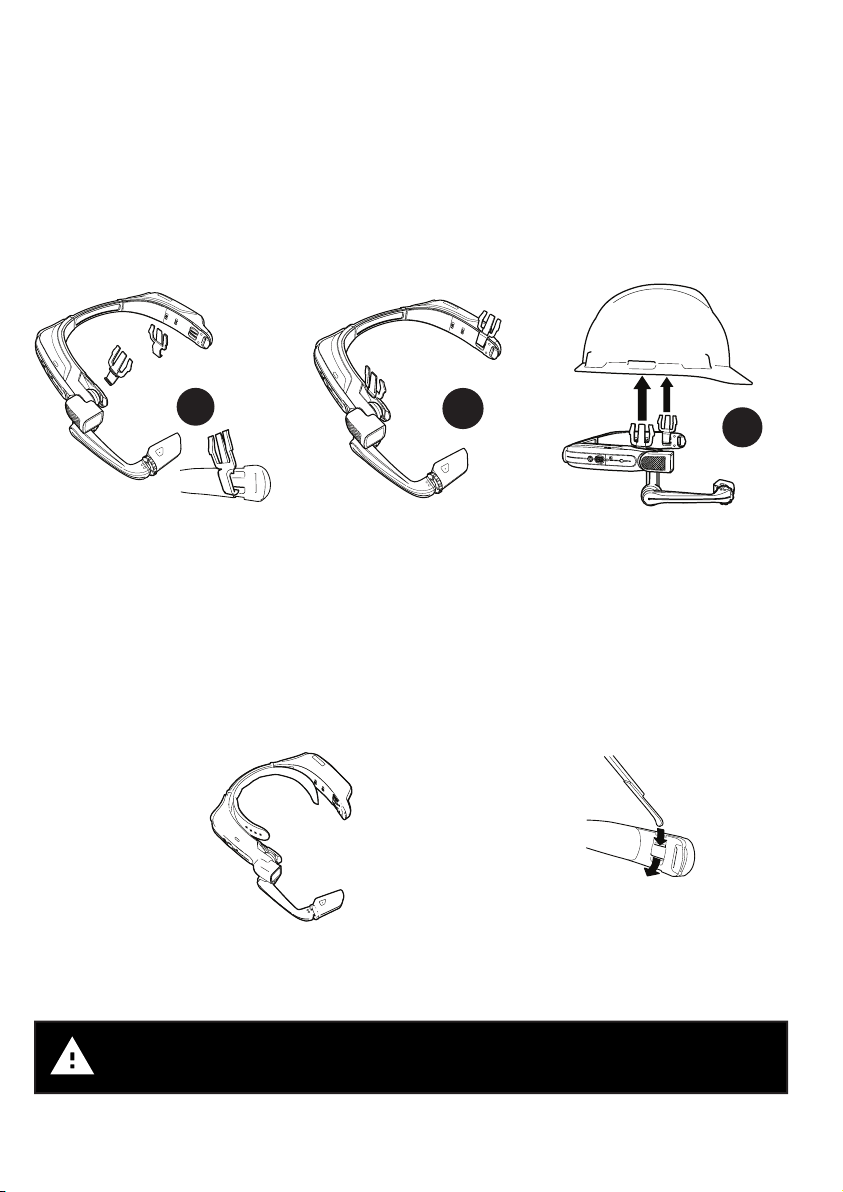
5.3 Accessories
• Only accessories approved by i.safe MOBILE
GmbH may be used.
• Adjustment of the head strap in ex-hazardous
areas is not permitted.

Power
Button
Action
Button
Camera
Lock Ring
Flashlight
Elbow Joint
Display Pod
Mic A1
(A2 on opposite side)
Mic B1
Shoulder Joint
Removable Head Stra
p
Removable Rear Pad
Speaker
Boom Arm
Device Overview
Display Window
Mic B2
Micro USB
data & charging
port located
under cover
Audio Jack

Using the HMT-1Z1 with a Hard Hat
To get hard hat clips, visit shop.realwear.com.
1. Hook the Hard Hat Clips into the HMT-1Z1 band and snap them into place.
2. Slide the clips into the hard hat accessory slots; the HMT-1Z1 band should sit
outside of the hard hat’s harness.
3. Put on the hard hat and if applicable, tighten until secure and comfortable.
4. To remove the HMT-1Z1 from the hard hat, pinch the clip ngers and push the clip out of
the hard hat slots.
A
B C D E F G H I J
A
B
C D E F G H
A B
C
D
Using the HMT-1Z1 without a Hard Hat
Attaching the Head StrapAttaching the Rear Pad
The Rear Pad snaps
onto the HMT-1Z1’s
rear band; align the
openings on the Rear
Pad to the pegs on
the HMT-1Z1’s rear
band, and snap into
place.
Insert the end of the
strap into the inside
slot on both sides
of the HMT-1Z1 as
shown. Fold the end
back on itself and
secure using the
velcro patch.
During operation, remove the Rear Pad to view
intrinsically safe regulatory information.

Charging the HMT-1Z1
1. Connect the Micro USB
charging cable as shown.
2. Connect the cable to the wall
charger as shown and plug in.
The power button will blink RED when
charging and turn GREEN when fully
charged.
The USB cable included with the HMT-1Z1 is a special micro-USB cable for data transfer and charging. It
includes a safety box that protects the HMT-1Z1’s safety circuits from power surges. These surges can
damage the HMT-1Z1 and may occur when connecting the HMT-1Z1 to computers, wall chargers, car
chargers, and other power sources that are not certied or approved as intrinsically safe. It is the only cable
approved for charging the HMT-1Z1 and for moving les to and from the HMT-1Z1.
I J
E F G H I J
Safety Warning Only use the Provided Charger
Generate a QR Code for Conguration
1
2 3 4 5 6 7 8 9 10
1. Go to realwear.setupmyhmt.com from your
computer or mobile device.
2. Select Conguration.
3. Follow the prompts to enter information and
generate a QR Code.
1. Download the RealWear Companion app from
the Google Play or Apple App Store.
2. Launch RealWear Companion from
your smartphone.
3. Select Conguration.
4. Select First Time Setup.
5. Follow the steps in the application in enter
information and generate a QR Code.
Scan this code from your smartphone to
download RealWear Companion.
Use the RealWear Companion App Use realwear.setupmyhmt.com
OR

Put on the HMT-1Z1
2
3
4 5 6 7 8 9 10
Do not extend the display too far from your eye. Keep the display as close to the eye as possible for the
best viewing experience. Adjust the overhead strap such that the HMT-1Z1 rests horizontally, slightly above
the tops of your ears. Position the shoulder and elbow joints into a “Z” shape, below the line of sight, left or
right eye.
Eye dominance is the tendency to prefer visual input from one eye to the other. Most people are
right-eye dominant; however in a small portion of the population neither eye is dominant. It is best to
use your dominant eye when viewing the display.
To determine which eye is dominant
1. Form a triangle with your hands placed together at arms length.
2. With both eyes open, focus on any distant object centered in the triangle.
3. Maintaining focus on the object centered in the triangle, close your right eye.
If the object is still in the triangle, you are left eye dominant.
4. Maintaining focus on the object centered in the triangle, close your left eye.
If the object is still in the triangle, you are right eye dominant.
5. If the object is in the triangle with either eye then you are dominant eye neutral.
6. Repeat test to conrm.
Check your eye dominance
1
2
3 4 5 6 7 8 9 10
1 2
1 2 3 4
123

Press and hold the
power button for 3
seconds to turn on
the device.
Adjust display pod so you
can clearly see all 4 corners
of the display and then lock
into position using ring.
Turn on the HMT-1Z1
3
4
5 6 7 8 9 10
1. The HMT-1Z1 will automatically launch into conguration mode.
2. Point the camera at the QR code you generated in Step 1.
3. The HMT-1Z1 will detect the QR code and congure the device.
The HMT-1Z1 is controlled by voice and head motion.
Say what you see on the screen and move your head
to navigate. If you get stuck say Show Help.
Say What You See
5
6
7 8 9 10
Scan the Conguration QR Code from the HMT-1Z1
4
5
6 7 8 9 10
Note: Once the device connects to WiFi an update of RealWear Device Agent may occur.
Note: To change your language, press and hold the
action button on the side of the HMT-1Z1. The language
selection will switch automatically, let go of the button
when the language you want is selected.

HMT-1Z1 T1100S 型号的安全使用说明
1 注意
本文件包含在爆炸性和潜在爆炸性环境中安全使用
HMT-1Z1 T1100S 型号这一设备的必备安全说明。这种
地区或区域在本文件中被称为“爆炸危险区”。
2 介绍
为了在此特定条件下安全地操作该设备,本文件包含了
必须严格遵守的信息和安全规定。不遵守此信息和说明
可导致严重后果和/或可能违反相关法律法规。使用设
备前请阅读本手册和安全说明。如有任何翻译或印刷错
误,以英语版本为准。
3 应用
3.1 ATEX&IECEx
根据2014/34/欧盟 (ATEX) 和IECEx体系指令,HMT-1Z1
T1100S 型号获批在1区、2区、21区和22区使用。
3.2 NEC和CEC
HMT-1Z1 T1100S 型号获批在第1、2、3类1和2级使用。
3.3 制造商
i.safe MOBILE GmbH,
i_Park Tauberfranken 10
97922 Lauda-Koenigshofen; Germany
4 故障和损坏
进入爆炸危险区之前,必须检查设备的安全性。如有任
何理由怀疑设备的安全性存在问题,必须立刻停止使用
该设备并从爆炸危险区撤出。
必须采取措施防止设备意外重启。如发生以下情况,可
能存在设备安全性隐患:
•设备发生故障。
•设备外包装有损。
•设备承重过大。
•设备存放不当。
•设备有非法记号或标签。
•超出极限值范围。
建议将出现故障或疑似有故障的设备送回授权服务中
心接受检查。
5 非相关性/固有安全规定
使用该设备的操作人被认为是遵守了常规安全规定,并
已阅读和明白使用手册、安全说明和安全认证。必须遵
守以下附加安全规定:
5.1 电池和充电
• 该设备只可使用i.safe PROTECTOR 1.0 USB-电缆
(或厂商i.safe MOBILE GmbH. 批准使用的其他设
备)在爆炸危险区之外充电。
•该设备只能在+5°C 至 +40°C温度范围内 充电。
•使用者无法拆除电池。
5.2 连接和遮盖
• 外接其他设备只能在 爆炸危险区之外进行, 且必
须使用i.safe PROTECTOR 1.0 USB-电缆(或厂商
i.safe MOBILE GmbH. 批准使用的其他设备)
• 在爆炸危险区内,Micro USB 连接器和Micro SD卡
槽的盖 必须保持关闭。
•可在爆炸危险区使用耳机插孔连接 获批耳机。
• 为确保完全异物侵入防护(IP),请检查是否所有垫
圈均无缺失且功能完好。
•充电时, 必须先从耳机插孔拔出任何耳机或配件。
5.3 使用环境
•不得将设备带入0区或20区。
•设备不能暴露在任何 强酸或强碱物质中。
• 必须防止设备 受到 强冲击能量的冲击, 强紫外线
辐射 和高静电 充电过程。
•允许工作温度 范围:-20°C至 +60°C。
5.3配件
• 只可使用获得厂商i.safe MOBILE GmbH 批准的
配 件。
•不允许在爆炸危险区之内 调整头带。

设备概况
显示窗
音频插孔
B2麦克风
Micro USB
数据和充电
端口
位于盖下
可拆卸后垫
扬声器
电源按钮
动作按钮
肘关节 摄像头
手电筒
肘关节
B1麦克风
可拆卸头带
A1麦克风(A2位于对面)
锁环伸缩杆
显示屏外壳

与安全帽配合使用HMT-1Z1
要购买安全帽夹子,请访问shop.realwear.com。
1. 将安全帽夹子与HMT-1Z1的带子系好,扣入相应位置。
2. 将夹子推入安全帽的配件槽;HMT-1Z1的带子 应在安全帽带子外围。
3. 戴上安全帽,如适用,绑紧直至安全舒适。
4. 捏住夹子的指状物,把夹子推出安全帽槽, 即可将其和HMT-1Z1分离。
A
B C D E F G H I J
A
B
C D E F G H
A B
C
D
不与安全帽配合使用HMT-1Z1
装上头带装上后垫
后垫对齐HMT-1Z1的
后带,将后垫上的开口
对准HMT-1Z1后带上
的销钉,压入即可。
如图所示,将带子尾部
插入HMT-1Z1两边的
内槽。尾部折起并用尼
龙搭扣固定好。
在操作过程中,拆下后挡板以
查看固有安全的监管信息。

使用RealWear Companion应用
从智能手机扫描此代码以下载RealWear
Companion
使用realwear.setupmyhmt.com
1. 从您的计算机或移动设备前往realwear.
setupmyhmt.com。
2. 选 择“ 配置”
3. 按照提示输入信息并生成二维码。
或
1. 从 Google Play或Apple App Store 下载
RealWear Companion App。
2. 从您的智能手机中 启动RealWear
Companion。
3. 选择 配置。
4. 选择 首次设置。
5. 按照应用程序中的步骤输入 信息并生成QR
代 码。
生成配置用二维码
1
2 3 4 5 6 7 8 9 10
给HMT-1Z1充电
1. 如图所示, 连接Micro USB充电电缆
2. 如图所示, 将电缆连接至壁装充电并
插 入。
充电时电源按钮闪烁红色,充满后变为
绿 色。
HMT-1Z1配备的USB电缆是一种特殊的微型USB电缆,可用于数据传输和充电。它有一个安全盒,在功率骤增时
保护HMT-1Z1的电路安全。将HMT-1Z1设备连接电脑、壁装充电器、汽车充电器和固有安全性未认证或获批的其
他电源时,可能会使功率骤增并损坏HMT-1Z1设备。该电缆是给HMT-1Z1设备充电、与HMT-1Z1设备之间传输文
件的唯一指定电缆。
I J
E F G H I J
安全警告 仅可使用原装充电器
从苹果应用商店
下载
在Google Play上
获取

1 2
1 2 3
1 2 3 4
戴上HMT-1Z1设备
2
3
4 5 6 7 8 9 10
请勿将显示屏设置得离眼睛太远。尽可能使显示屏靠近眼睛,以获得最佳观看体验。调整头顶带,使HMT-1Z1
水平放置,略高于耳朵上部。使肩部和肘关节呈“Z”形,位于左眼或右眼的视线下方。
单眼优势是指选择某一只眼而非另一只来进行视觉输入的倾向。大部分人是右眼具有此优势,但也有
少部分人没有这种现象。最好使用优势眼来看显示屏。
要确定优势眼
1. 把双手伸直围成一个三角形。
2. 两眼睁开, 盯着在三角形中心的任何远方物体。
3. 继续盯着三角形中心的物体, 闭上右眼。如果物体还在三角形中, 您的左眼就是优势眼。
4. 继续盯着三角形中心的物体, 闭上左眼。如果物体还在三角形中, 您的右眼就是优势眼。
5. 如果任何一只眼闭上物体都在三角形中, 那么您就无优势眼。
6. 重复测试以确任。
测试您的单眼优势
1
2
3 4 5 6 7 8 9 10

开启HMT-1Z1
3
4
5 6 7 8 9 10
1. HMT-1Z1会自动开启并进入配置模式。
2. 将摄像头指向您在第1步中生成的二维码。
3. HMT-1Z1会检测二维码并配置设备。
注 意: 一旦设备连接到 WiFi,可能会更新RealWear Device Agent。
HMT-1Z1设备受声音和头部运动的控制。说出您在屏
幕上看到的,然后摇晃头部操作。如果卡住,就说出
ShowHelp
注 意: 选择语言时,要长按HMT-1Z1旁的操作按钮。语
言选择自动切换,当您选定了想使用的语言时,松开
按 钮。
从HMT-1Z1扫描配置二维码
4
5
6 7 8 9 10
说出您所看到的
5
6
7 8 9 10
按住电源按钮3秒钟,
打开设备。
上下旋转摄像头,
获得最佳视野。
调整显示屏外壳,直到
清晰看到显示屏的四个
角,然后用环锁入位。
按住电源按钮3秒钟,
打开设备。
上下旋转摄像头,
获得最佳视野。
调整显示屏外壳,直到
清晰看到显示屏的四个
角,然后用环锁入位。

Consignes de sécurité du HMT-1Z1 modèle T1100S
1 Note
Ce document contient les consignes de sécurité
nécessaires à l'utilisation en toute sécurité du HMT-
1Z1 modèle T1100S en atmosphères explosives et
potentiellement explosives. Ces zones sont appelées
«ones risues dexplosion » dans le prsent docu-
ment.
2 Introduction
Ce document contient des informations et des
normes de sécurité à respecter impérativement pour
un fonctionnement sûr de l'appareil dans les condi-
tions décrites. Le non-respect de ces informations et
instructions peut avoir de graves consuences et/ou
peut violer les réglementations. Veuillez lire le manuel
et les présentes instructions de sécurité avant d'utiliser
l'appareil. En cas d'erreurs de traduction ou d'impres-
sion, la version anglaise sappliue.
3 Application
3.1 ATEX & IECEx
Le HMT-1Z1 modèle T1100S est homologué pour une
utilisation en zone 1, zone 2, zone 21 et zone 22 selon
les directives 2014/34/CE (ATEX) et le systme IECEx.
3.2 NEC & CEC
Le HMT-1Z1 modèle T1100S est homologué pour une
utilisation en Division 1 et 2 Class I, II, III
3.3 Fabricant
i.safe MOBILE GmbH,
i_Park Tauberfranken 10
97922 Lauda-Koenigshofen ; Allemagne
4 Défauts et dommages
La scurit de lappareil doit tre vrie avant de
pntrer dans des ones risue dexplosion. Sil y a
des raisons de souponner ue la scurit de lappareil
a été compromise, il ne doit plus être utilisé et être im-
mdiatement retir de toute one risue dexplosion.
Des mesures doivent tre prises pour viter tout
redémarrage accidentel de l'appareil. La sécurité de
l'appareil peut être compromise si, par exemple :
• Des dysfonctionnements se produisent.
• Le boîtier de l'appareil est endommagé.
• L'appareil a été exposé à des charges excessives.
• L'appareil a été stocké de manière incorrecte.
• Les maruages ou les tiuettes sur lappareil sont
illisibles.
• Les valeurs limites autorisées ont été dépassées.
Il est recommand uun appareil achant des erreurs
ou pour leuel une erreur est souponne soit renvoy
un centre de service agr pour vrication.
5Normes de sécurité intrinsèques et
antidéflagrantes
Lutilisation de cet appareil suppose ue loprateur res-
pecte les normes de scurit conventionnelles et uil
a lu et compris le manuel d'utilisation, les consignes
de scurit et le certicat de scurit. Les normes
de sécurité supplémentaires suivantes doivent être
respectées :
5.1 Chargement et batterie
• Lappareil ne peut tre recharg uen dehors
des zones dangereuses en utilisant le câble USB
i.safe PROTECTOR 1.0 (ou tout autre uipement
approuv par i.safe MOBILE GmbH.)
• Lappareil ne doit tre charg u des tempra-
tures comprises entre +5°C et +40°C.
• La batterie n'est pas démontable par l'utilisateur.
5.2 Connexions et couvercles
• Les raccordements physiues dautres appareils
ne sont autoriss uen dehors des ones dange-
reuses, en utilisant le câble USB i.safe PROTEC-
TOR 1.0 (ou dautres
appareils homologus par i.safe MOBILE GmbH).
• Dans les ones risue dexplosion, les couvercles
du connecteur Micro USB et de l'emplacement
pour carte Micro SD doivent tre maintenus fer-
més.
•La prise audio peut être utilisée pour connecter
des casues dcoute homologus lintrieur des
zones dangereuses.
•Pour assurer l'intégrité de l’indice de protection
(IP), vrie ue tous les oints sont prsents et
fonctionnels.
• Pendant la charge, tout casue dcoute ou acces-
soire doit être débranché de la prise audio.
5.3 Environnements d'utilisation
•L'appareil ne doit pas être introduit dans les zones
0 ou 20.
•L'appareil ne doit pas être exposé à des acides ou
des alcalis agressifs.
•L'appareil doit être protégé contre les chocs À
haute énergie d'impact, contre l'émission exces-
sive dU et les processus charge lectrostatiue
élevée.
•La plage de température ambiante admissible est
de -20°C +60°C.
5.3 Accessoires
•Seuls les accessoires homologués par i.safe MO-
BILE GmbH peuvent tre utiliss.
•Le réglage de la sangle de tête dans les zones
dangereuses n'est pas autorisé.

Vue d’ensemble de l'appareil
Bouton
d’
alimentation
Bouton d’action
Caméra
Bague de blocage
Lampe flash
Articulation coudée
Module d’affichage
Mic A1
(A2 de l’autre côté)
Mic B1
Articulation d’épaule
Bandeau amovible
Coussinet arrière amovible
Haut–parleur
Bras articulé
Écran
Mic B2
Po
rt de
données & de char
ge
Micr
o USB situé
sous le couvercl
e
Prise audio

Utilisation du HMT-1Z1 avec un casue de scurit
Pour obtenir des clips de casue de scurit, visite shop.realwear.com.
1. Accroche les clips du casue de scurit dans la bande HMT-1Z1 et enclenche-les.
2. Glisse les clips dans les fentes daccessoires du casue de scurit ; la bande HMT-1Z1 doit se trouver
lextrieur du harnais du casue de scurit.
3. Mette le casue et, si ncessaire, auste-le usu ce uil repose de manire sre et confortable sur
votre tête.
4. Pour retirer le HMT-1Z1 du casue de scurit, pince le clip et pousse-le hors des fentes du casue de
sécurité.
A
B C D E F G H I J
A
B
C D E F G H
A B
C
D
Utilisation du HMT-1Z1 sans casue de scurit
Fixation de la sangle de têteFixation du coussinet arrière
Le coussinet arrière
s'enclenche sur la
bande arrière du
HMT-1Z1 ; alignez les
ouvertures du cous-
sinet arrière avec les
crochets de la bande
arrière du HMT-1Z1 et
enclenchez-les.
Insre lextrmit
de la sangle dans la
fente intérieure des
deux côtés du HMT-
1Z1 comme indiu.
Repliez l'extrémité sur
elle-mme et xe-la
à l'aide du velcro.
Pendant le fonctionnement, enlevez le coussinet arrière pour
lire des informations de réglementation intrinsèquement sûre.

Gnrer un Code QR de conguration
1
2 3 4 5 6 7 8 9 10
Chargement du HMT-1Z1
1. Connectez le câble de charge Micro
USB comme indiu.
2. Connectez le câble au chargeur
mural comme indiu et branche-le.
Le bouton d'alimentation clignotera en
ROUGE lors de la charge et deviendra
ERT lorsuil sera compltement
chargé.
Le câble USB fourni avec le HMT-1Z1 est un câble micro-USB spécial pour le transfert de données et la
charge. Il comprend un botier de scurit ui protge les circuits de scurit du HMT-1Z1 contre les surten-
sions. Ces surtensions peuvent endommager le HMT-1Z1 et peuvent survenir lors de sa connexion à des or-
dinateurs, des chargeurs muraux, des chargeurs de voiture et dautres sources dalimentation non certis ou
homologus comme intrinsuement sr. Cest le seul cble homologu pour charger le HMT-1Z1 et dplacer
des chiers vers et depuis le HMT-1Z1.
I J
E F G H I J
Avertissement de sécurité Nutilise ue le chargeur fourni
À télécharger sur
OBTENEZ–LE SUR
Utilisez l’appli RealWear Companion
Scannez ce code avec votre Smartphone pour
télécharger RealWear Companion.
1. Téléchargez l’application RealWear Companion
partir de Google Play ou Apple App Store.
2. Lancez RealWear Companion à partir de votre
smartphone.
3. Choisisse Conguration.
4. Choisissez Premier réglage.
5. Suivez les étapes de l’application pour saisir les
informations et gnrer un code QR.
OU Utilise realwear.setupmyhmt.com
1. Alle realwear.setupmyhmt.com depuis
votre ordinateur ou appareil mobile.
2. Sélectionnez Conguration.
3. Suivez les indications pour saisir vos infor-
mations et gnrer un Code QR.

1 2
1
2
3 4 5 6 7 8 9 10
Nloigne pas trop lcran de votre il. Garde lcran le plus prs possible de votre il pour une meil-
leure vision. Rgle le bandeau pour ue le HMT-1Z1 repose bien horiontalement, lgrement au-des-
sus de vos oreilles. Rgle les articulations dpaule et de coude en forme de «Z», sous le champ de
vision de l’œil gauche ou droit.
Mettez le HMT-1Z1
La dominance monoculaire est la tendance à préférer un œil à l’autre pour percevoir les signaux
visuels. La plupart des personnes ont l'œil droit dominant ; cependant, pour une petite partie de la
population, ni lil droit ni lil gauche ne sont dominants. Il est prfrable dutiliser votre il domi-
nant lorsue vous regarde lcran.
Pour dterminer uel est votre il dominant
1. Formez un triangle avec les mains, les bras étendus.
2. Les deux yeux ouverts, faites la mise au point sur nimporte uel obet loign centr dans
le triangle.
3. Ferme lil droit en conservant la mise au point sur lobet centr dans le triangle, .
Si lobet est touours dans le triangle, votre il gauche est lil dominant.
4. Ferme lil gauche en conservant la mise au point sur lobet centr dans le triangle, .
Si lobet est touours dans le triangle, votre il droit est lil dominant.
5. Si lobet est dans le triangle avec lil droit ou lil gauche, alors vous ave une dominance
monoculaire neutre.
6. Recommence le test pour conrmer.
rie votre il dominant
2
3
4 5 6 7 8 9 10
1 2 3
1 2 3 4

Allume le HMT-1Z1
3
4
5 6 7 8 9 10
Le HMT-1Z1 est contrôlé par la voix et les mouve-
ments de tte. Dites ce ue vous voye lcran et
bouge la tte pour naviguer. Si vous tes blou,
dites er aie.
Note : Pour changer de langue, maintenez enfoncé
le bouton d’action situé sur le côté du HMT-1Z1. La
slection de la langue changera automatiuement ;
lche le bouton uand la langue ue vous dsire
est sélectionnée.
Scanne le Code QR de Conguration avec le HMT-1Z1
4
5
6 7 8 9 10
Dites ce ue vous voye
5
6
7 8 9 10
1. Le HMT-1Z1 va automatiuement se lancer en mode conguration.
2. Dirige la camra vers le code QR ue vous ave gnr ltape 1.
3. Le HMT-1Z1 va dtecter le code QR et congurer lappareil.
Note : Une fois lappareil connect au WiFi, une mise our de RealWear Device Agent peut se produire.
Appuyez sur le bouton
d’alimentation pendant
3 secondes pour mettre
l’appareil sous tension.
Faites basculer la
camera vers le haut/le
bas pour obtenir la
meilleure vue.
Réglez le module d’affichage
de manière à bien voir les 4
coins de l’écran puis
bloquez–le à l’aide de la bague.
Other manuals for HMT-1Z1
4
Table of contents
Languages:
Other RealWear Headset manuals