Recordex ReTract Plus User manual
Thank You For Choosing Our Projector Screen.
Please Read This Manual Carefully Before Using.
ReTract Plus
THANK YOU FOR CHOOSING OUR MANUAL WALL SCREEN!
All of our screens are inspected against very strict quality standards. We are
confident that you will be fully satisfied with your selection. Please take a few
minutes to carefully read this manual before using your screen. Enjoy!
MANUAL WALL SCREEN
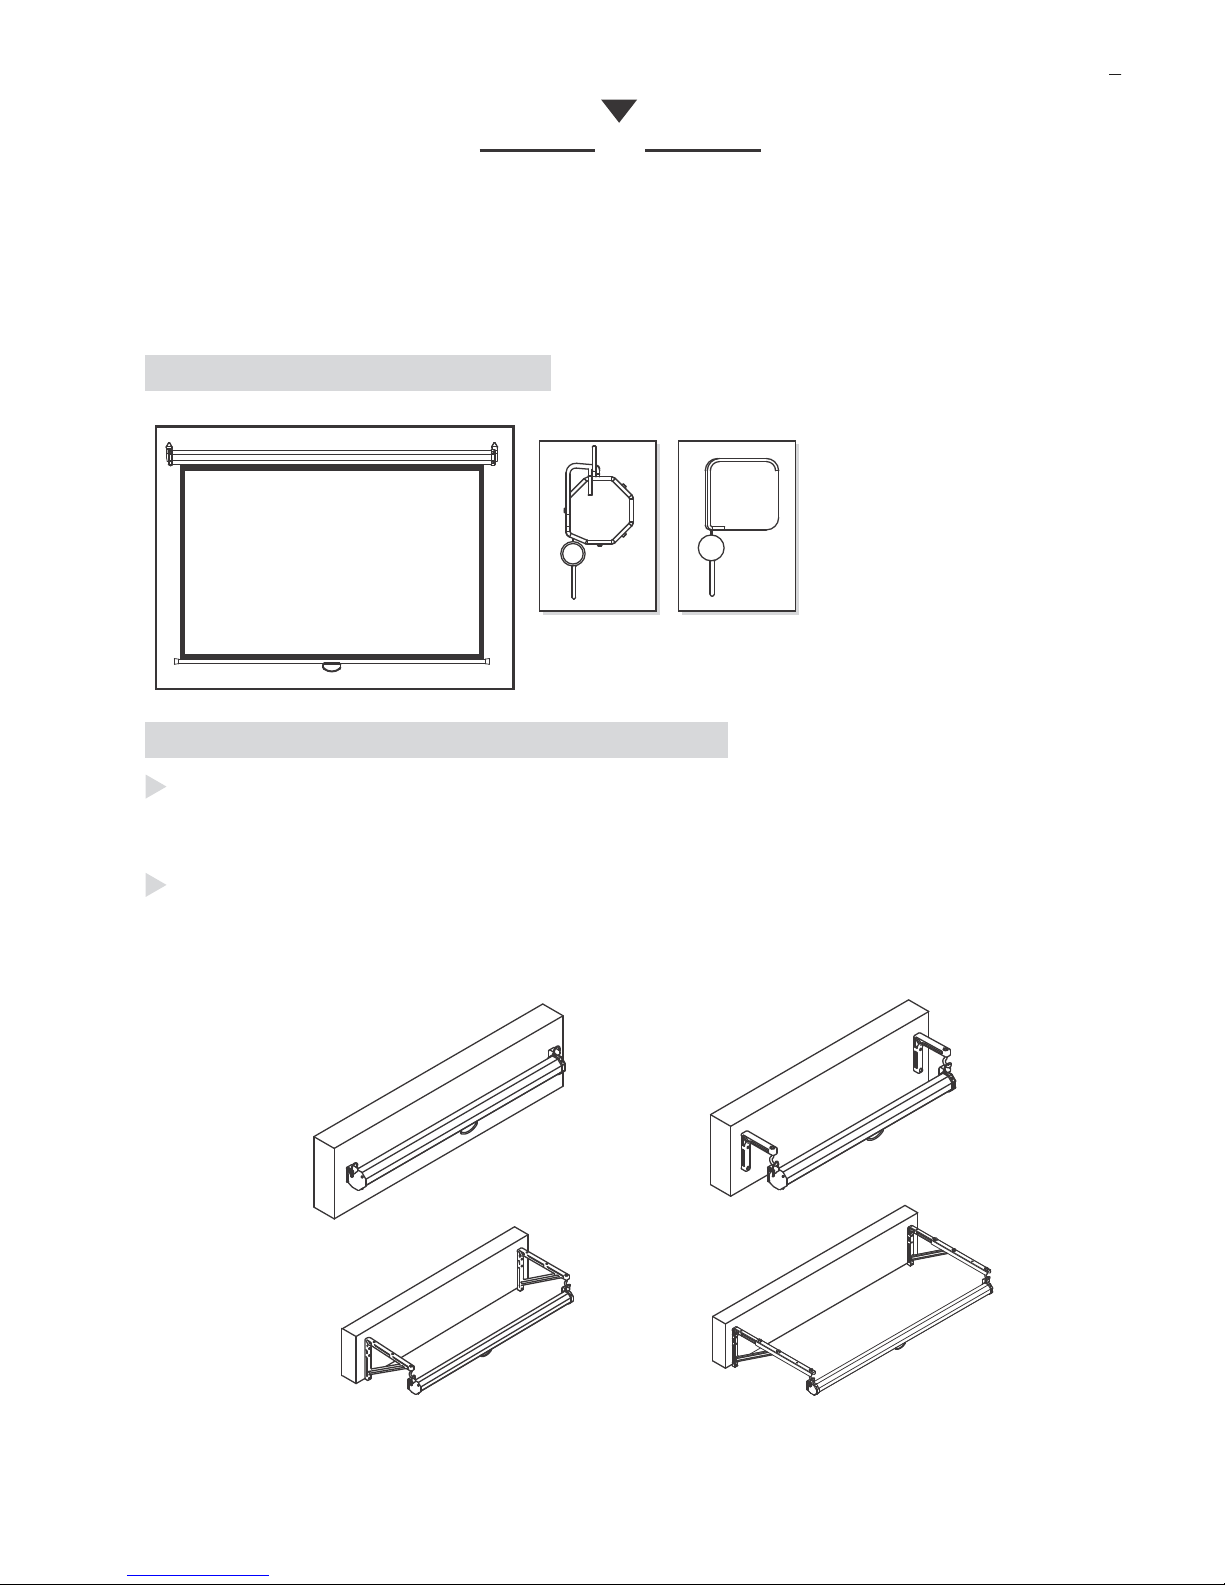
octagonal
housing
square
housing
NOTE: Screens over 80" wide
have a square housing while all
other screens have an
octagonal housing.
Standard Mount 6" Mounting
Bracket
14" Mounting
Bracket
23" Mounting
Bracket
SCREEN INSTALLATION & MOUNTING
Remove the outer packaging carefully and inspect the package for damage. If
the screen is damaged you need to immediately initiate a damage claim with
the shipping carrier.
Carefully and properly mount the screen on the wall or ceiling. We provide
several optional mounting brackets that are available where you purchased
your screen. Be sure to select appropriate mounting hardware. You may
wish to consult a professional when selecting mounting hardware.
1
2
00-16
00-01
00-02
6-ST4.2 10
00-16
00-02
00-03
00-01
00-16
00-10
00-11
00-13
00-14
00-15
00-12
00-12
00-19
00-05
00-06
00-04
00-08 00-09
00-07
00-16
00-03
00-19
00-11
00-10
00-07
00-02
00-01
00-10 00-19
00-11
00-03
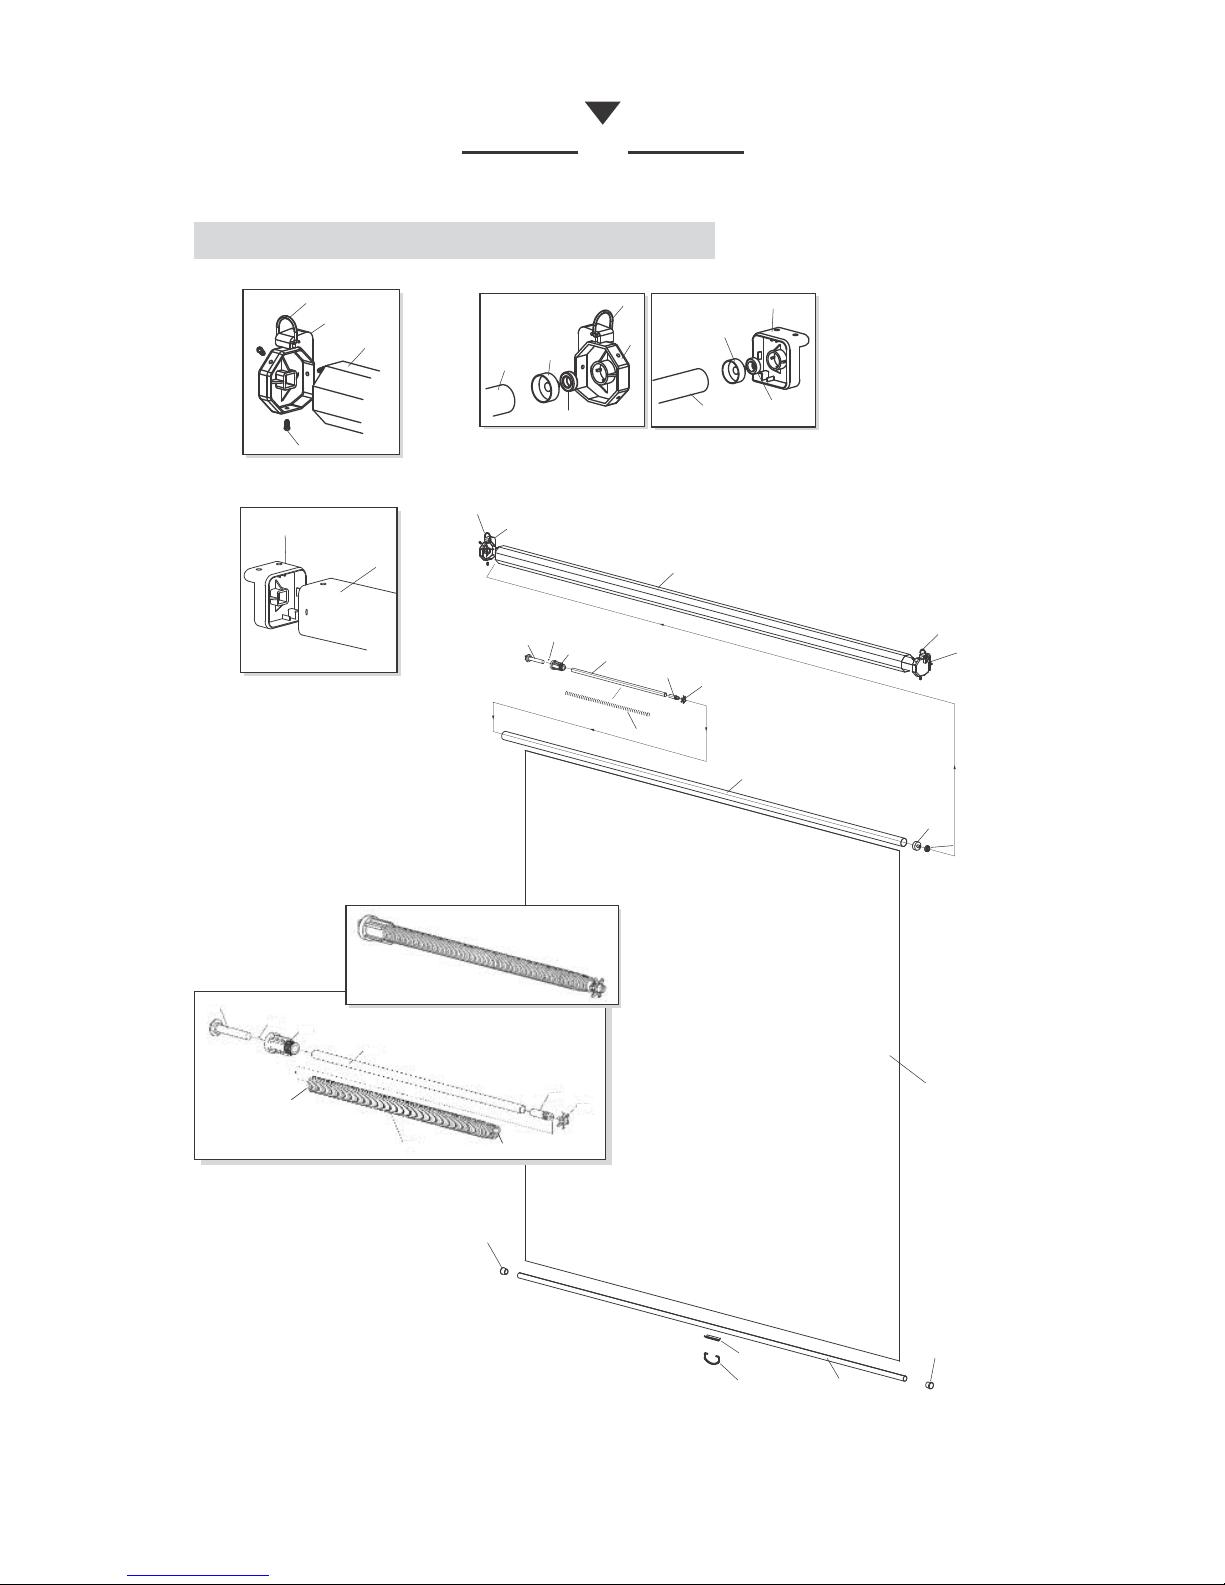
PARTS LIST FOR WALL SCREEN
00-01
00-02
00-03
00-04
00-05
00-06
00-07
00-08
00-09
00-10
00-11
00-12
00-13
00-14
00-15
00-16
00-17
00-18
00-19
00-20
00-21
00-22
LEFT END CAP
CASE
RIGHT END CAP
LOCK HEAD
LOCK HEAD COVER
SPRING
TUBE
STOP BAR
COVER
ROLLER
ROTATING COVER
RUBBER END CAP
PULL BAR
LOOP COVER
LOOP
RING
STEEL BALL
FABRIC
BEARING
LOOP PLACE
WELDED PIECE WITH SQUARE HOLE
WELDED PIECE WITH ROUND HOLE
OCTAGONAL
PLASTIC END CAPS
SQUARE PLASTIC END CAPS
SQUARE PLASTIC END CAPS
OCTAGONAL
PLASTIC END CAPS
00-18
3
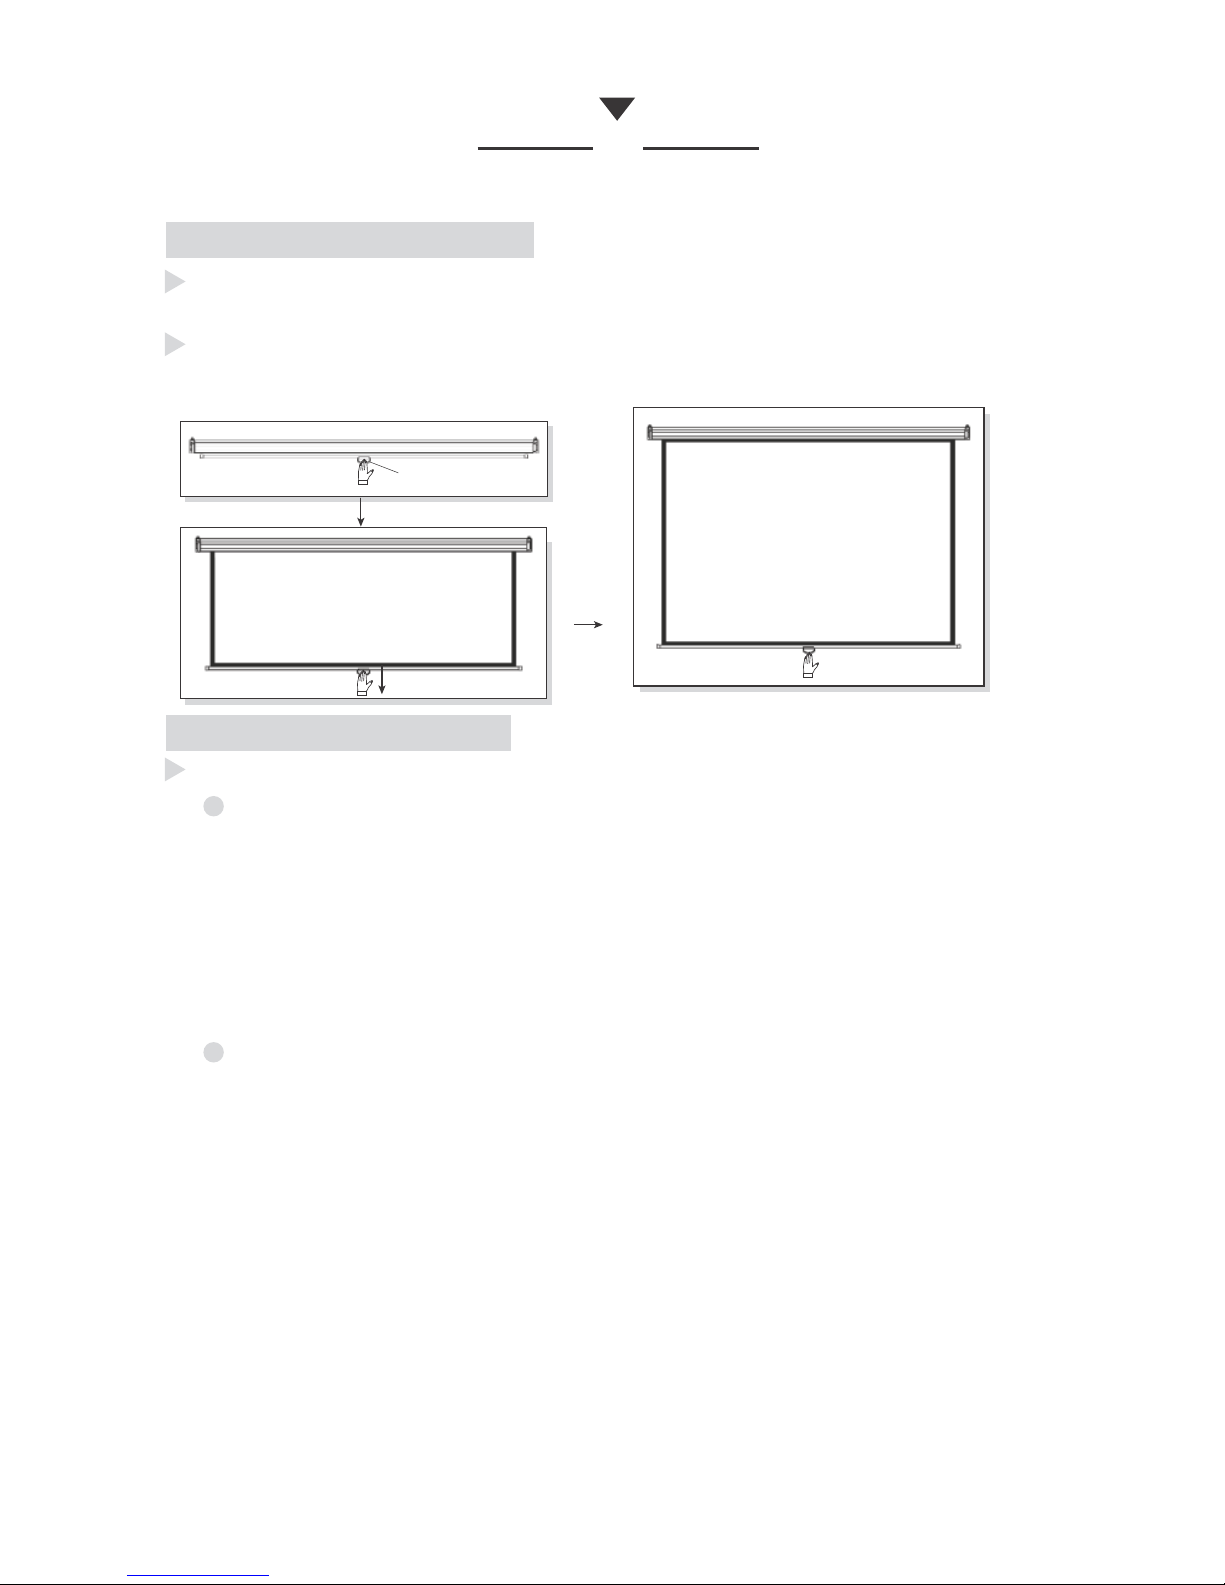
OPERATING INSTRUCTIONS
PROBLEM AND SOLUTION
Pull down the screen with the loop (00-15), stop at the desired position
for one second, then release the loop(00-15).
If the screen is not used for a long time, hold the loop (00-15), pull
down SLIGHTLY then release it IMMEDIATELY, the screen will retract
back into the housing.
PROBLEM: The screen does not retract all the way; a small part exposed.
Solution: Tighten the spring one or two turns clockwise.
PROBLEM: The screen will not retract; nearly the entire surface exposed.
Solution: You must fully rewind the spring.
The following problems may occur after a long period of infrequent use.
00-15
Loosen the three screws in the left end cap (00-01) and pull out the end cap slightly so
that it is disconnected from the housing. NOTE: Be careful to not remove the end cap as
this will allow the spring to unwind. Instead be certain to maintain contact with the end
cap and the lock head (00-04). The lock head fits into the square socket on the inside of
the end cap. With the end cap loose from the housing turn the end cap one or two
revolutions clockwise to tighten the spring.
Loosen the three screws in the left end cap (00-01) and completely remove it from the
housing. Next mark the roller (00-10) with a pen where it matches up with the small
triangle marking on the lock-head (00-04), and then remove the lock-head from the roller.
This will allow the spring to fully unwind. Now put the lock-head back into the roller and
match up the mark you made with the triangle mark on the lock-head. Next, align the end
cap so that the hanging ring (00-16) is oriented up and place the end cap back onto the
lock-head. Note, that the triangle mark on the lock-head will be pointing up in the same
direction as the hanging ring. Now you are ready to rewind the spring. Turn the end cap
clockwise to tighten the spring. Refer to the table on the next page for the proper number
of turns for your screen size. When finished winding the spring fasten the end cap to the
housing. Also, refer to Figure 1 and Figure 2 on the next page for diagrams to helps
clarify this procedure.
Read entire solution before beginning!
Read entire solution before beginning!

4
00-18
MARKER
FIG.1
00-16
00-01
00-10
00-05
00-04
00-01 00-04
00-05
00-10
00-18
MARKER
FIG.1
OCTAGONAL PLASTIC END CAPS
SQUARE PLASTIC END CAPS
SCREEN SIZE NUMBER OF TURNS
50" to 60" 7 to 8 turns clockwise
60" to 70" 8 to 10 turns clockwise
70" to 80" 10 to 12 turns clockwise
80" to 96"+ 14 to 16 turns clockwise
NOTE: If you need to re-assemble the spring and roller assembly follow these
steps.
·Screw END A of the spring (00-16) to threaded part of the lock head
cover (00-05) until tight.
·Insert END B of the spring (00-16) into the slot of the stop bar (00-08),
then attach the cover (star shaped) (00-09) to the stop bar.
·The lock-head (00-04), tube (00-07), and the stop bar (00-08) are pre-
assembled at the factory.
00-04
00-17
00-05
00-07
00-06
END A
END B
00-08
00-09
FIG 2
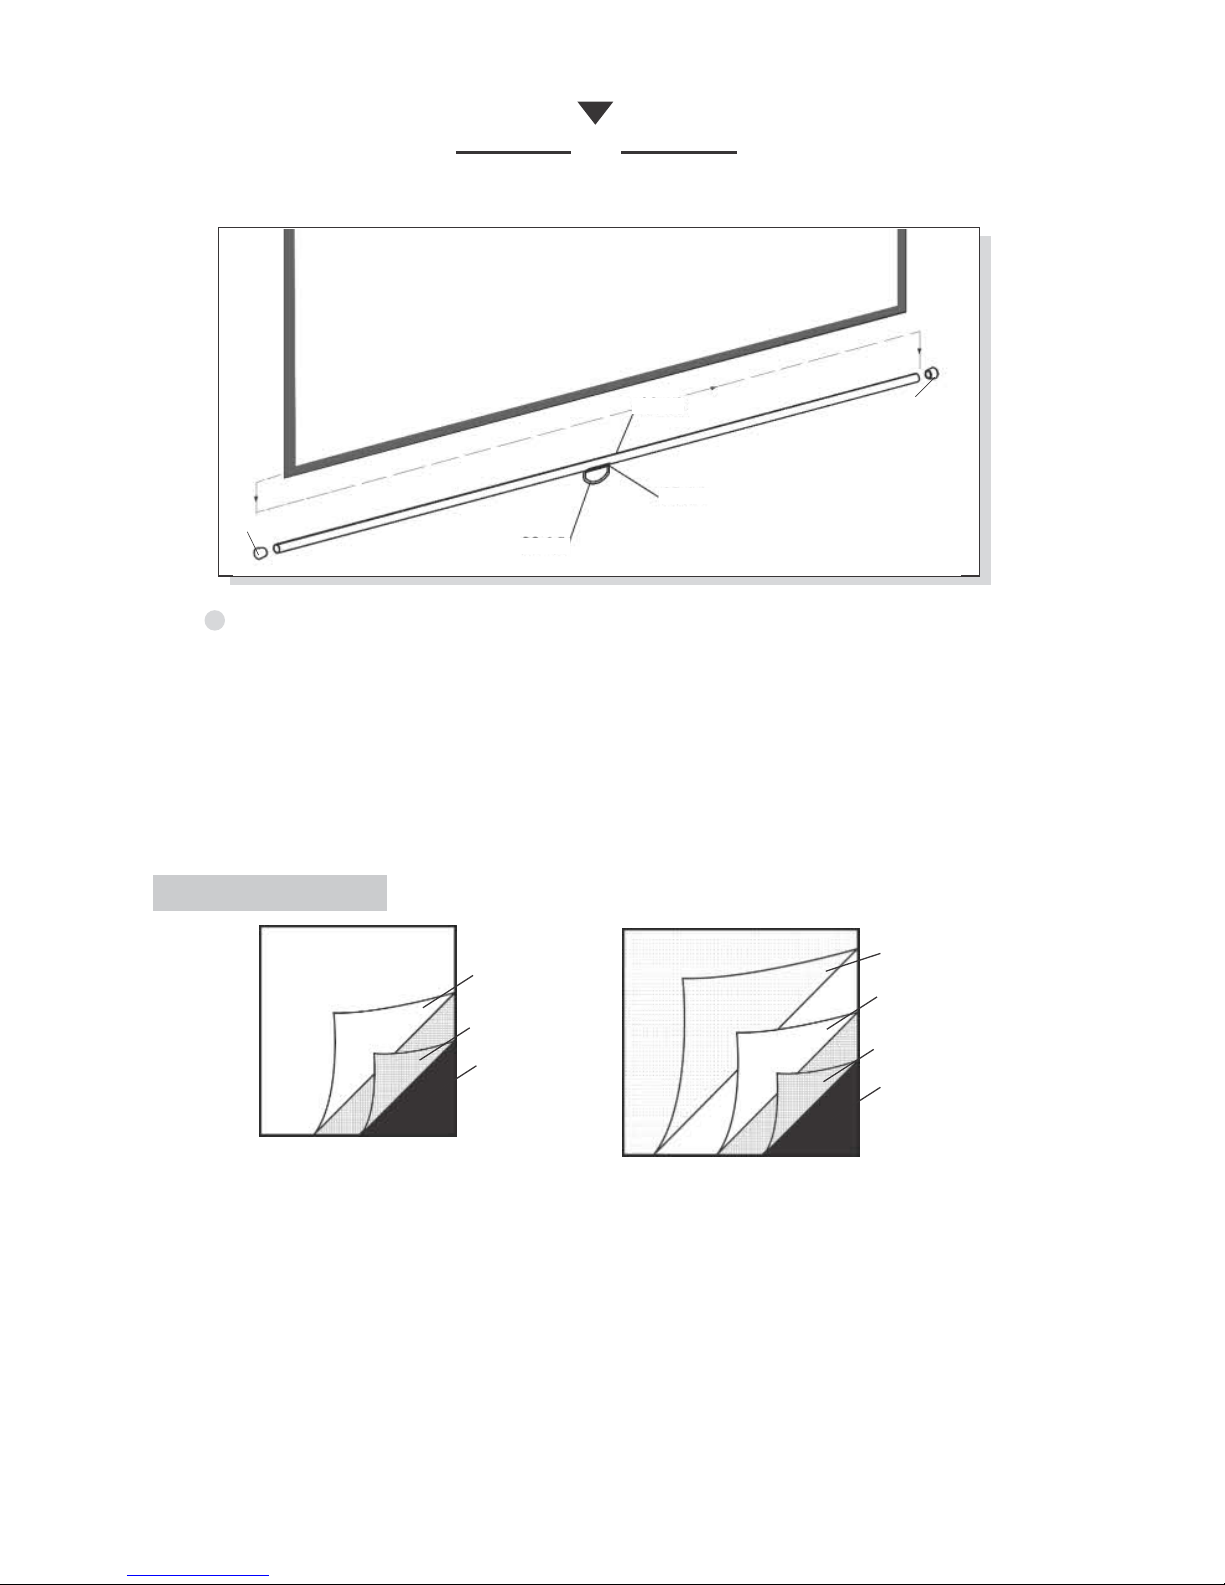
PROBLEM: Through misuse the pull loop or pull bar may become damaged.
Solution: Replace the loop (00-15) and pull bar (00-13).
Remove the rubber end cap (00-12) from the pull bar, remove the pull bar, and
replace with a new one. Make sure the screen surface is flat when you insert
the rubber end caps to prevent wrinkles. It may be helpful to tape the sides of
the screen to the wall before you insert the new pull bar and replace the caps.
5
SCREEN FABRIC
WHITE PVC
TERYLENE
FABRIC
Matte White Screen Surface
BLACK PVC
WHITE PVC
BLACK PVC
TERYLENE FABRIC
GLASS BEADED
Glass Beaded Screen
PROBLEM: The screen surface will not retract at all, or the screen fell
from the housing without being pulled.
·Check to see if the connection is loose between the spring (00-06)
and the lock head cover (00-05). If so, reassemble following the
instructions on page 4.
·Check if the lock head is damaged. If damage is present replace
the lock head.
6
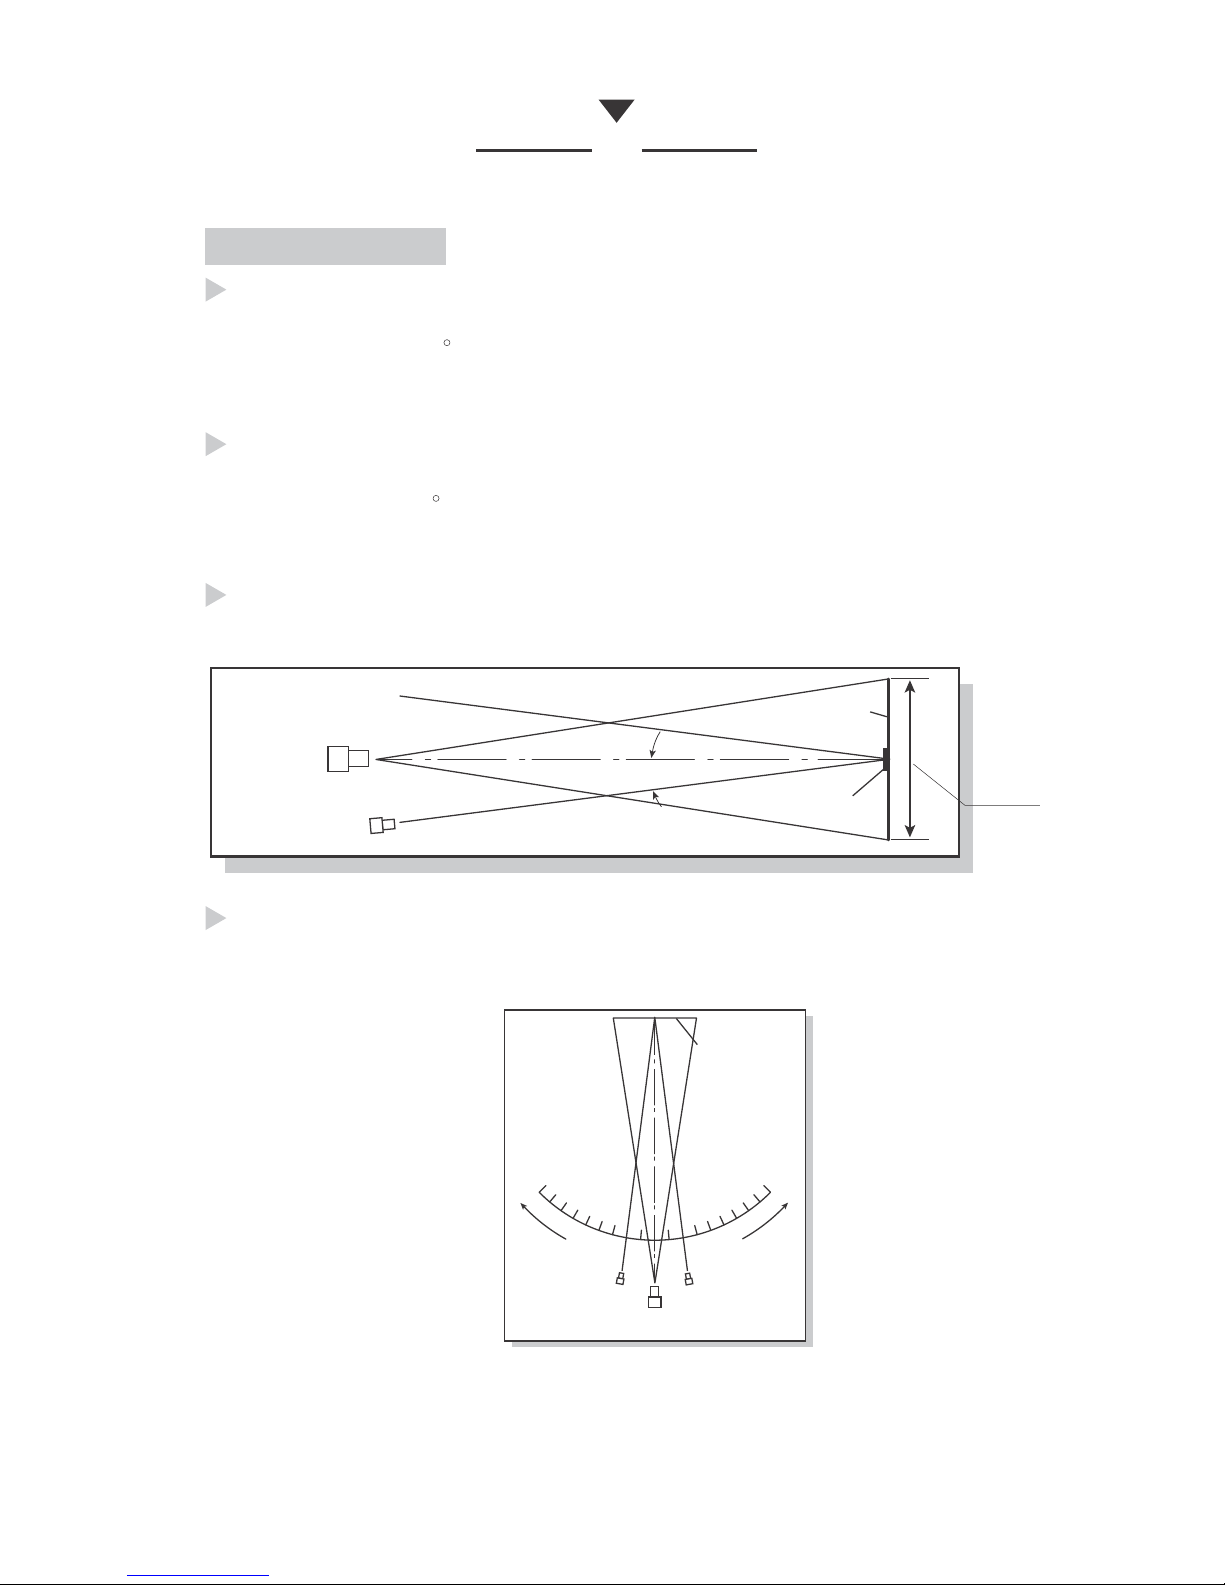
TECHNICAL DATA
PROJECTOR
LUMINOUS METER
SCREEN
Viewing Angle Measurement: refer the figure below
Standard: JB/T8389 issued by Ministry of Machinery Industry
Matte White Screen
Gain: 0.9
ViewingAngle: >160
High color rendering, high resolution.
Glass Beaded Screen
Gain: 2.2
ViewingAngle: >30
High color rendering, high resolution.
Gain Measurement: refer the diagram below
Standard: JB/T8389 issued by Ministry of Machinery Industry
PROJECTOR
Height
Direction
LUMINOUS METER
SCREEN
STANDARD BOARD

7
SCREEN MAINTENANCE & PROPER OPERATING CONDITIONS
·The screen surface may be cleaned with warm water and a soft
cotton cloth.
·To prevent marring or smudging the screen surface be careful
no to touch the screen surface with your fingers or any object
(i.e. pointing device)
·Do not display or store your screen in direct sunlight.
·Do not display your screen in front of a door, window, fan or
heating or cooling vent as air flow will disrupt
your viewing experience, and direct sunlight could cause fading.
·Handle the screen carefully to avoid damage and prolong the life
of your screen.

8
Table of contents
Other Recordex Projector Accessories manuals


