manuals.online logo
Brands
  1. Home
  2. •
  3. Brands
  4. •
  5. recteq
  6. •
  7. Grill
  8. •
  9. recteq The Flagship RT-1100 User manual

recteq The Flagship RT-1100 User manual

Other recteq Grill manuals

recteq Matador RT-G450 User manual

recteq

recteq Matador RT-G450 User manual

recteq Backyard Beast RT-1000 User manual

recteq

recteq Backyard Beast RT-1000 User manual

recteq RT-590 User manual

recteq

recteq RT-590 User manual

recteq Patio Legend RT-410 User manual

recteq

recteq Patio Legend RT-410 User manual

recteq RT-340 User manual

recteq

recteq RT-340 User manual

recteq RT-B380 Bullseye Guide

recteq

recteq RT-B380 Bullseye Guide

recteq Patio Legend 410 User manual

recteq

recteq Patio Legend 410 User manual

recteq RT-2500 User manual

recteq

recteq RT-2500 User manual

recteq WyldSide RT-A850 User manual

recteq

recteq WyldSide RT-A850 User manual

recteq RT-700 User manual

recteq

recteq RT-700 User manual

recteq RT-1250 User manual

recteq

recteq RT-1250 User manual

recteq RT-1070 User manual

recteq

recteq RT-1070 User manual

recteq RoadWarrior 340 User manual

recteq

recteq RoadWarrior 340 User manual

recteq RT-2500 BFG User manual

recteq

recteq RT-2500 BFG User manual

recteq Bullseye Deluxe RT-B380X User manual

recteq

recteq Bullseye Deluxe RT-B380X User manual

Popular Grill manuals by other brands

LMS BBQ08873P owner's manual

LMS

LMS BBQ08873P owner's manual

Cookworks LW-8010A Care & instruction manual

Cookworks

Cookworks LW-8010A Care & instruction manual

Campingaz CV Instructions for use

Campingaz

Campingaz CV Instructions for use

Metos XBL Series Installation and operation manual

Metos

Metos XBL Series Installation and operation manual

Fiesta ET34567 Use and care instructions

Fiesta

Fiesta ET34567 Use and care instructions

Mayer Barbecue BRENNA MKG-318A BASIC Assembly instructions

Mayer Barbecue

Mayer Barbecue BRENNA MKG-318A BASIC Assembly instructions

Landmann Avalon PTS Plus 5.1 Plus 12122 Assembly and operating manual

Landmann

Landmann Avalon PTS Plus 5.1 Plus 12122 Assembly and operating manual

Kenyon B70200 owner's manual

Kenyon

Kenyon B70200 owner's manual

Better Homes and Gardens GBC1486W owner's manual

Better Homes and Gardens

Better Homes and Gardens GBC1486W owner's manual

Orbegozo GR 2300 instruction manual

Orbegozo

Orbegozo GR 2300 instruction manual

bora PT11 Operating and installation instructions

bora

bora PT11 Operating and installation instructions

Klarstein 10031664 manual

Klarstein

Klarstein 10031664 manual

Garland MWE3W Installation and operation manual

Garland

Garland MWE3W Installation and operation manual

Char-Broil 463722714 Product guide

Char-Broil

Char-Broil 463722714 Product guide

MPM MOP-03 user manual

MPM

MPM MOP-03 user manual

Kenmore 415.16123800 Use and care guide

Kenmore

Kenmore 415.16123800 Use and care guide

Tucker Barbecues GTR Series Assembly, installation and operating instructions

Tucker Barbecues

Tucker Barbecues GTR Series Assembly, installation and operating instructions

Monogram ZGG540NCP1SS owner's manual

Monogram

Monogram ZGG540NCP1SS owner's manual

manuals.online logo
manuals.online logoBrands
  • About & Mission
  • Contact us
  • Privacy Policy
  • Terms and Conditions

Copyright 2025 Manuals.Online. All Rights Reserved.

Assembly Manual
READ ALL INSTRUCTIONS BEFORE INSTALLING AND USING THIS APPLIANCE
Please read this entire manual before installation and use of this pellet fuel-burning appliance. Failure to follow
these instructions could result in property damage, bodily injury, or even death. Contact local building or fire
officials about restrictions and installation inspection requirements in your area. Save these instructions.
A MAJOR CAUSE OF FIRES IS FAILURE TO
MAINTAIN REQUIRED CLEARANCES (AIR
SPACES) TO COMBUSTIBLE MATERIALS. IT IS
OF UTMOST IMPORTANCE THAT THIS
PRODUCT BE INSTALLED IN ACCORDANCE
WITH THESE INSTRUCTIONS.
RT-1100
1155 Perimeter Center West Suite 650
Sandy Springs, GA 30338
WARNING
FOR OUTDOOR USE ONLY
DO NOT STORE OR USE COMBUSTIBLE MATERIALS IN
OR NEAR THIS APPLIANCE.
TO PREVENT INJURY, NEVER ATTEMPT TO MOVE GRILL
WHILE HOT OR WITHOUT
ASSISTANCE.
UNPLUG WHILE NOT IN USE
NEVER STORE ANY GRILL IN A SMALL SPACE OR PLACE IN A
VEHICLE UNLESS COMPLETELY COOL AND FIRE IS VERIFIED AS
EXTINGUISHED.
LEAVE A MINIMUM OF 18” CLEARANCE FROM THE UNIT
TO COMBUSTIBLE CONSTRUCTION AND/OR MATERIALS AT
THE REAR, SIDES, AND TOP.
USE ON LEVEL GROUND AND NEVER USE
UNDER COMBUSTIBLE CEILINGS OR
OVERHANGS.
NEVER USE ON A COMBUSTIBLE FLOOR. USE
ON A NONCOMBUSTIBLE FLOOR OR FLOOR
PROTECTED WITH NONCOMBUSTIBLE
SURFACE WHERE PROTECTIVE SURFACE HAS
BEEN APPROVED FOR SUCH USE BY THE
AUTHORITY HAVING JURISDICTION.
2
3
IMPORTANT SAFETY INFORMATION
Warning: Read all safety information before operating grill.
For outdoor use only. Do not use in any enclosed area. Use on level surface, away
from overhanging easements.
Never move your grill while in operation and always lock/secure wheels
Keep grill 18” or more from any combustible surface.
Do not put anything flammable on the bottom shelf under the grill.
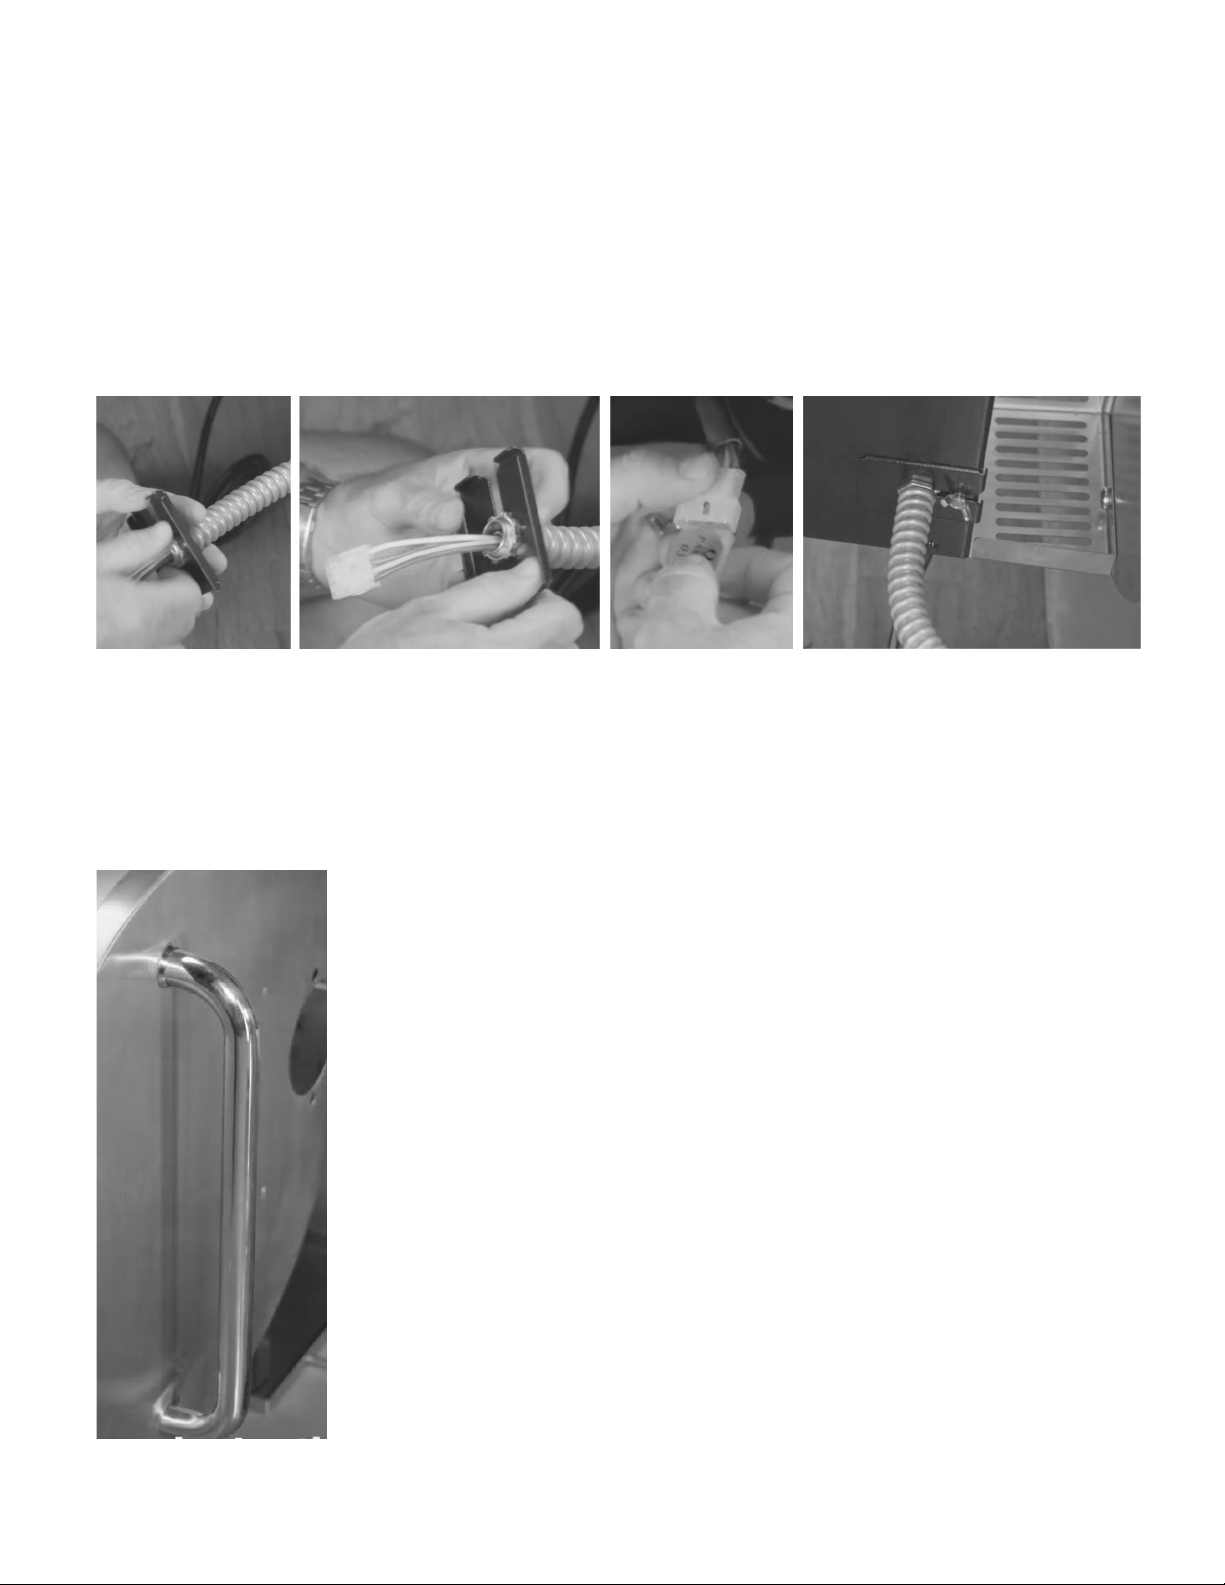
Never plug in your Flagship 1100 without the service access grate underneath your
controller installed.
Never put your grill in a vehicle without first ensuring that it is completely cool and that no
hot embers, pellets, or ashes remain in the fire pot or auger.
Occasionally, your Flagship 1100 should be checked for fire pot obstructions to make sure
proper airflow is maintained. See cleaning instructions in this manual for proper
procedures.
Your Flagship 1100 gets very hot; keep young children and animals away while in use. Use
extreme caution when cooking at high temperatures.
Use heat-resistant barbecue mitts or gloves when operating this unit. Long
handled, non-plastic utensils are also recommended.
Be aware of and/or remove loose clothing, jewelry, and accessories before using
grill.
Do not touch cooking chamber or attempt to move your Flagship 1100 while operating or
while the grill is hot.Make sure the fire is completely out and that the grill is completely
cool before transporting the grill.
Before covering your grill, make sure that the grill has cooled completely.
Never put your hand in the pellet hopper or attempt to service any part of your Flagship
1100 while your grill is plugged in.Keep protective grates and guards in place.
Follow these guidelines to prevent this colorless, odorless gas from poisoning you, your
family or others.
Know the symptoms of carbon monoxide poisoning: headache, dizziness, weakness, nausea,
vomiting, sleepiness, and confusion. Carbon monoxide reduces the blood’s ability to carry
oxygen. Low blood oxygen levels can result in loss of consciousness and death.
See a doctor if you or others develop cold or flu-like symptoms while cooking or in the
vicinity of this appliance. Carbon monoxide poisoning, which can easily be mistaken for a
cold or flu, is often detected too late.
Alcohol consumption and drug use increase the effects of carbon monoxide
poisoning.
Carbon monoxide is especially toxic to mother and child during pregnancy, infants, the
elderly, smokers, and people with blood or circulatory system problems, such as anemia, or
heart disease
Assembly Manual and User Guide
Congratulations on the purchase of your new Flagship 1100 Wood Pellet
Grill. With proper care and maintenance, your grill will provide you years
of trouble-free operation. Please review the following information
carefully for useful tips and information that will help you utilize your
grill’s extensive features and benefits.
To see our favorite recipes and cooking tips, visit recteq.com. As you
become familiar with your recteq, you will find that indoor cooking
becomes the exception and not the rule in your house. With the ability
to easily cook foods to standards that meet or exceed restaurant
quality, you will find yourself not wanting to go to restaurants and pay
for food that does not live up to the recteq standard of flavor. Also,
don’t be alarmed when your neighbors call and ask if you will ‘recteq’
some meat for them...This is a common occurrence among recteq
owners.
We want you to join the vibrant and growing community of recteq
owners. Whether you want to contribute your own tips and recipes,
learn from others, or a bit of both, please jump right in. You now have
an incredible tool for cooking. Let’s see how you use it!
Thank you for choosing recteq.
Ray Carnes & Ron Cundy Co-Founders, recteq, LLC
Flagship 1100
4
Flagship 1100 Contents
Component Qty
Steps
Used
Illustration Component Qty
Steps
Used
Illustration
Caster Wheels
24Pull Bar 1 8
Fixed Wheels 24Deflector 112
Legs 42Drip Pan 112
Bottom Shelf 13
Main Cooking
Grate
112
Bull
Horn
Handles 211
Top Cooking
Grate
112
Side Shelf
with
Controller
1 5 Drip Bucket 112
Bullhorn
Handle
Pads 211 Smokestack 1 9
Lid Sweep 111
Meat Probe(2)
Grate Tool (1)
Hardware
Pack(1)
Not Pictured
5
Hardware Specs Steps Used Illustration
Small bolts used to
mount legs and
bottom shelf.
M6 x 1.00
Length:.75in
Quantity: 20
2 & 3
Small flat washers
used for legs and
bottom shelf.
M6
Quantity: 20
2 & 3
Small lock washers
used for legs and
bottom shelf.
M6
Quantity: 20
2 & 3
Medium bolts used
for fixed wheels
and caster wheels
M8 x 1.25
Length:1in
Quantity: 16
4
Medium flat
washers used for
fixed wheels and
caster wheels
M8
Quantity: 16
4
Medium lock washers
used for fixed wheels
and caster wheels
M8
Quantity: 16
4
Large bolts used for
side shelf and
smokestack
M10 x 1.5
Length:1.5in
Quantity: 6
5 & 9
Large flat washers used
for side shelf and
smokestack
M10
Quantity: 6
5 & 9
Large lock washers
used for side shelf and
smokestack
M10
Quantity: 6
5 & 9
Large nuts used for side
shelf and smokestack
M10
Quantity: 6
5 & 9
FLAGSHIP 1100 Hardware Contents
6
Step 1: Unpack and Prepare for Assembly
Remove and unwrap all items from grill body.
With assistance, lay grill body on its back using packing material to protect
from damage. Be aware of sharp edges and points while assembling.
Step 2: Attach Legs
Start with grill on its back. Attach each leg to all four corners of the grill body
using 3 small bolts with lock washer and flat washer for each bolt (see
diagram).
Hand-tighten all bolts before tightening with screwdriver or drill.
(USE OF AN IMPACT DRILL/DRIVER IS NOT RECOMMENDED)
7
Step 3: Attach Bottom Shelf
Ensure recteq logo is facing front of grill and align shelf with feet
of the four legs.
Attach all four legs to bottom shelf using small bolt, lock washer,
and flat washer.
Step 4: Attach Wheels
Attach both fixed wheels to the left side of the bottom shelf using
medium bolt, lock washer, and flat washer.
Attach both caster wheels to the right side of the bottom shelf
using medium bolt, lock washer, and flat washer.
8
Step 5: Attach Side Shelf
Remove and discard placeholder bolts from left side of barrel.
Hold side shelf in place and attach to barrel with four large bolts
from outside and lock washers, washers, and nuts on inside.
Step 6: Attach RTD Probe to Controller
Remove bottom plate of side shelf underneath the controller.
Feed RTD Probe wires from inside of grill and into the side shelf.
Attach both probe wires to the bottom right prongs on the back of
controller.
Reinstall bottom plate of side shelf underneath the controller.
9
Feed wires through grommet hole
Feed wires from inside grill
Step 7: Connect Conduit from Grill Body to Side Shelf
Remove conduit plate and wingnut from power cord packaging.
Using the threaded ring, attach the conduit wire and plate.
Connect white molex connector at end of the conduit to the
molex connector inside the side shelf.
Push wiring into side shelf and use the wingnut to attach conduit
plate to side shelf.
10
Step 8: Install Pull Bar
Attach the pull bar to barrel using pre-installed hardware. The
beauty ring should be secured between the outside of the barrel
and pull bar.