manuals.online logo
Brands
  1. Home
  2. •
  3. Brands
  4. •
  5. Red Arrow
  6. •
  7. Lighting Equipment
  8. •
  9. Red Arrow LF13LEDPIR User manual

Red Arrow LF13LEDPIR User manual

LED Bulkhead with PIR
Installation Instructions P.1
T: 0800 195 0006 F: 0870 043 3946
E: [email protected] www.redarrowtrading.com
This installation must be carried out by an electrician. This light is constructed and tested to
IP44 and suitable for outdoor use. Please read these instructions carefully before installation.
Leave a copy for the user/maintenance engineer for future reference. Never modify the unit,
there are no user serviceable parts inside. It is not suitable for use with dimmer switches.
Install in accordance with I.E.C Wiring Regulations.
For models: LF13LEDPIR
Positioning the Unit
When selecting the mounting position, take into
account the following points:
1. The sensor is designed for optimum performance
when mounted 2.5 metres above ground level.
2. Avoid positioning close to trees or shrubs which
may cause false triggering during wet, windy
weather.
3. Avoid pointing at or positioning close to heat
sources such as Boiler flu’s or heat extraction units,
which may cause false triggering.
4. Avoid pointing at bright lights as unit will not
function when you set lux control level to dark.
5. Avoid mounting near strong electromagnetic
sources, which may cause false triggering.
6. The sensor is most sensitive to movement across the
detection area as opposed to directly towards or
away from the unit. Position the unit to point across
flow areas.
Specification
• Wattage: 12 x 0.5W LED
• LED: LG 5630
• Life Expectancy: 20,000 hours
• Supply voltage: 230V AC 50Hz
• IP Rating: IP44
• Material: Polycarbonate
• Lumen Output: 428lms
• Guarantee: Two years
Fitting the Unit
Before commencing any electrical work, ensure mains supply
cables are isolated by switching off and removing the relevant
fuse.
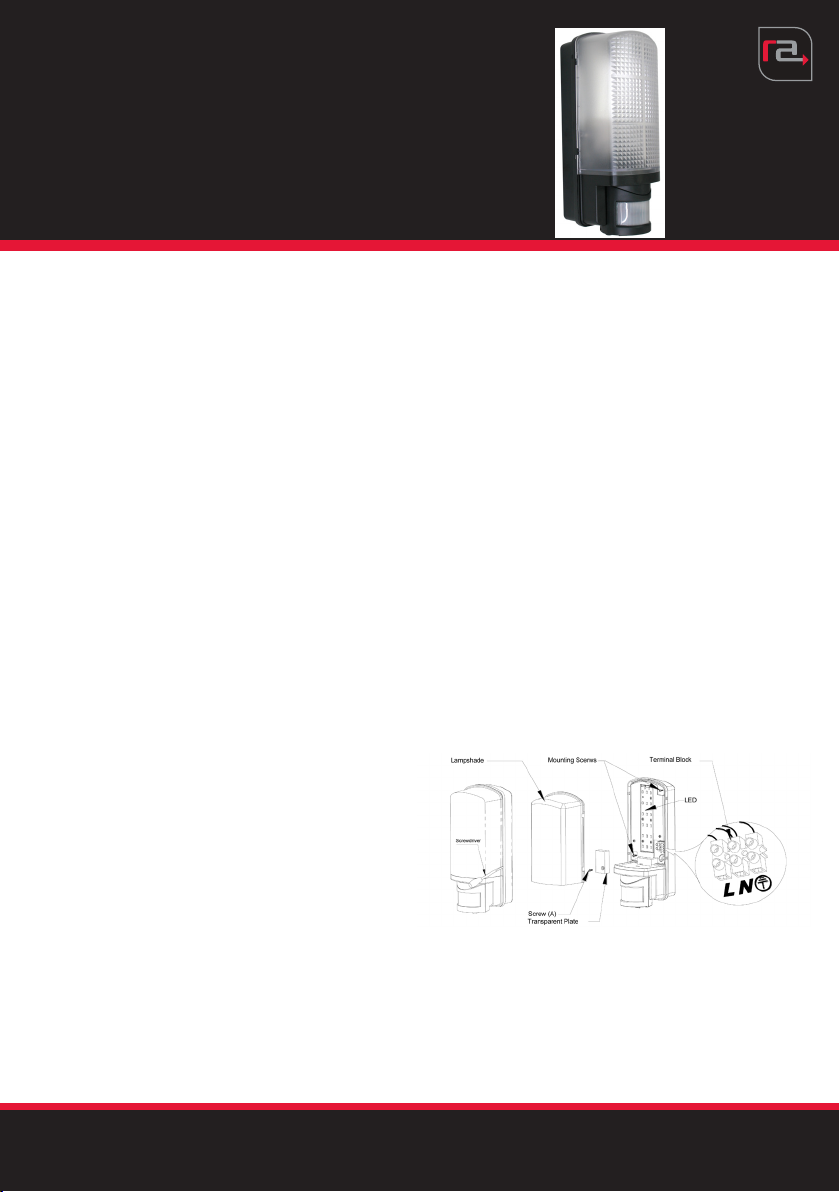
1. Remove the diffuser by using a tool (such as screw driver)
and unscrew the screws (A), remove the terminal plate and
terminal block.
2. Mark the mounting hole positions onto the wall. Drill and
plug the wall at the marked positions. Screw the light body
to the wall with suitable screws (supplied). Ensure that the
light body could not be out of shape.
3. Connecting the main power wires to the terminal block (see
the relative symbols), the wires must pass through the
rubber gasket. Note that screwing the earth-wire must use
the toothed washer).
4. Re-fit the terminal block and plastic plate (screw A).
5. Re-fit the light cover by hand (without tools).
Diagram A
After finishing the fitting operation, you can adjust the
detection area and working state of the PIR detector.
Red Arrow Trading
Elsworth House, Herries Road South,
Sheffield, S6 1QS
Guarantee
This product is guaranteed for a period of two years from the date of purchase. The guarantee is invalid in the case of improper use, tampering, removal of the Q.C. date label, installation
in an improper working environment or installation not according to the current edition of the I.E.E. Wiring Regulations (BS7671). The guarantee is also invalidated if the luminaire has
been Mega tested. Should this product fail during the guarantee period it will be replaced free of charge, subject to correct installation and return of the faulty unit. We do not accept
responsibility for any installation costs associated with the replacement of this product. We reserve the right to alter specifications without prior notice.
Product complies with
all relevant European
standards
Product is suitable for
mounting on flammable
material
F
T: 0800 195 0006 F: 0870 043 3946
E: [email protected] www.redarrowtrading.com
LED Bulkhead with PIR
Installation Instructions P.2
For models: LF13LEDPIR
Operation Mode
1. The detection area of movement detector (PIR) as per Diagram B.
2. You can select the scanning field of PIR by adjusting the PIR body, see
Diagram B.
3. You can select the Duration Time (from 10 ±5 seconds to 4 ±1 minutes)
and Lux level (from daylight to night) by adjusting TIME and LUX knobs as
below.
1. Adjusting the timing: Turn the time knob clockwise to increase the delay time.
2. Adjusting the lux level: You can control the operation of PIR during daylight ( )
and night ( ) by adjusting the lux knob. Turn the lux knob anti-clockwise to show
that the lux control is from daylight to night (dark).
3. Walking test: You can select the desired detection area by walking test. Turn the
lux knob to daylight position ( ), the light will turn on when you walk slowly
within the detection area during daylight. You can carry out the testing during day
and night by adjusting the lux knob.
IMPORTANT:
1. NEVER ATTEMPT TO REMOVE THE LENS COVER, AS THIS WILL DAMAGE
THE PIR AND VOID THE GUARANTEE.
2. BEFORE TOUCHING THE LIGHT, PLEASE SWITCH OFF FIRST AND THEN
LET IT COOL.
Red Arrow Trading
Elsworth House, Herries Road South,
Sheffield, S6 1QS
Diagram B
Diagram C

Other Red Arrow Lighting Equipment manuals

Red Arrow LF502A User manual

Red Arrow

Red Arrow LF502A User manual

Red Arrow VAN/3 User manual

Red Arrow

Red Arrow VAN/3 User manual

Red Arrow POL14LEDEMSCF User manual

Red Arrow

Red Arrow POL14LEDEMSCF User manual

Red Arrow Jupiter JUPS30-40 User manual

Red Arrow

Red Arrow Jupiter JUPS30-40 User manual

Red Arrow POLO 15W LED User manual

Red Arrow

Red Arrow POLO 15W LED User manual

Red Arrow ANA/30 User manual

Red Arrow

Red Arrow ANA/30 User manual

Popular Lighting Equipment manuals by other brands

walser Walimex Pro 380 Bi Color RLL-380BV instruction manual

walser

walser Walimex Pro 380 Bi Color RLL-380BV instruction manual

Finelite E3 LED Engine Replacement Instruction

Finelite

Finelite E3 LED Engine Replacement Instruction

as-Schwabe INDU1 operating instructions

as-Schwabe

as-Schwabe INDU1 operating instructions

Model Train Technology CABOOSE II Series Operation manual

Model Train Technology

Model Train Technology CABOOSE II Series Operation manual

Chauvet DMX-311X supplementary guide

Chauvet

Chauvet DMX-311X supplementary guide

JB Systems Space 3 Operation manual

JB Systems

JB Systems Space 3 Operation manual

Joouls JOOULY CR2025 operating manual

Joouls

Joouls JOOULY CR2025 operating manual

ARRI ARRIMAX 18/12 operating instructions

ARRI

ARRI ARRIMAX 18/12 operating instructions

EMG 85-7X Installation information

EMG

EMG 85-7X Installation information

IKEA SEGLATS instruction manual

IKEA

IKEA SEGLATS instruction manual

Safavieh TBL4119 quick guide

Safavieh

Safavieh TBL4119 quick guide

Gemini 940-1001 user manual

Gemini

Gemini 940-1001 user manual

GAME OF BRICKS Loop Coaster 10303 instruction manual

GAME OF BRICKS

GAME OF BRICKS Loop Coaster 10303 instruction manual

thomann PAR64 10MM UV user manual

thomann

thomann PAR64 10MM UV user manual

Beka LED DMX Tool 2 user manual

Beka LED

Beka LED DMX Tool 2 user manual

afx light 8BEAM-FX instruction manual

afx light

afx light 8BEAM-FX instruction manual

PROLUMIA 40010302 Operating	 instruction

PROLUMIA

PROLUMIA 40010302 Operating instruction

Robe XT Series user manual

Robe

Robe XT Series user manual

manuals.online logo
manuals.online logoBrands
  • About & Mission
  • Contact us
  • Privacy Policy
  • Terms and Conditions

Copyright 2025 Manuals.Online. All Rights Reserved.