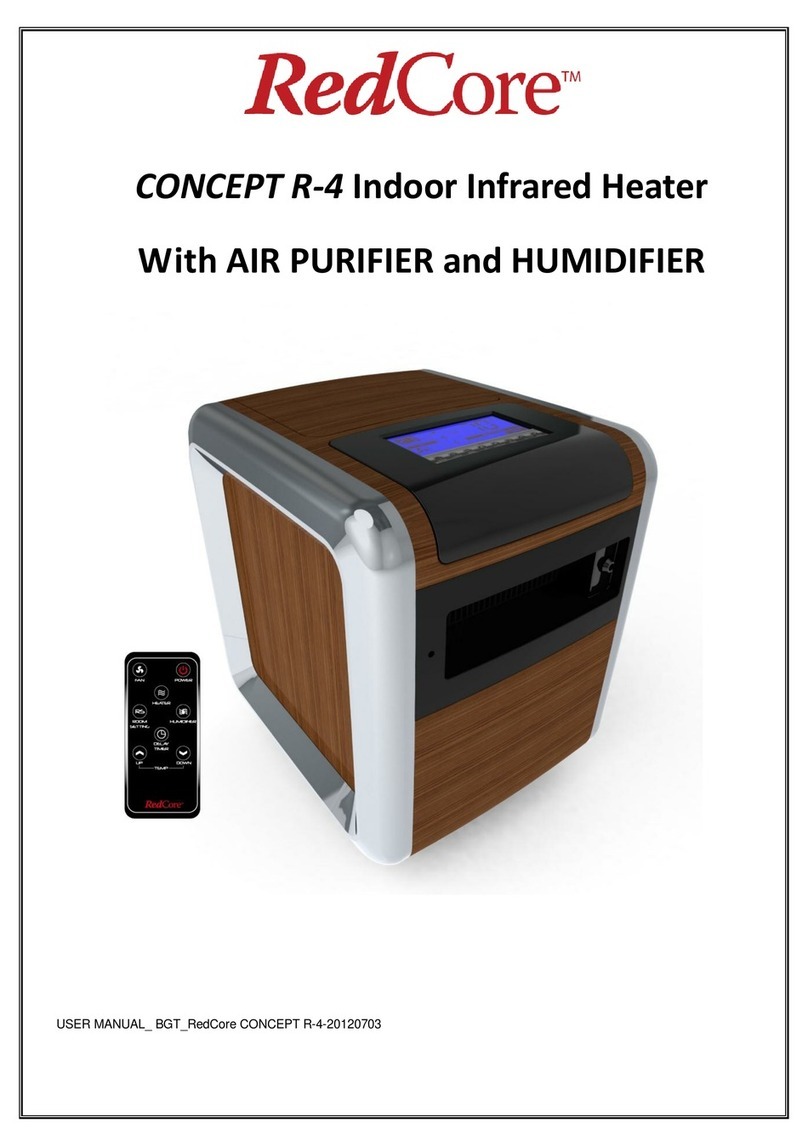
RedCore CONCEPT R-4 User manual

R-4 Indoor Infrared Heater
WITH PCO AIR PURIFIER and HUMIDIFIER
USER MANUAL RedCoreCONCEPT R-4-20100616

Thanks for choosingtheRedCore
TM Indoor Infrared Heater! Wehelpour customers savemoneyon
energybills while improvingtheir comfort with safe, therapeutic heatingproducts. TheRedCore™
Concept R4 is a 3-in-1 product, producingsoft infrared heating, humidification, and superior year-round
air purification allin oneconvenient product.
Pleaserefer to our website, www.redcore.com, for further information on all RedCore™ products.
For Serviceand Support Questions, pleasecontact:
American Comfort WorldwideLLC
Moonachie, NJ07074 USA
www.redcore.com
877-305-5519

PRECAUTION
1. Read allinstructions beforeusingthis appliance.
2. Theheater is hot when in use
.To avoid burns, do not placeanyobjects such as furniture, papers,
clothes, and curtains closer than 3feet (0.9 m) to thefront of theheater and keepthem awayfrom the
sides and rear when theheater is plugged in.
3. Extremecaution should betaken when usinganyappliancearound children, elderly, or disabled
persons, or whenever theheater is operatingunattended. Children under 14 years of ageshould not be
allowed to operatethis heater. This product is for adult useonlyand allchildren must besupervised when
usingthis product.
4. Always unplugheater when not in use.
5. Do not operateheater with a damaged cord or plug, after theheater malfunctions,or if theheater has
been dropped or damaged in anymanner. Discard heater or return to an authorized servicefacilityfor
examination and/or repair.
6. Do not useoutdoors.
7. This heater is not intended for usein bathrooms, laundryareas, and similar indoor locations. Never
locateappliancewhereit mayfallinto a bathtub or other water container.
8. Do not run cord under carpeting. Do not cover cord with throw rugs, runners, or similar coverings. Do
not routecord under furnitureor appliances. Arrangecord awayfrom traffic areas and whereit willnot be
tripped over.
9. To disconnect theappliance, turn controls to off, wait for heater to cooldown and shut off, and then
removeplugfrom outlet.
10. Connect to properlypolarized outlets only. This product requires a threeprongoutlet with ground.
11. Do not insert or allow foreign objects to enter into ventilation openingas this maycausean electric
shock, fireor damagetheappliance.
12. To prevent a possiblefire, do not blockair intakes or exhaust in anymanner. Do not useon soft
surfaces, likea bed, whereopenings maybecomeblocked.
13. Theheater has hot parts and sparkingparts inside. Do not usein areas wheregasoline, paint, or
flammableliquids areused or stored.
W ARNING 1: W HEN USING ELECTRICALAPPLIANCES,BASIC PRECAUTIONS
SHOULD ALW AYS BE FOLLOW ED TO REDUCE RISK OF FIRE,ELECTRIC
SHOCK,AND INJURY TO PERSONS.
W ARNING 2: RISK OF ELECTRIC SHOCK NO USER-SERVICABLE
PARTS INSIDE EXCEPT TO CLEAN THE AIR FILTER AND ADD W ATER
TO THE HUMIDIFIER.

14. Usethis applianceonlyas described in this manual. Anyusenot recommended bythemanufacturer
maycausefire, electric shock, or injuryto persons.
15. Always plugheaters directlyinto a walloutlet receptacle. Do not usean extension cord.
16. To prevent overload and blown fuses, besurethat no other applianceis plugged into the sameoutlet
on thesamecircuit.
17. It isnormal for the heater’splugand cord to feel warm to the touch. A plugor cord which becomes hot
to thetouch or becomes distorted in shapemaybea result of a worn electricaloutlet (receptacle). Worn
outlets or receptacles should bereplaced prior to further useof theheater. Pluggingthis heater into a
worn outlet (receptacle) mayresult in overheatingof thepower cord or fire.
18. Besurethat theplugis fullyinserted into an appropriatereceptacle. Pleaseremember that
receptacles also deterioratedueto agingand continuous use: checkoutlet and cord periodicallyfor signs
of overheatingor deformations of theplug. If anyoverheatingor deformation is present, immediately
discontinueusingthereceptacleand contact a qualified electrician.
19. CAUTION: To prevent electric shock, match widebladeof plugto wideslot of receptacleand insert
completely.
20. Do not cover theappliancewhileit is functioningin order to avoid overheatingand/or riskof fire.
21. Do not placetheheater near a bed becauseobjects such as pillows or blankets can falloff thebed
and beignited bytheheater.
22. Checkyour heater cord and plugconnections.
a) Faultywalloutlet connections or looseplugs can causetheoutlet or plugto overheat. Besuretheplug
fits tight in outlet.
b) Heaters draw morecurrent than smallappliances. Overheatingof theoutlet mayoccur even if it has
not occurred with theuseof other appliances.
c) Duringuse, checkfrequentlyto determine if your plugoutlet or faceplateis HOT!
d) If so, discontinueuseof theheater and havea qualified electrician checkand/or replacefaulty
outlet(s).
23. Do not locateagainst walls or behind drapes or furniture.
24. Becertain to clean theouter air filter in therear of theheater periodicallybyvacuumingit and/or
washingit to removedust particles. Becertain to drythefilter completelyprior to reinsertingit into its
position on theheater and prior to re-startingtheheater.
SAVE THESE INSTRUCTIONS

Productspecification and basicfeatures
lVoltage120V-60HZ
lHeatingpower: Upto1500 Watts.
lTemperaturecontrolrange:60-90 degrees Fahrenheit
lHeatingelement: Infrared PTC heater
lAir purifier: lifetimewashableair filter and PCO cell
lHumidifier: ultrasonic atomized design with separatecontrolfrom heater operation
lDelayTimer: 1-23hour delaytimesettingfor heater
lLCD displayand touch button operation, includingremotecontrol
lTip-over safetyswitch…automaticallyshuts off heater if it tips over
lCoverage: Upto 1,000 squarefeet.
lDimensions:17.8”high X 13.9”wideX 16.5” deep16.54
lWeight: 29.5 pounds

Main Features
ON/OFF (I/O)
switch located
backofunit
LCD Display
Hum idifier
air outlet
Hotair outlet
W irelessreceiver
Casters
Hum idifier water
tank

LCD displayand button instruction
lPower On/Off button: Turn on or turn off theheater
lHumidifier On/Off button: Turn on or turn off thehumidifier function
lRoom Settingbutton: Set theroom sizeaccordingto actualsizeof room and theheater willworkat
different power levels based on different room size settings: larger room =1500 Watts; medium
room = 1000 Watts; smallroom = 500 Watts.
lHeater On/Off button: Turn on or turn off theheatingfunction of theheater
lTemperatureUp/Down button: Adjust thedesired temperaturefrom 60-90*F. (Note: LCD willshow
target and actualtemperature.)
lFan Adjust button: Adjust thefan to function at High or Low mode
lDelayTimer Settingbutton: Set thedelaytimer from 1-23hours beforeheater turns on.
lPurifier Indication: Indicates that theair purifier is working
lHumidifier and Add Water mode: indicates that thehumidifier is working. When water is lower than
water line, LCD willdisplayAdd Water mode. Thehumidifier willstopautomaticallywhen Add Water
modeactivates
lHeating Upmode: Indicates theheater is heatingup. (Note: thefan willnot operatewhile theheater
is heatingup.)
lCoolingDown mode: Indicates theheater is coolingdown. (Note: thefan willautomaticallyturn off
when theheater has completed its cooldown function.)

Rem ote- Controlunit
How to OperatetheHeater
lUn-packageheater: cut open tapearea, fold backflaps and gentlyturn entireboxupsidedown. Lift
boxfrom Styrofoam packing. RemoveStyrofoam, turn upright. Werecommend keepingthepackage
for off-season storageand anytransportingneeds.
lPosition: Find a leveland unobstructed location to placetheunpackaged heater.
lPlug
in: Plug thepower cord directlyinto an unused grounded 120 volt 15 ampor higher circuit
receptacle.
lPower switch: Press down thepower switch located on therear of theheater to theON position (I).
lPower On unit: After pressingdown thePOWER button to turn on theheater, thedefault settingof
theheater willbetheAir Purifier is ON. TheUV lampwillworkto purifytheroom. TheLCD willshow
theactualroom temperature.

lHeater ON/OFF:Press theHEATER power button to turn on or off theheatingfunction of theheater.
Thefan willnot operateuntiltheheatingelement has reached a temperaturehigh enough to begin
thewarmingprocess. Duringtheperiod that thefan willnot work, themessage“HEATING UP” will
show on theLCD displayto indicatethat theheater is heatingup.
When theuser presses theHEATER button, if theactualroom temperatureis higher than thedefault
settingtemperatureof ”70F”,theheater willnot start heatingand LCD will show ”COOLING DOW N.”
Adjust thedesired temperatureup to a number higher than theactualroom temperature.
lRoom Setting: Press theROOM SETTING button to adjust thepower levelbased on theroom size.
Theheater has 3power settings and can beused for Small, Medium and Largesized rooms as
follows: Small= 500 Watts; Medium = 1000 Watts; Large= 1500 Watts.
lTem peraturesetting: Press theTEMP UP or TEMP DOWN button to set thedesired temperature.
Thetemperaturerangeis 60-90*F. BypressingtheHEATER button, theheater willdefault to the
pre-set temperatureof 70*F.
lHum idifier setting: Press theHUMIDIFIER button to turn on/off thehumidifier. Press thehumidifier
button onceand theunit willbegin to producehumidityuntilthewater is used up. Then, theLCD will
show ”ADD WATER.” Press twiceand thehumidifier willturn off. SEE “HOW TO FILL HUMIDIFIER
W ATER TANK” BELOW FOR FURTHER INSTRUCTIONS.

lDelay Tim er setting.
Press this button to set the desired number of hours, and the unit willstop heating and willnot start
heating again untilthat amount of time has elapsed. For example, set the DelayTimer for 8 hours
before you go to be at 10:00 pm, and the unit willturn on at 6:00 am. You can set the delaytimer
number from 1-23hours. To turn off theDelayTimer, press thebutton twiceand theunit willreturn to
normalheatingmode.
lFan adjust
PressingFAN button turns fan from HIGH to LOW. Pressingagain turns fan from LOW to HIGH
lTurn offtheheater: Press thepower button to turn off allfunctions. Thefan willcontinueto run until
allof theheat has been expelled and willthen turn off. The COOLING DOWN indicator willshow on
theLCD displayto indicatethat theheater is cooling down.
How to Refillthe Hum idifier W ater Tank
TheHumidifier Water Tankis located on topof theunit. To fillthetank, simplyremovethetank, unscrew
thecap, and fillit with water (werecommend distilled water). Replacethecapand carefullyplacethetank
backin theunit untilit seats on thebaseof theHumidifier.
1 Removethewater tankcover 2. Takeout thewater tank

3. Unscrew thecap 4. Add distilled water and replacetank
How to Clean theHum idifier
DO NOT USE VINEGAR TO CLEAN THIS HUMIDIFIER. If youarenot goingto usethehumidifier for an
extended period of time(duringwarm weather), drain allwater out of thebottleand chamber and dryit out
as much as possible using a soft towel. Do not attempt to run humidifier without water as this will
damagetheunit and nullifythewarranty.
How to Clean theAir Purifier Filter
Your Concept R4 heater comes with a PCO (Photo-Catalytic Oxidation) air purifier that combines
high-intensityUV light with superior activated carbon honeycomb filter technology
Thelifetimewashableair filter needs to becleaned on a regular basis to ensuremaximum performanceof
theair purifier and of theheater itself. To clean theAir Purifier, follow thesesimplesteps:
1. Removethefilter byopeningthefilter cover on thebackof theheater and carefullypullingthefilter
out.

2. Clean thefilter byvacuumingit with an attachment, or run warm water over it to removedust. Run
thewater in theoppositedirection of theair flow untilthewater runs clear.
3. Thefilter might excretesomefiltered residue, so becautious not to dripon anystainablesurfaces
such as carpeting. Youcan also soakthefilter in water mixed with a smallamount of mild dish soap
(don't forget to rinsewith water after soakingthefilter).
4. Shakethefilter over a sinkuntilexcess water is removed and allow it to dripdrycompletelybefore
reinstalling
5. DO NOT forcethefilter to dryusinganyalternativemethods
6. Reinstallthefilter to therear of theunit bypositioningthefilter backin place
lEnsurethat theheater is turned off (theswitch on thebackof theunit should bein the off
position. Unplugthepower cord from thewalloutlet beforecleaning.
lCarefullywipetheexterior of theheater with a soft, damp(not wet) cloth and drythoroughlywith
a soft, drycloth.
lOver timedust mayaccumulateon thefront vent of theheater. This can beremoved bywiping
with a dampcloth, or carefullycleaningusinga vacuum cleaner with brush attachment.
lDo notuse harsh or abrasivecleanersto clean your heater, as thesewilldamage thesurface.
lClean thefilter every30 days or as needed.
lDo not run humidifier without water –this willvoid thewarranty.
lWhen filter is visiblydirty, simplyremovethefilter from theunit, and with a hand-held vacuum,
removetheheavyparticulate.
W ARNING TO USER
Anyother serviceshould beperformed bya certified electrician specialist or byauthorized service
representative!
Themanufacturer shallnot be liablein theevent of non-observanceof theaboveinstructions!
Caution!!–disconnectpower cord beforeservicing

PERFORMANCE SUGGESTIONS
To assuremaximum performanceof theheater, pleasenotethefollowing recommendations:
1) For best result, do not locatetheheater in an area with a high rateof air filtration and movement as the
warm air willbeexhausted.
2) Tryplacingtheheater near a warmer insidewalland direct theoutput towards a cooler outsidewall.
Thecooler outsidewallwilltend to draw thegenerated heat towards itself, which willallow for more
efficient heating.
3) Placingtheheater next to a cold air return willdraw theheat awayfrom area to beheated. Tryclosing
or coveringthecold air return. This willallow for moreefficient heating. Experiment with theplacement of
theheater to seewhat works best for you.
4) To ensuremaximum efficiency, a 40% (minimum) relativehumidityshould bemaintained in theheated
environment.
5) Theheater is designed to operatefor maximum efficiencyupto 80-82 degreerange. Dueto thesoft
heat concept, temperatures at 68degrees feelas though it were72 degrees. This is dueto theheat
mixingwith humidityevenlyfor “head-to-toe” comfort.
6) When theheater is placed in an isolated area, i.e. basement or recreation area, thedeliveryregisters
and air return grills of theexistingsystem should beclosed in that area if possible.
7) Tryplacingtheheater a few feet abovethefloor in rooms with largeareas of bareconcrete. Makesure
theheater is secureand won't fall. This willallow for moreefficient heatingsinceconcrete acts as a heat
sinkand willtend to draw theheat in its direction.
8) Tryloweringyour centralheatingsystem to a lower temperatureand placingtheheater in thearea you
spend themajorityof your time. Now set theheater to your comfort level. This willhelpreduceyour
overallenergyconsumption.
9) When heatinglarger areas, placetheheater in a centrallocation. If a ceilingfan is nearby, tryusingit at
thesametimeto helpdistributetheheat evenly.
10) If used in an extremelydirtyor dustyarea, thefilter must becleaned morefrequentlyas thefilter can
clogand causetheheater to stopworking. Pleaserefer to “How to Clean the Air Purifier Filter” in this
manualfor cleaninginstructions.
11) Theheater grillis hot when in use. To avoid burns, do not let bareskin touch thehot surface. Keep
combustiblematerials, such as furniture, pillows, bedding, papers, clothes, and curtains at least threefeet
from thefront of theheater and keepthem awayfrom thesides and rear.
12) Extremecaution is necessarywhen anyheater is used byor near children or invalids and whenever

theheater is left operatingand unattended.
13) To disconnect heater, turn controls to off, then removeplugfrom outlet. Always unplugheater when
not in use.
QUESTIONS AND ANSW ERS
W hydoestheblower fan notworkafter I haveturned on theheater power button?
Theblower fan willnot workuntiltheheatingelement is hot enough to heat theair passingby. It will
normallyturn on after about 10 seconds.
W hydoestheblower fan keep running after I haveturned offthe power button?
Theblower fan willcontinueto run untiltheproprietaryheat chambers havecooled down. After a few
minutes thefan willshut off automatically.
Theheater'sairflow seem sto have dim inished?
Makesuretherear intakeis not blocked and that thefilter is clean. Follow thefilter maintenance
procedureto clean thefilter.
OnceI initiallyplug theunitin and turn iton,how long willittaketo heatm yroom ?
Generally, it takes less than an hour. Pleaseremember that with anytypeof heatingprocess thereare
manyvariables: sizeof theroom, how welltheroom is insulated, how manydoors/windows, how much
bareconcrete(which acts as a heat sinkwith anytypeof heating), the openingand closingof an exterior
door, and theoutsidetemperatureetc.
Can I use the heater to heatm ultiple room satthesam e tim e?
Yes. Keepin mind theheatingwillvarybased on how open your floor plan is and thesizes of therooms
involved. In somecases, runninga ceilingfan willhelpin heating multiplerooms simultaneouslyby
placingtheunit in a centralroom.
Myhom e isnotinsulated verywell,willthis heater help m e?
Yes, but it willtakea little longer to heat theroom initiallyand theoutside temperaturewillalso havean
impact on heatingtime. Oncetheroom has reached thedesired temperatureit willcycleon and off
accordingly.
Can theheater beused in a bathroom ?
It is not recommended dueto thehigh levelof moisturein a bathroom.
W illI be able to use theheater in a basem entor garage?
Yes, but keepin mind that rooms with littleinsulation willnot retain theheat as efficiently. Bareconcrete
floors which act as a heat sinkwith anytypeof heatingwillabsorb some of theheat. Placingtheheater a
few feet abovethefloor willallow for moreefficient heating.

Can I use m orethan one heater ata tim e?
Yes, but youshould makesuretheyarenot on thesamecircuit. Each heater and applianceshould beon
its own circuit.
Can I usetheheater on a job/construction site?
Theheater was not designed to beused in a high dust construction environment. Usingtheheater for this
purposewillvoid your warranty.
Can I m ove the heater around while itis operating?
It is not recommended to moveanyportableheater whileit is operating. Werecommend movingthe
heater onlyoncethefan has completelyturned off.
W hatiszoneheating?
Zoneheatingis about focusingheat wherepeoplespend themost time. After all, thereis no point to
heating multiple rooms to 68+ degrees when not in use.
Can I use the heater and another appliance atthe sam etim e?
Yes, as longas theyarenot on thesamecircuit. Zoneheaters areconsidered to bean appliance. You
should not run morethan onelarge applianceon a singlecircuit breaker. Your freezer, refrigerator,
microwaveoven, washingmachine, dryer, and other such appliances should not sharea circuit breaker.
Can I use an extension cord,surgeprotector,or power strip with m yheater?
It is not recommended. It is designed to plugdirectlyinto a grounded 120 volt 15 ampor higher circuit
receptacle. However, if youhaveto usean extension cord, thecord should beNo. 14 AWG minimum size
and rated not less than 2000 watts. Theextension cord should bea 3wire cord with a groundingtype
cord and plugconnector.
I don'thavea grounded outlet; can I use a cord adaptor or rem ove thegrounding plug?
NO. If youdon't havea grounded outlet, contact a licensed electrician in your area for advice. Removing
or alteringanypart of theheater is unsafeand also willvoid thewarranty.

Am erican Com fortW orldwide
Lim ited W arranty&
Lim ited Lifetim eW arrantyon PTC Heating Elem entOnly
Am er ican Co m f o r t W o r ld w id e LLC (“ACW ”)w ar r an t s t his Red Co r e™po r t able r o o m heat er t o t he o r igin al r et ai l pur chaser
(“Pur chaser ”),f o r o n e year f r o m t he d at e o f pur chase ,again st d ef ect sin m at e rial an d w o r km an shi p un d e r n o r m al use an d
ser vice. ACW f ur t h er w ar r an t s t h e f o llo w in g co m po n en t s:
1. f an , f o r t h r ee (3) year s f r o m d at e o f pur ch ase;
2. quar t zh eat in g elem en t (if in co r po r at ed in pr o d uc t ) f o r t h r ee (3) year s f r o m d at e o f pur ch ase;
3. PTC cer am ic h eat in g elem en t (if in co r po r at ed in pro d uct ) f o r lif et im e o f pr o d uct .
Sho uld yo ur Red Co r e ™r o o m he at er pro ve d ef ect ive w i t hin o n e year f r o m t h e d at e o f pur ch ase, please f o llo w o ur r et ur n
pr o ced ure t o r et ur n t h e d ef ect ive un it . Wit h in t h e f ir st 30 d ays, ACW is r espo n sib le f o r t h e f r eigh t co st t o an d f r om o ur
aut h o r ized ser vice cen t er f o r allun it s w it h an ACW aut h o r ized RM A. Af t er 30 d ays an d up t o lif e o f w ar r an t y, t h e cust o m er
is r espo n sib le f o r f r eigh t co st s t o an d f r o m o ur aut h o r ized ser vice cen t er .
Un d er n o cir cum st an ces ar e pro d uct s d am aged in sh ippin g co ver ed un d er t h is w ar r an t y.
ACW ’sso le o b ligat io n un d er t h is w ar r an t y is t o r eplace, o r at ACW ’sd iscr et io n , t o r epair , f r ee o f ch ar ge, alld ef ect ive par t s
acco r d in g t o t h e t im elin e d escr ib ed ab o ve. Allr eplacem en t par t s an d un it s w illb e n ew , r em an uf act ured , o r r ef ur b ish ed .
ANY IM PLIED WARRANTY OF M ERCHANTABILITY IS SIM ILARLY LIM ITED TO ONE (1) YEAR FROM DATE OF ORIGINAL PURCHASE AND NO
ACTION BASED UPON ANY IM PLIED WARRANTY OF M ERCHANTABILITY OR OTHERWISE MAY BE COM M ENCED AFTER EXPIRATION OF
ONE (1) YEAR FROM DATE OF ORIGINAL RETAIL PURCHASE. So m e st at es d o n o t allo w lim it at io n s o n h o w lo n g an im plied
w ar r an t y last s, so t h e ab o ve lim it at io n m ay n o t apply t o yo u.
Th e pr o visio n s o f t h is w ar r an t y sh alln o t apply t o an y pr o d uct w h ich in ACW’sjud gm en t hasbeen (1)subject t o m isuse o r
n eglect . (2) d am aged in an accid en t o r in sh ippin g, (3) used f o r a purpo se f o r w h ich it w as n o t d esign ed , o r (4) r epair ed o r
alt er ed in an y w ay t h at ad ver sely af f ect ed it s per f o r m an ce o r r eliab ilit y. Do not attem ptto “open unit”,exceptfor filter
servicing and/or hum idifier tankrefilling. Opening unitwillvoid m anufacturer’s warranty.
THIS W ARRANTY DOES NOT COVER:
·Dam age, accid en t alo r o t h er w ise, t o t h e un it w h ile in t h e po ssessio n o f t h e co n sum er n o t caused b y a d ef ect in
m at er ialo r w o r km an sh ip.
·Dam age caused b y co n sum er m isuse, t am per in g, o r f ailur e t o f o llo w t h e car e an d specialh an d lin g pr o visio n s in t h e
in st r uct io n s.
·Dam age t o t h e f in ish o f t h e case, o r o t h er appear an ce par t s caused b y t h e w ear .
·Dam age caused b y r epair s o r alt er at io n s o f t h e un it b y an yo n e o t h er t h an t h o se aut h o r ized b y ACW.
·Fr eigh t an d In sur an ce co st f o r t h e w ar r an t y ser vice b eyo n d 30 d ays f r o m d at e o f pur ch ase up t o lif e o f w ar ran t y.
Th is w ar r an t y co ver s o n ly n ew pr o d uct s purch ased f r o m o ur aut h o r ized d ealer s o r r et ailer s. It d o es n o t co ver used ,
salvaged , o r r ef ur b ish ed pro d uct s.
To o b t ain w ar ran t y ser vice, t h e d ef ect ive pr o d uct o r par t m ust b e sh ipped o r d eliver ed t o : Am er ican Co m f o r t Wo r ld w id e.
Ifwarranty appliesunder ACW ’sapproved term s,allshipping charges and insuranceare covered bypurchaser.
AM ERICAN COM FORT WORLDWIDE LLC NEITHER ASSUM ES NOR AUTHORIZES ANY PERSON TO ASSUM E FOR IT ANY OTHER LIABILITY IN
CONNECTION WITH ITS PRODUCTS. THERE ARE NO WARRANTIES WHICH EXTEND BEYOND THE DESCRIPTION ON THE FACE HEREOF. NO
RESPONSIBILITY IS ASSUM ED FOR INCIDENTAL OR CONSEQUENTIAL DAM AGES THAT M AY RESULT FROM THE USE OF An ACW PRODUCT,
NOR FOR THE DAM AGES DUE TO ACCIDENT, ABUSE, LACK OF RESPONSIBLE CARE, THE AFFIXING OF ANY UNAUTHORIZED
ATTACHM ENT, LOSS OF PARTS, OR USE AT A VOLTAGE OTHER THAN SPECIFIED. So m e st at es d o n o t allo w t h e exclusio n o f
lim it at io n o f in cid en t alo r co n sequen t iald am ages, so t h ese lim it at io n s m ay n o t apply t o yo u. ACW d isclaim s allliab ilit ies f o r
d ef ect s o r d am ages caused b y use o f r eplacem en t par t s o b t ain ed f r o m o r b y ser vice at an y ser vice cen t er o t h er t h an ACW.
Th is w ar r an t y gives yo u specif ic legalr igh t s, an d yo u m ay also h ave o t h er righ t s w hich var yf r o m st at e t o st at e.
QUESTIONS? Call1- 877-305-5519 or visit www.redcore.com

For Serviceand Support Questions, pleasecontact:
American Comfort WorldwideLLC
Moonachie, NJ07074 USA
www.redcore.com
877-305-5519
Other manuals for CONCEPT R-4
2
Table of contents
Other RedCore Heater manuals
Popular Heater manuals by other brands

MONDEX
MONDEX Tahko 6.6 Installation and operating instructions

Tylo
Tylo H2 Installation and operating instructions

Sawo
Sawo ARIES ARI3-45Ni2-CNR manual

HeatStar
HeatStar HSU50NG Operating instructions and owner's manual

Creda
Creda 75773301 installation instructions

Mr. Coffee
Mr. Coffee BVMC-TM33 user manual