RedPort wXa-122 User manual

Copyright © Global Marine Networks, LLC
OptimizerUser’sGuide
RedPort Router - wXa-122

Copyright © Global Marine Networks, LLC
Table of Contents
1.0 About this guide . . . . . . . . 04
2.0 Introduction to RedPort Optimizer . . . . . 05
3.0 Getting Started - Router Administration . . . . 06
4.0 RedPort Halo WiFi Extender . . . . . . 08
5.0 GPS Tracking . . . . . . . . 13
6.0 GPS/NMEA Repeater . . . . . . . 15
7.0 Signal Monitor . . . . . . . 23
8.0 GSM . . . . . . . . . . 24
9.0 Restrict Wireless Network Access. . . . . . 29
10.0 Rename the Wireless Network. . . . . . . 31
11.0 Change Admin Password . . . . . . . 33
12.0 Update Firmware . . . . . . . . 35
13.0 Access System Log . . . . . . . . 37
14.0 Reboot . . . . . . . . . 38
15.0 System Status for Monitoring Usage . . . . . 40
16.0 Profiles . . . . . . . . . 41
17.0 Firewall Modification . . . . . . . 43
Appendix A - Optimizer Quick Start Guide. . . . . . 46
Appendix B - Halo WiFi Extender Quick Start Guide . . . . 48

Optimizer User’s Guide Copyright © Global Marine Networks, LLC Page 3of 45
Optimizer User’s Guide Revision History
Date
Revision
Author
December 15, 2014
Initial Release
D. Brickhouse
March 19, 2015
Version 2.0
D. Brickhouse

Optimizer User’s Guide Copyright © Global Marine Networks, LLC Page 4of 45
1.0 About this guide
This guide is intended for onboard/onsite administrators of the RedPort Optimizer wXa-
112 routers. It features only those sections of the user interface that require
configuration for a specific service or may need to be accessed by the average user.
For convenience, the Optimizer Quick Start Guide can be found in Appendix A of this
document. It includes important information regarding the physical connection setup and
initial configuration for email.
The following chapter references will help you in administering the most-used features
of the Optimizer.
Chapter 3.0 Getting Started
Chapter 4.0 Halo WiFi Extender
Chapter 5.0 GPS Tracking Service
Chapter 6.0 GPS/NMEA Repeater Settings
Chapter 7.0 Signal Monitor (how to change/disable)
Chapter 9.0 Restrict Wireless Network Access with password protection
Chapter 10.0 Rename the Wireless Hotspot Network
Chapter 11.0 Change the Router Admin Password
Chapter 12.0 Update Firmware
Chapter 13.0 Access Optimizer System Log
Chapter 14.0 Reboot the Router
Other useful information can be found in the following chapters:
Chapter 8.0 GSM Capability
Chapter 15.0 System Status for Monitoring Usage
Chapter 16.0 Profiles
Chapter 17.0 Firewall Modification
wXa refers to the webXaccelerator by RedPort, a trademark of Global Marine Networks, LLC.

Optimizer User’s Guide Copyright © Global Marine Networks, LLC Page 5of 45
2.0 Introduction to RedPort Optimizer
Global Marine Networks (GMN), the leaders in advancing satellite data speeds and
services, helps Fixed and Mobile Satellite Services providers and their customers by
offering the industry’s fastest, most reliable and easy-to-use email, web, VoIP and other
hardware and software services to maritime, oil and gas, first responder and business
continuity users. The company’s products include XGate high-speed satellite email,
WeatherNet weather and oceanographic data software, and vessel tracking systems.
Ship to shore network management solutions are sold by GMN under the RedPort
Global brand name at www.redportglobal.com and as white-label solutions for the
world’s premier satellite data service service providers.
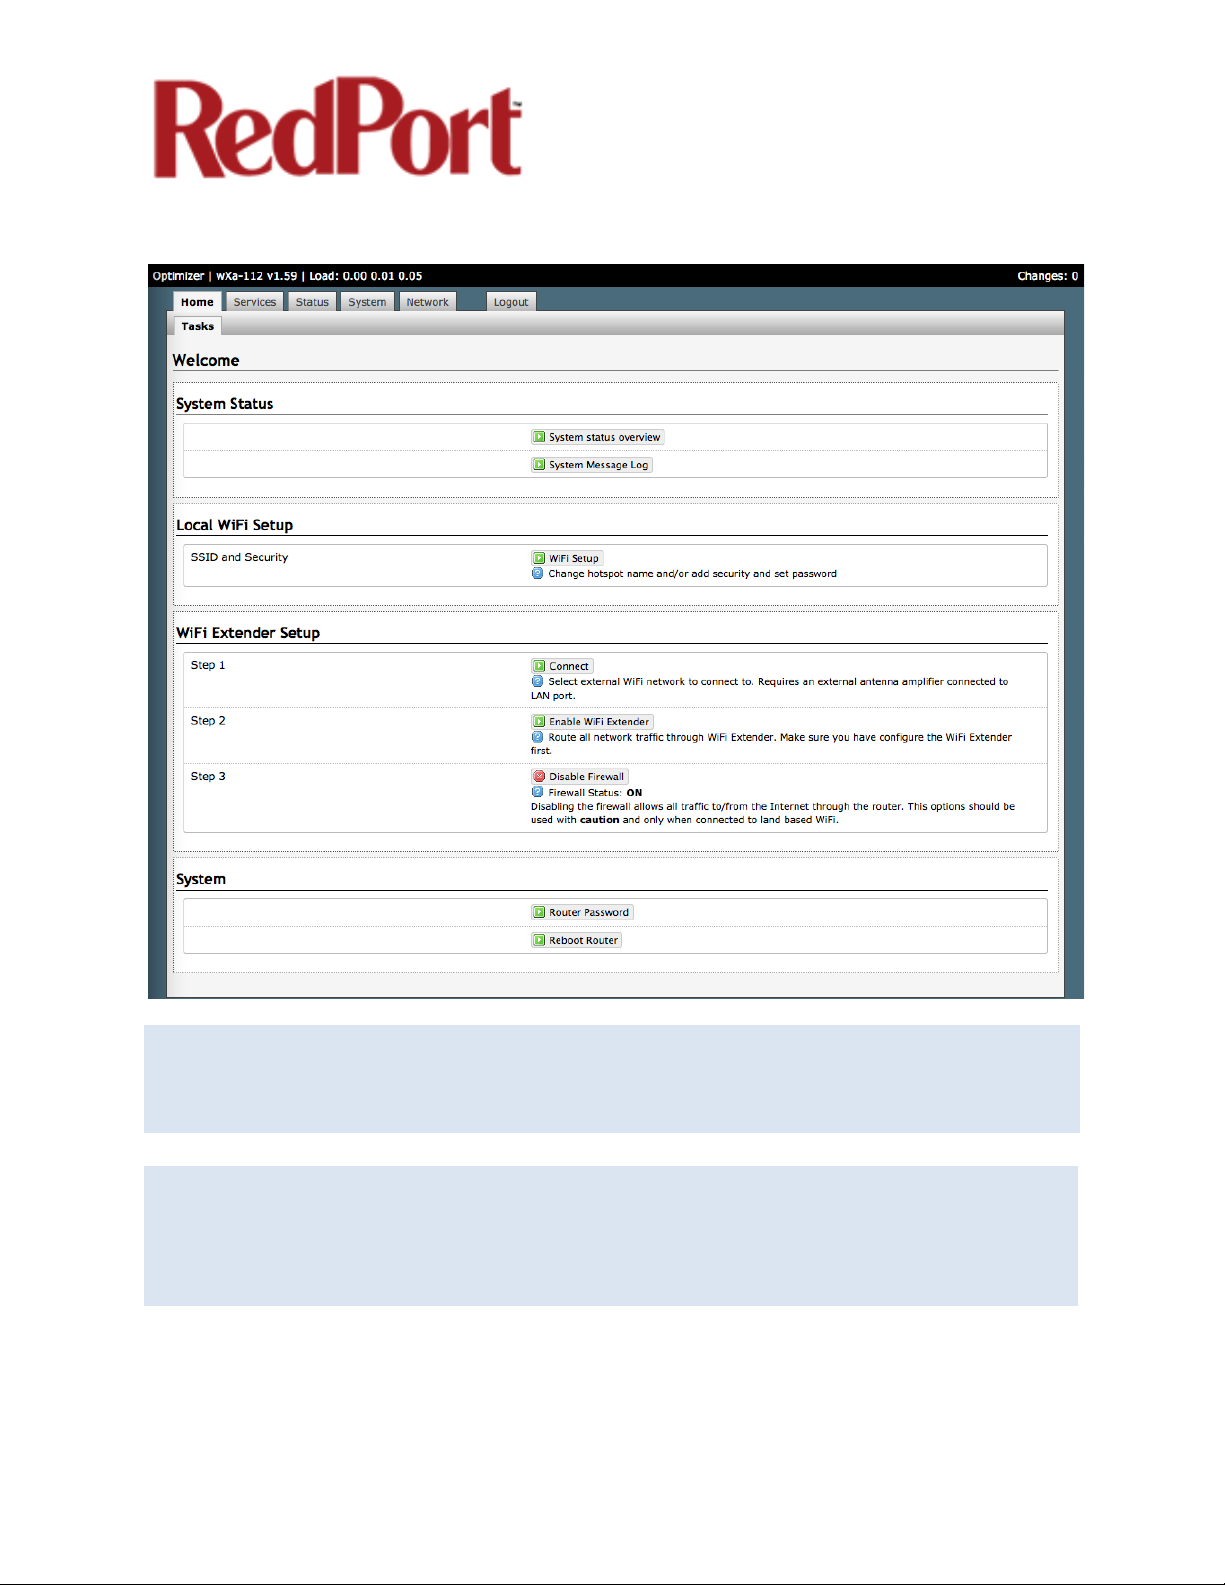
Optimizer is a satellite firewall and WiFi hotspot router that lets you easily access
accelerated satellite email, weather, web and tracking services, while blocking all
unwanted data traffic.
Email, Web, Weather and Tracking features require compatible service subscriptions.
Key Features
Designed specifically for use with satellite phones and terminals:
•Compatible with any IP-based satellite phone and satellite broadband terminal.
•Powerful firewall stops all unwanted data traffic. Optimizer blocks all traffic except
XGate-compressed email, web and weather data.
•WiFi signal makes setup and use with compatible computers and tablets easy.
•Works with XGate for email, web, weather and social media services.
•GSM support to switch between satellite and GSM when available.
•Track GPS locations from compatible GPS-enabled devices.
•Compatible with optional RedPort Halo WiFi Extender for access to external WiFi
networks, when available.
NOTE: The Optimizer ships pre-configured for use with XGate satellite email/data
service. XGate service and Tracking service are not included with the Optimizer and
must be purchased separately. Contact your satellite service provider for details.

Optimizer User’s Guide Copyright © Global Marine Networks, LLC Page 6of 45
3.0 Getting Started – Router Administration
As the onboard/onsite administrator, under normal operating conditions, you will seldom
have a need to interact with the user interface of the router. However, should you find
yourself in a position that requires you to login to the router, this Guide is designed to
help you.
Access the Optimizer User Interface
To access the Optimizer's user interface you must login to the router:
1. With power provided to the Optimizer, connect to the WiFi Hotspot created by the
router using a desktop or laptop computer. Connect to the WiFi Hotspot just like you
would any other WiFi connection:
On a Windows PC, go to: Windows Start > Control Panel > Network Connections
On a MAC, go to: Apple > System Preferences > Network
The Network Name will look something like: ‘wxa-112-XXXX’ where ‘XXXX’ may
represent the last four digits of the Optimizer Mac address. Select this wireless network.
2. Open any web browser on the computer and enter the URL: http://192.168.10.1
3. Login with the username = superadmin, password = webxaccess
This login gives you full access to the user interface. If you do not require full
access, there is an alternate login that provides limited access, restricted to use
of the optional RedPort Halo WiFi Extender. Alternate login: username = admin,
password = webxaccess
CAUTION: The Optimizer ships pre-configured for use with XGate satellite
email/data service and the optional RedPort Halo WiFi Extender. Tampering with any
settings that are not addressed in this Guide will violate the warranty and may render
the Optimizer inoperable.

Optimizer User’s Guide Copyright © Global Marine Networks, LLC Page 7of 45
Once logged in, you will see the Optimizer's Home screen.
Use the tabs to navigate through the user interface. You will see that the information
represented in the user interface can be quite technical. This Guide will cover only those
sections of the user interface that require configuration for a specific service or may
need to be accessed by the average user.
NOTE: An alternate method to access the user interface: With power to the
Optimizer, physically connect the Optimizer to your computer using a standard
ethernet cable in the Optimizer's LAN port and follow the directions above, starting
with Step 2, entering the URL http:192.168.10.1
NOTE: The WiFi Extender Setup section only displays when the optional RedPort
Halo WiFi Extender is physically connected to the Optimizer and powered ON.

Optimizer User’s Guide Copyright © Global Marine Networks, LLC Page 8of 45
4.0 Halo WiFi Extender
The Halo long-range WiFi extender system takes a weak WiFi signal – at a marina, for
example, or truck stop, basecamp, etc – and amplifies that signal and routes it through
the RedPort Optimizer WiFi hotspot. It has a marine enclosure designed for outside
installation. Install the WiFi Extender almost anywhere outside.
For your convenience, the Halo WiFi Extender Quick Start Guide can be found in
Appendix B of this document. It includes important information regarding the physical
connection setup.
4.1 Configure Connection to the Halo
With the Halo powered ON and connected to the Optimizer. Login to the Optimizer
router with either username = admin or with username = superadmin (see Section 3.0
Getting Started for details).
Configuration requires two steps to connect:
4.1.1 Step 1. Connect to the External WiFi Network
Select <Connect> button
CAUTION: Attach the antenna to the Halo body BEFORE powering the unit.
Powering the Halo without the antenna attached will damage the unit and may
render it inoperable.

Optimizer User’s Guide Copyright © Global Marine Networks, LLC Page 9of 45
Select <Scan> to see what wireless networks may be available.
Select the wireless network you want to connect to and press <Join Network>
Enter the password to access the external wireless network, if required. Select
<Submit>.
Notice the signal strength is 0% as you are not yet connected to the wireless network.
Select <Save & Apply> to tell the Halo to connect to that network.

Optimizer User’s Guide Copyright © Global Marine Networks, LLC Page 10 of 45
Notice that now the signal strength now registers greater than 0%.
Select the <Home> Tab to return to the Welcome screen.
4.1.2 Step 2. Route Network Traffic through the Halo
Select <Enable WiFi Extender>
NOTE: If the signal status is blinking from 0% to 100% this typically means that
the WiFi Network Password/Key was entered incorrectly. Check with the external
WiFi Network Administrator to confirm the correct password. Select the Wireless
Security tab and enter the correct password in the Key field and <Save & Apply>.

Optimizer User’s Guide Copyright © Global Marine Networks, LLC Page 11 of 45
All traffic is now routed through the WiFi Extender. You can run XGate and XWeb.
To return to routing traffic through your satellite device, simply select <Disable WiFi
Extender>.
4.1.3 Step 3. Manage the Firewall (optional)
By default, the firewall is ENABLED. This means that ALL traffic from your computer is
blocked from the internet with the exception of XGate and XWeb traffic. This setting is
recommended when using the Halo in areas where there may be many users
competing for the wireless network bandwidth thereby causing slow and painful internet
connections.
If you want to sync some applications or perform some other function that is currently
being blocked, i.e. streaming video, you must Disable the Firewall.
To Disable the firewall:
Select <Disable Firewall>

Optimizer User’s Guide Copyright © Global Marine Networks, LLC Page 12 of 45
Your computer now has full access to the internet for syncing applications, browsing,
etc.
To turn the Firewall back on, select <Enable Firewall>
4.2 Disconnect from the Halo
To disconnect from the Halo select <Disable WiFi Extender>
Notice that the Firewall is turned back on automatically to protect you from runaway
airtime charges.
CAUTION: It is important to <Disable WiFi Extender> when the external WiFi network
is no longer available and you want to use your satellite device. Failure to Disable will
prevent a successful satellite connection as the Optimizer continues to look for the
external WiFi network.
NOTE: An alternate method of disconnecting from the Halo is to cycle power to
Optimizer or Reboot the Optimizer. This will also restore the Firewall Status to ON.

Optimizer User’s Guide Copyright © Global Marine Networks, LLC Page 13 of 45
5.0 GPS Tracking
If you wish to have tracking service using your satellite device, the Optimizer offers GPS
Tracking service powered by GSatTrack or Tracking service via SMS message.
5.1 Tracking powered by GSatTrack
Using a GPS-enabled satellite device, the Optimizer can be configured to submit
position reports to a central database for viewing on the tracking website.
To enable this service, select Services > GPS Tracking > Tracking.
This tracking service must be purchased separately. See your satellite service
provider for details.

Optimizer User’s Guide Copyright © Global Marine Networks, LLC Page 14 of 45
Step 1. Enter the Tracking Interval in minutes; the default is set to hourly reporting (60
minutes). This means that every 60 minutes a position report will be transmitted over
your satellite link. Keep in mind that standard airtime charges will apply to each postition
report. Adjust the Tracking Interval to meet your needs.
Step 2. Select the satellite terminal you are using. Note: a valid NMEA/GPS feed is
required when using some satellite devices.
Step 3. Select <Save & Apply>.
5.2 Tracking viaSMS
If using certain satellite devices, GPS information can be sent to an email address using
your satellite provider's SMS service. Standard SMS charges may apply; check with
your satellite airtime provider for details.

Optimizer User’s Guide Copyright © Global Marine Networks, LLC Page 15 of 45
Step 1. Enter the Tracking Interval in minutes; the default is set to hourly reporting (60
minutes). This means that every 60 minutes a position report will be transmitted via the
SMS service provided by your satellite provider network. Keep in mind that standard
SMS charges may apply to each postition report. Adjust the Tracking Interval to meet
your needs.
Step 2. Select which satellite device you are using. At this time, tracking via SMS is
available with the Inmarsat IsatPhone, Iridium handheld 9575 Extreme, Iridium GO! or
an Iridium terminal such as the Pilot. Note: a valid NMEA/GPS feed is required when
using an Iridium terminal.
Step 3. Enter the recipient's email address. The SMS message with the GPS
information will be sent to this email address at the interval entered in Step 1.
Step 4. Select <Save & Apply>.

Optimizer User’s Guide Copyright © Global Marine Networks, LLC Page 16 of 45
6.0 GPS/NMEA Repeater
The Optimizer supports USB and RS-232 NMEA devices allowing multiple applications
to share the GPS/NMEA data. If you have a NMEA RS-422 device, adding a RS-422 to
RS-232 converter to your setup may allow the sharing of data.
The Optimizer does not transmit data but can be configured to receive and repeat
GPS/NMEA data from:
•A broadband satellite terminal with integrated GPS when connected to the
Optimizer via a standard ethernet connection. (As of this writing, supported
terminals include: Iridium Pilot, Inmarsat FBB and Inmarsat BGAN).
•A handheld satellite phone with integrated GPS when connected to the Optimizer
with the satphone's USB-Mini/Micro USB cable. (As of this writing, supported
handheld satphones include: Iridium 9575 Extreme and Inmarsat IsatPhonePro.)
•A USB connected GPS or NMEA device.
•A serial port connected GPS or NMEA device
WARNING: IsatPhonePro users! The phone only transmits GPS coordinates
about every 10 minutes. It is NOT recommended for navigation or any
application that requires real time data.
NOTE: If you are using a satellite phone with a serial port (RS-232) that transmits
GPS data (i.e. some fixed phones and fleet phones), it is NOT compatible with the
Optimizer. In order to repeat GPS data, a separate GPS device must be
connected.

Optimizer User’s Guide Copyright © Global Marine Networks, LLC Page 17 of 45
6.1 Equipment Setup
A physical connection is required from the source (satellite terminal or satellite phone
that transmits GPS coordinates, or other GPS/NMEA device) to the Optimizer.
6.1.1 Broadband Satellite Terminal with Integrated GPS
When using a supported broadband satellite terminal with integrated GPS, connect the
terminal to the Optimizer SAT port using a standard ethernet cable.
(OPTIONAL: Use a second ethernet cable to connect the computer with the destination
software, like a navigation program, to the Optimizer LAN port.)
The Optimizer will broadcast the GPS signal both over Ethernet and WiFi, so you can
connect your computer either way in order to establish a successful connection with
your destination software.

Optimizer User’s Guide Copyright © Global Marine Networks, LLC Page 18 of 45
6.1.2 Handheld Satellite Phone with Integrated GPS
When using a supported USB connected satphone with integrated GPS, connect the
satphone to the Optimizer using the Mini-USB (satphone) to USB (Optimizer) cable.
(OPTIONAL: Use an ethernet cable to connect the computer with the destination
software, like a navigation program, to the Optimizer LAN port.)
The Optimizer will broadcast the GPS signal both over Ethernet and WiFi, so you can
connect your computer either way in order to establish a successful connection with
your destination software.

Optimizer User’s Guide Copyright © Global Marine Networks, LLC Page 19 of 45
6.1.3 USB NMEA Device
When using a NMEA device that supports a USB connection, connect the GPS/NMEA
device to the Optimizer with an appropriate USB to NMEA device cable as indicated by
the NMEA device manufacturer.
(OPTIONAL: Use an ethernet cable to connect the computer with the destination
software, like a navigation program, to the Optimizer LAN port.)
The Optimizer will broadcast the GPS signal both over Ethernet and WiFi, so you can
connect your computer either way in order to establish a successful connection with
your destination software.
NOTE: If your satellite device requires a USB connection to the Optimizer (for example, an
Iridium 9555) you can use a 2-port USB hub (either 1.0 or 2.0) plugged into the Optimizer's
USB port to accommodate two USB devices.

Optimizer User’s Guide Copyright © Global Marine Networks, LLC Page 20 of 45
6.1.4 RS-232 NMEA Device
With Serial Port Connector
When using a NMEA device with Serial Port connection, a USB to Serial Adapter
(PL-2303HX) is required to connect the device to the Optimizer.
The Optimizer will broadcast the GPS signal both over Ethernet and WiFi, so you
can connect your computer either way in order to establish a successful
connection with your destination software.
CAUTION: The PL-2303HX is the only USB to Serial Adapter that is
compatible with the Optimizer.
NOTE: If your satellite device requires a USB connection to the Optimizer (for example, an
Iridium 9555) you can use a 2-port USB hub (either 1.0 or 2.0) plugged into the Optimizer's
USB port to accommodate two USB devices.
Table of contents
Other RedPort Network Router manuals