Redsun PF2100 User manual

1
REDSUN PF2100 PLL RADIO
OPERATING MANUAL
TRANSLATED BY LIYPN – © ALL RIGHTS RESERVED – JUNE 2006
(We are the copyright holder of this manual in English. Please do NOT
distribute this manual in any form nor post this manual on any web sites
or radio groups without our written consent, e-mail:
Thank you for your cooperation.)
INDEX Page
A. ILLUSTRATIONS 3
B. POWER SUPPLY
1. USING BATTERY 6
2. USING EXTERNAL AC POWER 6
3. USING EXTERNAL DC SUPPLY (optional accessory) 6
C. BASIC OPERATION
1. TURNING ON THE RADIO 7
2. SELECTING THE FM BAND 7
3. SELECTING AM BANDS 7
4. SEARCHING & SAVING RADIO STATIONS TO MEMORIES 8
D. SPECIAL FUNCTIONS
1. MW and SW Gain Control 9
2. DX / LOCAL Switch 9
3. AUDIO LINE OUT 9
E. ANTENNA
1. LISTENING TO FM 10
2. LISTENING TO SHORTWAVE 11

2
3. LISTENING TO MEDIUM WAVE 11
4. EXTERNAL ANTENNA FOR FM / SW 11
5. EXTERNAL ANTENNA FOR MW 11
6. AM IF OUT 12
F. TIMER FUNCTIONS
1. SETTING THE TIMERS 12
2. USING THE TIMERS 12
3. USING THE SNOOZE FUNCTION 13
4. ADJUSTING THE SLEEP TIME 13
G. SETTING THE CLOCK
1. SELECTING LOCAL / WORLD TIME 14
2. SETTING LOCAL TIME 14
3. SETTING WORLD TIME 14
4. 12 / 24 HOUR MODE 14
5. DISPLAYING THE TIMERS 15
6. SETTING THE TIMERS 15
H. OTHER FUNCTIONS
1. BACKLIGHT FOR LCD PANEL 15
2. BACKLIGHTS FOR BUTTONS 16
3. RE-CHARGING BATTERIES 16
4. CHANGING MW STEPS 16
5. USING THE RE-SET FUNCTION 16
I. SPECIAL NOTES
1. WIDE / NARROW BANDS SELECTION FOR AM 17
2. MW / SW RF GAIN 17
3. RE-CHARGING BATTERIES 17
4. FM MONO OR FM STEREO 17
SPECIFICATIONS 18

3
A. ILLUSTRATIONS

4
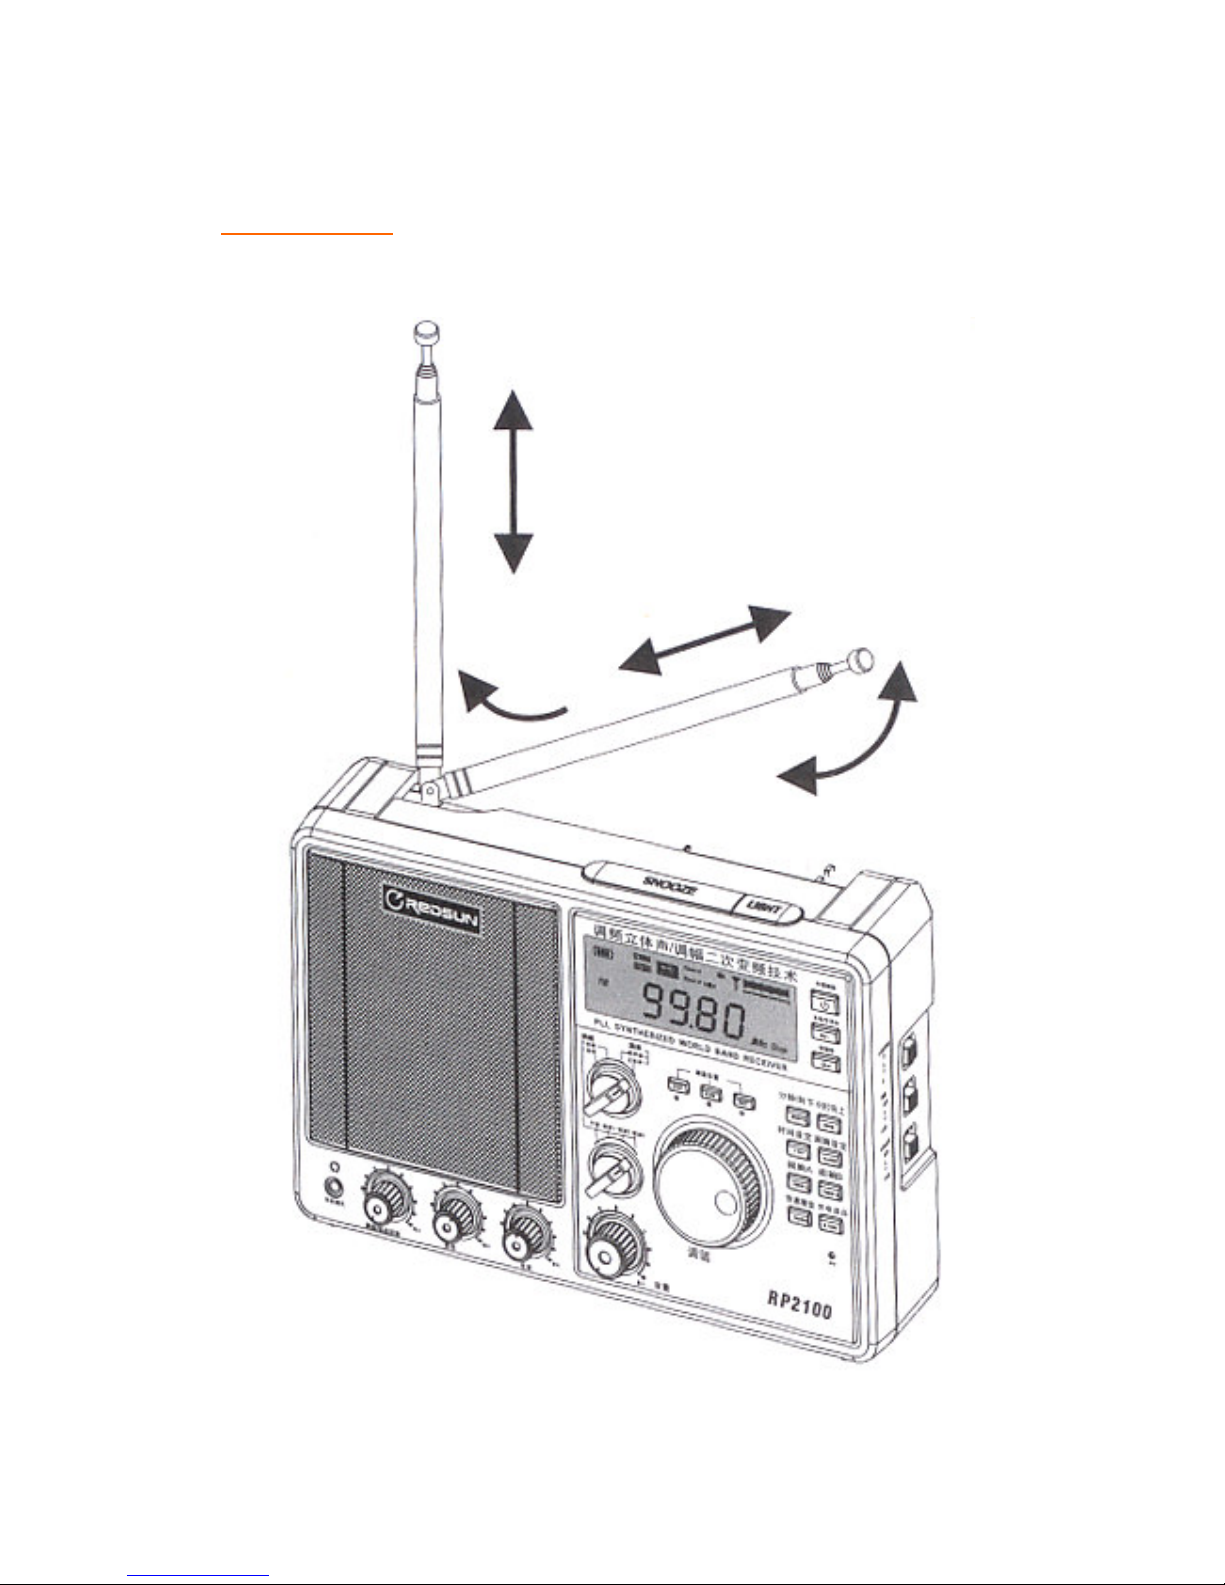
1. Whip Antenna – for FM and Short Wave
2. SNOOZE Button
3. LCD Display
4. LIGHT Button – press this button shortly the backlight will be on for 8
seconds; press this button for a longer while the backlight will be on
always; press again to turn off the backlight
5. STOP Button – locks the tuning knob from tuning frequencies
6. SLOW Button – FM 10 KHz., MW and Short Wave 1 KHz.
7. FAST Button – FM 100 KHz., SW 5 KHz., MW 9 or 10 KHz.
8. POWER / SLEEP Button
9. LOCAL / WORLD TIME Button – press this button for 5 seconds will
change the display clock from local time to world time
10. LOCK Button – Press this button shortly will enable the lock function, all
buttons will not function except the LIGHT Button; press this button for a
longer time will disable the lock function
11. BUTTON LIGHTS Switch – When this switch is on (up position), all
buttons will be lighted up for 8 seconds when any button is touched
12. DX / LOCAL Switch – Up position for DX, down position for local
13. UP Button – When the radio is being turned off, press this button for 5
seconds will change the 12 / 24 hours time mode; When adjusting the
clock, this button adjusts the hour; When the radio is being turned on,
press this button shortly will manually increase the frequency; When
pressing this key for a longer time, the radio will auto search for stations;
When saving memory pre-set, this button will save to the selected address
14. INT. / EXT. ANTENNA Switch – Up position for internal, down position for
external antenna;
15. DOWN Button - When adjusting the clock, this button adjusts the second;
When the radio is being turned on, press this button shortly will manually
decrease the frequency; When pressing this key for a longer time, the
radio will auto search for stations; When saving memory pre-set, this
button will save to the selected address
16. ALARM MODE Button – Sets the alarm modes of the Timer A and Timer B
17. MEM Button – When the radio is being turned off, press this key for a
longer period to adjust the time clock; When the radio is being turned off,
press this key to store memory pre-sets

5
18. TIMER B Button – When the radio is being turned off, press this key to set
the Timer B; Press this key again to display the settings of the Timer B
19. TIMER A Button – When the radio is being turned off, press this key to set
the Timer B; Press this key again to display the settings of the Timer A
20. PRESET Button – When the radio is being turned off, press this button to
recharge the batteries inside the battery compartment; When the radio is
being turned on, press this button to select the memory pre-sets
21. Q. TUNE Button – Press this button for 1000 KHz. Steps in FM, 100 KHz.
Steps for MW, and for band selections in short wave
22. RESET – Use a sharp object to press this hidden button to reset the radio
when the radio is not working properly
23. TUNING Knob – For tuning frequencies, and for adjusting time
24. VOLUME Knob
25. BASS Knob
26. TREBLE Knob
27. RF GAIN Control knob for MW and short wave
28. HEADPHONE Socket – Use a stereo headphone for FM listening
29. MW / SW1 / SW2 / SW3 BAND SELECTION SWITH
30. AM / FM MODE Switch – (from left to right) AM wide, AM narrow, FM
mono, FM stereo
31. HANDLE
32. EXT. ANTENNA Socket – for FM and SW
33. EXT. ANTENNA Sockets – for MW
34. AM IF OUT Socket
35. BATERRY COMPARTMENT
36. LINE OUT – Upper is for right, lower for left
37. BATTERY TYPE Switch – To select AA or D size battery inside the battery
compartment
38. EXT. DC POWER Socket – 6 to 9 volts
39. EXT. AC POWER Socket – 220 volts

6
B. POWER SUPPLY
1. USING BATTERY
AA size or D size batteries can be used with this radio. After
inserting 4 pcs. of battery into the battery compartment (35), set the
BATTERY TYPE switch (37) to the appropriate position
The display panel will show the full battery strength sign if you
are using new batteries
If a flashing battery sign is displayed, the battery will soon be
exhausted. The radio will be turned off automatically.
You should replace new batteries as soon as possible. The
sign will appear. Avoid mixing new and used batteries for use with
the radio. Remove all batteries from the battery compartment if you
will not use the radio for a long time.
After replacing the batteries, there is no need to set the radio time
again as the clock will last for some time even the radio is not
connected to the batteries or power supply.
2. USING EXTERNAL AC POWER
When the external power cord is inserted to the EXT. AC POWER
Socket (39), the radio will be powered by external AC power. If the
external AC power supply is interrupted, the radio will be powered by
the batteries inside the radio automatically.
This radio is set for use with 220V. AC, if your AC power supply is
110V., you will need to use the 110V. input 220V. output power
transformer between the AC 110V. mains and the radio.
3. USING EXTERNAL DC SUPPLY (optional accessory)
When the EXTERNAL DC POWER Socket is supplied with 6 – 9 V., the
radio will be powered by the external DC power.
The external DC power supply must be between 6 to 9 volts, output
current > 500 m.a., and the polarity is . If not, it would be
dangerous and may also cause damage to the radio.

7
If you also intend to use an External DC Supply for recharging the
batteries inside the radio, the voltage of the External DC Supply should
not be less than 8 volts.
Priority of power supply to the radio is (in order of priority): External DC Supply,
External AC Supply, Battery.
C. BASIC OPERATION
1. TURNING ON THE RADIO
Press the POWER / SLEEP Button (8) once, the LCD panel will
display the “60” sign and the sign, meaning the radio will be
turned off automatically in 60 minutes time.
If you wish to change the auto turn off time, press this button again
until the desired time is reached.
If the “ON” sign is displayed, the radio will be turned on without a time
limit.
2. SELECTING THE FM BAND
If you are listening FM programs through the speaker of the radio, it is
better to set the AM / FM / MODE Switch (30) to the FM mono
position (second from right) for better sound to noise ratio.
If you are using a headphone or an external amplifier, this switch (30)
should be set to the FM stereo position (most right).
3. SELECTING AM BANDS
Normally, set the AM / FM / MODE Switch (30) to the AM Narrow
position (second from left), then set the MW / SW1 / SW2 /SW3
BAND SELECTION Switch (29) to the desired AM band.
If you feel that the signal of the station being received is strong
enough, you may wish to set the AM / FM / MODE Switch (30) to the
AM Wide position (most left) for better sound quality.

8
4. SEARCHING & SAVING RADIO STATIONS TO MEMORIES
4.1 Manual Search
Use the TUNING Knob (23) to tune to a radio station either by slow or
fast speed, or
Use the UP (13) OR DOWN (15) button to search for a station.
This radio uses the PLL mode, all frequencies will not drift.
4.2 Automatic Search
When the radio is being turned on, press the UP (13) or DOWN (15)
button for a longer period of time, the radio will search for the strong signal
stations. When such a station is found, the automatic search will cease.
4.3 Selection of Memory Pre-Sets
This radio can store up to 50 memory pre-sets: 10 for each band.
When the radio is being turned on, press the MEM button (17).
The “PRESET” sign will flash and display on the LCD panel, the radio
is not in the save memory mode.
Press the UP (13) or DOWN (15) button to select a suitable address
from 1 to 10.
Press the MEM button (17) to save the frequency to the selected
address.
To retrieve the memory pre-sets, press MEM button (17) button
followed by pressing the UP (13) or DOWN (15) button. The saved
memory pre-sets can be retrieved in sequence.
5. TURNING OFF THE RADIO
Press the POWER / SLEEP Button (8) when the radio is being turned on,
the radio will be turned off and the digital time clock will appear on the LCD
panel.

9
D. SPECIAL FUNCTIONS
1. MW AND SW GAIN CONTROL
When listening to MW or SW stations, normally the RF GAIN Knob
(27) should be set to full for best sensitivity.
In case the station is of very strong signal, the signal may be
overloaded resulting in distortion of sound quality, the RF GAIN Knob
(27) should be turned counter-clockwise to eliminate the distortion.
If the area where you use this radio is polluted with noise and
interference, adjust this Knob (27) to lower the sensitivity may
sometimes help to alleviate the interference.
2. DX / LOCAL SWITCH
The DX / LOCAL Switch (12) on this radio may be used to overcome
interference of strong signals in the SW and MW bands.
Normally, the DX / LOCAL Switch (12) should be set to DX. When
there is strong RF, VHF or BP signal intruding into the MW or SW
bands, set this switch (12) to LOCAL may help to suppress such RF
interferences.
3. AUDIO LINE OUT
You can connect radio to an external amplifier via the LINE OUT
Socket for more powerful and better sound quality.
Set the AM / FM MODE Switch to the FM Stereo position when
listening to FM stereo programs. The sign “STEREO” will display on
the LCD panel.
The VOLUME (24) control knob would not change the sound level of
the LINE OUT function.

10
E. ANTENNA
1. LISTENING TO FM

11
Pull out the whip antenna, rotate the radio or the antenna to the best
direction to listen to FM.
Sometimes, shortening the whip antenna may also help to improve
adjacent frequency interference when frequencies of the FM stations
are too close together.
2. LISTENING TO SHORTWAVE
Use the whip antenna on the radio to listen to short wave. Pull out the
antenna fully and keep it vertical to get the best result.
3. LISTENING TO MEDIUM WAVE
This radio uses internal ferrite rod antenna for receiving MW stations.
This type of antenna is highly directional. Therefore, when listening to MW
stations, you should rotate the radio body to find the direction that the radio can
receive the strongest signal in order to improve reception.
4. EXTERNAL ANTENNA FOR FM / SW
External antenna for FM (75 ohm) or external antenna for SW (50
ohm) can be connected to the EXT. ANTENNA Socket for FM and SW
(32) for better position and FM-DX.
The INT. / EXT. ANTENNA Switch (14) on the side of the radio should
be set to external antenna (lower position).
5. EXTERNAL ANTENNA FOR MW
The EXT. ANTENNA Sockets for MW (33) on this radio is for

12
connection of a long wire antenna (red socket) and to the ground
(black socket).
When there is a thunderstorm, please disconnect the external
antenna from the radio and place it in a safe place.
6. AM IF OUT
This radio has an AM IF OUT socket (34) that is for extended functions,
such as SSB, DRM, SSTV, etc. (Please read other related materials re these
topics),
F. TIMER FUNCTIONS
1. Setting the Timers
Press the TIMER A button (19) will display the alarm time of the Timer
A and the sign of “TIMER A” will flash; press the ALARM MODE
button (16) to select between buzzer or radio mode.
Press the TIMER B button (18) will display the alarm time of the Timer
A and the sign of “TIMER A” will flash; press the ALARM MODE
button (16) to select between buzzer or radio mode.
2. Using the Timers
When the buzzer timer is enabled, the sign appears on the
LCD display; when the set time is reached, the buzzer will sound for 3
minutes continuously.
When the radio timer is enabled, the sign appears on the LCD
display; when the set time is reached, the radio will be turned on for
60 minutes continuously.
When the radio is turned on by the timer, the respective sign or
sign will flash on the LCD display.
Press the POWER / SLEEP button (8) to disable the timer function

13
and turn off the radio, the sign or sign will no longer flash.
If the radio is set to local time, the timer settings will work according to
the local time; If the radio is set to world time, the timer settings will
work according to the word time.
3. Using the Snooze Function
When the timer is activated, press the SNOOZE button (2) once will
temporarily turned off the buzzer or the radio, the snooze function is
now enabled.
Five minutes later, the timer will be in active mode again.
If there is no further manual intervention, the buzzer will sound for 3
minutes or the radio will be turned on for 60 minutes, then the radio
will be turned off automatically.
This Snooze function can be repeated 4 times.
When the SNOOZE button (2) is pressed for the 5th time, the timer
function will be disabled.
4. Adjusting the Sleep Time
Press the POWER / SLEEP button (8) once, the LCD panel will
display the “60” and the signs, representing that the radio will
be turned off in 60 minutes time.
If you wish to change the sleep time, press the POWER / SLEEP
button (8) again before it disappears, the figures on the LCD panel
will change as follows:
90 -> 60 -> 45 -> 30 -> 15 -> 5 -> 1 -> on -> (back to 90)
If you stop at 30, the radio will be turned off automatically within 30
minutes.
If you stop at “on”, the radio will be turned on until further manual
intervention, the will not appear on the LCD panel.

14
G. SETTING THE CLOCK
1. SELECTING LOCAL / WORLD TIME
This radio can display the local time or world time.
Press the LOCAL / WORLD TIME button (9) will display local time or
world time.
Press the LOCAL / WORLD TIME button (9) for 5 minutes to change
the Local / World time mode.
2. SETTING LOCAL TIME
Press the LOCAL / WORLD TIME button (9) to select local time.
Press the MEM button (17) until the time flashes on the LCD panel.
Press the UP button (13) to select adjustment for hour; press the UP
button (13) for a longer while to increase the hour, or rotate the
TUNING knob (23) to increase or decrease the hour.
Press the DOWN button (15) to select adjustment for hour; press the
DOWN button (15) for a longer while to increase the hour, or rotate
the TUNING knob (23) to increase or decrease the hour.
When the desired time reading is reached, press the MEM button (17)
again to confirm, the clock is now set.
3. SETTING WORLD TIME
Press the LOCAL / WORLD TIME button (9) to select world time.
The other steps are the same as setting local time, as items 2 – 5
above.
4. 12 / 24 HOUR MODE
Press the UP button (13) for 5 seconds to change the 12 / 24 hour
mode.
When the 12-hour mode is selected, “AM” or “PM” will be displayed
on the LCD panel.

15
5. DISPLAYING THE TIMERS
Press the TIMER A button (19) will display the set time of the Timer A,
the “TIMER A” sign will also flash on the LCD panel.
Press the TIMER B button (18) will display the set time of the Timer B,
the “TIMER B” sign will also flash on the LCD panel.
6. SETTING THE TIMERS
Timer A
1. Press the TIMER A button (19) until the “TIMER A” sign flashes.
2. Press the UP button (13) to select adjustment for hour; press the UP
button (13) for a longer while to increase the hour, or rotate the
TUNING knob (23) to increase or decrease the hour.
3. Press the DOWN button (15) to select adjustment for hour; press the
DOWN button (15) for a longer while to increase the hour, or rotate the
TUNING knob (23) to increase or decrease the hour.
4. When the desired time reading is reached, press the TIMER A button
(19) again to confirm, the clock is now set.
Timer B
Press the TIMER B button (18) until the “TIMER A” sign flashes.
The other steps as the same as for Timer A, items 2 – 4 above.
H. OTHER FUNCTIONS
1. BACKLIGHT FOR LCD PANEL
Press the LIGHT button (4) once, the backlight for the LCD panel will
be on for 8 seconds.
Press the LIGHT button (4) for 2 seconds or longer, the backlight for
the LCD panel will be on always, until the LIGHT button (4) is pressed
again.

16
2. BACKLIGHTS FOR BUTTONS
Set the BUTTON LIGHTS switch (11) to the “ON” (upper) position, the
backlights for buttons will be on for 8 seconds when any buttons are
pressed.
If you are using battery, it is suggested that this switch be set to the
“OFF” (lower) position in order to save energy unless you are using
the radio in complete darkness.
3. RE-CHARGING BATTERIES
Use re-chargeable batteries only, do not re-charge normal batteries.
Both the AC 220V. input or the DC 9V. input can recharge the
batteries inside the battery compartment.
When using the DC input to re-charge batteries, make sure that the
voltage should maintain at 9V., and in any case not lower than 8V.,
other the re-charge function may not work.
When the radio is being turned off, pres the PRESET button (20) to
enter the re-charge mode, the battery sign will flash on the LCD
panel.
When the batteries are fully charged or the recharge time has
reached 12 hours, the recharge function will cease automatically.
When the radio is being turned on, the re-charge function will not
work.
4. CHANGING MW STEPS
There is a MW step switch to choose 9 KHz. steps or 10 KHz. Step
inside the battery compartment.
The frequency range for 10 KHz. Step is 520 – 1710 KHz., for 9 KHz.
Is 522 – 1620 KHz.
Use a sharp object to press the RESET button (22) after the MW step
is changed, otherwise the change may not be effective.
5. USING THE RE-SET FUNCTION

17
This radio uses computer software that may enter to an unending
loop due to outside interference or static, use a sharp object to press
the RESET button (22) if the radio is not working properly.
I. SPECIAL NOTES
1. WIDE / NARROW BANDS SELECTION FOR AM
The wide band is +/- 6 KHz., the narrow band is +/- 3 KHz.
When receiving strong signal stations of MW and SW, set to wide
band for better sound quality.
When you find adjacent stations are intruding into the station that you
receive, set the radio to the narrow band.
2. MW / SW RF GAIN
Since AM signal (especially in the SW bands) sometimes fades
greatly and is beyond the AGC (automatic gain control) scope, you
can use the RF gain to manually adjust the radio for better listening
effect.
3. DX / LOCAL SWITCH FOR MW /SW
If you find distorted FM radio stations or TV sound signals intruding to
the MW or SW band, you should set this DX / LOCAL switch (12) to
the local position to eliminate the interference.
If you do not have such interference, you should set this switch to the
DX position.
4. FM MONO OR FM STEREO
If you are using the speaker on the radio to listen to FM programs,
always use set the AM / FM MODE switch (30) to the FM mono
position for better sound to noise ratio and the least interference.
Set this switch to FM stereo mode when you are using headphone to
listen to stereo FM stereo programs.

18
SPECIFICATIONS
FREQUENCY RANGE
FM: 87.00 – 108.00 MHz.
MW: 522 – 1620 KHz. (9 KHz. Step)
520 – 1710 KHz. (10 KHz. Step)
SW1: 1711 – 10010 KHz.
SW2: 9990 – 20010 KHz.
SW3: 19990 – 29999 KHz.
ACCURACY
FM: 10 KHz.
AM: 1 KHz.
SENSITIVITY
FM > 5 uv
MW > 0.2mV/m
SW > 20 uv
SELECTIVITY
Wide: > 40 db (100x)
Narrow: > 60 db (1000x)
IMAGE INTERFERENCE CONTROL
FM: > 46 db (200x)
MW: > 60 db (1000x)
SW: > 40 (100x)
MEMORY PRE-SETS

19
10 for each band – Total 50
AM IF OUTPUT
For expansion of CW, SSB, DRM, SSTV, etc.
DUAL CONVERSION
First IF: 55.845 MHz.
Second IF: 455 KHz.
AUDIO POWER OUTPUT (USING AC)
> 2500 mW
POWER SUPPLY
Battery: 4 x D cells or 4 x AA cells
DC: 6 – 9 V. (center is negative)
AC: 220V. / 50 Hz.
SPEAKER
8-OHM 5W
EXTERNAL HEADPHONE
3.5 mm - 32 ohm
DIMENSIONS
290 X 185 X 70 mm
Please visit our eBay shop to find more updated items of your
interest from time to time by visiting the following URL, thank you:
http://stores.ebay.com/V-COM-COLLECTIONS
This manual suits for next models
1
Table of contents