PURE move 2500 User manual

1
EN
Owner’s Manual EN
Bedienungsanleitung FR
Manuel de l’utilisateur DE
Manuale dell’utente IT
Brugsvejledning DA
Manual de instrucciones ES

2
1. Read these instructions – All the safety and operating instructions should be read
before this product is operated.
2. Keep these instructions – The safety and operating instructions should be retained for
future reference.
3. Heed all warnings – All warnings on the appliance and in the operating instructions
should be adhered to.
4. Follow all instructions – All operating and use instructions should be followed.
5. Clean only with dry cloth.
6. Do not install near any heat sources such as radiators, heat registers, stoves, or other
apparatus (including amplifiers) that produce heat.
7. Only use attachments/accessories specified by the manufacturer.
8. Unplug the apparatus during lightning storms or when unused for long periods of time.
9. Refer all servicing to qualified personnel. Servicing is required when the apparatus has
been damaged in any way, does not operate normally, or has been dropped.
10. To reduce the risk of electric shock, do not remove plastic cover or screws as there
are no user-serviceable parts inside. Refer servicing to qualified personnel.
11. Avoid liquids getting into Move. Should not be immersed in water, or used where this
may happen, such as a bathroom.
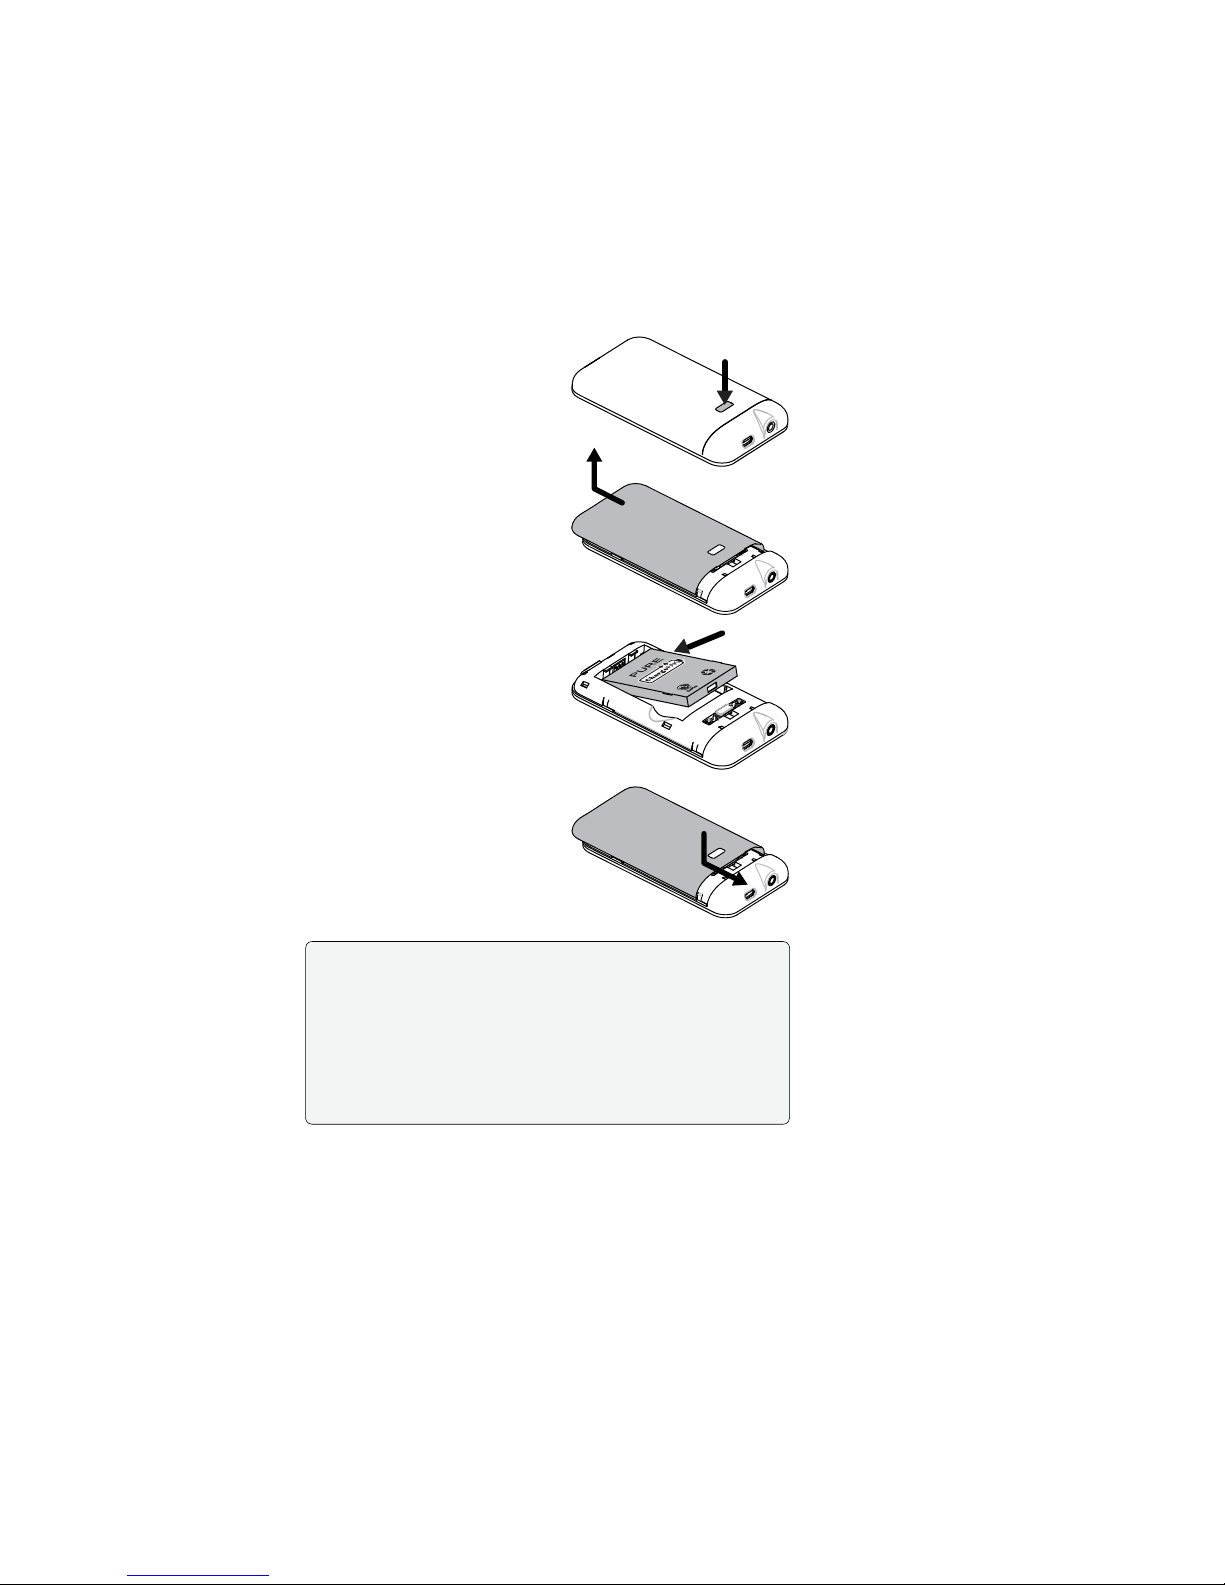
1. Read the instructions for ChargePAK use in this document.
2. Only use your ChargePAK with original PURE products.
3. Store ChargePAK in a cool, dry place at normal room temperature. Remove from
devices that will be stored unused for extended periods.
4. Do not puncture, modify, drop, throw, or cause other unnecessary shocks to your
ChargePAK. May present a risk of fire, explosion, or chemical burn if mistreated.
5. Do not dispose of ChargePAK in a fire or incinerator, or leave in hot places such as a
motor car under direct sunlight. Do not store near oven, stove, or other heat source.
6. Do not connect ChargePAK directly to an electrical source, such as a building outlet
or automobile power-point. Do not place into a microwave oven, or any other high-
pressure container.
7. Do not immerse ChargePAK in water or otherwise expose it to liquids.
8. Do not short circuit ChargePAK.
9. Do not use or charge a ChargePAK that appears to be leaking, discoloured, rusty,
deformed; emitting an odour; or is otherwise abnormal.
10. Do not touch a leaking ChargePAK directly; wear protective material to remove and
dispose of it properly immediately.
11. Do not store where children may have access.
12. Dispose of ChargePAK as per normal rechargeable batteries according to the local
laws and regulations of your region. Some batteries may be recycled, and may be
accepted for disposal at your local recycling centre.
+
™
ChargePAK
+
Move 2500 Safety Instructions
ChargePAK M1 Safety Instructions

3
EN
Contents
What’s in the box?....................................................4
Quick guide to Move 2500 .......................................5
Getting started .........................................................6
Insert the ChargePAK ................................................................ 6
Connect headphones ................................................................ 7
Switch on .................................................................................. 7
Select language......................................................................... 7
Autotune.................................................................................... 7
Reading the display..................................................8
Using the navigation dial...........................................9
Listening to digital radio..........................................10
Listening to FM radio..............................................10
Favourites...............................................................11
Settings..................................................................11
Time (12h/24h) ........................................................................ 11
Language ................................................................................ 11
Factory reset............................................................................ 11
Version..................................................................................... 12
Update .................................................................................... 12
FM stereo...............................................................12
Autotune ................................................................12
Sleep timer.............................................................13
Audio settings ........................................................13
Display settings ......................................................14
Technical Specifications..........................................14

4
Li-ion 3.7V 1000mAh
Model M1
Please recycle
What’s in the box?
Move 2500 Noise-isolating headphones
(Plus a choice of small,
medium or large earbuds)
ChargePAK M1 Power adapter
(Attach the
appropriate pins for
your region)

5
EN
Quick guide to Move 2500
Display
Navigation dial
Top
Bottom Micro USB socket
For connecting the
mains adapter or a
USB cable (for software
updates).
Lock switch
Slide to lock the
navigation dial and
the select button to
prevent accidental use.
3.5mm headphone
socket
Select button

6
1. Press plastic catch on rear
and slide the rear cover and
lift off as shown.
2. Insert ChargePAK M1. It can
only be inserted one way,
with the ChargePAK logo
facing up.
3. Once ChargePAK M1 is
securely inserted, place the
rear cover back on. Press
down slightly near the catch
while sliding the cover on.
Getting started
Li-ion 3.7V 1000mAh
Model M1
Pleaserecycle
Insert the ChargePAK
Note: Before using Move for the first time, we recommend plugging
into the mains to charge for at least 3 hours.
We recommend removing ChargePAK M1 only if storing
Move unused for a long period of time.
Like all Lithium-ion batteries, ChargePAK M1 will become less
efficient after many hundreds of charges. To replace it, visit
your local PURE dealer, or purchase direct from
www.pure.com.

7
EN
Connect headphones
Attach the size of earbuds
that best fits your ears for the
optimum sound quality and
noise isolation.
Unravel the earphone cable and
connect the headphones to the
socket on the bottom of Move.
Switch on
Press Source to switch
Move on.
Select language
Turn the navigation dial and press
select to choose from English,
French, German or Italian.
Autotune
Move will perform an autotune
for digital stations and tune to
a station when complete. The
number of stations found is
displayed during an autotune.
English
Language *
DR
Scanning... 32
DR
ST
Now playing: Pur
BBC Radio 2
Damage to hearing can occur with consistent exposure to high
volume when using headphones. Always check the volume level
before using Move.
Note: Because the headphone cable doubles as an aerial, using
headphones with shorter or asymmetrical cables may affect
reception. Move is designed for headphones with a standard
3.5mm connector with two rings, headphones with three ring
connectors may not work as expected.
Note: An autotune can take up to two minutes.
Move 2500

8
Reading the display
DR
ST
FM
Bringing you hot
1Xtra - BBC
AM
PM
ST
Stereo signal
DR
Digital radio
FM
FM radio
Volume/mute
Current volume level
Signal strength
Indicates the
current signal
strength
Sleep timer
Displayed when the
sleep timer is set
Text area
Displays menus,
settings and station
information
Battery charge level
Animated when
charging. Removed
when fully charged.
Current time
AM/PM
indicator

9
EN
Using the navigation dial
Turn
Press
During normal listening:
Turn the dial to adjust the
volume level.
When in a menu:
Turn the dial to scroll through
options.
Select (centre button)
Confirm selections.
Menu
Access options and settings.
Press again to go back a step.
(Favourites)
Press to display the favourites
list. Hold to save a favourite. You
can save up to 10 digital and 10
FM stations as favourites.
Source (also On/Off)
Switch between digital and FM
radio. Press to switch on and
hold to switch off.
(Tune)
Displays the station list in digital
radio or tuning screen in FM.
DR
Settings
Digital radio
DR
25
Volume

10
Tuning
Press to show the FM tuning
screen then use one of the
following methods to find the
station you want:
Seek tune
Press left ( ) or right ( )
on the navigation dial to seek
to the previous or next station
with a strong signal, Press
select to exit.
Manual tune
Turn the navigation dial to
tune manually to a frequency.
Press select to exit.
Listening to digital radio
Listening to FM radio
Tuning
Press to show the station list.
Turn the navigation dial to scroll
through stations and press
select to tune. Press Menu or
to exit.
DR
ST
Absolute
Station list
FM
88.30MHz
Scanning...
FM
87.50MHz
FM tuning

11
EN
Favourites
DR
ST
3: (empty)
Favourites
DR
ST
Stored
Favourite 3
3
Saving a favourite
You can save up to 10
digital and 10 FM stations as
favourites for easy access.
1. Press to show the
favourites list.
2. Turn the navigation dial to
scroll through favourites.
3. Press and hold or select
to save the current station
as a favourite. You can save
over existing favourites.
Selecting a favourite
1. Press to show the
favourites list.
2. Turn the navigation dial to
scroll through favourites.
3. Press select to tune.
Settings
Press Menu, select Settings
and choose a setting to adjust:
Time (12h/24h)
Switch between 12 or 24
hour clock.
Language
Select a menu language from
English, French, German
or Italian.
Factory reset
Select Yes to delete all personal
settings and favourites. Restarts
with default settings.
DR
ST
24 hour
Time (12h/24h)*
DR
ST
English
Language *
DR
ST
3: Absolute
Favourites
DR
ST
<No> Yes
Factory reset?

12
Version
Displays the current software
version.
Update
To update to a new version of
software:
1. Check PURE support at
http://support.pure com for
a software update.
2. If available, download the
update to your computer.
3. Run the update on your
computer and follow the
instructions.
DR
ST
V1.0_M_dab-mmi-F
Version
DR
ST
<No> Yes
Update?
ST
FM
Stereo
FM stereo *
Autotune
(Digital radio only)
FM stereo
(FM radio only)
Press Menu, then select
Autotune to search for new
stations and remove those no
longer broadcasting.
Press Menu, then select FM
stereo and choose between
Stereo or Mono FM reception.
Mono may improve weaker
reception.
DR
Scanning... 32

13
EN
Tip: The current value for most settings is indicated on
the display by an asterisk (
).
Sleep timer
Audio settings
The sleep timer can be set to
switch Move off after a period
of time.
1. Press Menu, then select
Sleep timer.
2. Turn the navigation dial and
press select to set the timer
for up to 90 minutes or
choose Sleep off to cancel.
The sleep timer icon will appear
when a sleep timer is set.
To adjust the bass and treble
settings:
1. Press Menu then select
Audio.
2. Select Bass or Treble
3. Turn the navigation dial and
press select to set the level
from -6 (low) to 6 (high).
DR
ST
30 minutes
Set sleep time
DR
ST
3
Treble
DR
ST
Bringing you hot
1Xtra - BBC

14
Radio DAB/DAB+/DMB-R (Band III and L-Band)
and FM (RDS).
Headphones Noise-isolating,16 Ohm, 10 mm drivers.
Input Micro USB for power supply and software upgrade.
Output 3.5mm stereo output for headphones.
Mains power 100-240V, 50/60Hz 5V DC 800mA external power
adapter.
Battery ChargePAK M1 1000mAh.
Dimensions 102 mm x 56 mm x 15 mm
Approvals CE marked. Compliant with the EMC and Low Voltage
Directives (2004/108/EC and 2006/95/EC). ETSI EN 300
401 compliant. Australian C-Tick N1600 and Electrical
Safety.
Technical Specifications
Display settings
Press Menu and select Display
and select one of the following
options:
Backlight
Adjust how long the display
backlight stays on. Choose from
Always on, Timed off (after 7
seconds) or Off.
Information
(Digital radio only)
Choose the information shown
on the display.
Scrolling text
Provided by the broadcaster.
Signal strength
The clear block indicates
reliable reception level.
Signal quality
From 0 (low) to 100 (high).
DR
ST
Always on
Backlight
DR
ST
Sig.quality
Information

15
EN
Warranty information
Imagination Technologies Ltd. warrants to the end user that this product will be free
from defects in materials and workmanship in the course of normal use for a period
of two years (one year for ChargePAK M1) from the date of purchase. This guarantee
covers breakdowns due to manufacturing or design faults; it does not apply in
cases such as accidental damage, however caused, wear and tear, negligence,
adjustment, modification or repair not authorised by us. Should you have a problem
with your unit please contact your supplier or contact PURE Support at http://
support.pure.com.
Disclaimer
Imagination Technologies Limited makes no representation or warranties with respect
to the content of this document and specifically disclaims any implied warranties of
merchantability or fitness for any particular purpose. Further, Imagination Technologies
Limited reserves the right to revise this publication and to make changes in it from time
to time without obligation of Imagination Technologies Limited to notify any person or
organization of such revisions or changes.
Trademarks
Move 2500, ChargePAK, PURE, the PURE logo, Imagination Technologies, and the
Imagination Technologies logo are trademarks or registered trademarks of Imagination
Technologies Limited.
Copyright
Copyright © 2011 Imagination Technologies Limited. All rights reserved. No part of this
publication may be copied or distributed, transmitted, transcribed, stored in a retrieval
system, or translated into any human or computer language, in any form or by any
means, electronic, mechanical, magnetic, manual or otherwise, or disclosed to third
parties without the express written permission of Imagination Technologies Limited.
Disposal of Waste Electrical & Electronic Equipment
This symbol on the product or on its packaging indicates that this product
should not be treated as household waste. Instead it should be handed
over to a suitable collection point for the recycling of electrical and elec-
tronic equipment. By ensuring this product is disposed of correctly, you
will help prevent potential negative consequences for the environment and
human health, which could otherwise be caused by inappropriate waste
handling of this product. The recycling of materials will help to conserve
natural resources. For more detailed information about recycling of this
product, please contact your local council office, your household waste
disposal service or the shop where you purchased the product.

16
1. Veuillez lire les présentes instructions – vous devez lire toutes les instructions de
sécurité et d’utilisation avant d’utiliser le présent produit.
2. Veuillez conserver les présentes instructions – vous devez conserver les instructions
de sécurité et d’utilisation en lieu sûr pour toute référence ultérieure.
3. Veuillez observer tous les avertissements – vous devez observer tous les
avertissements figurant sur l’appareil ou dans le mode d’emploi.
4. Veuillez suivre toutes les instructions – vous devez suivre toutes les instructions
d’utilisation.
5. Nettoyez l’appareil uniquement avec un chiffon sec.
6. N’installez pas l’appareil à proximité de sources de chaleur telles que des radiateurs,
des poêles ou tout autre équipement qui produit de la chaleur.
7. N’utilisez que les fixations et accessoires spécifiés par le fabricant.
8. Débranchez l’appareil en cas d’orages ou avant toute inutilisation prolongée.
9. Afin de réduire le risque de choc électrique, n’ôtez pas le couvercle (ni la partie arrière)
car il ne renferme pas de pièces devant faire l’objet d’un entretien. Les tâches de
service après-vente doivent être exécutées par un personnel qualifié.
10. Contactez ce service lorsque l’appareil a été endommagé, par exemple si le cordon
d’alimentation ou la prise a été endommagé, ou si l’appareil ne fonctionne pas
normalement, ou s’il est tombé.
11. N’utilisez pas cet appareil à proximité d’un point d’eau.
1. Veuillez lire les instructions d’utilisation du ChargePAK contenues dans ce document.
2. Utilisez votre ChargePAK uniquement avec des produits d’origine PURE.
3. Conservez votre ChargePAK dans un endroit sec et frais à température ambiante
normale. Enlevez les éléments qui seront conservés non utilisés pendant des périodes
prolongées.
4. Ne pas déchirer ni ôter le plastique recouvrant toute partie du ChargePAK. Ne pas
percer, modifier, laisser tomber, lancer ou causer tout autre choc inutile à votre
ChargePAK. Les piles peuvent représenter un risque d’incendie, d’explosion ou de
brûlures chimiques en cas de mauvaise utilisation.
5. Ne jetez pas le ChargePAK dans les flammes ou dans un incinérateur, ne le laissez
pas dans des endroits chauds tels qu’à proximité d’un moteur de voiture ou à
l’exposition directe du soleil. Ne conservez pas les piles près d’un four, d’une
cuisinière ou de toute autre source de chaleur.
6. Ne branchez pas le ChargePAK directement à une source électrique telle qu’une prise
de courant ou l’allume-cigare d’une voiture. Ne mettez pas les piles dans un four à
micro-ondes ou dans tout autre conteneur haute pression.
7. N’immergez pas le ChargePAK dans l’eau, ne l’exposez pas à tout autre liquide.
8. Ne mettez pas le ChargePAK en court-circuit.
9. N’utilisez pas, ne rechargez pas un ChargePAK paraissant fuir, être décoloré, rouillé,
déformé, émettant une odeur ou autrement anormal.
10. Ne touchez pas directement un ChargePAK qui fuit, équipez-vous d’une protection et
jetez-le correctement immédiatement.
11. Ne donnez pas le ChargePAK aux jeunes enfants, conservez-le hors d’atteinte des
enfants.
12. Jetez le ChargePAK comme vous le feriez avec des piles rechargeables normales,
conformément aux lois et régulations locales en vigueur dans votre région. Certaines
piles peuvent être recyclées et acceptées par votre centre de recyclage local.
+
™
ChargePAK
+
Instructions de sécurité Move 2500
Instructions de sécurité ChargePAK M1

17
FR
Table des matières
Contenu de la boîte................................................18
Guide de démarrage rapide de Move 2500............19
Pour commencer ...................................................20
Mise en place du ChargePAK .................................................. 20
Branchement des écouteurs.................................................... 21
Mise en marche....................................................................... 21
Choix d'une langue.................................................................. 21
Autotune.................................................................................. 21
Affichage à l'écran..................................................22
Utilisation de la molette de navigation.....................23
Écoute de la radio numérique.................................24
Écoute de la radio FM ............................................24
Favoris ...................................................................25
Paramètres.............................................................25
Heure (12/24 h)........................................................................ 25
Langue .................................................................................... 25
Réinitialisation .......................................................................... 26
Version..................................................................................... 26
Mise à jour............................................................................... 26
FM stéréo...............................................................26
Autotune ................................................................26
Veille automatique ..................................................27
Réglages audio ......................................................27
Paramètres d'affichage...........................................28
Caractéristiques techniques ...................................28

18
Li-ion 3.7V 1000mAh
Model M1
Please recycle
Contenu de la boîte
Move 2500 Écouteurs avec isolation du bruit
(ainsi que toute une gamme
d'oreillettes petites, moyennes et
grandes)
ChargePAK M1 Adaptateur secteur
(utilisez l'adaptateur
de fiche approprié à
votre pays)

19
FR
Guide de démarrage rapide de Move 2500
Affichage
Molette de
navigation
Face supérieure
Face inférieure Prise Micro USB
Pour connecter
l'adaptateur secteur ou
un câble USB (pour des
mises à jour logicielles).
Interrupteur de
verrouillage
Faites-le glisser pour
verrouiller la molette de
navigation et le bouton
de sélection afin d'éviter
toute utilisation inopinée.
Prise mini-jack de
3,5 mm pour les
écouteurs.
Bouton de
sélection

20
1. Poussez la languette en
plastique à l'arrière, faites
glisser le couvercle arrière et
soulevez-le comme illustré.
2. Insérez la batterie
ChargePAK M1. Elle peut
seulement être insérée d'une
seule façon, avec le logo
ChargePAK vers le haut.
3. Une fois la batterie
ChargePAK M1 bien insérée,
replacez le couvercle arrière.
Appuyez doucement près de
la languette tout en faisant
glisser le couvercle pour le
remettre en place.
Pour commencer
Li-ion 3.7V 1000mAh
Model M1
Pleaserecycle
Mise en place du ChargePAK
Remarque : Avant la première utilisation de Move, nous recommandons
de le raccorder au secteur pour le charger pendant 3 heures au moins.
Nous recommandons de retirer la ChargePAK M1 seulement si Move est
inutilisé pour une période prolongée.
Comme toutes les batteries Lithium-ion, la ChargePAK M1 devient
moins efficace après plusieurs centaines de charges. Pour la remplacer,
adressez-vous à votre revendeur PURE, ou achetez-la directement sur le
site www.pure.com.
Other manuals for move 2500
1
Table of contents
Languages:
Other PURE Radio manuals

PURE
PURE Wayne Hemingway Bug TOO User manual

PURE
PURE ONE mini User manual

PURE
PURE Move T4 User manual

PURE
PURE Evoke Play User manual

PURE
PURE Elan User manual

PURE
PURE Tempus-1XT User manual

PURE
PURE EVOKE-2S User manual

PURE
PURE Highway 600P EU User manual

PURE
PURE move 2500 User manual

PURE
PURE Evoke D4BT User manual

PURE
PURE Pure flow User manual

PURE
PURE HIGHWAY 300DI User manual

PURE
PURE Evoke User manual

PURE
PURE EVOKE Flow User manual

PURE
PURE DRX-601EX User manual

PURE
PURE Evoke F4 User manual

PURE
PURE ONE CLASSIC User manual

PURE
PURE POCKETDAB 2000 User manual

PURE
PURE Siesta Rise S/Marius Specification sheet

PURE
PURE SENSIA 200D CONNECT User manual