Rehab motion Manual

Technical Information | English

2
© 2021 HD Rehab AB
HD Motion | Technical Information
WE MANUFACTURE QUALITY OF LIFE
HD Rehab helps people achieve an improved quality of life. Our products help make
the lives of users, their families, and caregivers easier, safer, and more comfortable.
HD Rehab oers assistive products for people living with disability. Our primary product is wheelchairs,
which we have been designing, developing, and manufacturing for over 40 years. We accept no
compromises in quality. Precision, safety for user and caregiver, function, and design are our guiding
principles. We are condent that you will feel the dierence compared to any other wheelchair.
GLAD TO BE FLEXIBLE
Whether you are a user, a family member, or a caregiver we welcome your requests and opinions. Our
designers and developers work closely with the production team at our facility on the island of Lidingö
in Stockholm. Our creative employees use their specialist knowledge, experience, and inventiveness to
nd solutions for the unique needs of each individual.
This document is available in PDF format at hdrehab.com.

3
HD Motion | Technical Information
CONTENTS
1 General Information 4
1.1 Important documents 4
1.2 Lubricants and thread lockers 4
1.3 Finishes 5
2. Wheelchair Construction 5
2.1 Chassis construction 6
2.2 Chassis configuration options 6
2.3 Chassis attachment points 7
2.4 Gas springs for seat tilt and back recline 8
2.5 Adjustment of seat zero position 8
2.6 Replacement of gas spring for seat tilt 9
2.7 Replacement of gas spring for back recline 10
2.8 Change to fixed back angle 11
2.9 Replacement of back frame 11
2.10 Replacement of seat frame 12
2.11 Raising seat with adapter 12
2.12 Drive wheel & Cross tube positions 13
2.13 Drive wheels 14
2.14 Tip protectors 14
2.15 Fenders 15
2.16 Castors 15
2.16.1 Replacement of castor fork 15
2.16.2 Replacement of castor 15
3. Construction of Various Components 16
3.1 Disc brake system 16
3.1.1 Adjustment of disc brakes 16
3.1.2 Replacement of brake cable 17
3.1.3 Replacement of brake pad and disc 17
3.2 User brakes 18
3.2.1 Adjustment 18
3.2.2 Replacement and repair 18
3.2.3 Replacement of brake cable 19
3.3 Cable controls 20
3.3.1 Cable routing 20
3.3.2 Replacement of control 21
3.3.3 Replacement of cable 22
3.3.4 Adjustment of cable 23
3.4 Push bar 23
3.4.1 Replacement of push bar 23
3.4.2 Replacement of angle joint 23
3.5 Backrest system 24
3.5.1 Back spacers 24
3.6 Armrests 25
3.6.1 Height adjustment mechanism 25
3.6.2 Depth adjustment mechanism 25
3.6.3 Replacement of armrest pad 25
3.6.4 Replacement of side support 26
3.7 Armrest mount 26
3.8 Leg rests 27
3.8.1 Leg rest mount 27
3.8.2 Leg rest tubes 28
3.8.3 Footrests 28
3.8.4 Foot box 29
3.8.5 Calf supports 29

4HD Motion | Technical Information
1. GENERAL INFORMATION
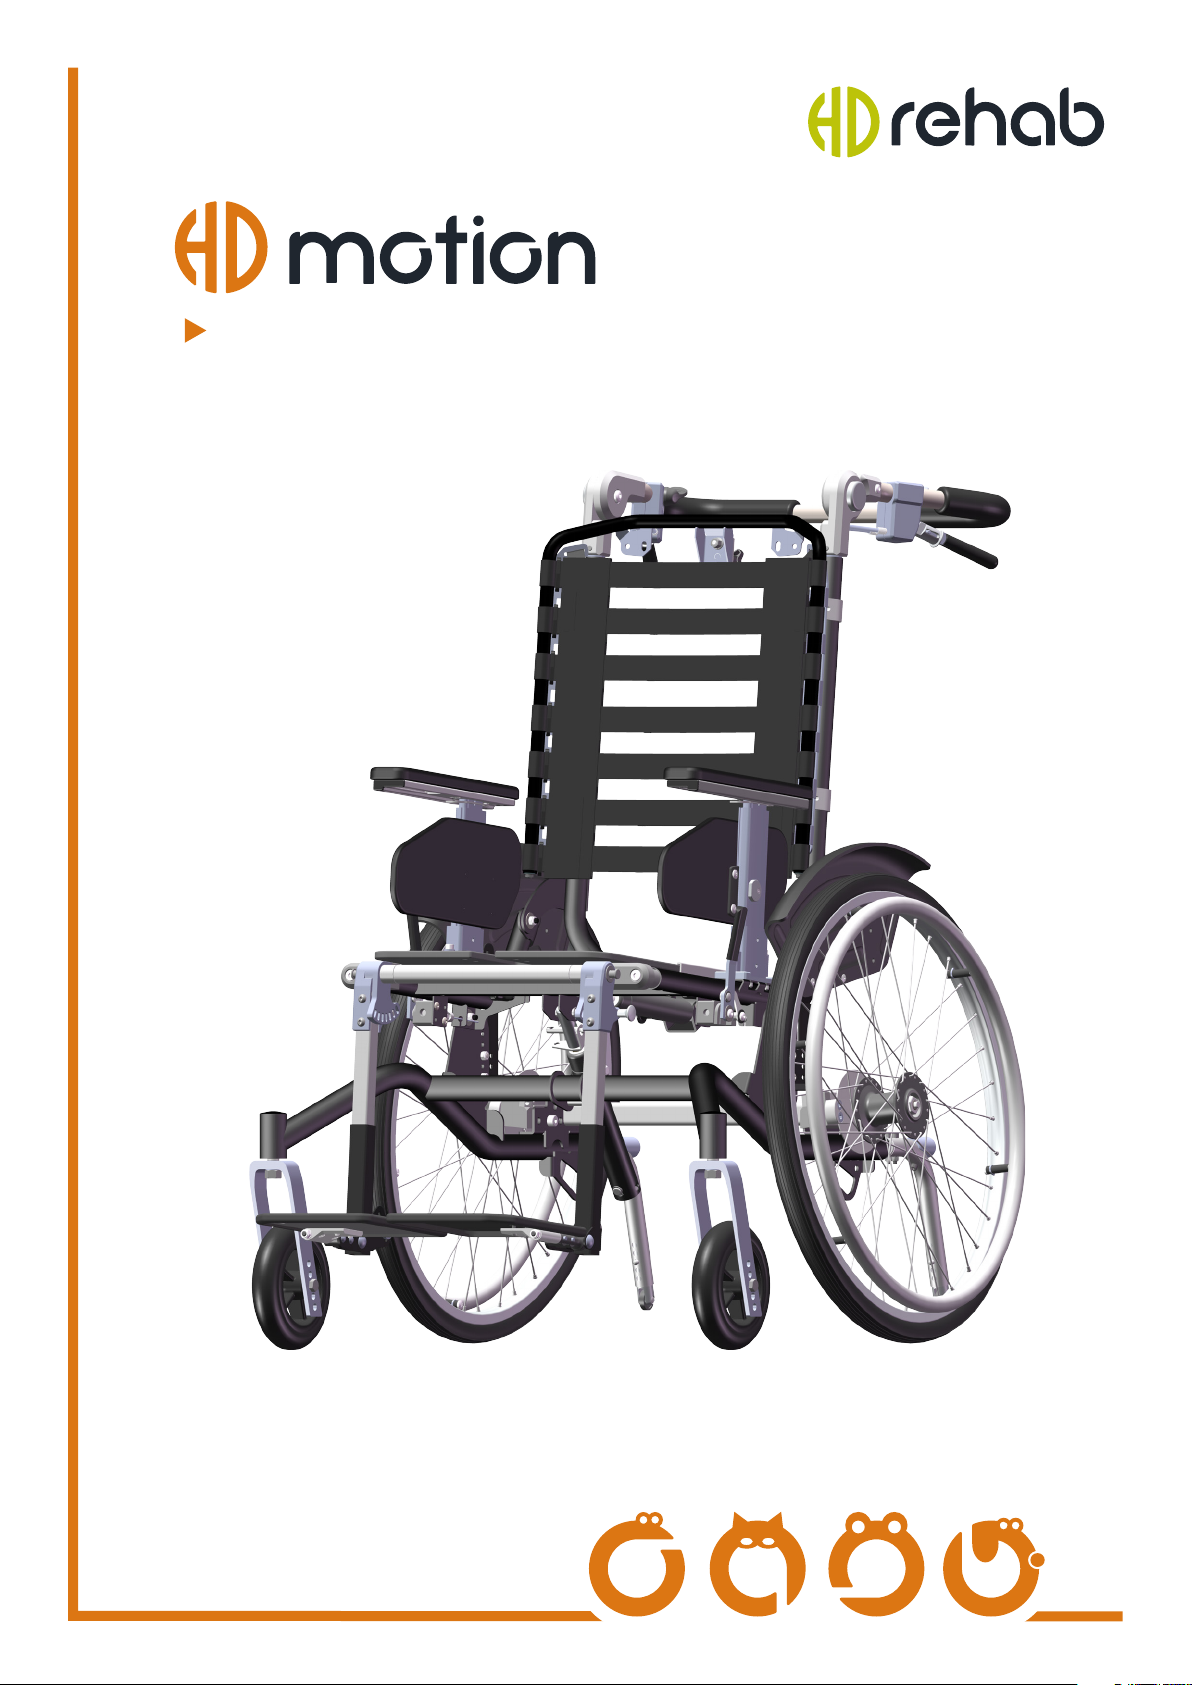
The product is a comfort wheelchair that comes in two versions, HD Motion 22 and HD Motion 16.
HD Motion 22 is intended for children/youth or small adults who can to some degree drive the
wheelchair independently. It can also be used if the user is unable to drive independently. HD Motion
16 is only for users who cannot drive independently.
HD Motion is intended for users in need of excellent comfort and support when seated. The seat and
back can tilt in various positions to give the user a variety of seating options for activity and rest.
Prescription by a medical professional is required before beginning to use HD Motion. This applies to
new wheelchairs as well as when a used chair changes users. All prescription and adaptation of the
wheelchair must be carried out by qualied personnel.
If the user has movement patterns or behaviour that strains the wheelchair excessively a reinforced
model may be needed. This applies for example to users with increased tonus or spasticity.
The wheelchair is approved for use as a seat during transportation in vehicles.
HD Motion is a Class 1 Medical Device, CE-marked per EU 217/745 (MDR).
1.1 Important documents
It is useful to have the following documents at hand when working with HD Motion:
95431-1 Information about custom-made products
Information regarding regulations that apply for adaptations and modications of
medical products.
96711-1 Risk Information - Special congurations and Accessories
Information about increased risks when using certain special congurations and
accessories.
96764-1 Labelling
Information about which labels are to be found on the wheelchair.
96730-1 Maintenance Schedule
Instructions for maintenance to maximise the life and performance of the wheelchair.
1.2 Lubricants and thread lockers
Table 1 details recommended lubricants and threadl ockers.
Table 1 - Recommended lubricants and thread lockers
Area of use Lubricant type Product used by HD Rehab
General lubrication of sliding surfaces etc. Synthetic food grade grease Fuchs Cassida EPS 2
Vendor: Ikaros AB
Locking of screws, permanent, e.g. wheel
axle pin
High strength thread locker Loctite 2700
Locking of screws to crossbars etc. that
may be removed for repairs
Medium strength thread locker Loctite 2400

5
HD Motion | Technical Information
1.3 Finishes
The following nishes are used on HD Motion:
• Powder coat painting, frames: Grey metallic, colour code RAL 7832, gloss 85.
Orange, colour code RAL 2004, gloss 72.
Green, colour code RAL 6037, gloss 72.
• Powder coat painting, details and accessories: Black, colour code RAL 9005, gloss 40.
• Anodizing: natural and black.
• Nitrocarburizing.
• Galvanizing.
2. WHEELCHAIR CONSTRUCTION
HD Motion is built with a chassis that gives the fundamental characteristics, see section 2.1.
The chassis is complemented with dierent conguration accessories such as dierent backrest
systems, leg rest options, armrests, and push bar.
In addition, the wheelchair can be equipped with a range of dierent accessories such as headrest, tray
table, trunk support, and more.
Chassis components are named per Figure 1.
1Wheel frame 6Drive wheel 11 Controls
2Seat frame 7Castor 12 Angle joint
3Back frame 8Fender 13 Push bar
4Wheel mount 9Armrest mount 14 Gas spring, tilt
5Tip protector 10 User brake 15 Gas spring, recline
Figure 1. Chassis components
15
10
5
9
4
1311
14
8
3
12
7
2
6
1
15
10
5
9
4
13
14
8
3
12
7
2
11
6
1

6HD Motion | Technical Information
2.1 Chassis construction
HD Motion has a chassis constructed of three interacting frames; wheel frame, seat frame, and back
frame. These are attached to each other at a number of points and create the desired geometry for
balance, recline, and seat tilt. The wheel frame and seat frame are connected at a point with some
adjustment possible.
Adjustment of seat tilt and back recline are done with cable controls (11 in Figure 1) which are placed
on the push bar.
The two models, 22 and 16, have identical chassis except for the wheel frame, where the brackets for
wheel attachment and anchoring are dierent.
2.2 Chassis conguration options
The HD Motion chassis can be modied to change several basic characteristics of the wheelchair.
The standard conguration is the reference point for all specied data regarding characteristics,
functionality, measurements, and testing against relevant standards. Changes to the conguration
of the wheelchair come with both positive and negative consequences. Therefore the standard
conguration should be used wherever possible.
The following modications can be made:
• Seat frame length, to achieve dierent seating depths. The type of wheelchair chosen when
ordering determines the length, it cannot be modied later.
• Seat width can be adjusted by re-positioning the armrest mounts, see section 3.7.
• The tilt position of the seating unit can be adjusted, see section 2.5.
• Fixed back angle between 90° and 105° can be set by replacing the gas spring with a rod, as
described in section 2.8.
• Seat height can be raised with an adapter, see section 2.11.
• Wheel mounting position has 3 possible settings. This determines the stability and driving
characteristics of the wheelchair. See section 2.12.
• Size of drive wheels.
Model 22: 22” is standard. 20”or 24” can be used. See sections 2.11, 2.13, and 2.14.
Model 16: 16” is standard. This cannot be changed.
• Change of camber angle. Aects stability and driving characteristics.

7
HD Motion | Technical Information
2.3 Chassis attachment points
The back of the seat frame is attached to the side plates of the wheel frame with screws on both sides
(3 in Figure 2). Each connection consists of a bushing, 2 washers, a screw, and a lock nut.
The front of the seat frame is attached to the gas spring for seat tilt via pin joints (5 and 6 in Figure 2).
Each connection consists of a pin and 2 circlips. Note the pins have dierent lengths.
Generally the seat frame does not need to be replaced. If the need does arise, see section 2.10.
The back frame is attached to the seat frame with screws on both sides (2 in Figure 2). Each connection
consists of a bushing, 2 washers, a screw, and a lock nut. Note: the bushings for the back connection (2)
and the seat connection (3) are not the same.
The gas spring for back recline is attached to seat frame via a pin joint (4 in Figure 2). The connection
consists of a pin and 2 circlips. The gas spring attaches to the bottom of the back frame via a spring-
loaded pin (1 in Figure 2) that can be pulled out to release the back frame, allowing it to be folded
down to a transport position.
See sections 2.4 - 2.7 for further information regarding the gas springs.
Generally the back frame does not need to be replaced. If the need does arise, see section 2.9.
Figure 2. Chassis attachement points
5
4
3
2
6
1
3
2
5
4
6
1

8HD Motion | Technical Information
2.4 Gas springs for seat tilt and back recline
Both gas springs are equipped with release mechanisms, with the cable for control attached as seen in
Figures 3 and 4. The gas springs are activated from the cable controls on the push bar - back recline on
the left side, seat tilt on the right side.
2.5 Adjustment of seat zero position
The gas spring for seat tilt is mounted in holder (Figure 3) which allow for adjustment of the zero
position of the seat. Adjustment is done as follows:
1. Set the seat tilt all the way forward, which is to say the gas spring fully in, see Figure 3.
2. Loosen the nut (6) a few turns so that the gas spring is not held fast in the holder (15).
3. Loosen the nut (7) a few turns so that the gas spring can move in the holder.
4. Adjust the seat to the desired position. Depending on the wheels and tires, it can be adjusted
between approximately -5° and +3°.
5. Tighten the nut (7) rmly.
6. Tighten the nut (6) just enough that the gas spring cannot rattle in the holder.
7. Tilt the wheelchair to check that the desired positioning has been set.
Figure 3. Gas spring for seat tilt Figure 3.1. Pin parallel with bracket
19
14
7
18
13
6
17
11
12
16
10
9
45
15
8
1
23

9
HD Motion | Technical Information
2.6 Replacement of gas spring for seat tilt
1. Remove cushions, leg rests, and seat plate.
2. Remove the cable from the holder as follows (see Figure 3):
Fully loosen the nut (4). Take the wire housing (5) out of the bracket (12) by pulling the end of the
housing sideways to bring the wire out. Remove the wire nipple (1) from the pin (2). Take care not
to lose the spring (3).
3. Remove the gas spring from the seat frame by removing a circlip (19) and then pulling or knocking
out the pin (11). Be careful when removing the circlip. If it is opened too far it will be damaged and
must be discarded.
NOTE: When the pin is removed the seat unit can fall forward with risk for personal injury and
damage to the wheelchair. Ensure the seat unit is properly supported. Tip: Fold the back frame
forward so that all weight is forward and easier to control.
4. Remove the holder from the wheel frame by taking out the pin (14) in the same manner.
5. Remove the gas spring from the holder as follows:
Loosen the nut (6) a few turns. Remove the nut (7) and take out the bolt (17) and spacers (8 and
16). Push the gas spring out of the holder far enough to free the end plug (19). Push the sleeve (18)
out of the end plug, which can then be removed. Pull the gas spring out of the holder.
6. Loosen the nut (13) a little so that the gas spring can be threaded out of the rod (9). Hold all of the
end pieces together so they do not fall apart. Thread the new gas spring into the rod. Check that
all pieces are in place and that the nut (13) is fully threaded on to the gas spring shaft.
7. Adjust the gas spring position in the rod (9) so that the pin (2) is parallel with the bracket (12)
when the spring is pressed (lightly) against the release pin of the gas spring. See Figure 3.1.
8. Tighten the nut (13) but not excessively.
9. Reassemble the gas spring in the holder and the holder to the wheelchair in the reverse order of
steps 2-5 above. Do not forget the spring (3).
10. Reassemble the seat plate and check function. The cable for the seat tilt may need adjustment.
Some adjustment for proper release of the gas spring can even be done by moving the gas spring
slightly in the rod.
See also section 3.3 Cable controls for more info.
11. Adjust the seat zero position per section 2.5.

10 HD Motion | Technical Information
2.7 Replacement of gas spring for back recline
1. Remove cushions and seat plate.
2. Release the gas spring from the back frame by pulling out the pin (6 in Figure 4), and then fold the
back frame forward. Be careful as the back frame is free to fall when then pin is pulled out.
3. Loosen the nut (11) slightly so that the gas spring can be threaded out of the rod (7). Hold all of
the end pieces together so they do not fall apart.
4. Thread the new gas spring into the rod. Check that all pieces are in place and that the nut (11) is
fully threaded on to the gas spring shaft.
5. Adjust the gas spring position in the rod (7) so that the pin (2) is parallel with the bracket (10)
when the spring is pressed (lightly) against the release pin of the gas spring. See Figure 4.1.
6. Tighten the nut (13) but not excessively. Turn the gas spring to the correct angle and attach it to
the back frame with the pin (6). Check that the pin snaps into place correctly.
7. Check the back recline function. The cable may need adjustment. Some adjustment for proper
release of the gas spring can even be done by moving the gas spring slightly in the rod.
See also section 3.3 Cable controls for more info.
8. Reassemble the seat plate and cushions.
Figure 4. Gas spring for back recline Figure 4.1. Pin parallel with bracket
1
23
7 8 9
10
11
45
6

11
HD Motion | Technical Information
2.8 Change to xed back angle
The gas spring can be replaced with a Fixed back connector (Figure 5) for a xed back angle. The back
angle can be set between approximately 90° and 105°. Other angles are possible on request.
The replacement is done as follows:
1. Remove the seat cushion and seat plate.
2. Release the gas spring from the back frame by pulling out the pin (6 in Figure 4), and then fold the
back frame forward. Be careful as the back frame is free to fall when then pin is pulled out.
3. Remove the cable as follows: Fully loosen the nut (4). Take the wire housing (5) out of the bracket
(10) by pulling the end of the housing sideways to bring the wire out. Remove the wire nipple (1)
from the pin (2).
4. Remove the gas spring from the seat frame by removing a circlip (8 in Figure 4) and then pulling
or knocking out the pin (11). Be careful when removing the circlip. If it is opened too far it will be
damaged and must be discarded.
5. Assemble the xed back connector to the seat frame with the same pin and circlips. NOTE: check
that the circlips are undamaged.
6. Adjust the length of the xed back connector so that it gives the desired back angle. Secure it by
tightening the nut (Figure 5).
The control lever for back recline then has no function. This can be handled in 2 ways:
1. The lever can remain in place. The cable should then be bound up and pinned in place under the
wheelchair. It may be confusing for users to have a lever with no function.
2. The lever and cable can be removed from the cable control. The hole that is left in the cable
control should then be covered with a plug. A plug is included in the conversion kit, see Assembly
instructions Fixed back connector, doc nr 96810-1. See sections 3.3.2 and 3.3.3 for disassembly.
2.9 Replacement of back frame
1. Remove back cushion and disassemble backrest
(Flexi-back or Solid back) and any accessories.
2. Remove all clips (2 in Figure 6) that hold the cables in
place on the back frame.
3. Remove the push bar (entire unit) by removing the 2
screws (1) and pulling it fully out of the back frame.
Be very careful to not damage the cables.
4. Release the gas spring at the back by pulling out the
pin (4), fold the back frame forward.
5. Take apart the screw connections on each side (3)
and remove the back frame.
6. Assemble the new back frame by following the same
steps in reverse order. Be careful that the screw
connections with their bushings are assembled
correctly. See Figure 2.
It is very important that the cables are clipped in place
correctly. See section 3.3.1.
Figure 5. Fixed back connector
Figure 6. Replacement of back frame
43
2
2
1

12 HD Motion | Technical Information
2.10 Replacement of seat frame
1. Remove the back frame per section 2.9 steps 1-5.
2. Remove seat cushion, seat plate, leg rests, and armrests.
3. Release the gas spring for tilt per section 2.6 step 3.
4. Remove the gas spring for recline per section 2.8 step 3.
5. Remove both user brakes from the seat frame. They are attached
with 2 screws from the inside of the seat frame (Figure 7). Be
careful not to damage the brake cables.
6. Take apart the screw connections (see 3 in Figure 2) and remove
the seat frame.
7. Assemble the new seat frame by following the same steps in
reverse order. Check that the seat frame moves smoothly about
the fastening points. NOTE: The seat frame is always mounted in
the front holes of the wheel frame side plates.
8. Move the armrest mounts over if none are present on the new
seat frame (see section 3.7.1).
NOTE: Check that the new seat frame has the correct labelling;
see Labelling, doc nr 96764-1. Correct labelling is required for
CE-marking to be valid.
2.11 Raising seat with adapter
HD Motion can be equipped with a seat raising kit to increase the seat
height by 30 mm or 50 mm. The kit can be used with both HD Motion
22 and HD Motion 16.
The adapter plates are mounted between the joint plates of the seat
frame and the side plates of the wheel frame with screw connections
(Figure 8). The holder for the gas spring is replaced with a dierent
version (Figure 9). The kit can be assembled on a wheelchair by
following mounting instructions, but it is advantageous to assemble the
kit directly on a newly ordered wheelchair.
The raising kit does not signicantly increase the tipping risk but
the wheelchair must be marked with the included decals and
complementary information must be added to the user manual. It
is important that the instructions are followed to use the correct
conguration of tip protectors, particularly if 24” drive wheels are used.
See section 2.14.
The adapter kit in combination with 24” wheels raises the seat so far that
there can be conicts in some congurations (maximum seat width).
Wheel mounts without cambering are recommended in this case.
Table 2 shows the seat height for dierent congurations. Note that
seat height is slightly aected by camber angle.
Table 2 - Seat height in dierent congurations [cm]
Drive
wheel Camber Without
adapter
Adapter
30 mm
Adapter
50 mm
16 0° 42 45 47
22 6° 42 45 47
24 6° 45 48 50
22 0° 43 46 48
24 0° 46 49 51
Figure 7. Screws for user brakes
(seen from inside of seat frame)
Figure 8. Adapter
connection points
Figure 9. Gas spring holder
2
1
1
2

13
HD Motion | Technical Information
2.12 Drive wheel & Cross tube positions
The drive wheel mount has three attachment positions with 25 mm spacing to allow variation in the
wheelbase length. The middle position is the standard conguration. See Figure 10.
The cross tube is mounted with screws through holes in the back of the wheel mount. To simplify
assembly these screws can be accessed through the large hole in the brake disc. Be careful when doing
this assembly that the brake disc is not damaged. See Figure 11.
NOTE: The cross bar must always be in place.
NOTE: When the wheel mount is moved the fenders also need to move. See section 2.15.
NOTE: Thread locker (Loctite 2400 or equivalent) must be used on the screws.
A - Wheel mount 25 mm forward
B - Wheel mount mid position
C - Wheel mount 25 mm back
Assembly hole
Figure 10. Attachment positions
Figure 11. Screws for assembly
Model 16 Model 16
Model 22
Model 22
Assembly hole
Model 22
A B C
A B CA B C
A B C
A B C
A B C

14 HD Motion | Technical Information
2.13 Drive wheels
With HD Motion model 22 drive wheels of size 20”, 22”, and 24” can be used, together with dierent tyre
types. 22” is the standard size, all reference measurements and tests are based on this standard.
The size of drive wheels, tyre type, wheel mounting position, and camber angle all aect the driving
characteristics of the wheelchair, as well as general characteristic such as length and total width.
2.14 Tip protectors
HD Motion is equipped with tip protectors, see Figure 12. The tip protectors are xed in placed and
cannot be removed without tools. By pushing inward with a foot or hand the tip protector can be
turned up to an inactive position. The attachment for the wheel (6) can be adjusted to dierent
positions with a snap lock (5) to give the desired tip protection. The same tip protectors are used for
HD Motion 22 and HD Motion 16.
If the entire tip protector is to be replaced remove the screw (8) from the underside of the wheel frame.
NOTE: When assembling a new tip protector the spring washer (7) must be oriented correctly, with the
convex side facing upward.
NOTE: The tip protectors have left-hand and right-hand versions.
If HD Motion 22 is equipped with a dierent
wheel size than the standard 22”the tip
protectors need to be modied as follows:
20” drive wheels:
The tip protector can be retained, but
to keep the same setting options the
tip protector tube (4) is replaced with a
shorter version as follows:
1. Remove the screws and nuts (1).
2. Replace the tube (4).
3. Re-assemble the screws and nuts.
4. Move the wheel attachment (6) to
the new tip protector.
24” drive wheels:
Replace the wheel attachment (6) with a
longer version. This compensates for the
height dierence to the ground.
NOTE: If the wheel attachment is not replaced
the tip protector will not be as safe in all
positions as it is in the standard conguration.
Figure 12. Tip protector
3
4
1
2
5
6
7
8

15
HD Motion | Technical Information
2.15 Fenders
Fenders (model 22 only) are xed with 2 screws and lock nuts to the side plates of the wheel frame, See
Figure 13. The positioning is determined by wheel size and wheel mount position.
2.16 Castors
2.16.1 Replacement of castor fork
The castor fork is replaced by removing the cap (6 in Figure 14) and then removing the circlip (7) that
secures the axle (8). Pull out the fork and replace with the new one and assemble it in the same way.
2.16.2 Replacement of castor
Change the castor by removing the bolt (9 in Figure 14) and replacing the castor. Reassemble in the
same way; do not forget the washer on each side.
The castor fork has 5 holes to mount the castor. Which hole should be used is specied in Table 2. The
position is determined by the size of the castors and the size of the drive wheels.
Standard castors are 150 mm in diameter. Note that other sizes
of castor can aect the driving characteristics of the wheelchair,
and that some sizes may come in to conict with the footrests.
Table 2 - Castor positioning
Drive wheel
(inches)
Tyre
type
Castor
(mm)
Position
(Figure 14)
16 PUR 150 3
16 Pneumatic 150 3
20 PUR 150 1
20 Pneumatic 150 1
22 PUR 150 3
22 Pneumatic 150 2
24 PUR 150 5
24 Pneumatic 150 5
Wheel mount 25 mm forward
Wheel mount mid position
Wheel mount 25 mm back
Figure 13. Fender position
20” drive wheel 22” drive wheel 24” drive wheel
Figur 14. Castor
5
9
4
8
3
7
2
6
1

16 HD Motion | Technical Information
3. CONSTRUCTION OF VARIOUS COMPONENTS
3.1 Disc brake system
The disc brake system is integrated with the wheel mount (Figure 15). The brake consists of a
disc (10) with 3 holes that connect to the drive wheel. The brake disc is pushed against the brake
pad (9) by a padded piston (7). This action is controlled by the brake handles on the push bar and
by the user brake handles (for wheelchairs equipped with user brakes). There are separate cables
for each brake handle. The cables are connected to an actuating plate (3) which drives the brake
piston. The brake cables are of xed length, with adjustment screws and nipples at each end.
3.1.1 Adjustment of disc brakes
Because the disc brakes are activated by both the caregiver brakes and the user
brakes, they must be adjusted at the same time.
1. First locate the adjustment screw. The adjustment screws for user brakes
(N and O in Figure 16) on the right and left side respectively. Adjustment
screws for caregiver brakes (C and D in Figure 19). Note: The adjustment
screw for the caregiver brake on the right side is found on the left side of
the back frame, and vice versa.
2. Loosen the nut (2 in Figure 16) on all adjustment screws and thread in the
sleeves (1) a few turns to slacken the brakes.
3. Check that all cables are correctly routed and clipped in place (see Figure 19).
4. Adjust the caregiver brakes rst. Adjust by threading the sleeve (1 in Figure
16) - screw it out for more braking force, in for less braking force. Tighten the
nut (2) after adjusting.
NOTE: The brakes must always be adjusted such that the braking force is
correct with the caregiver brakes in the parking position. Verify this is the case.
5. Adjust the user brakes in the same manner.
NOTE: The brakes must always be adjusted such that the braking force is
correct with the caregiver brakes in the parking position. Verify this is the case.
Figure 15. Disc brake system
Figure 16.
Adjustment
screw
7
11
910
8
1
2
1
65
3
4
2

17
HD Motion | Technical Information
3.1.2 Replacement of brake cable
A damaged brake cable must be replaced immediately, as follows:
Replacement of brake cable for caregiver brakes:
1. Remove the drive wheel and support the wheelchair so that it sits in a stable position.
2. Remove the 2 screws and the cover plate (1 in Figure 15) from the wheel mount.
3. Loosen the nuts on the adjustments for both the caregiver brake and the user brake (see 3.1.1
steps 1 and 2). Thread in the sleeve on the adjustment screw a few turns.
4. Unscrew the end sleeve of the cable (2 in Figure 15) from the wheel mount. Pull gently outward
and sideways to free the wire from the guide. Turn the wire such that the nipple (4) can be
removed from the actuating plate (3).
5. See section 3.3.3 for replace of cable in the cable control.
6. When the new cable is assembled in the controls it must be routed correctly along the back frame
and be clipped in place, see Figure 19 and section 3.3.1.
7. Fit the nipple (4 in Figure 15) into the actuating plate (3), turn it up so that the wire can be placed
in the wire guide, screw in the end sleeve (2) fully.
8. Follow the instructions in section 3.1.1 steps 4 and 5 for adjustment of braking force.
9. Check the brake function and that all cables are correctly clipped in place on the back frame (see
Figure 16). Also check that the push bar can be adjusted through the full range without aecting
the brake cables.
3.1.3 Replacement of brake pad and disc
Worn or damaged brake pads or brake discs are replaced as follows (see Spare part list for details):
1. Remove the drive wheel and then unscrew the brake pad (9 in Figure 15).
2. Remove the circlip (11) with circlip pliers and remove the brake disc (10). Note the plastic washer
(8) that must always be assembled between the brake disc and the wheel bushing.
3. The brake piston (7), brake disc, and brake pad can now be replaced with new parts.
4. Light greasing inside the brake piston is recommended, but be careful that no grease gets on the
brake disc or brake pads.
NOTE: The brake pads can be cleaned but must be perfectly at to function properly.
5. Reassemble in reverse order. Check that the circlip (11) and replace it if damaged.
6. Check the brake function and adjust the cables as necessary per section 3.1.1.

18 HD Motion | Technical Information
3.2 User brakes
User brakes must always be equipped on HD Motion 22, and can optionally be added to HD Motion 16.
The brakes are mounted on the seat frame and activate the disc brakes via cable.
The user brakes are in left-hand and right-hand versions and are attached to the seat frame with
2 screws from the inside (1 and 3 in Figure 17).
3.2.1 Adjustment
Adjust by threading the sleeve (1 in Figure 16) - screw it out for more braking force, in for less braking
force. Tighten the nut (2) after adjusting.
NOTE: The brakes must always be adjusted such that the braking force is correct with the caregiver
brakes in the parking position. Verify this is the case.
NOTE: Caregiver brakes must always be adjusted before user brakes.
3.2.2 Replacement and repair
If the brake lever needs to be replaced, both the lever and the brake arm must be replaced as
they are riveted together. Remove the screws (2 and 4 in Figure 17). See also page A7.1 in Spare
Parts, doc nr 96740-1.
NOTE: The screws may be dicult to turn as they are secured with Loctite.
When mounting a new lever Loctite should be used.
NOTE: Ensure no Loctite runs out as it may negatively aect the braking function.
Normally the entire brake unit is replaced.

19
HD Motion | Technical Information
3.2.3 Replacement of brake cable
1. The cable for the caregiver brake needs to rst be removed from the wheel mount. Follow
steps 1-4 in section 3.1.2.
2. See Figure 17, the assembly of the user brake as seen from inside the seat frame. Fully
unscrew the nut (6). Pull the end sleeve (7) back so it can be pulled free from the bracket.
3. Remove the nipple of the wire (5) from the brake lever unit.
4. Unscrew the end sleeve (5 in Figure 15) from the wheel mount. Pull gently outward and
sideways to free the wire from the guide. Turn the wire such that the nipple (6) can be
removed from the actuating plate (3).
5. Reassemble in the same manner. Check rst that the adjustment screw (1 in Figure 16) on
the new cable is fully screwed in for maximum slack, this makes assembly easier.
6. Fit the nipple (6 in Figure 15) into the actuating plate (3). Then screw in the end sleeve (5).
7. Fit the nipple (5 in Figure 17) into the brake unit. Fit the end sleeve (7) into the wire bracket
and tighten in place with the nut (6).
8. Check that everything is correctly in place.
9. Adjust the brakes per section 3.1.1 and 3.2.1. Start as always with the caregiver brakes.
Figure 17. User brake (view from inside the seat frame)
2 4 531 76

20 HD Motion | Technical Information
3.3 Cable controls
Cable controls are located on the right and left side of the
push bar (Figure 18).
Right side:
The brake handle (2) controls the brake on the right drive
wheel. The green lever controls the gas spring for seat tilt.
Left side:
The brake handle (4) controls the brake on the left drive
wheel. The grey lever controls the gas spring for back recline.
Each cable control consists of an outer half, with the brake
handle, and an inner half, with the control lever. The two
halves clamp together in place on the push bar.
3.3.1 Cable routing
Figure 19 shows the routing of all wire cables on HD Motion. From the cable controls on the push
bar cables connect for caregiver brakes, back recline, and seat tilt.
Figure 19. Cable routing
Figure 18. Cable controls
ABack recline
BSeat tilt
CCaregiver brake LH
DCaregiver brake RH
ECable strap
F - M Cable clip (8 st)
NUser brake LH
OUser brake RH
P Cable strap
1
2
3
4
A
I
E
M
B
J
F
N P O
C
K
G
D
L
H
Table of contents
Other Rehab Mobility Aid manuals
Popular Mobility Aid manuals by other brands

TOPRO
TOPRO Taurus user manual

Graham Field
Graham Field Lumex 700176C Assembly and operation instructions

Invacare
Invacare InTouch ITTG Assembly, installation and operating instructions

SystemRoMedic
SystemRoMedic SupportStraps manual

Harvest Healthcare
Harvest Healthcare HSL410 manual

NRS Healthcare
NRS Healthcare M99266 User instructions

aidapt
aidapt VP155JK Usage and maintenance instructions

Guardian
Guardian G1-400BX2 User instructions and warranty

Guardian
Guardian G2-300KRX1 User instructions and warranty

Sunrise Medical
Sunrise Medical Guardian Sidestepper 07770 User Instructions & Warranty

Peak
Peak 8224-FX user manual

RoMedic
RoMedic Rena 440 manual