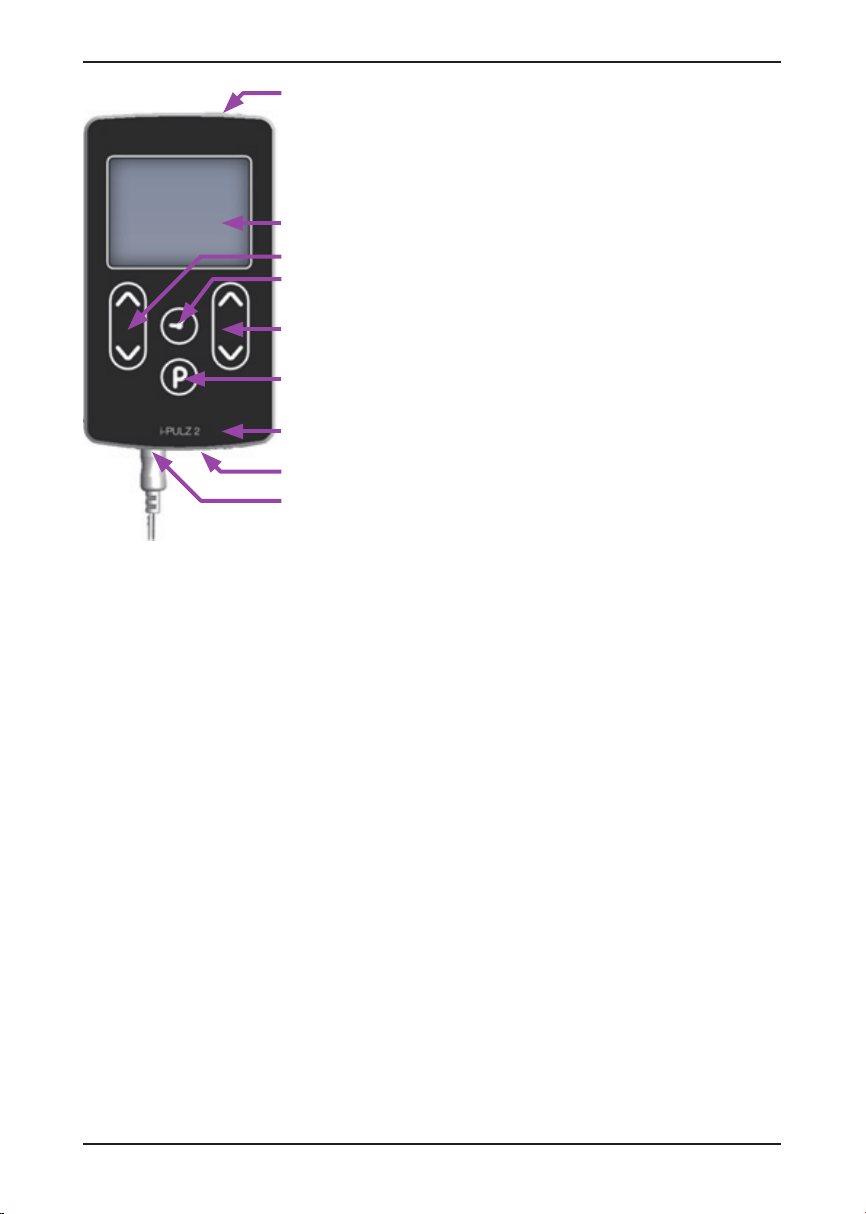
Rehan Electronics i-Pulz 2 User manual

USER MANUAL
i-Pulz 2

Read this manual carefully before using the
i-Pulz 2 and keep closely to the instructions
of your treatment specialist.
Table of contents
1 Device information ........................................................................4
Intended purpose ...........................................................................4
Intended patient population ...........................................................4
Indications ................................................................................4
Contra-indications ....................................................................4
Intended parts of the body.............................................................5
Side effects.....................................................................................5
Environment....................................................................................6
Warnings.........................................................................................6
Precautions.....................................................................................6
Maintenance and repair..................................................................7
2 The i-Pulz 2 nerve stimulator ........................................................8
General ...........................................................................................8
Controls ..........................................................................................8
Buttons ...........................................................................................9
The display ...................................................................................10
Device status LED ........................................................................11
Channels left and right .................................................................11
3 Starting the treatment .................................................................11
Cleansing of the skin ....................................................................12
Placing the electrodes..................................................................12
Setting up the stimulator ..............................................................12
Treatment period ..........................................................................13
Stopping the treatment.................................................................14
Removing the electrodes..............................................................14
Taking care of your skin................................................................14
Irritation of the skin.......................................................................15
4 Settings menu and advanced possibilities ................................15
Settings menu ..............................................................................15

Adjust menu .................................................................................17
Low and rest intensity ..................................................................19
Compliance menu ........................................................................19
Charging .......................................................................................20
5 Accessories .................................................................................22
TENS cables.................................................................................22
Electrodes.....................................................................................22
6 Contents of package ...................................................................23
7 Technical information ..................................................................23
8 Pre-set overview..........................................................................25
9 Errors............................................................................................27
Error-numbers...............................................................................27
Other indications/faults ................................................................28
Irritated skin..................................................................................30
Maximum allowed intensity for electrode sizes............................30
10 Important information regarding EMC........................................30
General .........................................................................................30
Table 1 Emissions Guidance for users .........................................31
Table 2 Immunity Guidance for Users ..........................................32
Table 3 Conducted and Radiated Immunity Guidance ................33
Table 4 Recommended separation distance................................34
i-Pulz2_UserManual_EN_V1.5.1 3-2023

4 i-Pulz 2
1 Device information
Intended purpose
The i-Pulz 2 is intended for transcutaneous electrical nerve stimulation
(non-invasive nerve stimulation). A pain treatment specialist can
prescribe treatment with the i-Pulz 2 to treat acute and chronic pain
complaints and syndromes. See the indications.
Intended patient population
The i-Pulz 2 may be used on all patients indicated for transcutaneous
electrical nerve and/or muscle stimulation by a qualied pain treatment
specialist. The patient can use the device independently after
instruction from a specialist.
A minimum age of approximately 15 till +99 years, children under the
supervision of the parents.
Indications
Typical examples prescribed by qualied pain treatment specialist are:
• Neurological pain, like neuralgia, blunt pain and phantom pain.
• Muscle and joint pain, like rheumatic pain, lower-back pain, neck
and shoulder pain, etc.
• Post-surgery and post-traumatic pain.
• Angina Pectoris.
• Facial pain.
• Delivery pain.
• Complex Regional Pain Syndrome, CRPS type I and II.
• Scar tissue pain.
• Muscle treatment.
Contra-indications
Patients with the following contra indications should seek advice and
suitability from a pain treatment specialist before using TENS therapy:
• Skin conditions or damaged skin.
• Implanted electronic device, for example, a cardiac pacemaker or
implantable cardioverter-debrillators.
• Metal implants, near the TENS area.
• Tumours or malignant activity, near the TENS area.
• Cardiac arrhythmia.
• Epilepsy.

5i-Pulz 2
• Pregnancy (especially the first 12 weeks).
• Reduced awareness.
• Dementia.
• Cognitive limitation and/or not independent in “ADL” in
combination with insufcient help from third parties.
Intended parts of the body
The i-Pulz 2 is connected to the body using electrodes which can be
placed on intact, non-irritated and healthy skin over the entire body
except for the contra indicated body parts.
Contra indicated body parts include:
• On damaged or irritated skin/tissues.
• Across or through the head (Trans cerebrally).
• Directly on the eyes.
• Covering the mouth or the lips.
• On the front of the neck (especially the carotid sinus).
• Crossing the heart section.
• From electrodes placed on the chest and the upper back (through
the chest using an anterior and posterior electrode positions, or
other transthoracic applications understood as “across a thoracic
diameter”).
• Application of electrodes near the thorax may increase the risk of
cardiac brillation. Follow placement of electrodes as outlined by
the clinician or pain specialist*.
• Directly over the spinal column*.
* The qualied pain treatment specialist must determine eligibility for
transcutaneous electrical nerve stimulation.
Side effects
In principle, TENS has no side effects. However, electrodes can cause
an allergic reaction. In this case, please contact the supplier of the
electrode. In addition, stimulation can cause a buzzing, tingling or
prickling sensation.
Environment
The i-Pulz 2 is a portable, battery-powered medical device for home
use. It is suitable for indoor and outdoor use. However, take care when
using outdoors as the device has limited waterproof specication. See
chapter Technical Specications for IP rating.The i-Pulz 2 is non-sterile
and does not require a sterile environment.

6 i-Pulz 2
Warnings
• Simultaneous use of the i-Pulz 2 and surgical devices operating on
a high frequency can cause burns where the electrodes are placed
on the skin.
• The operation of electronic monitors, like ECG equipment, can be
disrupted when the i-Pulz 2 is activated.
• Only use the i-Pulz 2 for purposes as described in this manual.
• The use of the i-Pulz 2 in the range of shortwave or microwave
equipment (cellular phone or microwave) can cause uctuations in
the output of the i-Pulz 2.
• Poorly adhered or small electrodes can cause very unpleasant
stimulation, or even burns if high currents are set. Replace the
electrode in time and check the maximum allowable intensity with
the applied electrode. This can be found in chapter 10.
• Irritation of the skin can be caused by “lengthy” use of small
electrodes and/or an electric current that is too high.
• Keep the i-Pulz 2 out of reach from children.
• Only use the i-Pulz 2 on the advice of a pain treatment specialist;
• A treatment must be interrupted when driving or controlling heavy
machinery. Also while showering, take a bath or swimming.
• Never loan out your TENS device to another person.
Precautions
• Please make sure the i-Pulz 2 doesn’t get hit, fall or is used
inappropriately in order to prevent it from getting damaged.
• Check the i-Pulz 2 and cables for any inconsistencies before using
it. Do not use if damaged or degraded in any way and replace the
device or cable immediately.
• Avoid connecting the device to other equipment not described
in this manual as this may make the device unsafe for use or
compromise the selected therapy.
• Always check if the i-Pulz 2 is switched off before removing or
placing electrodes.
• While it is not necessary to store the i-Pulz 2 in its carry case when
not being in use or when being transported, it is advisable to do
so for safety and added protection from dust, pet hairs, pests or
insects, and so on.
• Remove the device from its carry case when intending to use it.
• Use only accessories approved by the manufacturer or distributor.
Other accessories may make the device unsafe or affect the

7i-Pulz 2
effectiveness of the selected therapy.
• Do not wrap cables around the neck as this could lead to serious
injury or strangulation.
• TENS cables should only be connected to electrostimulation
electrodes that are connected to a single person. Never plug the
leads into an electrical outlet or any other electrical device!
• Keep the device away from heat sources, which can damage the
internal battery.
• The i-Pulz 2 has a limited degree of protection against water or
rain. Prevent the device from getting wet.
Maintenance and repair
The i-Pulz 2 stimulator requires little to no maintenance. You can clean
the device with a damp cloth. Never use abrasive or cleaning agents
that could damage or degrade the product.
You can clean the cables with a damp cloth. The use of aggressive
detergents is not advised, because the cables can get damaged or
become rigid, which increases the likelihood of the cables breaking
The expected service life of the i-Pulz 2 is ve years, though this
strongly depends on its use. The manufacturer advises a technical
check-up of the device every 5 years.
Caution:
• Turn the device OFF and remove cables before cleaning.
• Never submerge the device in water or in any other liquid. In case it
does get submerged, get the device checked by the manufacturer
or distributor before you use the i-Pulz 2 again.
Information for distributors and health care givers
The i-Pulz 2 can be redistributed. However, it is necessary to use new
cables and electrodes for each patient. The i-Pulz 2 can be cleaned
by disinfection wipes based on alcohol (IPA or ethanol) up to 70%.
For correct use, refer to the instructions of the cleaning product.
Professional automated hygienic maintenance is not suitable for the
i-Pulz 2 device itself.

8 i-Pulz 2
Only the manufacturer or distributor should do repairs or
upgrades to your i-Pulz 2. Never modify the device. Contact
your distributor for more information.
Information about the manufacturer and distributor can be found on
the back of this user manual.
2 The i-Pulz 2 nerve stimulator
General
The i-Pulz 2 is a two-channel nerve stimulator. There is a channel
on the left- and right side of the device. Both channels work
independently from each other and do not inuence each other – two
different forms of stimulation can, therefore, be used simultaneously. It
is also possible to use only one channel.
The i-Pulz 2 has 12 standard stimulation pre-sets (indicated by P1 to
P12). It is also possible to adapt user specic pre-sets (indicated by
P13 to P15) and to mask them (render invisible). The masking option is
to simplify the use of the device. The i-Pulz 2 will always start with the
last used pre-set and, if set, the last used timer-function as well.
Controls
I-Pulz 2 makes use of touch-technology. The buttons required to
control the device are at the front of the device. At the top is a physical
Power button to turn the device ON/OFF.

9i-Pulz 2
Power button
Screen
Up/down, left
Timer
Up/down, right
Pre-set
Device status
Channel, right
Channel, left
Buttons
Power button
Press this button to turn ON the
device. Hold the button pressed
for 2 seconds to turn it OFF. In
the case of an active pre-set
(intensity > 0 mA), it is possible to
enable or disable the key-lock.
Pre-set
Pressing this button (once or
multiple times) will select a
pre-set. In the case of an active
pre-set (intensity > 0 mA), it is
possible to reduce the intensity
to 0 immediately by holding the
pre-set button pressed for 2
seconds.
Timer
Pressing this button enables you to set a timer for the pre-set. Press
the Timer button (once or multiple times) to set up the desired time
(ranging from 0 to 99 minutes and starts at 0 again).
By holding the Timer button pressed for 2 seconds, the timer will be
turned OFF. The timer icon in the upper left corner of the screen, which
usually indicates that the timer is activated, will disappear, and the
timer value will be - - - - . Timer adjustments can only be done if both
channels are set to 0 mA.
Pause:
It is possible to enable or disable the pause-function by holding the
Timer button in case of an active pre-set (intensity > 0 mA).
Up/Down (intensity)
Pressing these buttons allows you to control the intensity. The buttons
on the right-hand side of the device control the right-hand side
channel and vice versa. These buttons can also be used to set other
parameters of the device (see chapter 4).

10 i-Pulz 2
The display
A - Pre-set number / (remaining) time
The pre-set number will be displayed here. After setting the intensity,
the timer will countdown to 0 minutes (if activated). During the
treatment, it is possible to show the active pre-set or remaining time by
tapping on the pre-set or Timer button.
B – Keypad lock
This function prevents any accidental increase in the intensity. The
key-icon indicates that the lock is active. The key-lock can be (de-)
activated with the Power button.
If the buttons are not pressed after setting the intensity, the keypad
lock will activate after 15 seconds. The backlight will also dim when
the lock is active.
C – Timer
When the clock-icon is visible, the timer is active.
D – Warning, check the user manual.
When this icon is displayed, please read the manual for further
instructions (see chapter 9).
E – Battery indicator
This icon indicates the capacity of the battery and is displayed in 5
steps (100%, 75%, 50%, 25%, <5%).
F – Intensity display left channel
The display shows the set intensity.
A D
B
C
FG
H
E

11i-Pulz 2
G – Intensity display right channel
The display shows the set intensity.
H – Graphics section
This section display the parameters of the used pre-sets. Every pre-set
has a graphic representation of the TENS waves.
In the advanced mode this is used for menu information.
Device status LED
The LED lights up during the charging-process or when an error has
occurred. See the section “Charging” or “Errors” for more information.
Channels left and right
The channels are the outputs where the
cables for the electrodes can be connected.
The channels are divided into left and right,
just as with the controls. When a channel is
active, the output indicator will light yellow.
This indicates that a current is owing through
this channel to the electrodes.
3 Starting the treatment
When using the device daily, these are the steps to follow:
• Cleansing of the skin
• Placing of the electrodes
• Setting up the stimulator
• Treatment active
• Stopping treatment
• Removing the electrodes
• Skincare
Cleansing of the skin
It is important that you give the proper care to your skin. Cleansing
your skin properly will ensure good contact with the electrodes and will
help you to prevent irritation to the skin. Carefully clean your skin with
a mild soap. It is advised that you remove all body hair on the location
where the electrodes are to be placed, as body hair may cause

12 i-Pulz 2
irritation. To ensure that the electrodes stick to your skin properly,
please make sure that your skin is not oily or greasy. Furthermore, with
proper cleansing, the electrodes and patches will be easier to remove.
Placing the electrodes
Follow the instructions on the packaging of the electrodes or on their
instructions for use. Place and connect only one pair of electrodes at a
time, to avoid confusion.
Keep to the instructions of your pain treatment specialist when
placing the electrodes.
Setting up the stimulator
After the electrodes are placed properly, you can activate the device.
The device starts up with the pre-set you used last. During the trial
period, you and your pain treatment specialist have decided which
pre-set(s) is best suited for you. Chapter 8 gives an overview of all the
standard pre-sets.
Select pre-set
Every time you press the pre-set button the next pre-set will appear
(it is an ongoing list; you will reach your starting position eventually).
When holding the pre-set button for 2 seconds, it will switch back to
the last used pre-set.
Set timer
Check if the timer is set properly for the duration of the therapy. By
tapping on the Timer button the time increases. By holding the Timer
button for 2 seconds, the timer will be disabled.
Once the pre-set is started, this timer value will be saved and used
automatically when you select that pre-set again.
Set intensity
After you have selected the desired pre-set, you can set up its
intensity. Pressing the Up-button briey will increase the intensity in
small steps of 0,5 mA. When you keep the up-button pressed, the
intensity will increase faster.

13i-Pulz 2
Caution: for safety regulations, it is not possible to increase
the intensity beyond 20 mA when keeping the Up-button
pressed. Only when you release the button briefly can you
increase the intensity again, till the next “hold-point”:
20 – 40 – 60 – 70 – 75 – 80 – 85 – 90 – 95 – 100.
Keep to the maximum intensity indicated for the size of the
electrode in Chapter 10.
If there is none or a limited connection between
the device and your skin, and the intensity
comes above 5 mA, a cable icon will be
displayed. The intensity of the relevant channel
will be indicated by ”nc”. See “Figure 1 no
connection”.
When the intensity will be set higher than
7.5 mA, the device disables the channel to
prevent any hazards. See Figure 2 output
disabled.
In this case, check if the cables and the
electrodes are properly connected and if
necessary, replace them. Then retry to set the
intensity again. See the section “Error” for more
information.
Treatment period
Regarding the treatment period, you must strictly adhere to the
instructions from your pain treatment specialist specialist. If you need
a longer treatment period, you should discuss this with your pain
treatment specialist before changing your stimulation patterns.
In consultation with your doctor, you can do exercises or contemporary
activities during the treatment.
Figure 1 no connection
Figure 2 output disabled

14 i-Pulz 2
Pause
If it is desired to take a break during the treatment, hold the Timer
button pressed for 2 seconds. Then the intensity goes back to zero.
To resume the treatment again, press the Timer button again for 2
seconds, and the intensity gradually increases to the intensity level
before you paused. The automatic increasement is able to interrupt by
pressing any button.
Stopping the treatment
If the timer is activated, the i-Pulz 2 stimulator will switch off both
channels automatically when the timer is nished. The treatment can
also be stopped manually by holding the pre-set button pressed for
2 seconds. Or by turning down the intensity until it reaches 0.0 mA.
When the intensity reaches 0.0 mA, the device will switch off after a
few minutes in order to preserve the batteries. The device can also be
switched off by pressing the Power button.
Removing the electrodes
Always switch the device off before removing electrodes!
When removing the electrodes, follow the instructions on the
packaging of the electrodes or on their instructions for use.
Taking care of your skin
After you have removed the electrodes, you can carefully clean your
skin with a mild soap. Never use aggressive substances like ether or
alcohol to remove any adhesive residues.
After the skin is cleaned, a red mark from the patches and/or
electrodes may be visible on the skin. This reaction usually disappears
quickly.
Irritation of the skin
Despite all the precautions, it is possible that you experience irritation
of the skin. If you experience persistent irritation of your skin when
using the i-Pulz 2, please contact your pain treatment specialist.

15i-Pulz 2
4 Settings menu and advanced possibilities
Settings menu
To open the settings menu, hold the Power button pressed when the
device is OFF. After 2 seconds, the device switches to the settings
menu. It starts with device information, which indicates the software
version and PCB number.
By tapping on the pre-set button, it can step
through the menu items:
• Device information
• Cable tester
• Buzzer
• Time
• Timer step-size
• Mask pre-set
• Default settings.
To change the settings of the selected item, tap on
the Timer button.
Device information
This item pertains to specic information of the device like software
version and PCB number. This data may be requested by the
manufacturer or distributor if you report a defect or problem. By
tapping on the Timer button, it will display extra information about the
battery. SoC indicates the state of charge in % and SoH the state of
health of the battery. By tapping the Timer button again the voltage
and current of the battery is displayed.
Device
information
Cable tester
Buzzer
Time
Timer
step-size
Mask
preset
Default
settings

16 i-Pulz 2
Cable tester
Connect the supplied cable(s) to the device without connecting the
electrodes. For both channels, the text “OPEN” will be displayed on
the screen. You can now test the cable by pressing the 2 mm pins
together. The text on the display will change from “OPEN” to “CLOSE”
on the side of the device where you are testing the cables, you will also
hear a beep. If this is not the case, and the text “OPEN” remains on the
screen, this indicates that the cable is defective and must be replaced.
Please contact your distributor for a new set of cables.
With the Timer button, it is possible to leave this item and go back to
the settings menu again.
Buzzer
This option allows you to switch the sound that is heard by each touch
input on or off, to give extra feedback when a button is “pressed”.
With the left up-button, the sound will be turned off, with the right up-
button, the sound will be turned on. By pressing on the Timer button,
you will be asked if this change should be saved, before the device
goes back to the settings menu.
Time
The device stores the actual time, which
will be used for the compliance function. If
the time or date is not accurate, the other
functions of the device will still work correctly.
When you open this menu, the current
time and date will be displayed in the time-
overview. To change the time or date,
press the pre-set button to step through
the available values. With each value, is it
possible to decrease the value with the left
up-button and increase the value with the
right up-button.
By pressing the Timer button, it will switch
back to the time-overview.
When pressing on the Timer button in the
time-overview you will be asked if this change
should be saved, before the device will go
back to the settings menu.
Time
overview
Hours
Settings menu
Minutes
Year
Month
Day

17i-Pulz 2
Timer step-size
The timer step-size is set to 10 minutes by default. This interval size
can be changed to 1, 5, 10, or 15 minutes with the left or right up-
buttons. By pressing on the Timer button you will be asked if this
change should be saved, before the device will go back to the settings
menu.
Mask pre-set
With this menu item, it is possible to mask or unmask every pre-set.
This option can be active to simplify the use of the device by hiding
unused pre-sets.
With the pre-set button, it is possible to step through the pre-sets, with
the left or right up-button it is possible to mask/unmask the pre-set.
If all pre-sets are masked, P1 will remain visible during normal
use.
By pressing on the Timer button you will be asked if this change
should be saved, before the device will go back to the settings menu.
Default settings
The device settings as buzzer, timer step-size, and mask pre-set
will be set to factory default. Also, the user specied pre-sets and
compliance history will be cleared to factory default.
Adjust menu
Pre-sets P13, P14, and P15 can be adapted for user specied pre-
sets. With these pre-sets, it is possible to combine the basic pre-sets
P1 – P9 or to customize the parameters of the basic pre-sets. In
default, these pre-sets are not activated. To activate these pre-sets go
to the “mask pre-set” menu, so that these pre-sets can be unmasked.
Configure a user specified pre-set only in consultation with the
pain treatment specialist.

18 i-Pulz 2
To create a user specied pre-set, turn ON the
device and select P13, P14, or P15 to congure.
Press the Power button and the pre-set button
together to switch to the Adjust menu. (make
sure the intensity is 0.0 mA)
To switch back to the normal menu, press shortly
on the Power button again. The device will ask to
save the adjustments.
In the adjust menu, it is possible to select one
of the basic pre-sets for the right channel and
another basic pre-sets for the left channel.
Pre-set P10 can’t be combined with other pre-sets
and will therefore be for both channels.
With the Left Up/Down button, you can select P1 till P10 for the Left
channel. And the Right Up/Down button for the Right channel. See
Figure 3 adjust menu”.
To customize the parameters of these basic pre-
sets, press on the pre-set button. First, you can
adjust the parameters of the Left channel.
Depending on which basic program is selected,
various parameters can be changed. See the
section Pre-set overview.
• Use the Timer button to step through these various parameters.
• Use the Left Up/Down buttons to adjust the value of the parameter.
When the parameters for the Left channel are
set, press the pre-set button to switch to the
parameters for the Right channel.
• Use the Timer button to step through the
various parameters.
• Use the Right Up/Down button to adjust the
value of the parameter.
By pressing the pre-set button again, the adjust menu will start over
again, and you can select the basic pre-sets again.
Figure 3 adjust menu

19i-Pulz 2
Low and rest intensity
When a basic pre-set P4 or P7 is selected as a user specied pre-set,
you can set the separate intensity for the low-frequency period or the
rest period. Therefore, set the “low/rest intensity parameter” ON in the
adjust parameter menu.
When this pre-set is started, rst the desired
main intensity for the main frequency will be
set. After that, it is possible to set the intensity
for the lower or rest-period. To do this, press
on the intensity value at the screen. Now the
display changes like you can see in gure 6,
and it is possible to set the intensity of the lower
frequency or rest-period. This can be set 50%
higher or lower than the main frequency intensity.
Press on the screen at the intensity value again
to switch back to the normal screen.
When adjusting the main intensity level halfway the treatment, the low
or rest intensity-level will be reset to the same intensity as the main
intensity level.
Compliance menu
In the compliance menu, it is possible to see the usage history of the
device. The pre-set, intensity, and time of each use will be stored in the
device. This information can be used by a medical specialist, doctor,
caregiver or parent to verify correct use according to the instructions.
When the device is ON, press the Power button and the Timer button
simultaneously to switch to the compliance menu. The compliance
menu can be exited with a short press on the Power button. The
device asks to clear the compliance menu and switch back to the
normal menu.
When the compliance is opened, it displays the following information.
The Session Number + date indicates when the treatment happened.
Of every treatment, it shows; the used pre-set number, the intensity,
and the time per channel (in minutes).
The date is based on the time set in the device. If the device-time is
inaccurate, it can give a misrepresentation of the date. See settings
menu to set the correct time in the device.
Figure 6 set low / rest
intensity

20 i-Pulz 2
Controls
• With the Left Up/Down button, you can step through the sessions
one by one.
• With the Right Up/Down button, you can step 10 sessions further.
• With the Timer button, you can step to the last session.
• With the pre-set button, you can step to the rst session.
Charging
The i-Pulz 2 has a built-in Li-ion battery for long term use. This battery
is not user-replaceable and can only be changed by qualied service
personnel. The expected service life of the battery is ve years,
based on 1000 charge cycles. The battery life strongly depends on
its use. It is recommended to charge the i-Pulz 2’s battery only when
it is depleted. This preserves the battery life and provides a correct
indication of the battery level.
Battery storage condtition
If you want to store your i-Pulz 2 long term, two key factors will affect
the overall health of your battery: the environmental temperature and
the percentage of charge on the battery when it’s powered down for
storage. Therefore, we recommend the following:
• Do not fully charge or fully discharge your device’s battery,
charge it to around 50%. If you store a device when its battery is fully
discharged, the battery could fall into a deep discharge state, which
renders it incapable of holding a charge. Conversely, if you store it fully
charged for an extended period of time, the battery may lose some
capacity, leading to shorter battery life.
• Power down the i-Pulz 2 to avoid additional battery use.
• Place your i-Pulz 2 inside the caring case in a cool, moisture-free
environment that’s less than 30° C (88° F).
• If you plan to store your device for longer than six months, charge it
to around 50% every six months.
Depending on how long you store your i-Pulz 2, it may be in a low-
battery state when you remove it from long-term storage. After it’s
removed from storage, it may require 20 minutes of charging with the
original adapter before you can turn it ON.
Table of contents
Other Rehan Electronics Medical Equipment manuals