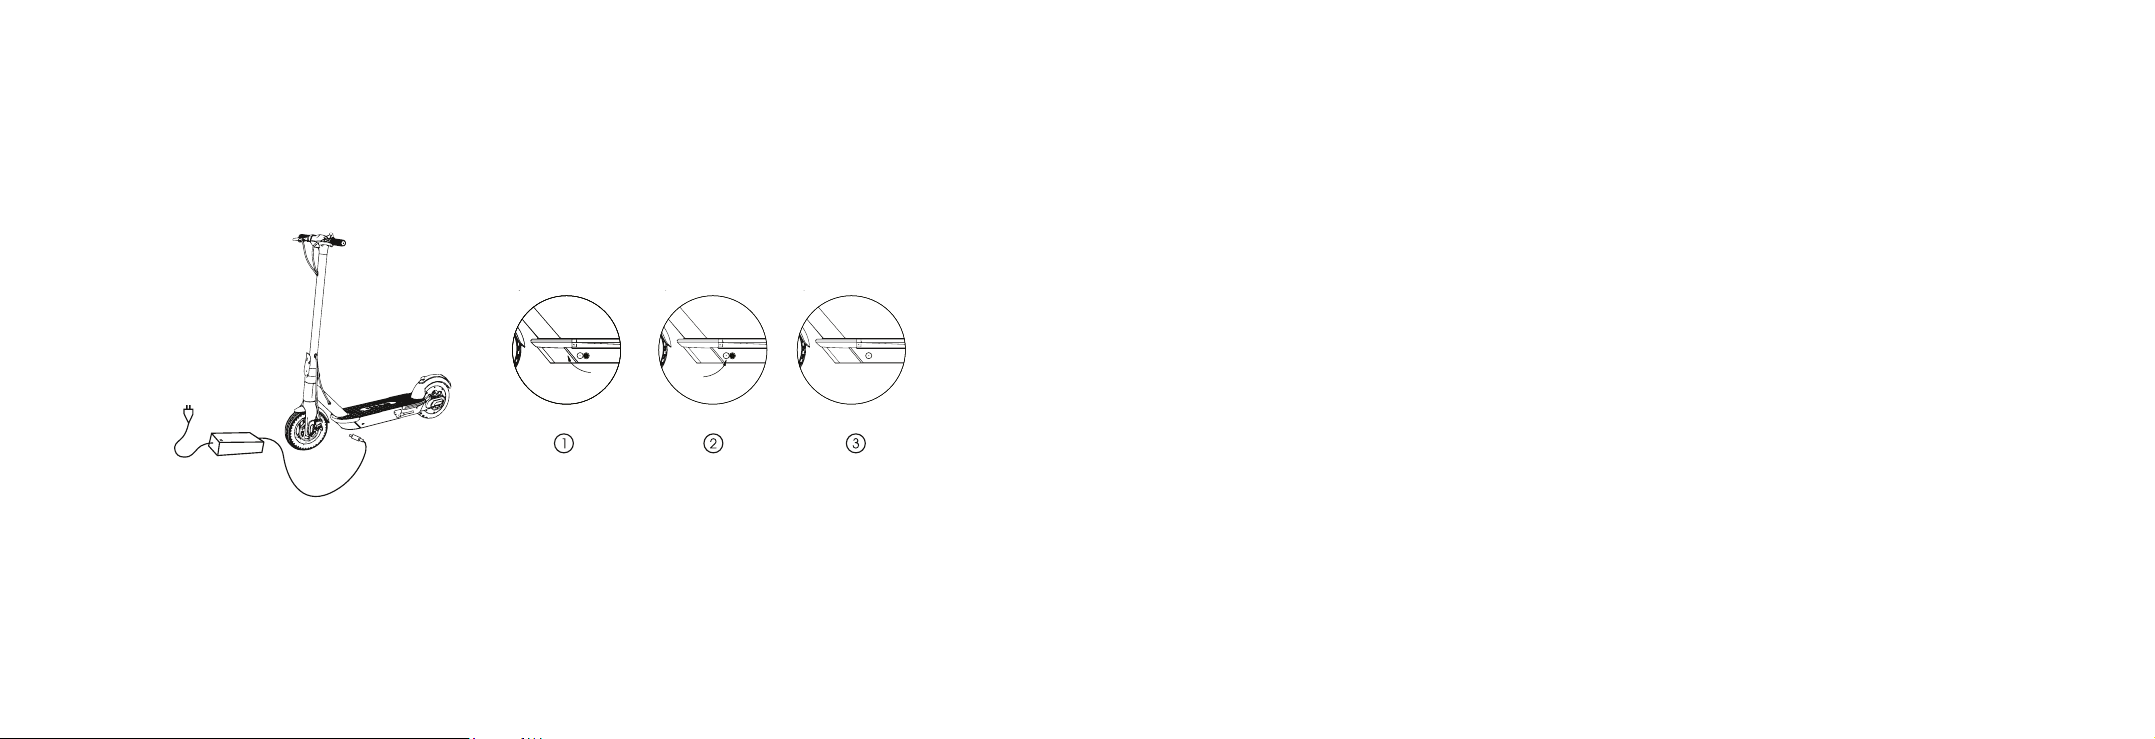
Reid FY-0634201500 User manual

OWNER'S PACK
SCAN HERE TO
REGISTER YOUR REID
SCAN HERE TO
REGISTER YOUR REID
@REIDBIKES
OWNER'S PACK

BUILD ME
RIDE ME
MAINTAIN ME
APP INTEGRATION
JOIN THE COMMUNITY
Pages 1-10
Pages 11-22
Pages 23-30
Pages 31-34
Pages 35-42
ENVIRONMENTAL PLEDGE
Pages 43-48

BUILD ME
1 2

About the Manual
1. This appliance can be used by riders 14 years and above only. Children shall not play with the
appliance. Cleaning and user maintenance shall not be made by children without supervision.
2. This manual can also be downloaded from the website: www.reidbikes.com
3. WARNING: For the purposes of recharging the battery, only use the detachable supply unit
(model: FY-0634201500) provided with this appliance.
4. When product is discarded:
(1) the battery must be removed from the appliance before it is scrapped;
(2) the appliance must be disconnected from the supply mains when removing the battery;
(3) the battery is to be disposed safely
5. This appliance contains batteries that are non-replaceable.
This manual applies to your Reid Overdrive electric scooter. Please read the manual
carefully to ensure that:
1.You quickly grasp the basic operating procedures and riding methods of your Reid
Overdrive electric scooter.
2.You familiarise yourself with safe driving rules for a safe and enjoyable scooter
experience.
3. You understand the composition and safety of your Reid Overdrive electric scooter.
If you have any questions or need more information, please visit www.reidbikes.com
Information
tips
Please pay attention to the following signs and relating content:
Dangers!
Could cause serious property
damage or personal injury
Warnings!
Improper operations can
lead to malfunction of the product
3 4

Charger adapter x1
Accelerator
Headlight
Bells
Refer
Front wheel
Fender
Folding
mechanism
Charging port
Meter
Silicone
pedal
Kickstand
Handle
Folding hook
Hardware body
Disc brake
Ambient lights
Rear fender
Brake lights
Motor
*Please check carefully that the parts in the package are
intact.
User manual x1
Screw M5 x5
Hex wrench M5 x1, M3 x1
Components
M5 M3
ComponentsWhat Comes In The Box
5 6

Use the control panel to control the scooter, the specific features are as follows:
1. Long press the power switch button to turn on the eScooter, also turning on the front light, ambient lighting, tail
light and rear brake light. The control panel shows the power and speed.
2. After turn on, the control panel display shows "1", indicating that the speed is 1st gear. Press the button to display
2nd gear; the highest is 3rd gear.
3. Press the button twice to turn on the front light. Press the button twice again to turn it off.
4. Press the button three times to display the total mileage. Pressing the button three times again will display the
speed.
5. When using the brake, the rear brake light will get brighter.
6. The battery bar at the top equates to the following: Five Bars = 100%, Four Bars = 80%, Three Bars = 60%, Two Bars =
40% and One Bar = 20 %.
Control instructions
Install the brakes to the correct position with the Hex wrench (M5 in the tool bag).
Lock
Cruise
control
Maximum
mileage
Installation GuideControl Panel
7 8

M
3
3. Fasten the scooter standpipe and fold out the kickstand.2. Hold the scooter upright, to ensure that the lock will not be affected, please keep the
folding-spanner (the blue part of the image) at the bottom. Pull the folding-spanner to the
top, then the scooter is completely locked.
5. Use the hex wrench in the tool bag to lock the screws on
both sides.
6. After the installation is complete, switch the scooter
on and off to check that the scooter is working properly.
4. Install the handlebar to the standpipe.
9 10

RIDE ME
11 12

Open rubber cap.
Insert in the charging plug.
After charging is completed, close the rubber cap.
Safety InstructionsCharging Instructions
Your Reid eScooter is a sporting entertainment tool that is not a vehicle. If you drive it into a public area
there are multiple safety risks not just to yourself but also to others. Strictly follow the instructions in this
manual, to protect yours and others safety and to ensure compliance with national and provincial
regulations and traffic regulations. It is important to understand that if you decide to take your Reid
eScooter on a public road or other public place, you may be exposed to the risk of unauthorised driving /
improper operation of your eScooter, even if you are in full compliance with our safe driving guide. You
must strictly follow the safety requirements of this manual where there are no national standards and
regulations for electric scooters. Reid shall not be liable for any liability, personal injury, accident, legal
dispute and all other unfavourable events resulting from the use of violating the instructions indicated in
this manual.
The faster the eScooter is driving, the longer the brakes need and on some smooth surfaces, using the
left-hand brake can cause the wheels to slip and lose balance or even fall. Therefore it is important to be
vigilant and maintain the proper speed during driving, whilst maintaining a reasonable safety distance to
others. Please be vigilant and drive at low speeds before entering unfamiliar terrain.
Do not lend your Reid eScooter to a person who has never ridden it before to avoid injury. If you do lend
your eScooter to someone, be sure to be responsible for the safety of them, you should teach them how to
ride and tell them of how to ride safely, wearing the right safety gear.
Please check your Reid eScooter every time before driving. If you find that parts are loose, the battery life
is minimum or there is abnormal sound or malfunction, then please stop using it immediately and do not
force it to drive.
13 14

2. One foot stands on the deck, the other foot
kicks backward.
Turn on the power and check the power indicator.
*There are risks of falling and injury when riding,
so please wear a helmet and protective gear as
shown in the picture.
How To Ride
3.Once you have the electric scooter moving above 5km,
putboth feet on the deck and push the throttle to start the
electric.
4. Releasing the throttle will slow you down gradually,
with an automatic energy recover system coming in.
For hard braking pull the lever on the left side.
5. When turning, you need to lean your body slightly
towards the direction you are turning and turn the
handle slowly.
6. Keep to one speed for approximately 8 seconds
to start the cruise control. When you release the throttle ,this
then means the speed will remain unchanged. To cancel the
cruise control, push the throttle or operate the brakes.
15 16

Please avoid riding in
the rain.
Do not ride quickly over uneven surfaces. Keep
a speed between 5km/h and 10km/h and bend
your knees slightly to ensure maximum safety.
Do not ride throughdoorways. Do not accelerate downhill.
Do not press the throttle whilst
walking with the eScooter.
Avoid obstacles when driving.
Do not hang any heavy items on
the handlebar.
Keep both feet on the deck whilst
driving.
Riding Safely
17 18

Warning Reminder
Do not try to do any dangerous movements.
Forbidden to drive on the road or
in crowded residential areas.
Forbidden to rotate the handle strongly
while driving with high speed.
Forbidden to drive through water
deeper than 2cm.
Forbidden to drive the eScooter with
more than one person and/or holding
a child.
Forbidden to step or tread on the
back mudguard. Forbidden to press the disc brake.
Forbidden to go up or down stairs or
to jump over barriers when driving.
Forbidden to drive without your hands
holding the handlebar.
19 20

After the e-scooter has been folded successfully, use one hand or two to hold the folding-
level to transit.
Put the safety-lock (the red part of the image) up whilst holding the steer tube. Then, open up the
folding spanner (the blue part of the image) and aim it at the bell and fender hook. Next, buckle the
belt with the back-fender.
Folding and Transportation
21 22

MAINTAIN ME
23 24

1. Do not use alcohol, gasoline, kerosene or other corrosive, volatile solvents to clean, otherwise it will seriously
damage the body and internal structure. It is forbidden to use a pressure fun spray and flush. Make sure that
the charging cable is unplugged and the rubber cap has been tightened when cleaning, otherwise it may
cause an electric shock or accident due to water intake.
2. Store you Reid eScooter in a dry and cool room as much as possible to avoid accelerating of ageing. Failure
to do so will reduce the usage life of the battery over time.
3. When the scooter is fully charged and not in use, it needs to be recharged every 3 months to avoid battery
over-discharge protection.
1. Do not use other brand of batteries, otherwise there may be security risks.
2. Do not touch the battery contacts and do not open the battery compartment. Any tampering of this may
cause a short circuit, potentially damaging the battery and causing personal injury.
3. Only use the original charger for charging, otherwise it may cause damage or a fire.
4. Inappropriate disposal of used batteries may result in serious environmental pollution. Disposal of waste
battery packs must be in accordance with local regulations.
If there is a mark on the body of your Reid eScooter, wipe it with a small amount of water with a soft cloth. If it is
difficult to clean, you can use a toothbrush to brush it repeatedly then use a damp cloth to clean in. If the body
has plastic scratches, you can use sandpaper or other abrasive materials for polishing.
Electric scooter cleaning and storage
Electric scooter battery maintenance
5. Do not place the battery in a high temperature environment higher than 50 °C or lower than -20 °C (for
example do not expose the eScooter or its battery pack to the car in summer)otherwise it may cause a
malfunction, or even a risk of fire. The ideal temperature for maximum mileage and performance is between
20°C and 25°C and riding below 0°C will severely decrease battery life and performance. In some instance, at
-20°C the mileage may be only half or less than at optimal temperature.
Disc brakes debug
Note:
It is forbidden for non-professionals to remove the battery pack. Failure to do so may result in serious electrical
faults or safety short-circuits.
If you feel the brake is tight when you are riding, you can adjust the disc brake by loosening the screw on the Rotary knob, with a
M5 hex wrench (as shown in the picture below). Turn the Rotary knob slightly to the right and tighten the screw with a M5 hex
wrench. If you feel the brake is loose, you can turn the Rotary knob slightly to the left, after loosening the screw on the Rotary
knob with a M5 hex wrench and then tighten the screw.
M5
Rotary knob
Alternatively, take your electric scooter to the nearest service centre for adjustment.
Daily Maintenance
Note
25 26

Ride Limits
Main Parameter
Product Dimensions
Weight
Rider Age
Rider Height(CM)
Max Speed(KM/H)
Max Mileage(KM)
Max Slope
Road
Working Temperature
Charging Temperature
Stock Temperature
Waterproof level
LxWxH(MM)
Folding Size LxWxH(MM)
Total Scooter(KG)
-10-40°C
0-40°C
-20-45°C
IPX4
1160x510x1220
1160x510x550
18
100
30
Height dependant
120-200
25
40-45
15%-20%
Rider Weight Maximum(KG)
Rider Weight Minimum(KG)
Parameters Description Specifications
Cement, asphalt, flat roads, etc., shall not
exceed step above 1cm, and shall not exceed
gap over 3cm.
Parameter Table
Motor
Charger
Battery Pack
Battery manufacturer
Battery model name
Rated voltage(VDC)
Maximum Charge Voltage(VDC)
Rated Capacity
Protection
350
700
FY-4202000
84
100-240
42
2
6-7
Shenzhen World Electronic
Co.,Ltd BSJ-29-C
36
42
12Ah
Temperature, short circuit,
undervoltage, overcurrent,
overcharge, overdischarge
Shenzhen Fuyuandian Power Co.,Ltd
Parameters Description Specifications
Electric scooters are fully charged, load is 100kg, ambient temperature is 25°C
without wind, maximum speed is 25kph. However, the actual cruising range varies
with driving habit, roads, ambient temperature, wind speed and other factors.
Height: The height of the body to the ground.
Endurance:
Note: Data and parameters vary by mode. Subject to change without notice.
27 28
Charging time(H)
Rated Current Output (A)
Rated Voltage Output (VDC)
Rated Voltage Input (VAC)
Rated Power (W)
Charger Model Name
Charger Manufacturer
Max. Power (W)
Rated Power (W)

WARNING Warranty
Your eScooter has a 1-year warranty from the date of purchase.
If you’re having an issue with your eScooter, we want to help resolve it. In the first instance, please
contact the store where you purchased the product. If you experience any difficulty settling a
warranty claim with your retailer, please contact us directly. Likewise, should anything feel loose
or not right then please stop using your product immediately and get in contact with the retailer
you purchased it from or us directly.
Register you eScooter with us via the QR code below so we can quickly and easily verify your
purchase for you warranty. Should your eScooter ever be stolen, you can also get in touch with us
to retrieve your serial number which is often wanted by the authorities.
1.To reduce the risk of injury, user must read the instructions manual.
2. Prolonged exposure to UV rays, rain and the elements may damage the enclosed materials.
3. Store indoors when not in use.
4. Risk of fire, no user serviceable parts
5. Use only with specified charger in instructions
Error Code Chart
29 30
Battery Care
Never leave batteries charging in a building that is unattended or overnight when you are
Unplug or disconnect from the battery once charging is complete
Do not allow the battery to overheat and ensure it is charged on a hard surface where heat can
disperse
Monitor and assess for damage to the battery and the charger, following the manufacturer’s
guidance for replacement or repairs
Ensure smoke alarms – preferably interlinked detectors around the property - are fitted where
charging is taking place and, if possible, store and charge away from main living
sleeping in the property

APP INTEGRATON
31 32

APP Download Guide: Pairing Your eScooter
To pair your phone to your eScooter, please download the app and follow these
instructions: Open the app, select the model of your scooter, create and account with
us and then click the Bluetooth button in the top left hand corner of the main screen.
Chose your device and enter the password: 000000, you are now connected.
The Reid eMobility app is available to download in the App Store and Google Play. You
can also scan the QR code below to download and install the app.
Bluetooth password: 000000
33 34

JOIN THE COMMUNITY
35 36
Table of contents
Other Reid Scooter manuals