Reinecker MANO touch 4 User manual

MANO touch 4
EN
User manual
Please read this user
manual carefully
prior to installation,
use and maintenance
for your own safety
and in order to avoid
damages on your
system.

KonformitätserklärungKonformitätserklärung
Declaration of conformityDeclaration of conformity
Reinecker Vision GmbH
Sandwiesenstraße 19 · 64665 Alsbach-Hähnlein
Wir erklären in alleiniger Verantwortung für alle unsere Systeme,
dass diese mit den folgenden Richtlinien übereinstimmen.
We declare under our sole responsibility that the systems, which have been brought
into the market by us, meet the requirements of the following regulations.
Richtlinie 2017/745/EU
Medical Device Regulation (MDR)
Risikoklasse I nach Anhang VIII Regel 13
CE Konformität nach Anhang IX
und
RoHS II (Richtlinie 2011/65/EU)
Regulation (EU)2017/745
concerning medical devices risk class I
according to Annex VIII standard 13
CE conformity of Annex IX
and
RoHS II Regulation (EU)2011/65
Die CE– Kennzeichnung auf dem Gerät dokumentiert diese Übereinstimmung.
The CE mark on the system points out this accordance.
Alsbach-Hähnlein,
...........................................
Ort und Datum der Ausstellung
Place and date of issue
M. Reinecker Geschäftsführer
M. Reinecker General Manager
...................................................
Name und Unterschrift des Befugten
Name and signature of the authorized person
KonformitätserklärungKonformitätserklärung
Declaration of conformityDeclaration of conformity
KonformitätserklärungKonformitätserklärung
Declaration of conformityDeclaration of conformity
MANO touch 4
(MANOT040)
01.01.2021

Content
I. General Information .......................................6
Notes on the electromagnetic compatibility (EMC) ..................6
Storage of the user manual....................................6
Product description ..........................................7
Medical Device .............................................7
Purpose ...................................................7
Evolution and lifetime of products ...............................8
Combination with other products................................8
Precautions by alteration of the performance of the device ...........8
Reinstatement and installation .................................8
Cleaning of the system .......................................8
Special advice for transport and storage .........................9
Disposal of the unit according to (EU) 2012/19 ....................9
Safety instructions ..........................................10
II. Instructions on the adequate use of the electronic magnifier
MANO touch 4...........................................11
Scope of delivery...........................................11
Available as an option .......................................11
Characteristics.............................................11
Description of Ports and Controls ..............................12
Description of the controls....................................12
Touch display .............................................13
Connections. . . . . . . . . . . . . . . . . . . . . . . . . . . . . . . . . . . . . . . . . . . . . . . 13
Touch screen functions ......................................14
Using the interface .........................................14
Description of the menu functions..............................15
Menu options..............................................15
Colour mode ..............................................16
Back (to previous view) ......................................17
Brightness ................................................17
Contrast..................................................17
Icon arrangement ..........................................18
Auto focus ................................................18
Advanced adjustments ......................................19
Color scheme icon settings ...................................22
Image gallery..............................................23
Battery use ...............................................24
Replacement of batteries ....................................25
Disposal of batteries ........................................25
Protective circuit of the battery ................................25
Trouble shooting ...........................................26
Technical details ...........................................27
Warranty Information........................................28
Notes ....................................................29

6 7
I. General Information
Important notes on the operation of the reading magnifier MANOtouch4.
Please read them carefully prior to the operation of the reading magnifier!
Notes on the electromagnetic compatibility (EMC)
This reading system is suited for use in all set-ups including the domicile
that are connected directly to a public power supply for buildings with
residential purposes.
This reading system is designed for the use in the indicated electro-
magnetic environment. The user should ensure the use in the indicated
environment.
This reading system operates on HF-Energy exclusively for its own func-
tion. Therefore the emitted interference of high frequency disturbances
is very low and the interference with other appliances operated close-by
is improbable. When operating the reading system simultaneously with
other systems, however, the possibility of disturbances of the system or
other systems should not be neglected.
For this reason it should be ensured that the system is not placed directly
beside or on top of another system. If the set-up of this system in the
proximity of medical, measuring devices cannot be avoided,the operator
of these devices has to be informed that it is necessary to observe the
performance of the system to control the conventional use of the system
in the chosen set-up.
Electronic devices are sensitive towards electric discharge and towards
high frequency electromagnetic fields.
Attention:
In order to avoid high frequency disturbances the operator should
respect a minimum distance of one meter to portable and mobile
HF-telecommunication devices.
The device may not be used in the patients environment.
Storage of the user manual
The user manual is an essential part of MANOtouch4. Please keep
the manual in a safe place for future reference.
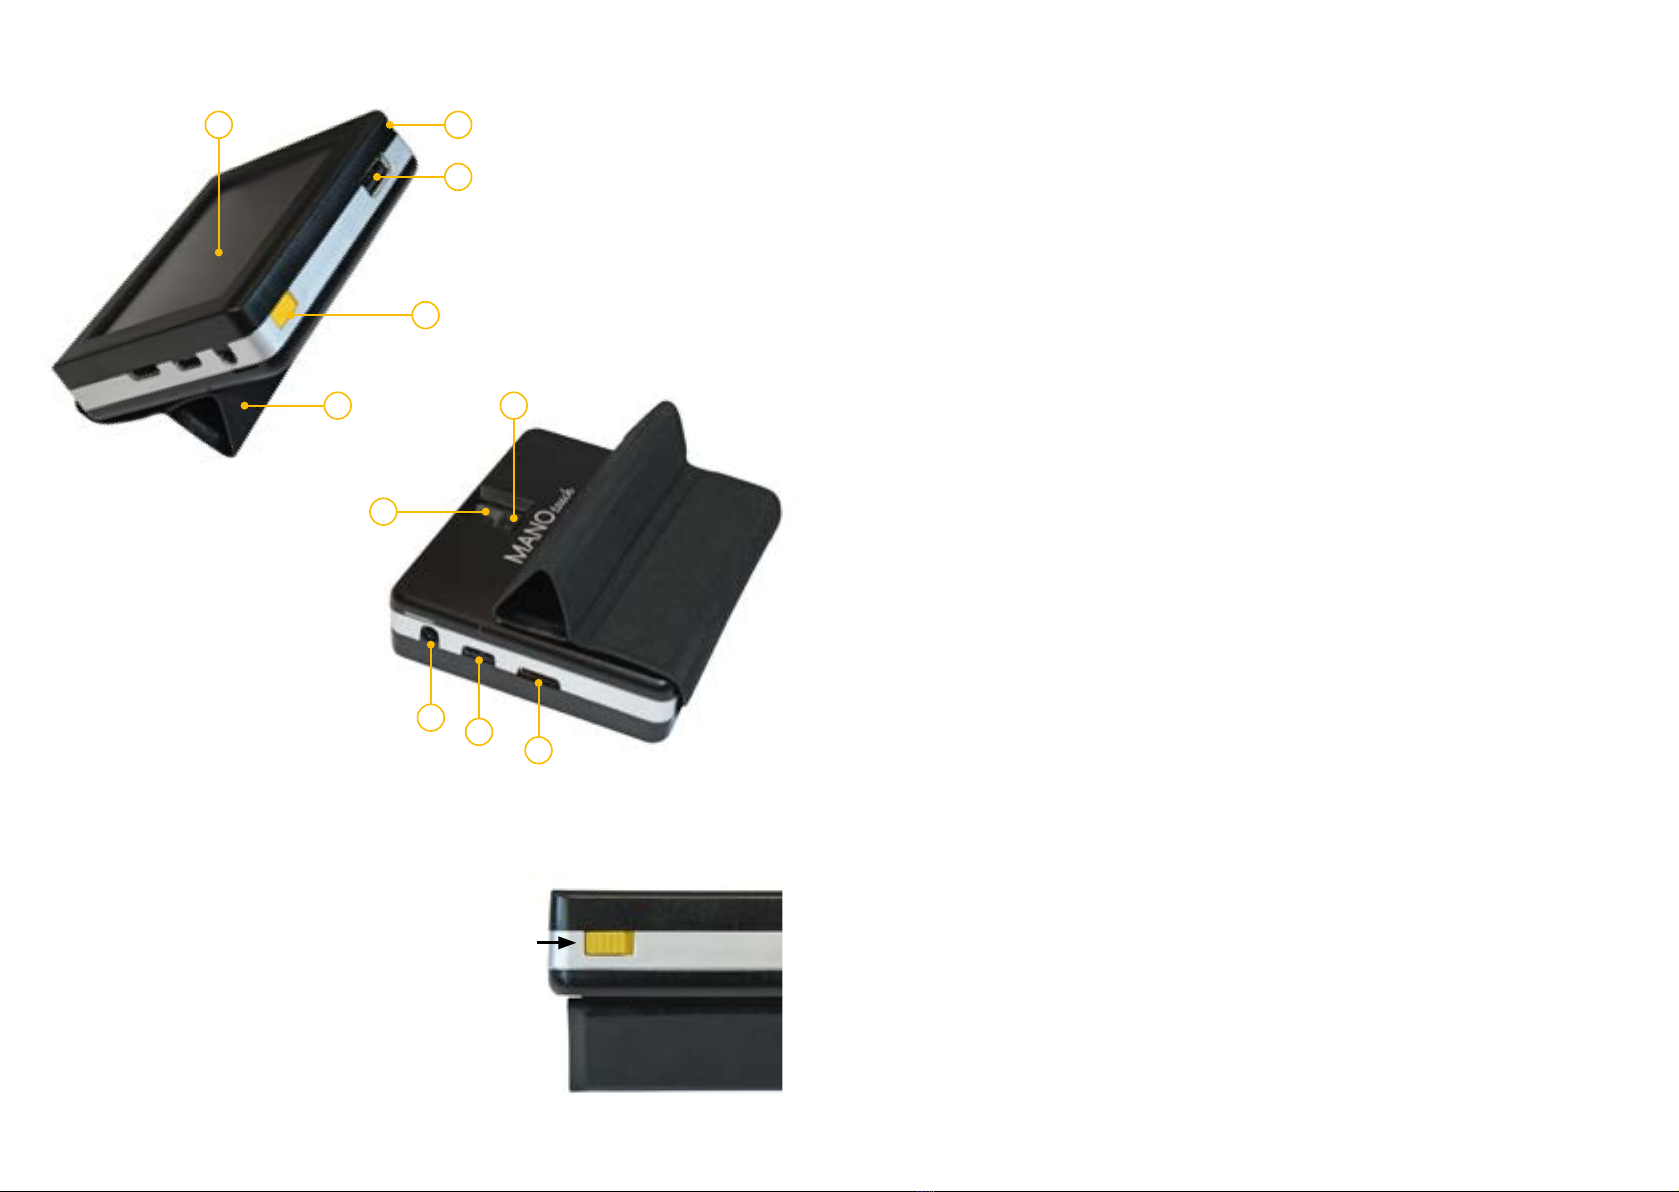
Product description
MANOtouch4 is an electronic magnifier for text and pictures for perma-
nent and private use.
• clear, virtual touch display (approx. 9 cm in diagonal)
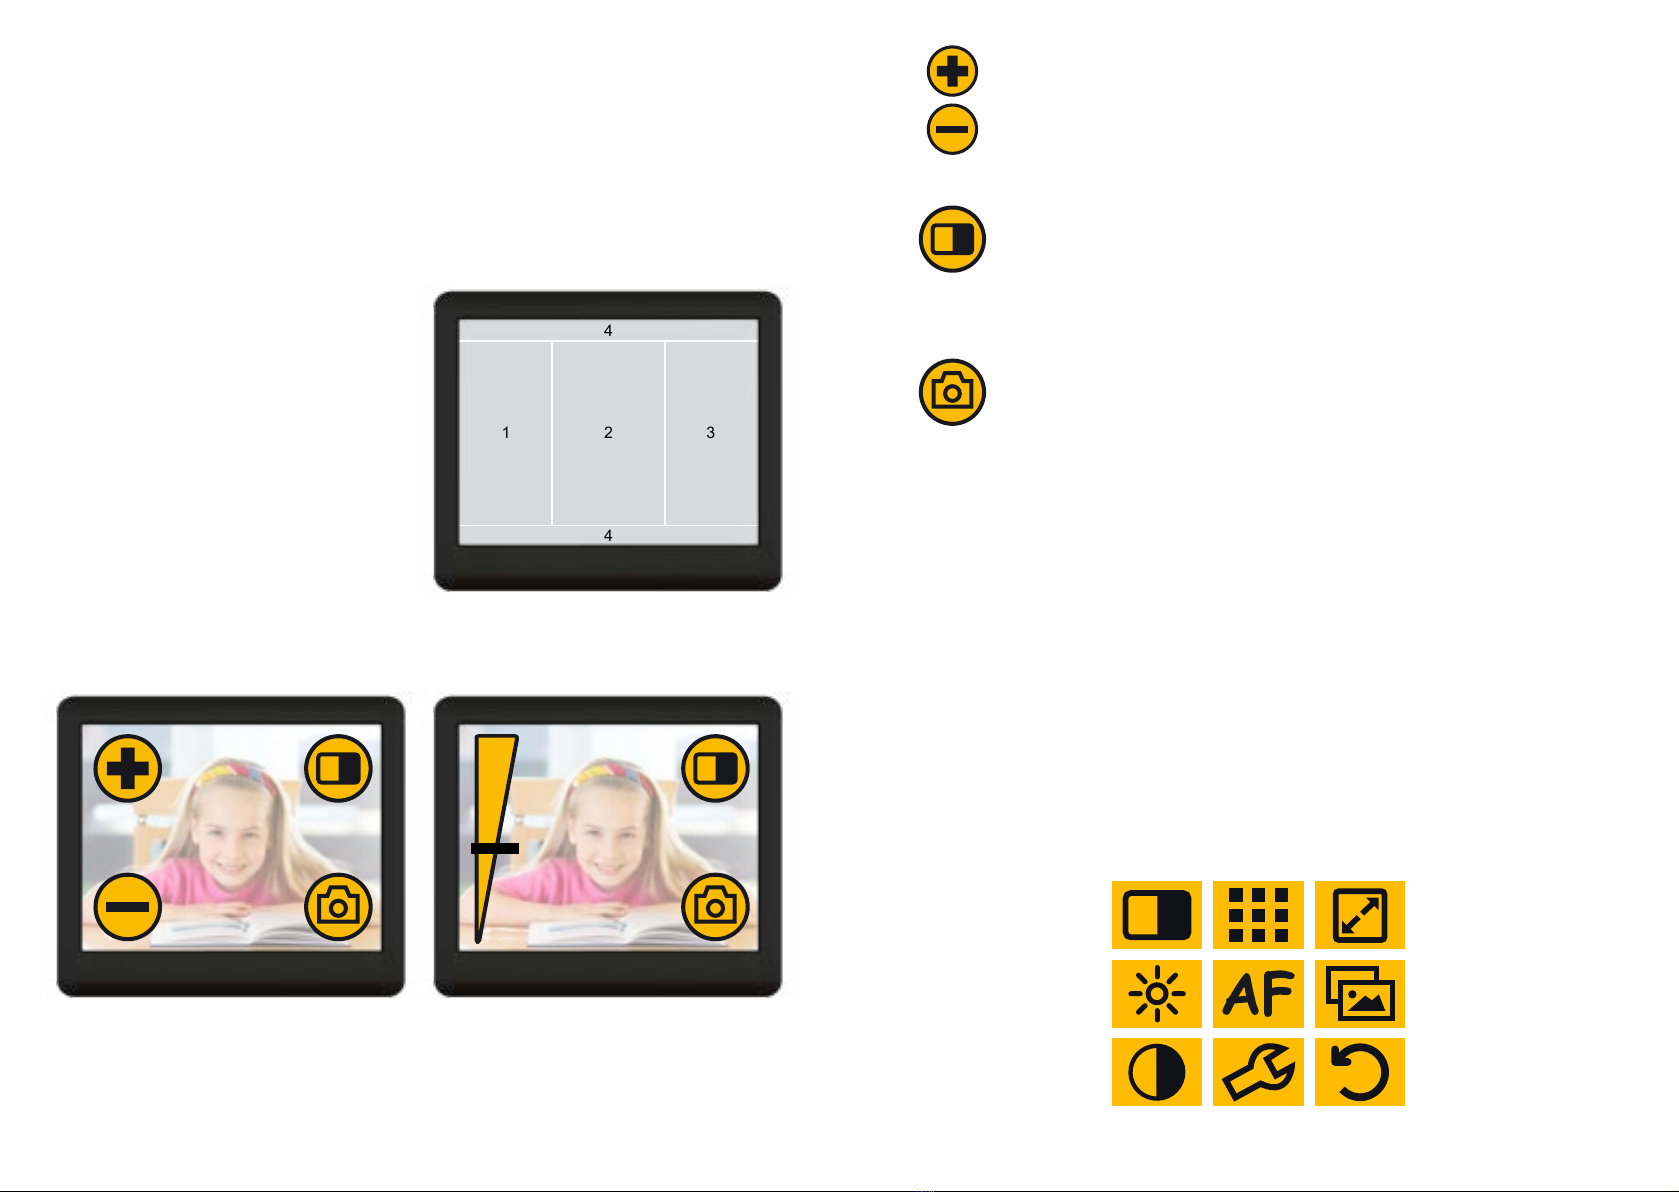
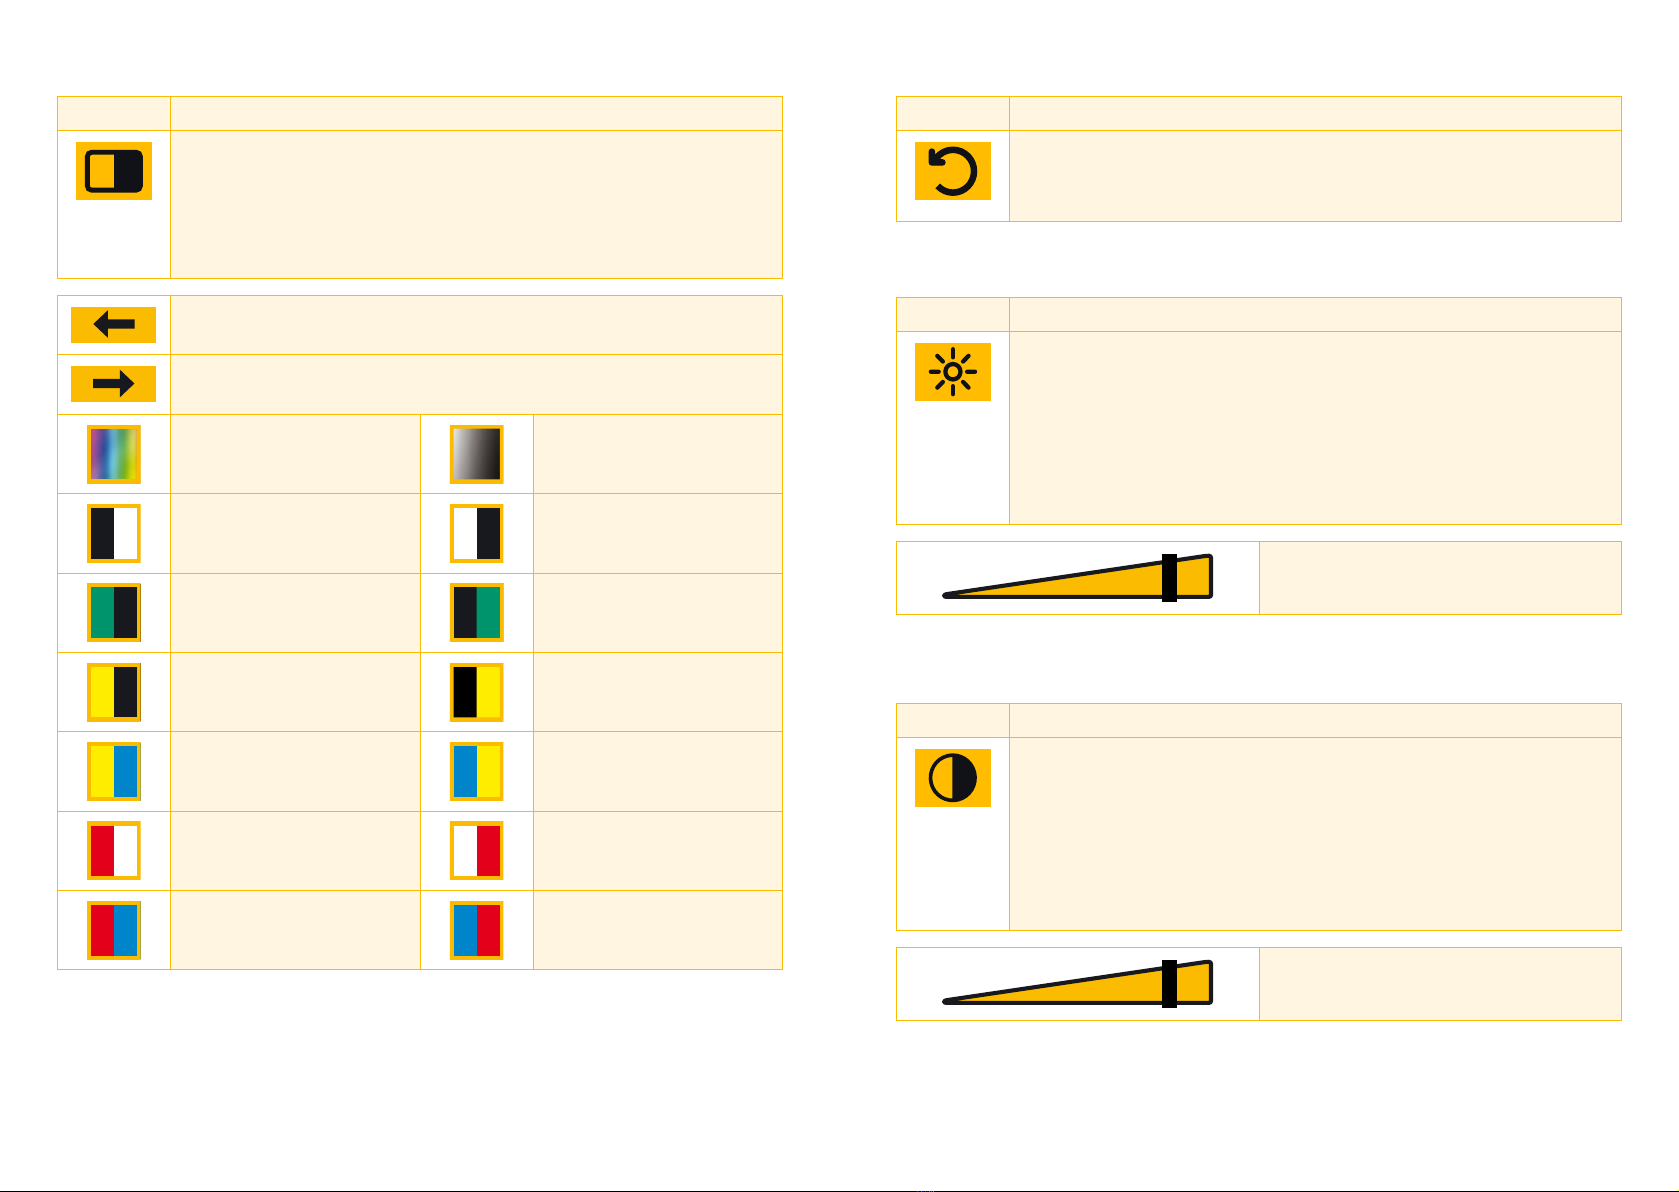
• easy, intuitive operation via virtual, customisable buttons
with optional tactile feed back (sensitively or acoustically)
• high resolution picture quality, contrast enhanced and flicker
free
• continuous magnification from approx. 1x to 20x, thanks to
cutting-edge camera technology
• multifunctional protection cover which can be also used as
comfortable reading/writing stand
• distance view mode, trapezoid balance, time display, HDMI
port, auto ON/OFF, auto focus ON/OFF, inductive charger
(available as an option)
• due to its light weight and its comfortable design,
MANOtouch4 can be comfortably used at home or “on the
go”.
Medical Device
MANOtouch4 is classified as a medical device, class I according to
(EU) 2017/745, Annexe VIII, standard 13. For the distribution to countries
outside the EU the respective country-specific guidelines have to be
regarded.
Purpose
This electronic magnifier is a medical device to assist with the magnifica-
tion of printed text and pictures. Visually impaired people can compensate
for their loss of visual acuity by using this device. For private appliance
only.

8 9
Evolution and lifetime of products
The Medical Device Directive regulates by law that manufacturers of
medical devices shall determine a period of safety operation of a product.
We fulfill hereby legal requirements and determine - for formal reasons -
a period of three years after date of first purchase.
Note:
The mentioned life span does not reflect the complete life span
of the product. It is rather an indication on when the product might be
obsolete and substitution might be recommended due to new product
developments.
Combination with other products
In case the end user intends to use the MANOtouch4 in combination
with another medical devices, it is recommended to get in contact with
Reinecker Vision GmbH or with a licensed distributor.
Precautions by alteration of the performance of the device
Should any of the technical features or performances change, please turn
OFF the device. Switch OFF the device and disconnect the power sup-
ply from the socket. Please do not switch on the device again. Refer
directly to your authorized dealer or to Reinecker Vision GmbH Service
Centre.
Reinstatement and installation
This device may be technically maintained and reconditioned by
Reinecker Vision GmbH only or by an authorized technician.
Reinstatement may only take place after the system has been cleaned,
disinfected and safety checked.
Cleaning of the system
• MANOtouch4 has to be disconnected from the power
supply before cleaning.
• For cleaning please use the enclosed screen cleaning
cloth or any other lint-free, lightly moistened cloth.
• Interior of device must NOT come in contact with liquids.
Special advice for transport and storage
For reasons of safety, the unit must only be transported and stored in the
original packing. The unit must be stored in dry and closed rooms in the
original packing.
The following conditions for transport and storage have to be respected:
• Air pressure: 700 to 1000 hPa
• Temperature range: +5°C to +40°C
• Relative air humidity: 30% to 80%
Disposal of the unit according to (EU) 2012/19
MANOtouch4 contains of electronic components. To avoid damage to the
environment, the country-specific rules have to be respected.
Caution:
The use of any other equipment might lead to an increased electro-
magnetic emission and to a product damage.

10 11
II. Instructions on the adequate use of the electronic
magnifier MANO touch 4
Scope of delivery
The following components are integrated in the delivery:
• HD-magnifier MANOtouch4, incl. protective cover
• Power supply (5V DC / 2,4A) incl. connection cable
• 4 removable country adapters (EU, USA, UK, AUS)
• Hand strap
• Carrying bag incl. micro fibre cloth
• User manual
Available as an option
• Induction charger (order code: MANOTLAD)
Characteristics
Protective cover (sealed)
In case the multifunctional protective
cover is sealed, it covers firmly the
device and protects its display.
The device will turned On and OFF
via the yellow slider.
If you close the protective cover
during use, the device switches to
standby mode. In case, the protective
cover will be re-opened within
approx. 20 minutes, the devices
switches to operation.
Protective cover (opened)
The protective cover can be
opened easily and be used as
stable, comfortable reading/writing
stand.
Safety instructions
Please respect the following safety instructions:
1. Do not plug the AC adapter into a faulty electrical outlet. Doing so
may cause electrical shock or fire.
2. Do not touch the AC adapter with wet hands.
3. Only use the original battery which is included in the delivery by
Reinecker Vision GmbH. The use of any other equipment might lead
to a product damage.
4. Do not expose MANOtouch4 to direct sunlight or to very hot or cold
environment, as this would harm the picture quality.
5. Do not use this device below +5°C or above +40°C.
6. No liquids must reach the interior of the system. Only use the device
in a dry environment.
7. The device may not be used next to medical devices (patients
environment).
8. Do not press down on the screen or lay heavy objects on the device.
This may cause damage to the device, particularly, the LCD.
9. Do not try to repair or to dismantle the device by your own. This would
automatically void the warranty. If you need any technical assistance
please get in contact with the local distributor or with Reinecker Vision
GmbH.
10. Always switch OFF the MANOtouch4 and disconnect it from the
power supply before cleaning it. For cleaning please use the screen
cleaning cloth or any other soft, lint-free, lightly moistened cloth.
Do not use alcohol containing or strong detergents.

12 13
Touch display
All functions of the device can be activated in an easy and intuitive man-
ner just by tapping the display.
The unit can be customized according to the individual demands of the
user.
Each touch to the screen is followed by a tactile feed back which can be
either activated or deactivated.
Connections
USB type-C for data exchange and power supply
This connection is for the use of power supply and charging with the
newest USB technology. You can use this connection also for importing
updates or exchanging data e.g. with your computer.
Underneath of this connection you may feel a tactile point which shall
give you the direction where to connect your plug. You can plug in your
USB cable in any direction.
HDMI connection
With the HDMI output you can connect your TV, external monitor or other
devices with a HDMI connection with MANOtouch4. The camera picture
will be displayed on the external device in high resolution picture quality.
Audio connection
Reserved for future operations. Port for MANO touch 4 audio signals.
USB port type-A for extentions
This port is also reserved for upcoming features. It could for example be
used for further communication options.
Description of Ports and Controls
Description of the controls
ON/OFF slider
Move the yellow slider to the right in order to
turn the unit ON. In case the unit is in boot
mode, after a few seconds you will recognize
two consecutive vibrations. After approx. 20
seconds the camera is activated.
If you move the yellow slider to the right
again, the device turns OFF.
1. Touch display
(with approx. 9cm screen diagonal)
2. Mounting ear
(for hand strap)
3. USB type-A
(connection for future applications)
4. ON/OFF slider
5. Multifunctional protective
cover (with magnet)
6. LED light
7. Camera
8. Audio connection
(jack socket 3,5 mm)
9. USB type-C
(for data exchange and power supply)
10. Mini-HDMI (Type C)
(connection for external monitor)
4
5
3
21
6
9
8
10
7

14 15
Touch screen functions
When the device is switched ON a magnified image will be displayed (in
colour mode).
Depending on the configuration settings some control elements can be dis-
played or not (automatically or manually). You can also choose to display
or hide them permanently.
Touch display with 3 functional areas
Area 1 and 3
Tap these areas in order to
show/hide virtual operation buttons.
Area 2
Tap this area in order to activate
the manual auto focus.
Area 4
Not yet in use.
Using the interface
Note: Alternatively you can replace the „+“ / „-“ symbols by a zoom bar
(see chapter „Icon arrangement“).
Zoom adjustment status bar
To change the zoom factor, touch and hold the zoom controller on the
status bar. While keeping the controller pressed, move it to the zoom
factor you wish to use.
4
123
4
Zoom in and Zoom out
Tap on the Plus or Minus icon and choose the requested
zoom factor.
Colour selection and menu selection
Briefly tap this icon in order to scroll within the (up to 14)
colours.
Tap and hold this icon in order to activate the menu selection.
Camera icon
Briefly tap the camera icon in order to capture your current
picture and to store it.
Tap an hold the camera icon in order to show all stored images.
Note: The photo function is only available, if there is con-
nection from type-C-port (data transfer and power supply) to
power supply or computer.
Description of the menu functions
By using the menu it is simple to make the required settings for the user
interface.
You can for example move the status bar for the zoom to a different
position or change it plus or minus icon.
Additionally, many other adjustments can be made.
Menu options
Tap and hold a menu icon for more than 1 second, all available options
for adjustment will be displayed.

16 17
Colour mode
Icon Description
Briefly tap this icon. All available colours will be displayed.
All colours marked with a green tick are activated. All col-
ours with no green tick are deactivated. Select the colours
you want to activate and mark them with a green tick in
order to activate them. All other colours are deactivated.
Brief tap: previous colour selections
brief tap: next colour selections
true colors Grey scale
black font,
white background
white font,
black background
black font,
green background
green font,
black background
black font,
yellow background
yellow font,
black background
blue font,
yellow background
yellow font,
blue background
red font,
white background
white font,
red background
red font,
blue background
blue font,
red background
Back (to previous view)
Brightness
Contrast
Note: Brightness and contrast can be adjusted individually for true colors
and semi-colors (grey-scales).
Icon Description
Once you have finished a menu adjustment, tap this icon in
order to return to the previous display.
Icon Description
Tap on this icon in order to adjust brightness to your
individual needs.
Tap and hold the brighness slider and move it in order to
adjust your best suited brightness level.
Alternatively tap the brightness control and adjust your
brightness level.
Brightness range from 0% to 100%
Icon Description
Tap this icon in order to adjust contrast to your individual
needs.
Tap and hold the contrast slider and move it in order to
adjust your best suited contrast level.
Alternatively tap the contrast control and adjust your con-
trast level.
Contrast range from 0% to 100%

18 19
Icon arrangement
Auto focus
Icon Description
Tap on this icon in order to customize your icons display
on screen. Just by tapping to one of the following icon
structures, it will be activated.
Tap briefly: shows previous structure
Tap briefly: shows next structure
Icon structure 1 Icon structure 2
Icon structure 3 Icon structure 4
Icon structure 5 Icon structure 6
Icon structure 7 Icon structure 8
Icon Description
Tap this icon in order to adjust the auto focus according to
your individual needs. Just by tapping to one of the follow-
ing icon structures, it will be activated.
Permanent auto focus
Auto focus will be acti-
vated by tapping in the
centre of the display only.
Auto focus will be acti-
vated when zooming in
or out.
Permanent auto focus
which can also be acti-
vated by tapping.
Advanced adjustments
Icon Description
Tap this icon to open your tool bar.
Tap briefly: shows previous options
Tap briefly: shows next option
Icon Description Symbol Description
Show time Time settings
14:20
Set your hours and
minutes by tapping the
up and down arrows.
Save time settings and
exit tool bar.
Icon Description
LED lights Illumination range from
0% to 100%
Icon Description
Battery status Battery icon shows the battery
status in %
Icon Description
Show icons perma-
nently or hide them
permanently.
0 = show icons permanently
1 = hide icons after 1 seconds
2 = hide icons after 2 seconds
3 = hide icons after 3 seconds
4 = hide icons after 4 seconds
5 = hide icons after 5 seconds

20 21
Icon Description
Distortion correction (or: extended lens shift control)
When inclining your magnifier, a distortion may occur (see
below). You have three possibilities to minimize this effect
in order to see a real picture.
With distortion correction
Without distortion correction
Icon
Tap this icon in order to
select from three possibili-
ties.
5.5 Selection 1
Tap - or + in order to adjust
the balance value which
ranges from -10 to +10
-11 Selection 2 Manual range from
-55% to +30%
Selection 3 Trapezoid balance OFF
Icon Description
Information Touch this icon to get the software
version of your device.
Icon Description
Factory reset Tab this icon in order to recall
factory settings.
Press briefly to get to the previous adjustment
When you select an icon by touching it, it will be confirmed
by a green arrow. Touch this icon again, the green icon will
disappear.
Factory reset
A
Recall user
adjustment A
A
Save user
adjustment A
B
Recall user
adjustment B
B
Save user
adjustment B
Your selection will be recalled when exit.
Icon Description
Intensity of vibration Intensität der Vibration in 6 Stufen
einstellbar.
30 = Vibration (tactile feed back) OFF
1- 5 = Vibration (tactile feed back) ON

22 23
Color scheme icon settings
Icon Description
Tap this icon in order to individually set your icons.
The chosen setting will be activated by tapping.
Tap briefly: shows previous icon view
Tap briefly: shows next icon view
You can adjust various icon settings according to your
individual preferences:
Image gallery
Icon Description
Tap this icon in order to recall your picture gallery.
Briefly tap a selected image to show it on full screen.
While looking at pictures in full-screen mode, you can modi-
fy zoom factor and colour mode.
Tap briefly: show previous pictures
Tap briefly: show next pictures
Exit picture gallery
When tapping this icon in full screen mode, you will lead
back to the picture gallery.
To delete a picture from the gallery, tap and hold it for
approx. 2 sec until the X icon appears. To revoke the dele-
tion process, tap and hold the deleted picture for approx. 2
sec until the X icon disappears.
Tap and hold the semi-colored picture in the center until 2
arrows appear on screen. Move your finger in direction of
the arrows in order to adjust the contrast of your picture.
Arrow to the top:
decrease contrast
Arrow down:
increase contrast

24 25
Battery use
Note: Best conditions for a long life span of your battery is to follow the
guidelines below:
1. Make sure that the battery has been fully charged prior to first
use or if the device haven‘t been in use for a longer period.
2. Connect the enclosed power supply with your wall socket and
the USB type C input of the device. During charging, the battery
indicator shows a red signal. When fully charged, the battery
indicator shows a green signal.
3. When the battery status indicator on the screen shows no bar,
means, that the battery level is low and the battery shall be
charged.
4. Charging time of the battery takes approx. 4 hours. When fully
charged, operating time is approx. 3 hours, depending on the
brightness adjusted.
Note: If the battery status is low, the unit turns off automatically. If this
happens, just connect your unit with a power supply, as described above.
In order to warranty battery life time, you only need to charge the battery,
when the battery level is low. When charging, make sure that the battery
will be fully charged. When using, make sure that the battery will be fully
discharged.
Replacement of batteries
Open the housing carefully
at the rear side of the unit
before inserting or replacing
a battery. Make sure that
the contacts of the battery
correspond to the contacts
of the unit. Then close the
cover again.
MANOtouch4 is now ready
for operation.
Disposal of batteries
Batteries must be disposed according to the country specific rules. They
shall never be burned. Let neither your children nor your pets play with
batteries.
Protective circuit of the battery
Despite of the protective circuit of the battery it is prohibited to generate
a short circuit by any metal to the battery. In that case there is a risk of
explosion which is a danger for people.

26 27
Trouble shooting
Problem Solution
MANOtouch4 doesn‘t
turn ON.
• Make sure, the battery has been charged
completely. Charge the battery for approx.
3.5 to 4 hours.
MANOtouch4 has been
turned ON but does not show
a picture.
• It is possible that the multifunction protective
cover is not opened properly and is obscur-
ing the camera.
Auto focus does not react. • Possibly the manual focus is set. In this
mode MANO touch 4 only focuses, if the
focus button is pressed. To avoid this you
can change from manual focus to auto focus
mode in the menu setting.
• Make sure that no dust comes into contact
with the camera lens. Clean the lens with the
cleaning cloth provided.
Display is too dark or too
bright.
• If no image can be seen on the screen, try
adjusting brightness or contrast.
Derating of the battery. • By repeated charging and discharging the
capacity of the battery can be reduced. This
may lead to a shorter life span or a reduced
performance of the battery.
Technical details
Type MANO touch 4 (MANOT040)
Screen LCD Display
with approx. 9 cm screen diagonal
Camera HD, 60 fps
Magnification levels without
reading/writing stand
approx. 1.0x - 20x
Magnification levels with a
reading/writing stand
approx. 2.5x - 10x
Focus auto focus / manual focus
Brightness of screen approx. 500 cd/m2
Color Mode 14 color modes
Image memory approx. 100 pictures
LED lights Continuous / OFF
Clock display via buttons combination
Reading stand included in the delivery
Battery Lithium-Polymer-battery, replaceable
Power supply 100-240 VAC 50-60 Hz / secondary
5 VDC 2.4 A
Operating time approx. 3 hours
(depending on the brightness adjusted)
Charging time approx. 4 hours
Weight approx. 200 g (incl. battery)
Dimensions without handle 92 x 81 x 21 mm (WxHxD)

28
Warranty Information
1. Reinecker Vision GmbH grants a warranty of 24 months (warranty
period only valid within the European Union) against defects in
manufacture counted from date of invoice ex Reinecker Vision GmbH.
2. All parts that have been replaced when repairing the unit will automati-
cally become property of Reinecker Vision GmbH.
3. Damage caused by improper use or by non-compliance with the
operating instructions will result in the invalidation of the warranty.
4. Interventions from persons other than Reinecker Vision GmbH
authorised specialists may lead to invalidity of warranty.
5. Partial warranty is valid for light sources serving to illuminate the
reading object, batteries and other parts subject to wear and tear.
6. If a warranty claim is necessary, the system has to be returned to the
manufacturer in Alsbach-Hähnlein or to your authorised dealer in the
original packaging including all components. The manufacturer does
not carry the cost for transport, packaging and insurance.
Phone number: +49 6257 9311-0
View our General Terms and Conditions.
Your authorized distributor:
Notes

Type: MANOtouch4 (MANOT040)
Serial number:
Manufacturer: Reinecker Vision GmbH
Final examination:
Power supply: 100 VAC – 240 VAC 50-60 Hz
Via power supply unit: 5V DC / 2,4A
Power consumption: max. 12 watt

Version 1.3, Stand 01/21, Art.-Nr. 00020 551
Subject to change.
In case service is
necessary, please
contact your autho-
rized distributor.
Bitte wenden Sie sich
bei Fragen oder einem
Servicefall direkt an
unser Hauptwerk in
Alsbach-Hähnlein
oder an eine unserer
Niederlassungen.
Bei im Ausland erwor-
benen Produkten
kontaktieren Sie im
Servicefall bitte Ihren
dort ansässigen
Händler.
Reinecker Vision GmbH
International Contact
sales department, customer relations:
Sandwiesenstraße 19
DE-64665 Alsbach-Hähnlein
customer service:
Erlenweg 3
DE-64665 Alsbach-Hähnlein
Tel.: +49 6257 9311-0
Fax: +49 6257 9311-8230
www.reineckervision.com
Reinecker Vision GmbH
Zentrale
Vertrieb, Kundenberatung:
Sandwiesenstraße 19
64665 Alsbach-Hähnlein
Kundendienst:
Erlenweg 3
64665 Alsbach-Hähnlein
Tel.: 06257 9311-0
Fax: 06257 9311-8008
www.reineckervision.de
Other manuals for MANO touch 4
1
This manual suits for next models
1
Table of contents
Other Reinecker Medical Equipment manuals
Popular Medical Equipment manuals by other brands

Sirona
Sirona Orthophos XG 3D/Ceph installation manual

Synthes
Synthes USS Small Stature/Paediatric Spine System manual

Stream DX
Stream DX Uroflowmeter user manual

Olympus
Olympus ORBEYE OME-V200 instructions

Respironics
Respironics SleepEasy user manual

Direct Supply
Direct Supply Panacea PAN-PL5500DF owner's manual