Reiner P3-MP User manual

DE
GB
ES
FR
IT
PT
P3-MP
Manual de instrucciones
Bedienungsanleitung
Instructions
Mode d‘emploi
Istruzioni per l‘uso
Manual de instruções

1Originalanleitung
1
Aluminiumbeutel
2
Druckpatrone
3
Clip
4
Sicherungsring
5
Einrastklemmen
6
Dichtung
7
Düsen
8
Kontakte-Druckpatrone
A
1
D
7
2
8
B
3
2
4
5
C
6
5
3

2
DE
Originalanleitung
Zu Ihrer Sicherheit
GEFAHR Warnungen vor Gefahren, die bei Missachtung
der Maßnahmen unmittelbar zu Tod oder
schweren Verletzungen führen.
WARNUNG Warnungen vor Gefahren, die bei Missachtung
der Maßnahmen zu Tod oder schweren Verlet-
zungen führen können.
VORSICHT Warnungen vor Gefahren, die bei Missachtung
der Maßnahmen zu Verletzungen führen
können.
ACHTUNG Warnungen vor Gefahren, die bei Missachtung
der Maßnahmen zu Sachschäden führen
können.
Hinweise und Tipps
Sicherheitshinweise für MP Tinte
WARNUNG
Spezialtinte ist leicht entzündlich. Mögliche Verbrennungen!
fLagertemperatur 10°C bis 20°C.
fNicht direkter Sonneneinstrahlung aussetzen.
WARNUNG
Bei Kontakt mit den Augen.
fEinige Minuten lang behutsam mit Wasser ausspülen.
fEventuell vorhandene Kontaktlinsen nach Möglichkeit
entfernen.
fWeiter ausspülen. Sofort GIFTINFORMATIONSZENTRUM oder Arzt
anrufen.

3Originalanleitung
1. Druckpatrone gebrauchsfertig machen
1.1. Verpackung önen Abb. A
fAluminiumbeutel
1
mit einer Schere abschneiden.
fDruckpatrone
2
entnehmen.
1.2. Clip von der Druckpatrone lösen Abb. B+ C
Die Druckpatrone
2
wird mit einem wiederverwendbaren Clip
3
ausgeliefert.
fEinrastklemmen
5
leicht auseinander drücken.
fSicherungsring
4
lösen.
fDruckpatrone entnehmen.
fDruckpatrone gemäß der Bedienungsanleitung zum Gerät
verwenden.
2. Druckmedien
Beste Ergebnisse werden erreicht, wenn die zu bedruckende Ober-
fläche sauber, fettfrei, trocken und temperaturangeglichen ist.
Auf zu bedruckenden Kunststoen sind polare oder polarisierte
Oberflächen besser geeignet als Flächen mit unpolarer Eigenschaft.
Eignung vor Serieneinsatz durch Probedruck überprüfen.

4
DE
Originalanleitung
3. Aufbewahrung Abb. A + B
MP Tinte ist schnelltrocknend. Die Dauer bis zum Eintrocknen
der Düsen
7
ist abhängig von der Umgebungstemperatur und
der Luftfeuchtigkeit.
In kurzen Druckpausen Gerät in die Station stellen oder
Düsen-Abdeckung schließen.
Akustische Signale des Gerätes beachten.
Soweit das Gerät nicht mit einer Düsen-Abdeckung ausgestat-
tet ist, bei Arbeitsunterbrechungen Druckpatrone
2
mit dem
Clip
3
gegen Eintrocknen schützen.
Um die Düsen
7
der Druckpatrone
2
sicher verschließen zu
können, die Dichtung am Clip
3
frei von Schmutz und Staub
halten.
fDruckpatrone
2
aus dem Gerät entnehmen.
fDruckpatrone in den Clip
3
führen.
fDruckpatrone herunterdrücken bis die Einrastklemmen
5
klicken.
fEinrastklemmen mit dem Sicherungsring
4
fixieren.
Druckpatrone nach dem Önen innerhalb von vier Wochen
aufbrauchen.
4. Umweltbedingungen
Temperatur für die
Lagerung
+10°C bis +20°C
Temperatur für den
Transport
-20 °C bis +40 °C (bis 24
Stunden)

5Originalanleitung
5. Störungen erkennen und beseitigen Abb. D
Eingetrocknete Tinte an den Düsen kann zu Streifenbildung oder zu
eingeschränkter Druckqualität führen.
5.1. Reinigungsmechanismus
fHinweise zur Reinigung der Düsen
7
in der Bedienungsanlei-
tung zum Gerät beachten.
5.2. Manuelle Reinigung der Düsen
Wenn der Reinigungsmechanismus nicht zu dem gewünschten
Erfolg führt, empfehlen wir folgende Maßnahme:
fUm die getrocknete Tinte zu lösen, ein weiches, eventuell
leicht in Ethanol (Spiritus) getränktes Tuch etwa drei Sekunden
gegen die Düsen
7
drücken.
fGelöste Tinte abtupfen und Düsen trocken wischen.
5.3. Kontakte-Druckpatrone reinigen
In seltenen Fällen können Verunreinigungen an den Kontakten-
Druckpatrone fehlerhafte Druckergebnisse hervorrufen.
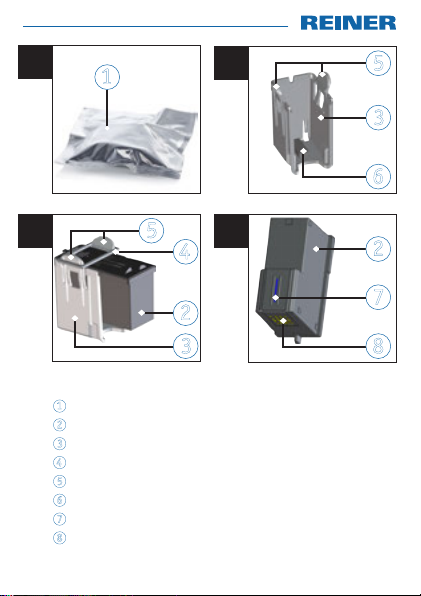
fKontakte-Druckpatrone
8
an der Druckpatrone
2
und im
Gerät mit einem weichen, eventuell leicht in Ethanol (Spiritus)
getränkten Tuch oder Wattestäbchen reinigen.
Entsorgung
Elektro- und Elektronik-Altgeräte
Altgeräte nicht mit dem gewöhnlichen Hausmüll entsor-
gen, sondern einer dafür vorgesehenen Annahmestelle
für das Recycling von elektrischen und elektronischen
Geräten zuführen.

6
DE
Originalanleitung
Notizen

7
A
1
D
7
2
8
B
3
2
4
5
C
6
5
3
1
Foil pouch
2
Print cartridge
3
Dust cover
4
Safety band
5
Latching wings
6
Rubber seal
7
Print nozzles
8
Printing contacts

8
GB
For your safety
DANGER Warnings about risks where non-observance
of the measures may directly cause death or
serious injury.
WARNING Warnings about risks where non-observance
of the measures may cause death or serious
injury.
CAUTION Warnings about risks where non-observance of
the measures may cause injury.
PLEASE NOTE Warnings about risks where non-observance of
the measures may cause material damage.
Instructions and tips
Safety instructions for MP ink
WARNING
Special ink is highly flammable. Possible burns!
fStore at 10 °C - 20 °C.
fDo not expose to direct sunlight.
WARNING
If in eyes.
fRinse cautiously with water for several minutes.
fRemove contact lenses, if present and easy to do.
fContinue rinsing. Immediately call a POISON CENTER
or doctor/physician.

9
1. Making the print head ready for use
1.1. Opening the pack Fig. A
fCut open foil pouch
1
with shears.
fRemove printing cartridge
2
.
1.2. Releasing the clip Fig. B+ C
The print cartridge
2
is supplied with a reusable dust cover
3
.
fSlightly push apart the latching wings
5
.
fRemove safety band
4
.
fRemove printing cartridge.
fUse the printing cartridge according to the operating
instructions for the device.
2. Printing material
For the best results, use material that is clean, non-greasy, dry
and at the same temperature as the print head.
Polar or polarised surfaces are better suitable on plastics to be
printed on than surfaces with unpolar properties.
Before carrying out a large print job, perform a test print.

10
GB
3. Storage Fig. A + B
MP ink is fast-drying. The time it takes the print nozzles
7
to dry up depends on the ambient temperature
and the humidity.
Put the device into the station during short print breaks or
close the nozzle cover.
Observe acoustic signals of the device.
Where the device is not equipped with a nozzle cover, protect
the printing cartridge
2
against drying out with the dust
cover
3
when interrupting work.
To securely close the nozzles
7
of the printing cartridge
2
,
keep the seal at the dust cover
3
free from dirt and dust.
fRemove the printing cartridge
2
out of the device.
fGuide the printing cartridge into the dust cover
3
.
fPush the printing cartridge down until the
latching wings
5
click.
fFasten the latching wings with the safety band
4
.
Use the print head within four weeks after opening.
4. Environmental Conditions
Temperature for storage +10°C to +20°C
Temperature for transport -20 °C to +40 °C (up to 24
hours)

11
5. Troubleshooting Fig. D
Dried ink on the print nozzles may result in streaks or reduced
print quality.
5.1. Cleaning mechanism
fObserve notes on cleaning of the print nozzles
7
in the
operating instructions for the device.
5.2. Cleaning the print head nozzles manually
We recommend the following measure if the cleaning mechanism
does not lead to the desired success:
fTo remove dried ink, press a soft cloth, if necessary lightly
soaked in ethanol (spirits), against the print nozzles
7
for about 3 seconds.
fDab o the dissolved ink and wipe the print nozzles dry.
5.3. Cleaning the print head contacts
In rare cases, dirt on the print head contacts may result in inferior
printing results.
fClean the contacts
8
on the print head
2
and in the device
with a soft cloth or cotton bud, if necessary lightly soaked
in ethanol (spirits).
Disposal
Electrical and electronic waste devices
Waste devices must not be disposed of in the conventio-
nal household waste. They must be returned to a special
collection point for recycling of electrical and electronic
devices.

12
GB
Notes

13
A
1
D
7
2
8
B
3
2
4
5
C
6
5
3
1
Envase de aluminio
2
Cartucho de impresión
3
Clip
4
Anillo de seguridad
5
Pinzas de encaje
6
Junta
7
Inyectores
8
Contacto de impresión

14
ES
Para su seguridad
PELIGRO Advertencias de peligro que causan la muerte
o lesiones graves de inmediato en caso de
incumplimiento.
ADVERTENCIA Advertencias de peligro que causan la muerte
o lesiones graves en caso de incumplimiento.
ATENCIÓN Advertencias de peligro que causan lesiones
en caso de incumplimiento.
AVISO Advertencias de peligro que causan daños
materiales en caso de incumplimiento.
Indicaciones y consejos
Indicaciones de seguridad de la Tinta MP
ADVERTENCIA
La tinta especial es fácilmente inflamable.
¡Posible de quemaduras!
fTemperatura de almacenamiento de 10ºC a 20ºC.
fNo exponer a la luz solar directa.
ADVERTENCIA
En caso de contacto con los ojos.
fAclarar cuidadosamente con agua durante varios minutos.
fQuitar las lentes de contacto, si lleva y resulta fácil.
Seguir aclarando.
fLlamar inmediatamente a un CENTRO DE INFORMACION
TOXICOLOGICA o a un médico.

15
1. Preparar el cabezal de impresión
1.1. Abrir el embalaje Imagen A
fCortar el envase de aluminio
1
con unas tijeras.
fRetirar el cartucho de impresión
2
.
1.2. Soltar el clip del cabezal de impresión Imagen B+ C
El cabezal de impresión
2
se suministra con un clip reutilizable
3
.
fPresionar las pinzas de encaje
5
para abrirlas ligeramente.
fAflojar el anillo de seguridad
4
.
fRetirar el cartucho de impresión.
fUsar el cartucho de impresión según lo establecido en el manu-
al de instrucciones del dispositivo.
2. Materiales de impresión
Los mejores resultados se obtienen cuando la superficie en la
que se va a imprimir se encuentra limpia, sin grasa, seca y a una
temperatura adecuada.
Al imprimir sobre superficies de plástico, las superficies polares o
polarizadas son mejores que las superficies con características no
polares.
Realizar una impresión de prueba antes de la impresión
en serie.

16
ES
3. Almacenamiento Imagen A + B
La Tinta MP es de secado rápido. Los poros de impresión
7
,
situados en el cabezal, pueden secarse dependiendo de la
temperatura ambiente y de la humedad.
Durante las pausas de impresión cortas, coloque el dispositivo
en la base o cierre las tapas de los inyectores.
Observar las señales acústicas del dispositivo.
Si el dispositivo no está equipado con tapas de inyectores, si se
interrumpe la impresión, proteger el cartucho de impresión
2
con el clip
3
para que no se seque.
Para poder cerrar los inyectores
7
del cartucho de
impresión
2
de manera segura, la junta del clip
3
debe
estar limpia y sin polvo.
fRetirar el cartucho de impresión
2
del dispositivo.
fInsertar el cartucho de impresión en el clip
3
.
fPresionar el cartucho de impresión hasta que las pinzas de
encaje
5
hagan clic.
fFijar las pinzas de encaje con el anillo de seguridad
4
.
Una vez abierto el cabezal de impresión, gastar en
un plazo de cuatro semanas.
4. Condiciones ambientales
Temperatura de alma-
cenamiento
+10 °C a +20 °C
Temperatura de trans-
porte
-20 °C a +40 °C (hasta 24 horas)

17
5. Detección y eliminación de fallos Imagen D
La tinta seca en las aberturas del cabezal de impresión puede
causar rayas o reducir la calidad de impresión.
5.1. Mecanismo de limpieza
fSiga las instrucciones de limpieza de los inyectores
7
del
manual de instrucciones.
5.2. Limpieza manual de las aberturas del cabezal de impresión
Si el mecanismo de limpieza no obtiene los resultados deseados,
recomendamos la siguiente medida:
fPara quitar la tinta seca, presionar en la abertura del cabezal
de impresión
7
con un paño levemente humedecido con etanol
(alcohol) durante, aproximadamente, tres segundos.
fRetirar la tinta que se quita y secar las aberturas del cabezal
de impresión.
5.3. Limpiar los contactos del cabezal de impresión
En raras ocasiones, la suciedad en los contactos del cabezal de
impresión puede dar como resultado una impresión imperfecta.
fLimpiar los contactos del cabezal de impresión
8
y
del dispositivo con un paño ligeramente humedecido
con etanol (alcohol) o un bastoncillo de algodón.
Eliminación
Aparatos eléctricos y electrónicos viejos
Los aparatos viejos no deben tirarse a la basura domésti-
ca. Deben entregarse en un punto de recogida designado
para el reciclaje de equipos eléctricos y electrónicos.

18
ES
Notas

19
A
1
D
7
2
8
B
3
2
4
5
C
6
5
3
1
Sachet en aluminium
2
Cartouche d’impression
3
Clip
4
Circlip
5
Ergots d’enclenchement
6
Joint
7
Buses
8
Contacts cartouche
d’impression
Other manuals for P3-MP
1
Table of contents
Languages:
Other Reiner Printer Accessories manuals