Renesas R0K578G1CD010BR User manual

User’s Manual
R01AN1911EJ0101_RL78G1C Rev.1.01 Page 1 of 23
Apr 10, 2014
RL78/G1C Group
USB Charger Solution Kit R0K578G1CD010BR
Summary
This document is a User's Manual for USB Charger Solution Kit R0K578G1CD010BR, which adopts Renesas
Electronics Corporation 16-bit Microcomputer R78/G1C.
R0K578G1CD010BR is a board product which compactly includes USB communication function, mobile battery
function based on USB Battery Charging Specification Revision 1.2 (USB 1.2), temperature and illuminance logger
function, mouse function and others.
Contents
1. Important ...........................................................................................................................................3
2. Precautions for Safety.......................................................................................................................5
2.1 Definitions of symbols .......................................................................................................................5
2.2 Warnings ...........................................................................................................................................6
2.3 Cautions ............................................................................................................................................7
3. Specification......................................................................................................................................8
4. Features ............................................................................................................................................9
5. Components Names and Functions................................................................................................10
6. Operations.......................................................................................................................................11
6.1 Setup...............................................................................................................................................11
6.1.1 How to install battery..................................................................................................................11
6.1.2 Unlock HOLD Switch .................................................................................................................13
6.1.3 Check LCD Displays..................................................................................................................13
6.2 Menu Functions...............................................................................................................................14
6.2.1 Software Version Display...........................................................................................................15
6.2.2 Time Settings.............................................................................................................................15
6.2.3 Formatting EEPROM.................................................................................................................16
6.3 Charging Battery .............................................................................................................................17
6.4 Supplying Power .............................................................................................................................18
6.5 USB Composite Devices (USB mouse + USB memory) ................................................................19
6.6 Android Open Accessory ................................................................................................................21
6.6.1 Starting the Demokit Application................................................................................................21
6.6.2 Demokit Application Operations.................................................................................................21
6.7 Power-saving Function....................................................................................................................22
R01AN1911EJ0101_RL78G1C
Rev.1.01
Apr 10, 2014

RL78/G1C Group USB Charger Solution Kit R0K578G1CD010BR
R01AN1911EJ0101_RL78G1C Rev.1.01 Page 2 of 23
Apr 10, 2014
Preface
All components of USB Charger Solution Kit R0K578G1CD010BR (hereinafter referred to as “this product”) are
listed under “Contents of Package” in release note of this product.
If you have any questions about this product, contact your local distributor.
The manuals relevant to usage of this product are listed below.
You can download the latest manuals from the Renesas Electronics homepage.
RL78/G1C User's Manual: Hardware
http://www.renesas.com/products/mpumcu/rl78/rl78g1x/rl78g1c/Documentation.jsp
Renesas USB Basic Mini Firmware (R01AN0326EJ)
http://www.renesas.com/products/tools/middleware_and_drivers/c_driver/usb_driver/app_notes.jsp

RL78/G1C Group USB Charger Solution Kit R0K578G1CD010BR
R01AN1911EJ0101_RL78G1C Rev.1.01 Page 3 of 23
Apr 10, 2014
1. Important
Before using this product, be sure to read this user’s manual carefully.
This Product:
"This product" in this document collectively refers to the following product manufactured by Renesas Electronics
Corporation. "This product" herein encompasses neither the customer's user system nor the host machine.
(a) RL78/G1C USB Charger Solution Kit R0K578G1CD010BR
Purpose of use of this product:
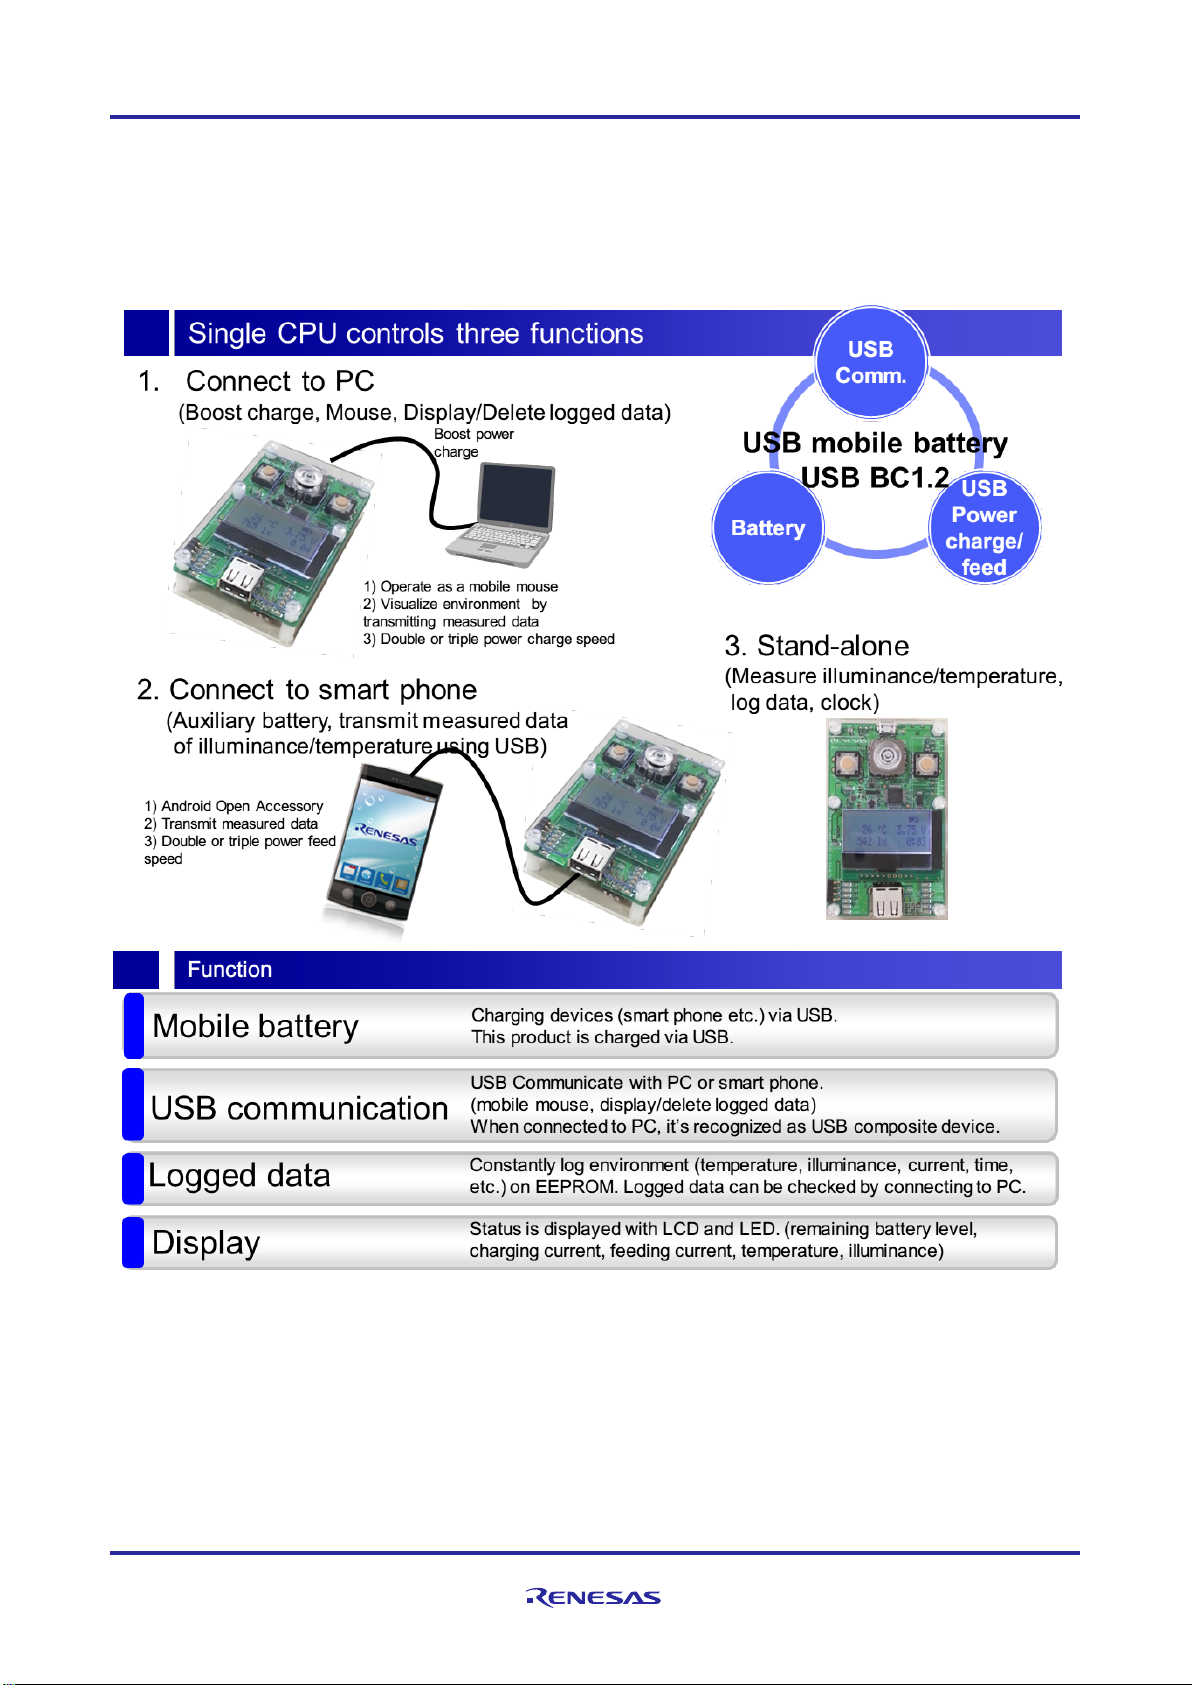
This product is a solution kit which adopts Renesas Electronics Corporation 16-bit Microcomputer R78/G1C, has
USB communication and charging/supplying power functions.
Be sure to use this product correctly according to said purpose of use. Please avoid using this product other than for
its intended purpose of use.
For those who use this product:
This product can only be used by those who have carefully read the user’s manual and know how to use it.
Use of this product requires basic knowledge of electric circuits, logical circuits, and MCUs.
When using this product:
(1)This product is a development-support unit for use in your program development and evaluation stages. When a
program you have finished developing is to be incorporated in a mass-produced product, the judgment as to
whether it can be put to practical use is entirely your own responsibility, and should be based on evaluation of the
device on which it is installed and other experiments.
(2)In no event shall Renesas Electronics Corporation be liable for any consequence arising from the use of this
product.
(3)Renesas Electronics Corporation strives to provide workarounds for and correct trouble with products
malfunctions, with some free and some incurring charges. However, this does not necessarily mean that Renesas
Electronics Corporation guarantees the provision of a workaround or correction under any circumstances.
(4)This product covered by this document has been developed on the assumption that it will be used for program
development and evaluation in laboratories. Therefore, it does not fall within the scope of applicability of the
Electrical Appliance and Material Safety Law and protection against electromagnetic interference when used in
Japan.
(5)Renesas Electronics Corporation cannot predict all possible situations and possible cases of misuse that carry a
potential for danger. Therefore, the warnings in this user's manual and the warning labels attached to this product
do not necessarily cover all such possible situations and cases. The customer is responsible for correctly and safely
using this product.
(6)This product covered by this document has not been through the process of checking conformance with UL or other
safety standards and IEC or other industry standards. This fact must be taken into account when this product is
taken from Japan to some other country.
(7)Renesas Electronics Corporation will not assume responsibility of direct or indirect damage caused by an
accidental failure or malfunction in this product.
(8)The all operation of the USB device connected to this product is not guaranteed.
(9)All of the application note and sample program provided about this product are reference data, and they do not
guarantee the operation. Please use as technical reference data for software development.

RL78/G1C Group USB Charger Solution Kit R0K578G1CD010BR
R01AN1911EJ0101_RL78G1C Rev.1.01 Page 4 of 23
Apr 10, 2014
When disposing of this product:
Penalties may be applicable for incorrect disposal of this waste, in accordance with your national legislation.
Usage restrictions:
This product has been developed as evaluation system for RL78/G1C.
Therefore, do not use it as an embedded device in other equipment. Also, do not use it to develop systems or
equipment for use in the following fields.
(1) Transportation and vehicular
(2) Medical (equipment that has an involvement in human life)
(3) Aerospace
(4) Nuclear power control
(5) Undersea repeaters
If you are considering the use of this product for one of the above purposes, please be sure to consult your local
distributor.
About product changes:
We are constantly making efforts to improve the design and performance of our product. Therefore, the
specification or design of this product, or this user's manual, may be changed without prior notice.
About rights:
(1) We assume no responsibility for any damage or infringement on patent rights or any other rights arising from the
use of any information, products or circuits presented in this user’s manual.
(2) The information or data in this user’s manual does not implicitly or otherwise grant a license to patent rights or any
other rights belonging to Renesas or to a third party.
(3) This user’s manual and this product (R0K578G1CD010BR) are copyrighted, with all rights reserved by Renesas.
This user’s manual may not be copied, duplicated or reproduced, in whole or part, without prior written consent
from Renesas.
About diagrams:
Some diagrams in this user’s manual may differ from the objects they represent.
About warranty:
Exchange free only in the case of initial failure within one month after purchase.
This product is provided "as is" and no repair, analysis, etc. are supported.

RL78/G1C Group USB Charger Solution Kit R0K578G1CD010BR
R01AN1911EJ0101_RL78G1C Rev.1.01 Page 5 of 23
Apr 10, 2014
2. Precautions for Safety
2.1 Definitions of symbols
This chapter describes the precautions which should be taken in order to use this product safely and properly. Be sure to
read and understand this chapter before using this product.
Contact us if you have any questions about the precautions described here.
This chapter describes the precautions which should be taken in order to use this product safely and properly. Be sure to
read this chapter before using this product.
WARNING
WARNING indicates a potentially dangerous situation that will cause death or heavy
wound unless it is avoided.
CAUTION
CAUTION indicates a potentially dangerous situation that will cause a slight injury or
a medium-degree injury or property damage unless it is avoided.
In addition to the two above, the following are also used as appropriate.
means WARNING or CAUTION.
Example:
CAUTION AGAINST AN ELECTRIC SHOCK
means PROHIBITION.
Example:
DISASSEMBLY PROHIBITED

RL78/G1C Group USB Charger Solution Kit R0K578G1CD010BR
R01AN1911EJ0101_RL78G1C Rev.1.01 Page 6 of 23
Apr 10, 2014
2.2 Warnings
WARNING
Warnings for Battery:
Do not store and use battery at hot environment, such as near a stove and near fire. Do not
disassemble and modify battery. Do not solder directly to contacts of battery. May cause battery
to ignite, burst, heat or leak.
Check the orientation of battery to install it to the product, and do not try to force the battery onto
the product if you having trouble installing it. May cause battery to ignite, burst, heat or leak.
Do not throw battery into fire or do not heat it. Do not nail battery, hit with a hammer or step on it.
May cause battery to ignite, burst, heat or leak.
Do not connect a wire or other metal object to +/- contacts of battery. Do not store metal object
with battery together. May cause battery to ignite, burst, heat or leak.
If battery’s fluid etc. contacts eyes, skin or cloth, immediately flush the eyes, skin or cloth with
clean water and see a doctor right away. Do not rub the eyes. May cause loss of sight.
Do not use or charge a wet battery. May cause battery to ignite, burst, heat or leak.
If battery leaks or gives off a strange smell, immediately remove it from the vicinity of open
flames. May cause battery to ignite, burst, heat or leak.
If battery charging is not finished even the charging time is longer than 7 hours, please unplug
USB cable and stop battery charging. May cause battery to ignite, burst, heat or leak.
The status of charging can be confirmed by “Charging LED”.
Warnings to Be Taken for Handling:
Do not disassemble this product. Personal injury due to electric shock may occur if this product is
disassembled. Disassembling this product will void your warranty.
If this product gives off a strange smell, sound or smoke when it is used, immediately unplug
USB cable. Because it may cause battery to ignite, burst, heat and leak, stop to use and please
be sure to consult your local distributor.
Warning for Installation:
Do not set this product in water or areas of high humidity. Make sure that the product does not
get wet. Spilling water or some other liquid into the product may cause un-repairable damage.
Warning for Use temperature:
This equipment is to be used in an environment with a maximum ambient temperature of 35°C.
Care should be taken that this temperature is not exceeded.

RL78/G1C Group USB Charger Solution Kit R0K578G1CD010BR
R01AN1911EJ0101_RL78G1C Rev.1.01 Page 7 of 23
Apr 10, 2014
2.3 Cautions
CAUTION
Cautions to Be Taken for Handling This Product:
Use caution when handling the product. Be careful not to apply a mechanical shock.
Do not touch the connector pins of this product and the target MCU connector pins directly.
Static electricity may damage the internal circuits.
When attaching and removing the cable, hold the plug of the cable and do not touch the cable.
Do not pull this product by the communications interface cable or the flexible cable. And,
excessive flexing or force may break conductors.
If the product is converted, it will become the outside for a guarantee.
If battery gives off a strange smell, sound or smoke when it is used, immediately remove battery
and stop to use. May cause battery to ignite, burst, heat and leak.
Do not touch this product in wet hand. May cause this product to failure. Uninstall batteries when
do not use this product over a prolonged period. May cause battery to over discharge.
Note on Transporting the Product:
When sending your product for repair, use the packing box and cushioning material supplied with
the product when it was delivered to you and specify caution in handling (handling as precision
equipment). If packing of your product is not complete, it may be damaged during transportation.
When you pack your product in a bag, make sure to use the conductive plastic bag supplied with
the product (usually a blue bag). If you use a different bag, it may lead to further trouble with your
product due to static electricity.
Caution to Be Taken for System Malfunctions:
If this product malfunctions because of interference like external noise, do the following to
remedy the trouble.
(1) Exit this product debugger, and shut OFF this product and the user system.
(2) After a lapse of 10 seconds, turn ON the power of this product and the user system again,
then launch this product debugger.
Caution to Be Taken for Disposal:
Penalties may be applicable for incorrect disposal of this waste, in accordance with your national
legislation.
European Union regulatory notices:
The WEEE (Waste Electrical and Electronic Equipment) regulations put responsibilities on
producers for the collection and recycling or disposal of electrical and electronic waste. Return of
WEEE under these regulations is applicable in the European Union only. This equipment
(including all accessories) is not intended for household use. After use the equipment cannot be
disposed of as household waste, and the WEEE must be treated, recycled and disposed of in an
environmentally sound manner.
Renesas Electronics Europe GmbH can take back end of life equipment, register for this service
at “http://www.renesas.eu/weee”.

RL78/G1C Group USB Charger Solution Kit R0K578G1CD010BR
R01AN1911EJ0101_RL78G1C Rev.1.01 Page 8 of 23
Apr 10, 2014
3. Specification
Items
Contents
Remarks
Type Name
R0K578G1CD010BR
Power Supply
Input
USB (input via micro-B connector)
Output
USB (output via standard-A connector)
Battery
Ni-MH battery AAA (HR03) x 6
Charging time: about 7 hours
Separately-sold item
Note 1
Low Voltage
for Operation
Charging
≥3V (Start to charge when no load)
Note 2
Feeding
≤2.9V (End to feed)
Note 3
Dimension
90 X 55 X 24 [mm]
Environment Condition
Operation: 10 ~ 35 C
Storage: -10 ~ 50 C
Dew condensation prevention
Features of PC connection
USB mouse
USB Full-Speed
Logs recorder (Illuminance, Temperature,
Battery voltage, Charging and feeding current)
for confirming and deleting
CSV format log file
Battery charging
Charging current: Max. 500mA
Features of smartphone
connection
Supply power to smartphone
Charging current: Max. 1500mA
Note 4
Data communication with smartphone
1) Display illuminance
and temperature value
on smartphone
2) Control LCD brightness by operating
smartphone
The Demokit Application of
AndroidTM Open Accessory is
needed. Refer to Section 6.6.
Note 5
Features of stand alone
Measure illuminance and temperature, display
the value on LCD
Record illuminance and temperature value to
log file
Recording time: 24 hours
Recording interval: every 1 minute
Clock, remaining battery level, sleep mode
Enter to sleep mode after 30
seconds. Note 6
Display
Feature
Illuminace
measurement
0-65535 lux, 1lux unit
Temperature
measurement
0-99 C, 1 C unit
Depending on the environment
condition
Remaining
battery level
0-5000mV, 1mV unit
Clock
24 hour display, 1 minutes unit
Charging
current
1-500mA, 1mA unit
Supply current
1-1500mA, 1mA unit
Other features Display USB BC1.2 Specification
When USB BC1.2 devices is
connected
Display VID, PID (in 3 seconds)
When USB devices connected
Note 1: The charging time depends on the environment temperature and the USB specification. Do not use any other batteries
different from Ni-MH battery.
Note 2: The battery voltage may drop to low voltage impossible to charge after this product is not used over a prolonged period.
Uninstall and charge the batteries by dedicated charger.
Note 3: The voltage of battery may drop sharply while the feeding current is large. This is because of the internal impedance of
battery and this depends on specification of battery. Use batteries with large capacity when feeding current is large. Change
batteries when battery performance becomes low because batteries are expendable supplies.
Note 4: The current of charging or feeding depend on the specification of the devices connected. (e.g. USB Battery Charging
Specification corresponding. etc.) This product detects if the device connected is correspond to USB Battery Charging
Specification or not, and controls the charging current according to USB specification.
Note 5: Android is a trademark of Google Inc.
Note 6: This product will enter to sleep mode when the un-used period is long than 30 seconds in standalone operation.
Please confirm the “HOLD” switch if this product set does not wakeup even if the left/right buttons are pushed.

RL78/G1C Group USB Charger Solution Kit R0K578G1CD010BR
R01AN1911EJ0101_RL78G1C Rev.1.01 Page 9 of 23
Apr 10, 2014
4. Features
USB BC1.2 support MCU RL78/G1C is used in this product. This product is available for boost USB power charge and USB power
supply. RL78/G1C controls all peripheral devices.
•The Renesas peripheral devices controlled by RL78/G1C:
EEPROM: R1EX25512ATA00I
*Note 1: Do not connect both USB device via USB A connector and USB micro-B connector in same time, because this product does
not correspond to this usage.
*Note 2: This product is compliant with “AndroidTM Open Accessory”. It is able to be recognized as an Android accessory when an
Android mobile terminal device (Android 4.0 above) is connected. Android is a trademark of Google Inc.

RL78/G1C Group USB Charger Solution Kit R0K578G1CD010BR
R01AN1911EJ0101_RL78G1C Rev.1.01 Page 10 of 23
Apr 10, 2014
5. Components Names and Functions
The following shows the top layer component layout and key parts functions.
USB Micro-B Connector
USB interface to connect with
PC and other devices via the
USB cable included in this
product.
HOLD Switch
Used to avoid miss
operations. When set to
right side, the board will not
react to any key operation.
Reset Button
(backside of PCB)
Press to clear all settings and
reset to default setting.
USB Standard-A Connector
USB interface to connect with
Smartphone and other devices via
the USB cable included in this
product.
Temperature Sensor
(backside of PCB)
Senses surrounding
temperature. When warmed
by a hand, it senses a
change in temperature.
RL78/G1C Microcomputer
[R5F10JGCAFB]
This microcontroller controls all
the functions in this product,
and also embeds USB
functions.
Charge Level LED
Indicates the charge level
with six orange-colored
LEDs. It blinks faster
when higher current is
charged in the battery.
Left Button
Operate as the left click
of mouse functions. It is
also used as Enter (OK)
key in configuration
settings.
Ambient Light Sensor
Measures surrounding
iluminance.
When covered by a hand,
it displays the changes of
illuminance.
Right Button
Operates as the right
click of mouse functions.
It is also used as
“Cancel” key in
configuration settings.
Supply Level LED
Indicates the supplying
level with six green-
colored LEDs. It blinks
faster when higher
current is supplied to the
module.
LCD Display
Displays various statuses
including temperature,
illuminance, battery level,
time,charging/supplying
power. It comes with a
white LED backlight.
When display is off,
device is in sleep mode.
Press either right or left
button to return to normal
mode.
Joystick
Operating this part will
move the cursor. Use this
to select target items
when setting
configurations in the
menu.
EEPROM
[R1EX25512ATA001]
Stores sensor data and is
used as temporary
memory for the USB
interface.
Charge Control IC
(back side of PCB)
Controls charging of Ni-MH
battery.
Charge LED
Turns ON when charging
battery.

RL78/G1C Group USB Charger Solution Kit R0K578G1CD010BR
R01AN1911EJ0101_RL78G1C Rev.1.01 Page 11 of 23
Apr 10, 2014
6. Operations
This section describes how to use this product.
6.1 Setup
6.1.1 How to install battery
* Batteries are not included in this product. Prepare 6 AAA Ni-MH batteries for this product.
This product has battery charging function. Use chargeable battery for this product.
1. Remove the four screws (red circled in the picture) at the four corners of the bottom plate
using a Phillips head screw driver.
2. Detach the bottom plate from the main body. Do not lose the screws.

RL78/G1C Group USB Charger Solution Kit R0K578G1CD010BR
R01AN1911EJ0101_RL78G1C Rev.1.01 Page 12 of 23
Apr 10, 2014
3. Install batteries to battery socket. Do not mistake the battery electrodes.
4. Tighten the four screws at the four corners of the bottom plate.
Both the bottom plate and the screws are made of plastic.
Please be careful when tightening the screws; tightening the screws too hard can cause the bottom
plate to split or the screws to break.

RL78/G1C Group USB Charger Solution Kit R0K578G1CD010BR
R01AN1911EJ0101_RL78G1C Rev.1.01 Page 13 of 23
Apr 10, 2014
6.1.2 Unlock HOLD Switch
1. Unlock the HOLD switch by sliding it to the left.
6.1.3 Check LCD Displays
1. Make sure the LCD displays the following items in the correct format.
- Temperature
The LCD displays measured real-time temperature readings of the built-in temperature sensor
from 0 to 99 (˚C).
- Illuminance
The LCD displays measured real-time illuminance readings of the built-in ambient light sensor
from 0 to 65535 (lx).
- Battery Voltage Level
The LCD displays the real-time battery voltage level in 1mV unit.
- Time
The LCD displays the current time in the format of hh:mm.
The colon blinks every 0.5 seconds.
[Default Display]
Temperature
Battery
Voltage Level
Illuminance
Time
25 ℃3752 mV
1000 lx 0:00

RL78/G1C Group USB Charger Solution Kit R0K578G1CD010BR
R01AN1911EJ0101_RL78G1C Rev.1.01 Page 14 of 23
Apr 10, 2014
6.2 Menu Functions
1. When the USB is not connected, display the menu in the LCD by pressing both Left and Right
buttons simultaneously.
* The menu will not be displayed when battery voltage level is 0mV.
2. Select the desired function by moving the joystick up and down.
3. Select the desired item by pressing the Left button. To return to the initial screen, press the
Right button.
After selecting an item in [Menu Display 1], follow the rest of instructions in section 6.2.1.
After selecting an item in [Menu Display 2], follow the rest of instructions in section 6.2.2.
After selecting an item in [Menu Display 3], follow the rest of instructions in section 6.2.3.
Move the joystick
up.
Move the joystick
up.
Press the Right and Left
buttons at the same time.
Move the joystick
down.
Move the joystick
down.
[Default Display]
[Menu Display 1]
[Menu Display 1]
[Menu Display 2]
[Menu Display 3]
25 ℃3752 mV
1000 lx 0:00
[MENU]
> S/W Version
[MENU]
> S/W Version
S / W Version
> Set Time
Set Time
> Format

RL78/G1C Group USB Charger Solution Kit R0K578G1CD010BR
R01AN1911EJ0101_RL78G1C Rev.1.01 Page 15 of 23
Apr 10, 2014
6.2.1 Software Version Display
1. The LCD displays the software version as follows.
(C) ルネサスエレクトロニクス
Version 1 . 00N
6.2.2 Time Settings
1. Select the year by moving the joystick up and down (00 to 99).
2. Press the Left button to enter setting.
3. Select the month by moving the joystick up and down (01 to 12).
4. Press the Left button to enter setting.
5. Select the date by moving the joystick up and down (01 to 31).
6. Press the Left Button to enter setting.
7. Select the hour by moving the joystick up and down (00 to 23).
8. Press the Left button to enter setting.
9. Select the minutes by moving the joystick up and down (00 to 59).
10. Press the Left button to enter setting.
(Once you have started these settings, you cannot return to a previous step in the process. If you
make a mistake, complete that setting and then go back to step 1 and start over.)
12/11/01 00:00
[Time Setting Display]
[Software Version Display]
* Number depends on the software version

RL78/G1C Group USB Charger Solution Kit R0K578G1CD010BR
R01AN1911EJ0101_RL78G1C Rev.1.01 Page 16 of 23
Apr 10, 2014
6.2.3 Formatting EEPROM
1. Select "YES" or "NO" by moving the joystick up and down.
2. To format the built-in EEPROM, press the Left button to select "YES". This will clear the
data log and delete all the written files.
* Please format very carefully since this function will format the EEPROM by clearing
the data log and deleting all the written files.
* Carry out this formatting operation only after attaching the battery to the main body
and setting time.
If the EEPROM is not formatted, log data may be inconsistent with the actual time.
* After the EEPROM is formatted, the YYYYMMDD.csv file is generated automatically.
Move the joystick up.
Move the joystick down.
[Format Display 2]
[Format Display 1]
Format EEPROM?
YES >NO
Format EEPROM?
>YES NO

RL78/G1C Group USB Charger Solution Kit R0K578G1CD010BR
R01AN1911EJ0101_RL78G1C Rev.1.01 Page 17 of 23
Apr 10, 2014
6.3 Charging Battery
1. Connect the USB Micro-B connector to a PC or USB charger via the USB cable included in
this product.
The battery starts charging after Battery Charging mode (Note 1) and amount of charging
current are displayed in the LCD.
The blinking speed of the LEDs (orange) changes based on amount of current when charging.
Note 1 SDP: Standard Downstream Port
CDP: Charging Downstream Port
DCP: Dedicated Charging Port
The maximum charging current of this product in all above cases is 500mA.
2. The charge automatically stops when the USB cable is disconnected or the battery is
charged to 100%.
Caution when battery voltage level becomes low:
Battery charging will be stopped when battery voltage is lower than 3V. Uninstall and charge
batteries by dedicated charger when battery charging is not started even though the above
procedures have been done. Change batteries when battery performance becomes low
because batteries are expendable supplies.
USB Micro-B connection
[Default Display]
[Charge Display]
25 ℃3752 mV
1000 lx 0:00
496 mA 3752 mV
SDP 0:00

RL78/G1C Group USB Charger Solution Kit R0K578G1CD010BR
R01AN1911EJ0101_RL78G1C Rev.1.01 Page 18 of 23
Apr 10, 2014
6.4 Supplying Power
1. Connect the USB Standard-A connector to a USB device via the USB cable included in this
product.
The device starts charging after Power Supply mode (Note 1) and amount of power supply
current are displayed in the LCD.
The blinking speed of the LEDs (green) changes based on amount of power supply current.
Note 1 BC: Devices supporting Battery Charging
NON-BC: Devices not supporting Battery Charging
2. This product automatically stops supplying power when the USB cable is disconnected
or the battery voltage level is too low (2900mV).
USB Standard-A connection
[Default Display]
[VID, PID Display]
After 3 seconds
[Power Supply Display]
25 ℃3752 mV
1000 lx 0:00
VID=045B 3752 mV
PID=8122 0:00
1230 mA 3752 mV
BC 0:00

RL78/G1C Group USB Charger Solution Kit R0K578G1CD010BR
R01AN1911EJ0101_RL78G1C Rev.1.01 Page 19 of 23
Apr 10, 2014
6.5 USB Composite Devices (USB mouse + USB memory)
1. Start up the PC.
2. Connect the USB Micro-B connector to a PC via the USB cable included in this product.
The device driver for this USB device is automatically installed as it uses a generic driver
standard in Windows PC.
Use the Left button, Right button and joystick as USB pointing devices to move the cursor
around the PC screen and click.
This product is also recognized as USB memory. The data stored in this product’s EEPROM can
be read/written from/to the PC.
* Do not format the USB memory from your PC.
* File name must be within 8 alphanumeric characters (double-byte characters not
supported).
* File name extension must be within 3 capital alphanumeric characters.
* Writable area size of this product is 1 KB.
* Do not change the file name of the CSV file storing the sensor data.
* To change the CSV file storing the sensor data, format the EEPROM according to the
instructions described above.
File storing sensor
data (in CSV format)

RL78/G1C Group USB Charger Solution Kit R0K578G1CD010BR
R01AN1911EJ0101_RL78G1C Rev.1.01 Page 20 of 23
Apr 10, 2014
3. Open the CSV file storing the sponsor data with a PC application.
Table of contents
Other Renesas Batteries Charger manuals
Popular Batteries Charger manuals by other brands

MGE UPS Systems
MGE UPS Systems EX RT CLA Installation and user manual

Datalogic
Datalogic CHR-PM80 Quick reference guide

Scanstrut
Scanstrut ROKK SC-CW-04E installation instructions

Mennekes
Mennekes AMTRON Compact 2.0 7,4 OPERATING AND INSTALLATION Manual

VOLTCRAFT
VOLTCRAFT VC-11374060 operating instructions

Sealey
Sealey ECS650 instructions

Exendis
Exendis Impulse S6 instruction manual

Schumacher Electric
Schumacher Electric SC-1200A owner's manual

APA
APA 16496 operating instructions

PRO Charging System
PRO Charging System i2412 Safety, installation and operating instructions

Genius
Genius G4 Owner's manual & user guide

RRC
RRC RRC-SCC1130 Series User instructions