Renogy BT-2 User manual

BT-2
BLUETOOTH
MODULE
Version 2.1
Bluetooth Module for Renogy Solar Products

The Renogy BT-2 is a new generation of Bluetooth module for Renogy solar
charge controllers, smart lithium batteries, Dual Iput DC-DC, and inverter
chargers. Powered by its RJ45 communication port, the BT-2 provides wireless
monitoring of the system data and allows users to change parameters through
the Renogy DC Home smart phone App.
General Information
01

Key Features
02
Powered directly through RJ45 communication port
Signal range up to 82ft(25m)
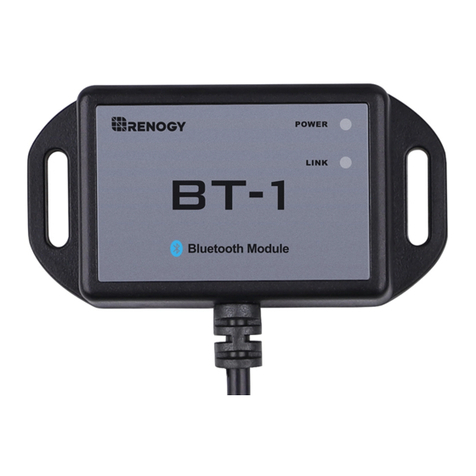
Two LED lights indicate the power and Bluetooth connection condition
Bluetooth 4.2 and BLE technology provides fast and uninterrupted
communication
Embedded exclusive Bluetooth chip with high efficiency and low energy
consumption
Connects to our user-friendly smart phone App, Renogy DC Home, to keep
track of your system
Wirelessly monitor and control compatible solar charge controllers via
Bluetooth

03
Identification of Parts
Power Indicator
Communication
Status Indicator
Product Model Communication Cord
Mounting Hole

04
RJ45 Port

05
The Android version of the Renogy DC Home APP is available to download on
Renogy.com and the Google Play Store.
For IOS version, simply search“Renogy DC Home”in App store to
download.
In the Google Play Store, simply search “Renogy DC Home” in App store to
download.
To Download App
1.
2.

06
Operation
Connect the BT-2 Bluetooth module to any Renogy solar charge controller,
smart lithium battery, Dual Iput DC-DC, and inverter charger with an RJ45 port
and RS485 communication protocol.
Connection

07
Communication status indicator
Power Indicator Solid (Green) Power On
OffPower Off
Status Note
Green Power Indictor:
Blue Communication Indicator:
Link Indicator Flashing (Blue) Communicating
OffStand by
Status Note

08
Compatible Models
Communication Protocol RS485
Port Type RJ45
All Renogy Products with RJ45 Port
Compatible Models
RBC30D1S
RBC50D1S
RBT100LFP12S
RCC20RVRE
RCC40RVRE
R-INVT-PGH1-10111S
R-INVT-PGH1-20111S

09
1.First-time users of the Renogy DC Home App will need to create an account. If you
have an existing Renogy.com account, you can use those same credentials.Otherwise,
you will need to register a new account.
How to Connect Via Renogy DC Home App:

10
2.After logging in successfully, you need to add your device. You can do this by clicking
the blue plus button located on the upper right corner or by tapping the blue “+Add
devices” link at the bottom of the screen.

11
3.An Operation Guide will pop up. Follow the directions by turning on your device’s
Bluetooth and then selecting “Next”. After confirming your connection, tap the checkbox
and then select “Next”. The App will now look for the device.

12
4.When a device is found, select the Bluetooth device, then name the device if you
wish.Afterwards, press “Next” and then select the type of device you areconnecting. In
this example, we will select Charge Controller.When successful, the App will confirm the
product SKU. If the SKU is correct, click“OK” to start communicating with your Rover
30Amp.

13
5.In the main interface, you can see the general parameters of the charge controller
under “my devices” section.

Technical Specifications
14
Description Parameter
Standby Power Consumption 0.04W
Operating Power Consumption 0.05W
Communication Range
Serial Baud Rate
Communication Protocol RS485
Port Type RJ45
Cable Length 5.00m (16.4ft)
Dimensions 67.3 X 35 X 14mm
2.65 X 1.38 X 0.55in
Installation Dimensions
Weight 130g(4.58oz)
Operation Temperature
Protection Grade IP54
≤82ft(25m)
Fixed Baud Rate 9600bps
67.3 φ3.5mm(2.66 φ 0.14in)
BT-2
-20℃~85℃(-4°F to 185°F)
Model

15
This device complies with Part 15 of the FCC Rules. Operation is subject to the
following two conditions:
(1) this device may not cause harmful interference, and
(2) this device must accept any interference received, including interference that
may cause undesired operation.
Note: This equipment has been tested and found to comply with the limits for a
Class B digital device, pursuant to Part 15 of the FCC Rules. These limits are
designed to provide reasonable protection against harmful interference in a
residential installation. This equipment generates, uses, and can radiate radio
frequency energy, and if not installed and used in accordance with the instructions,
may cause harmful interference to radio communications. However, there is no
guarantee that interference will not occur in a particular installation. If this
equipment does cause harmful interference to radio or television reception, which
can be determined by turning the equipment off and on, the user is encouraged to
try to correct the interference by one or more of the following measures:
Changes or modifications not expressly approved by the party responsible for
compliance could void the user’s authority to operate the equipment.
FCC Compliance Statement

16
– Reorient or relocate the receiving antenna.
(3)FCC 20cm Statement
– Increase the separation between the equipment and receiver.
– Consult the dealer or an experienced radio/TV technician for help.
– Connect the equipment into an outlet on a circuit different from that to which
the receiver is connected.
This equipment complies with FCC radiation exposure limits set forth for an
uncontrolled environment. This equipment should be installed and operated with
a minimum distance of 20cm between the radiator & your body. This transmitter
must not be co-located or operating in conjunction with any other antenna or
transmitter.

17
(1) This device may not cause interference.
(2)This device must accept any interference, including interference that may
cause undesired operation of the device.
1)L'appareil ne doit pas produire de brouillage;
2)L'appareil doit accepter tout brouillage radioélectrique subi, même si le
brouillage est susceptible d'en compromettre le fonctionnement.
L'émetteur/récepteur exempt de licence contenu dans le présent appareil est
conforme aux CNR d'Innovation, Sciences et Développement économique
Canada applicables aux appareils radio exempts de licence. L'exploitation est
autorisée aux deux conditions suivantes :
This device contains licence-exempt transmitter(s)/receiver(s) that comply with
Innovation, Science and Economic Development Canada’s licence-exempt
RSS(s). Operation is subject to the following two conditions:

18
The device meets the exemption from the routine evaluation limits in section 2.5
of RSS 102 and compliance with RSS-102 RF exposure, users can obtain
Canadian information on RF exposure and compliance.
Le dispositif rencontre l'exemption des limites courantes d'évaluation dans la
section 2.5 de RSS 102 etla conformité à l'exposition de RSS-102 rf,
utilisateurs peut obtenir l'information canadienne surl'exposition et la conformité
de rf.
This transmitter must not be co-located or operating in conjunction with any
other antenna or transmitter. This equipment should be installed and operated
with a minimum distance of 20 centimeters between the radiator and your body.
Cet émetteur ne doit pas être Co-placé ou ne fonctionnant en même temps
qu'aucune autre antenne ouémetteur. Cet équipement devrait être installé et
actionné avec une distance minimum de 20 centimètres entre le radiateur et
votre corps.

Renogy reserves the right to change
the contents of this manual without notice.
RENOGY.COM
US 2775 E Philadelphia St, Ontario, CA 91761, USA
909-287-7111
www.renogy.com
support@renogy.com
https://www.renogy.cn
support@renogy.cn
CN
400-6636-695
苏州高新区科技城培源路1号5号楼-4
CA https://ca.renogy.com
supportca@renogy.com
https://au.renogy.com
supportau@renogy.com
AU
JP https://www.renogy.jp
supportjp@renogy.com
https://uk.renogy.com
supportuk@renogy.com
UK
https://de.renogy.com
supportde@renogy.com
DE
Table of contents
Other Renogy Control Unit manuals
Popular Control Unit manuals by other brands

M-system
M-system M6NPS1 instruction manual

UNI Geräte
UNI Geräte EVSxxU Series Operating and mounting manual

Knick
Knick Protos OXY 3400-067 user manual

Grodan
Grodan GroSens installation manual

FrSky
FrSky RB-35 instruction manual

Roger Technology
Roger Technology B70/1B Instruction and warnings for the installer