Rescue 42 The Ripper User manual

Copyright 2019 Rescue 42, Inc. The Ripper™- 1 Owner’s Manual Page
2
Introduction
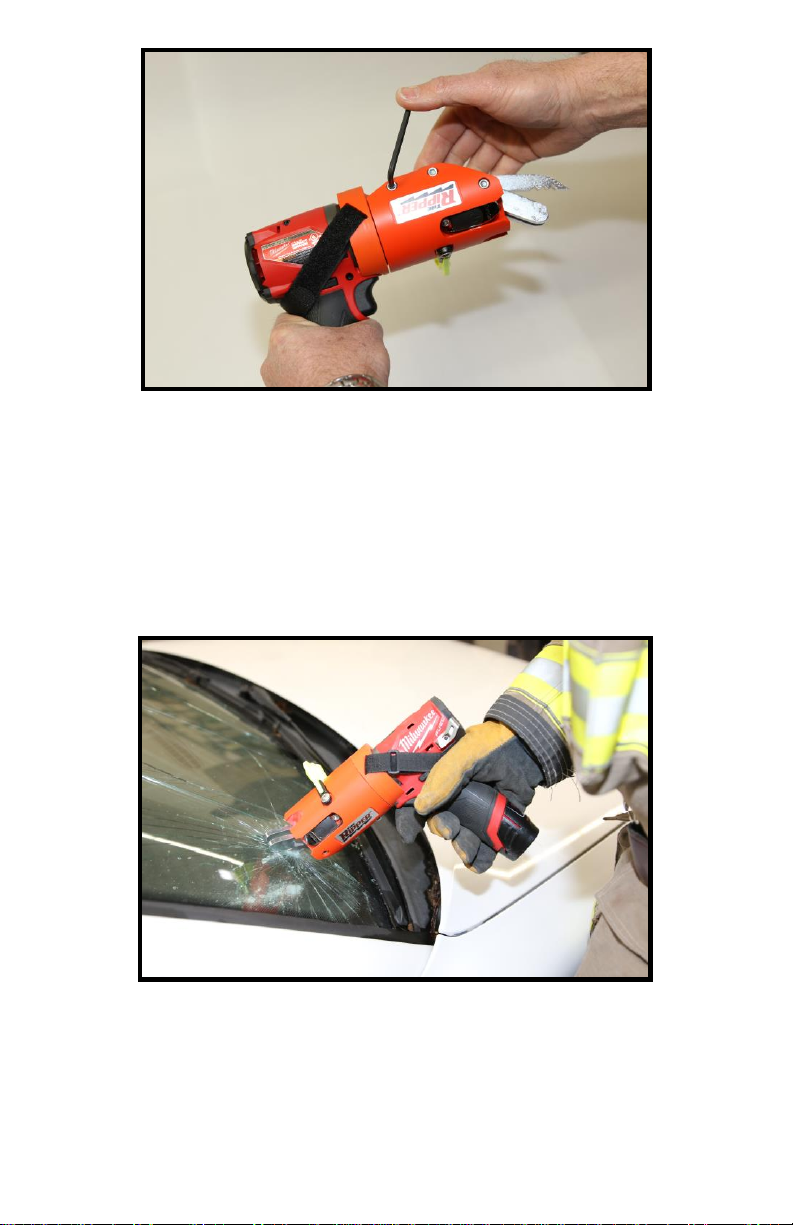
Thank you for purchasing The Ripper™. The Ripper™is designed to cut
vehicle laminated glass (LG) windshields and side windows to access
trapped or non-compliant subjects and injured or dying patients.
Please read this manual in its entirety before using The Ripper™.
Safe Operations and Warnings - Read Before Using
WARNING: TO REDUCE THE RISK OF INJURY, THE USER MUST
READ AND UNDERSTAND THIS OWNER’S MANUAL BEFORE
USING THIS PRODUCT. FAILURE TO FOLLOW THE WARNINGS
AND INSTRUCTIONS MAY RESULT IN SERIOUS INJURY OR DEATH.
Cutting LG generates glass chips and fine dust/powder. Users must wear
their agency-specified PPE, which should include protective clothing,
gloves, eye and possibly respiratory protection. LG dust (non-crystalline
glass dust or Amorphous Silica Dioxide) is only an irritant dust and is
not considered to be hazardous. While most glass fragments will
remain on the outside of the glass pane, some will fall inside. While
often not possible, attempt to protect occupants from fragments.
Although the blades do not appear or feel sharp to the touch, please
note that the shear blade oscillates like a scissor to cut LG. Do not place
your fingers or any parts of your body in or on the blades while the
battery is attached to the cordless Impact Driver used to power the tool.
Do not use The Ripper™ for cutting materials other than Laminated
Glass (LG); you may damage the tool and will void the warranty.
See the Impact Driver’s owner’s manual for safety warnings regarding
its safe operation. All impact drivers have owner’s manuals posted on
the manufacturer’s website.
Never use The Ripper™ on the incorrect Impact Driver. Each Ripper™
has the model number of the compatible impact driver engraved on the
trailing edge of the interface cone. If you have any questions about
compatibility of The Ripper™ with an impact driver, send an email to:

Copyright 2019 Rescue 42, Inc. The Ripper™- 1 Owner’s Manual Page
3
Components
The Ripper™ is made of high-quality engineered copolymer and ultra-
high strength, corrosion resistant steels. It is simple to use and designed
to allow you to conduct any cleaning and maintenance in the field.
Figures 1 & 2 identify the components.
Figure 1: The Ripper™ Overview
Figure 2: The Ripper™ Overview with Access Port Highlighted

Copyright 2019 Rescue 42, Inc. The Ripper™- 1 Owner’s Manual Page
4
WARNING: Always remove the battery pack from the Impact
Driver before assembling parts or making adjustments. This should
prevent accidental starting that could cause serious injury.
Connecting The Ripper™to an Impact Driver
1. Remove the battery from the Impact Driver.
2. Compare the model number of the Impact Driver with the
model number engraved on the Ripper™Interface Cone. They
must match. If not, you cannot attach The Ripper™.
3. Ensure that the female ¼” hex socket on the Impact Driver is
clean and that the engagement collar slides easily.
4. Rotate the Interface Cone until the removal access port is
visible, then move The Ripper’s™ retention strap out of the way.
5. Rotate the Interface Cone to align with the Impact Driver’s
body. The cone is in the right position when the Removal Access
Port is pointing toward the top of the Impact Driver.
6. Slide the hex drive shaft into the hex socket of the Impact
Driver. If installed correctly, the Impact Driver will lock on to
The Ripper™ drive shaft and the Interface Cone will be snug
against the front housing of the Impact Driver. Check this by
pulling on The Ripper™Body to test that it is properly
connected to the Impact Driver. Not all Impact Drivers are alike.
You may need to slide the engagement collar forward while
pushing The Ripper™ into place. You can slide it forward by
using your fingertip through the Access Hole or with a small
screwdriver. Just pull forward on the engagement collar while
pushing in on the Ripper™ body. It should lock into place.
7. Move the retaining strap into position, thread the end through
the ring rectangular ring, pull until tight and press the hook and
loop strap surfaces together. See Figure 3.
8. Install the battery and you are ready to cut laminated glass.

Copyright 2019 Rescue 42, Inc. The Ripper™- 1 Owner’s Manual Page
5
Figure 3: Connecting The Ripper™ Retaining Strap
Disconnecting from an Impact Driver
To disconnect The Ripper™ from an impact driver follow these steps:
1. Clean glass dust or fragments off The Ripper™ and Impact Driver.
2. Remove the battery from the Impact Driver.
3. Loosen The Ripper’s™ retention strap and move it out of the way.
4. Rotate The Ripper’s™ housing on the interface cone until the
removal access port is exposed, and the Impact Driver’s sliding
engagement collar is visible.
5. Using either your finger or the provided flat-bladed screwdriver
(Fig. 4 & 5), slide the engagement collar of the impact driver
forward (away from the Impact Driver). At the same time pull The
Ripper™ off the Impact Driver. Be cautious of the blade tips as The
Ripper™body comes off the Impact Driver; the attachment may
release quickly causing it to suddenly separate. Use caution not to
strike someone or something with the blade tips.
1
2
3
4

Copyright 2019 Rescue 42, Inc. The Ripper™- 1 Owner’s Manual Page
6
Figure 4: Disconnecting by Hand
Figure 5: Disconnecting with Tool
Using the resqme® Glass Punch/Seatbelt Cutter
The Ripper™ features a resqme®tool that can break tempered safety
glass, cut seat belts, or cut side curtains and curtain tethers, making The
Ripper™ capable of removing any commonly found vehicle side window
glass. The resqme® will not break laminated glass.
To remove tempered side window glass with the integrated resqme®
tool, turn The Ripper™ until the black tip of the resqme® is pressed
against the glass. Push the black head firmly into the bottom corner of
the side window until it “snaps”. If the glass shatters you can use The
Ripper™to sweep the window frame free of glass particles and access
the interior. If the window doesn’t shatter, it is laminated glass and you
must cut it with The Ripper™ blades. You may remove the resqme®
from The Ripper™ for breaking glass and cutting seat belts and side
curtains and tethers by pulling it firmly away from The Ripper™body.

Copyright 2019 Rescue 42, Inc. The Ripper™- 1 Owner’s Manual Page
7
Turning On/Off the LED Light
The Ripper™ is equipped with an integrated high-performance
rechargeable LED flashlight. It is operated by pressing the button on the
flashlight housing (Fig. 6). With the light turned off press the button to
turn on the light. Pressing a second time within short succession will
brighten the light setting, pressing once again will shut off the light.
Figure 6: Flashlight
Charging the LED Light
Open the charging port on the side of the flashlight by removing the
rubber plug. Connect the Micro-USB end into the light and plug the
other end in to a power supply (USB adapter, PC, or other standard USB
output port). To fully charge the light when depleted requires
approximately 2 hours. A charging indicator light built into the flashlight
will illuminate steadily during charging and will go out when fully
charged. The light will need to be recharged if output appears to be dim
or the light becomes unresponsive (Fig 6).
Setting Pivot Friction
The Ripper™ is designed to be used right or left-handed. It can be
operated with one hand or two. It is capable of cutting at any angle.
The Ripper™ can pivot 360 degrees and does not have a travel stop.
This enables the operator to turn the tool in any direction or cut glass
from any angle. The operator can adjust the friction on the pivot
mechanism to their individual liking by tightening or loosening the
friction adjustment bolt with the provided 5/32” hex wrench (Fig. 7).

Copyright 2019 Rescue 42, Inc. The Ripper™- 1 Owner’s Manual Page
8
Figure 7: Pivot Friction
Punching Starter Hole in Glass
The Ripper™ is designed to use the blade tip to punch through the LG
enabling instantaneous cutting. Simply grip the unit firmly by the
Impact Driver grip and punch it firmly into the glass surface. Then
rotate The Ripper™to the correct cut angle and pull the trigger in one
continuous motion to begin cutting (Fig. 8).
Figure 8: Punching Starter Hole

Copyright 2019 Rescue 42, Inc. The Ripper™- 1 Owner’s Manual Page
9
Figure 9: Cutting Laminated Glass
Cutting Laminated Glass Using Power
Pivot the Impact Driver into a comfortable operating position. Place the
lower oscillating shear blade through the starter hole or existing cut
line, and the upper fixed cutting blades on top of the LG pane. Apply
power to the impact driver and cut (Fig. 9). The Ripper™ is designed to
operate at any RPM and can operate in forward or reverse Impact
Driver modes. For optimal cutting speeds, if applicable, set the Impact
Driver speed setting to the highest RPM output. For best results be sure
the lower fixed (non-oscillating) blades and the angled Ripper™ body
housing are in constant contact with the glass surface. Allow the cutter
to do the work by applying modest forward pressure to cause The
Ripper™ to cut the glass. Excessive pressure actually slows the cutting
process rather than speeding it up.
Cutting Laminated Glass Manually (No Power)
In the unlikely event that the Impact Driver batteries are dead or
missing, or the Impact Driver fails, you can manually use The Ripper’s™
cutting blades to cut LG by using a “can-opening” motion. To cut
manually push the cutting blade as deep against the glass as possible,
and then lever The Ripper™upwards, rotating the tool against the cut
and allowing The Ripper’s™ manual cutting teeth to tear through the
glass (just like manually opening a can). Repeat this process to continue
the cut. It will take longer to cut the pane, but the manual cutting
ability of our blade system and cone interface make a perfect backup
system for your operations.

Copyright 2019 Rescue 42, Inc. The Ripper™- 1 Owner’s Manual Page
10
Procedure for Cutting Side Windows
1. Try the door handle to check if the door is locked or jammed.
2. Turn The Ripper™ sideways and push the black tip of the resqme®
tool against the window until it triggers the punch. If the window
shatters, it is tempered glass and you’re in. If not, it is made of
laminated glass and will need to be cut.
3. If the door is locked and the occupant is unconscious or
can’t/won’t open the door, punch The Ripper™ into the glass and
cut an arch over the interior latch, push the flap in with your hand
or The Ripper™ and reach in to unlock or open the door. Only do
this if it safe to reach into the vehicle. (Fig. 10)
4. If the flap method fails or you need the whole window removed,
punch The Ripper™ into the lower corner of the glass and cut all
the way across the base of the window. Use the flap hole to pull
the window out or pry the center of the cut glass out with The
Ripper™, grasp the center and pull the window out. (Fig. 11)
5. If needed, remove the resqme® tool and use the cutter to cut
seatbelts or side curtains/tethers.
Figure 10: Flap Method

Copyright 2019 Rescue 42, Inc. The Ripper™- 1 Owner’s Manual Page
11
Figure 11: Cut to Remove Window
Replacing Cutting Blades
The cutting blades are designed to cut many windows, but they do dull
over time. Replacement blades are available through your dealer and
can be easily swapped out by the owner. Follow the installation
instructions that come with the replacement blades to reassemble.
WARNING: Always remove the battery pack from the Impact
Driver before assembling parts or making adjustments. This should
prevent accidental starting that could cause serious injury.
Ordering Parts
The Ripper™ is durable and will require little maintenance other than
post use cleaning. Parts are available from Rescue 42, through our
distributor network. If you need help in finding a distributor please go
to our website http://rescue42.com/dealers/ to find one near you.
Technical Assistance
Rescue 42 provides support by email and phone. Please write to
5pm M-F (USA Pacific Time Zone), except holidays).

Copyright 2019 Rescue 42, Inc. The Ripper™- 1 Owner’s Manual Page
12
Three Year Limited Warranty
DO NOT RETURN THIS ITEM TO THE PLACE OF PURCHASE
Every Rescue 42, Inc. Ripper™ laminated glass cutter is warranted to the original purchaser only, to
be free from defects in material and workmanship subject to certain exceptions:
•The cutting blades
•The carrying bag
•The integrated LED light’s battery
•The resqme®
•Any Cordless Impact Drivers, Batteries and Chargers sold with or without The Ripper™.
See respective manufacturer’s warranty for claim instructions.
Rescue 42 will repair or replace any part on a Ripper™ which, after examination, is determined to
be defective in material or workmanship for a period of three (3) years after the date of purchase.
Return of The Ripper™ may be required. Video or photos may also be used by Rescue 42 (at its sole
option) to determine qualification for warranty coverage. If return of The Ripper™ is required,
shipping costs shall be the responsibility of the shipping party. The customer shall pay for shipment
to Rescue 42, and if The Ripper™ is determined to be qualified by Rescue 42 for warranty repair or
replacement, return shipment by ground transit shall be paid for by Rescue 42.
The warranty does not apply to damage Rescue 42 determines to be from repairs made or
attempted by anyone other than Rescue 42, or an authorized Rescue 42 representative. Damage
or degradation from normal wear and tear, misuse or abuse (such as jamming the moving cutting
blades into metal or non-laminated glass objects), alterations, accidents, lack of maintenance, lack
of proper storage, or use with an incompatible Impact Driver shall not be covered by warranty.
RESCUE 42 SHALL NOT BE LIABLE FOR ANY INCIDENTAL OR CONSEQUENTIAL DAMAGES FOR
BREACH OF ANY EXPRESS OR IMPLIED WARRANTY ON THIS PRODUCT. EVERY EFFORT HAS BEEN
MADE TO ENSURE THE COMPLETE ACCURACY OF THE CONTENTS OF THE OWNERS MANUAL. NO
LIABILITY ARISING FROM ITS USE, HOWEVER, CAN BE ACCEPTED BY RESCUE 42, INC, WHO
RESERVES THE RIGHT, WITHOUT PRIOR NOTICE, TO ALTER THE SPECIFICATIONS, CONSTRUCTION,
OR CONTENT OF ITS EQUIPMENT AT RESCUE 42’S OWN DISCRETION.
To claim a warranty please send an email containing the following information to
RipperWarranty@Rescue42.com You must provide:
1. The serial number found on a label of The Ripper’s™ main body.
2. An explanation of the problem; photos or short videos are optional, but helpful.
3. Proof of purchase (optional).
4. Your name.
5. Your full mailing address, including zip code (must be able to receive packages).
6. Your email address.
7. Your daytime phone number.
Warranty claims will be fully processed within five (5) business days; if Rescue 42 deems that the
return of your Ripper™ is required to fix the problem, it will issue a Returned Merchandise
Authorization (RMA) number to you via email or by phone call. Before sending The Ripper™ in for
warranty service, you MUST obtain an RMA number from Rescue 42. This number must be found
both on the exterior and packed within the shipping container, along with the information
requested above. Any product sent to Rescue 42 without an RMA number shall not be the
responsibility of Rescue 42 if lost. The return of any repaired or replaced product shall be conveyed
by ground transit. Rescue 42, Inc.
370 Ryan Ave. #120, Chico, CA 95973 Ph. (888) 42-RESCUE
RipperWarranty@Rescue42.com
This manual suits for next models
1
Table of contents
Popular Safety Equipment manuals by other brands

auto maskin
auto maskin Marine Pro. 400 Series installation manua

Spanset
Spanset safety harnesses User instructions

A.HABERKORN
A.HABERKORN HERKULES INSTRUCTIONS FOR USE AND TEST MANUAL

Petzl
Petzl I'D S Inspection Procedure

Tractel
Tractel LDR 06 Installation, operating and maintenance manual

FrontLine
FrontLine RO4W instruction manual