Resol FlowFlowCon Sensor Guide

F lo w C o n A
www.resol.de
Handbuch
RESOL
F lo w C o n S e n s o r / S e n s o r H E
Installation
Operation
Commissioning
F lo w C o n S e n s o r / H E
www.resol.de
Manual
*48004841*
48004841
EN
Thank you for buying this RESOL product.
Please read this manual carefully to get the best performance from this unit.
Please keep this manual carefully.

© RESOL 10263 flowcon_sensor.monen.indd
F lo w C o n S e n s o r / S e n s o r H E
| 2
Subject to technical change. Errors excepted.
Proper usage
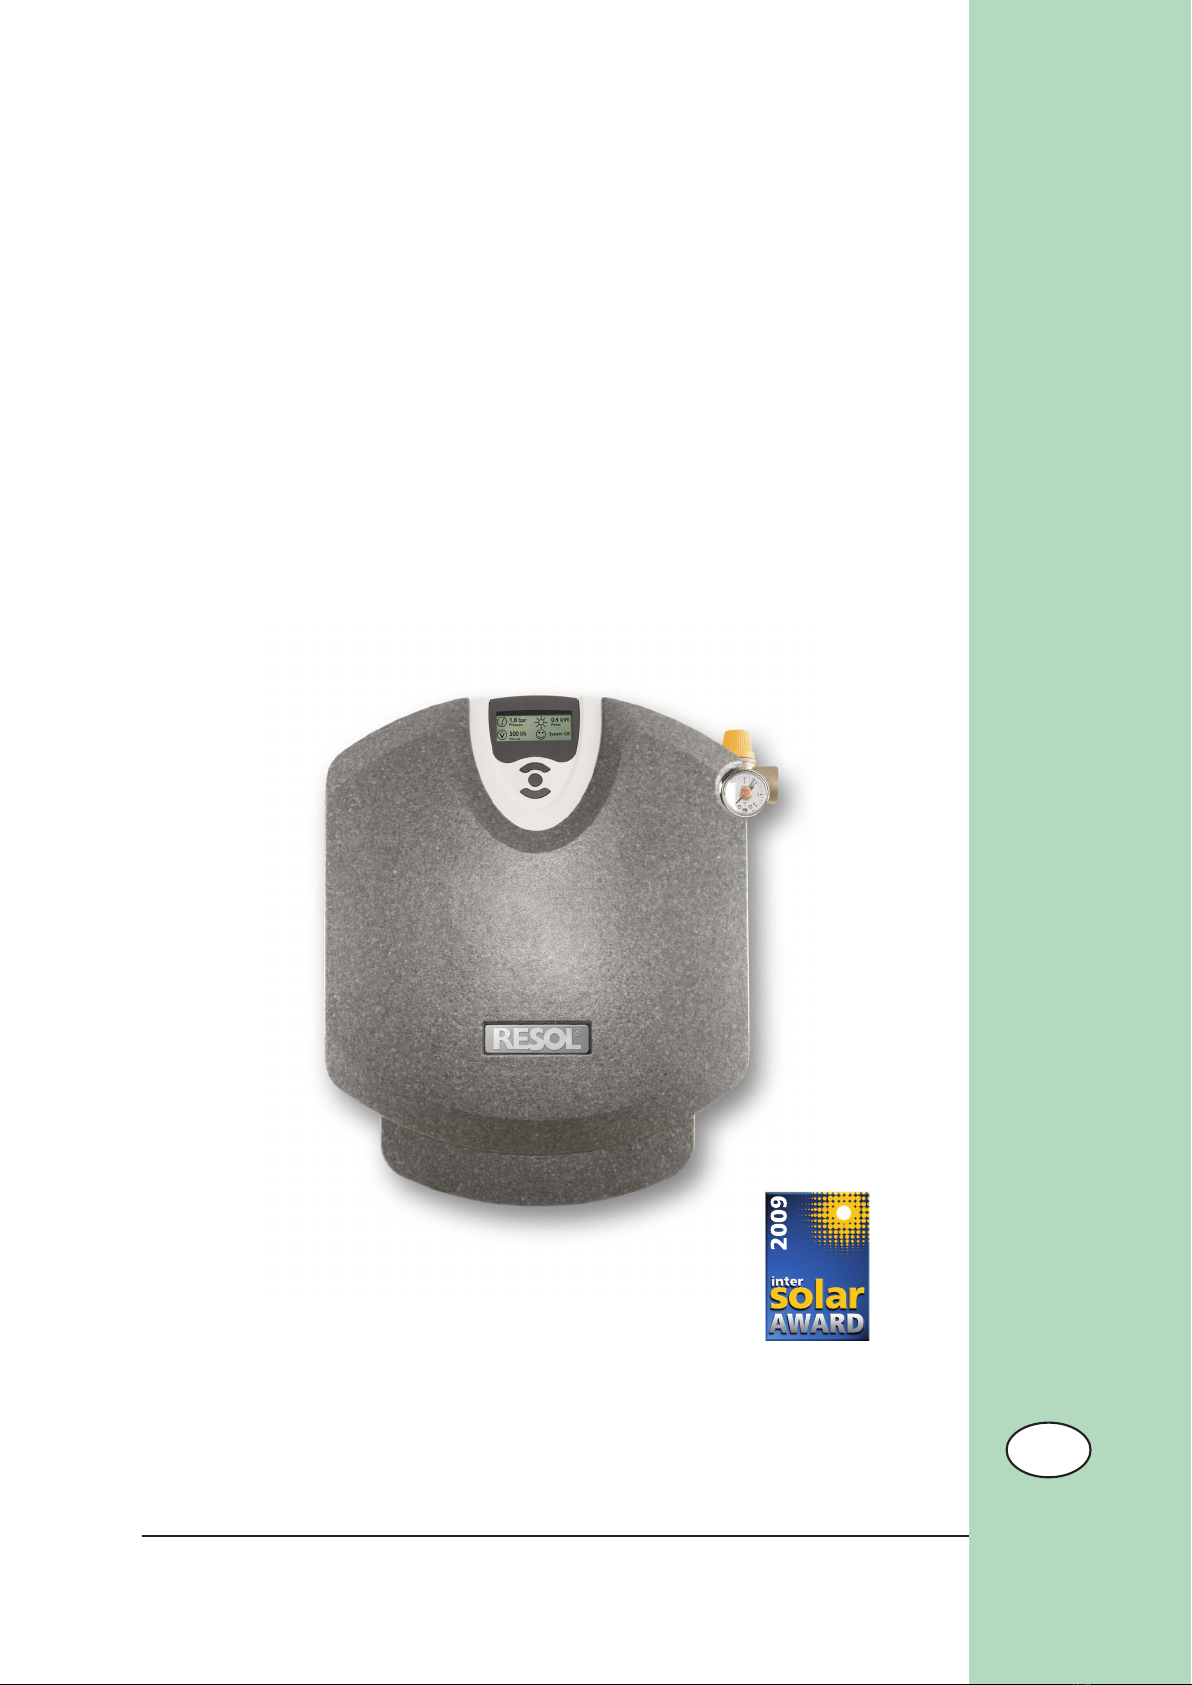
The solar station with the integrated controller may only
be used in the collector circuit of solar thermal systems
in compliance with the technical data specified in these
instructions.
Improper use excludes all liability claims.
Table of contents
1. Pump station with integrated controller ....... 3
2. Mounting the station ....................................... 6
3. Commissioning ................................................. 6
3.1 Flushing and filling of the system ...............................6
3.2 Emptying the solar thermal system ..........................8
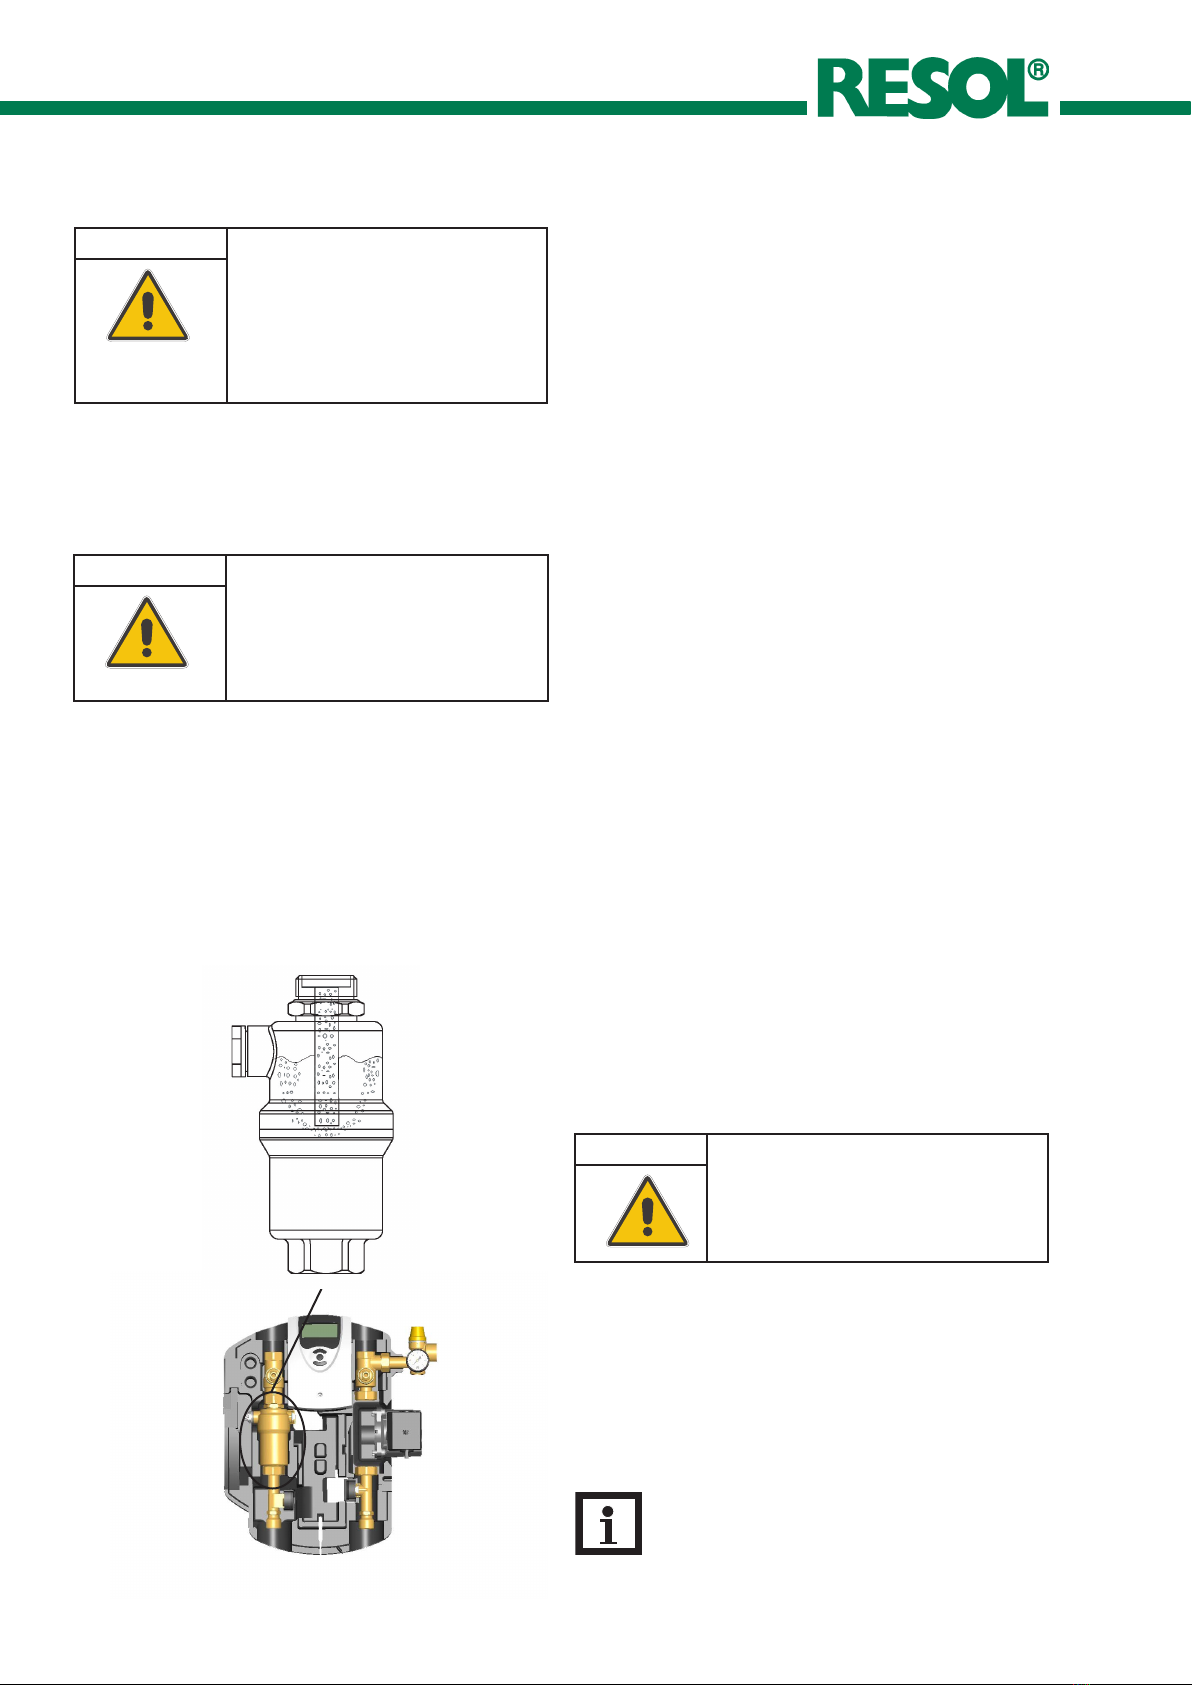
4. AirStopp ............................................................ 8
5. Digital sensors .................................................. 9
6. Mounting of the controller ............................. 9
7. Accessories for the station .............................. 9
8. Integrated controller D e lt a S o l® Sensor ....... 10
9. Installation .......................................................11
10. Sensor and relay allocation ...........................11
11. Initial commissioning .....................................11
11.1 Push buttons .................................................................11
11.2 Commissioning assistant ............................................12
11.3 Adjusting the minimum pump speed ...........................15
12. Menu structure .............................................. 16
13. Operation and function ................................. 19
14. Info area .......................................................... 20
15. Main menu ...................................................... 23
15.1 Status ............................................................................. 23
15.2 Balance values .............................................................. 23
15.3 Adjustment values .......................................................24
16. Messages ......................................................... 31
16.1 Permanent monitoring functions .............................31
16.2 Optional monitoring functions ................................... 32
Index ........................................................................ 35
Imprint .................................................................... 36
Description of symbols
Disposal
Signal words describe the danger that may occur, when it
is not avoided.
WARNING means that injury, possibly life-threatening
injury, can occur.
ATTENTION means that damage to the appliance can
occur.
•Dispose of the packaging in an environmentally sound
manner.
•Dispose of old appliances in an environmentally sound
manner. Upon request we will take back your old
appliances bought from us and guarantee an environ-
mentally sound disposal of the devices.
Information about the product
CE-Declaration of conformity
The product complies with the relevant
directives and is therefore labelled with the
CE mark. The Declaration of Conformity
is available upon request, please contact
RESOL.
Note
Notes are indicated with an information symbol.
ÎArrows indicate instruction steps that should be
carried out.
Safety advice
Please pay attention to the following safety advice in order
to avoid danger and damage to people and property.
Instructions
Attention must be paid to the valid local standards, regu-
lations and directives!
Target group
These instructions are exclusively addressed to authorised
skilled personnel.
•Only qualified electricians should carry out electrical
works.
•Initial installation must be effected by qualified personnel
named by the manufacturer
WARNING! Warnings are indicated with a
warning triangle!
ÎThey contain information
on how to avoid the danger
described.

© RESOL 10263 flowcon_sensor.monen.indd
F lo w C o n S e n s o r / S e n s o r H E
3 |
1. Pump station with integrated controller
•With Grundfos Direct SensorsTM
•High efficiency pump (product version F l o w C o n
S e n s o r HE) funded by a number of national incentive
programs
•Precise measurement of temperature, pressure and
flow rate
•Advanced error diagnostic system
•Heat quantity measurement
•Full graphic display
•RESOL VBus®
The F lo w C o n S e n s o r / S e n s o r H E is a complete
pump station that is delivered with all the electric and
hydraulic core components of the solar system, including
the sensors required, pre-assembled in one easy-to-mount
unit. The separate installation of collector and store sen-
sors is not required.
The F l o w C o n S e n s o r / S e n s o r H E offers the effi-
ciency and the functional range of a standard solar system
while being much more reliable and requiring less instal-
lation effort.
The station is equipped with important components and
safety assemblies for operating the solar thermal system:
•Ball valves in flow and return in combination with check
valves to prevent gravity circulation
•Digital sensors for measuring temperature, pressure
and flow rate
•AirStopp for manual bleeding of the solar thermal system
•Manometer for displaying the system pressure
•Safety valve to prevent inadmissible overpressure
•High-efficiency pump (F l o w C o n S e n s o r H E only)
In order to optimise the time frame, the algorithm takes a
range of parameters into account, e. g. the tilt and the ori-
entation of the collector, the geographical position as well as
the season. Furthermore, the testing time frame is adjusted
to the typical identified store temperature.
Sequence of control phases of the F lo w C o n S e n s o r :
Loading
yes
no
no
30 min pause
Identification The testing time frame begins with an identification
phase. The controller activates the pump at minimum
speed to check whether a solar gain might be possible.
If a solar gain is possible, the stabilising phase is started,
during which the pump remains active and the controller
continues to test for the possibility of an efficient solar gain.
The pump station commences normal operation, i. e. it
enters the loading phase. The store is loaded as long as
an efficient solar gain is possible.
yes
Stabilising
What makes the F l o w C o n S e n s o r so special is its con-
trol algorithm. For each individual operating day, it calculates
a specific time frame during which it is sensible to start the
pump for testing purposes. The integrated sensors then
identify the collector and store temperatures by experi-
mentally activating the pump.
If no solar loading is possible, a 30 min pause is run in
order to give the collector time to heat up.
Theoretical irradiation on
the collectors
Testing time frame Pause
6:00 12:00 18:00

© RESOL 10263 flowcon_sensor.monen.indd
F lo w C o n S e n s o r / S e n s o r H E
| 4
160 mm 55 mm
D e l t a S o l ® Sensor /
Sensor HE controller
Included:
1 x pump station F lo w C o n S e n s o r / S e n s o r H E with
integrated D e lt a S o l® Sensor / Sensor HE controller
1 x wall mounting bracket
1 x accessory bag
2 x screw and wall plug
Technical data of the pump station
Dimensions:
Height (with insulation): 417 mm
Width (with insulation): 374 mm
Depth (with insulation): 179 mm
Distance centre: 160 mm
Distance axis/wall: 55 mm
Pipe connections: ¾" IT
Connection to expansion vessel:
3/4" AG, flat sealing
Outlet safety valve: 3/4" IT
Equipment:
Safety valve: 6 bar
Manometer: 0 ... 6 bar
Non-return valves:
Opening pressure 200 mmWS, openable
Material:
Fittings: brass
Seals: EPDM
Insulation: EPP, l = 0,041 W/(m*K)
Technical Data:
Max. permitted pressure: 6 bar
Max. operating temperature: 120 °C
Flow range: 100 ... 500 l/h
Size of collector field: < 25 m²
pump
digital sensor
(return)
digital sensor
(flow)
AirStopp
safety
assembly
manometer

© RESOL 10263 flowcon_sensor.monen.indd
F lo w C o n S e n s o r / S e n s o r H E
5 |
0,0
1,0
2,0
3,0
4,0
5,0
6,0
7,0
8,0
9,0
10,0
0 200 400 600 800 1000 1200
0
9,8
19,6
29,4
39,2
49
58,8
68,6
78,4
88,2
98
FlowCon Sensor / Sensor HE
Grundfos Solar PM 15-85
Wilo ST 15/6
Pump characteristic / pressure loss characteristic F l o w C o n S e n s o r / S e n s o r H E
flow rate [l/h]
pressure loss [kPa]
pressure [mWS]
The installation and commissioning of the solar station as
well as the connection of electrical components requires
technical knowledge commensurate with a recognised
vocational qualification as a fitter for plumbing, heating and
air conditioning technology, or a profession requiring a com-
parable level of knowledge. The following must be observed
during installation and commissioning:
• the relevant regional and national regulations
• the accident prevention regulations of the trade association
• the technical and safety instructions of these instructions
Safety instructions
WARNING: Risk of scalding
There is a danger of steam emission with safety val-
ves. Therefore a discharge pipe must be connected
to the ¾“ internal thread of the safety assembly.
Please observe the enclosed instructions regarding
the safety valve when doing this.
Attention: Damage to property
The group of fittings must be installed with suffi-
cient spacing to the collectors because tempera-
tures in the vicinity of the collectors can be very
high. An intermediate vessel may be necessary for
installation in the attic.
Attention: Damage to property
It is imperative that you make sure the EPDM
sealing elements of the solar station do not come
into contact with substances containing mineral oil.
Mineral oil products cause lasting damage to the
material, whereby its sealant properties are lost.
If necessary, ask the manufacturer whether the
solar fluid, fats or installation aids contain mineral
oils.
The manufacturer does not assume liability nor
provide warranty for damage to property resulting
from sealants damaged in this way.

© RESOL 10263 flowcon_sensor.monen.indd
F lo w C o n S e n s o r / S e n s o r H E
| 6
3.1 Flushing and filling of the system
3. Commissioning
fig.1
(1) (2)
ÎDetermine the mounting site of the station
ÎTake the station out of the packaging. Remove the front
half of the insulation (a) by pulling it backwards.
ÎHold the enclosed wall mounting bracket (b) against
the wall and mark the fastening holes, drill holes and
insert wall plugs
ÎFasten the wall mounting bracket to the wall with the
screws
ÎPush the station against the wall mounting bracket. The
station catches and is then attached to the wall
ÎConnect the station to the solar thermal system; ob-
serve the connections (d) and (e)
ÎCheck the inlet pressure of the expansion vessel
and, if necessary, adjust it to the local conditions
(P inlet [bar] = 1 bar + Dh [m]*1/10 (Dh = height diffe-
rence between collector and station)
ÎConnect the electrical components of the solar station:
Attach the store and collector sensor and connect the-
se to the controller. Plug the controller into a socket
ÎTighten all union nuts and screw connections
ÎReattach the front half of the insulation to the station
Upon demounting, the clips (c) have to be removed.
2. Mounting the station
WARNING! Scald danger!
Danger of severe application damage!
Flushing and/or filling the system on a
very sunny day can lead to a sudden
volatilisation of heat transfer fluid.
ÎDo not flush or fill the system
during p e r io d s of strong
sunshine!
ATTENTION! Frost damage!
It is impossible to completely empty a
solar system once it has been flushed.
If water is used for flushing the system,
frost damage can occur. Use heat trans-
fer fluid to flush and fill the system.
ÎUse a mixture of water and propyle-
ne or ethylene (max. 50 % propylene/
ethylene) as a heat transfer fluid!
Note
If the pump is to support the flushing and filling
process, the controller has to be commissioned
first! For detailed information see chap. 11.2.
(a)
(b)
(c)
Instructions for initial commissioning:
The optionally available flushing and filling unit should be
mounted horizontally at the lowest point in the return of
the solar circuit (see fig. 1).
A filter should be placed between the flushing and filling
station and the solar pump.
This flushing process is described in “3.1.1 Flushing the sy-
stem for initial commissioning”. Then continue as described
in “3.1.2 Bleeding and filling the solar system”.
flushing and filling unit
(d)
(e)
(d) connection for discharge pipe
(e) connection for expansion vessel

© RESOL 10263 flowcon_sensor.monen.indd
F lo w C o n S e n s o r / S e n s o r H E
7 |
3.1.1 Flushing the system for initial
commissioning
ÎDisconnect the expansion vessel from the solar thermal
system
ÎConnect the pressure hose of a flushing and filling sta-
tion to the fill valve (3)
ÎConnect the flushing hose of a flushing and filling station
to the drain valve (5) at the lowest point of the solar
thermal system
ÎClose the ball valve (4)
ÎOpen the fill valve (3) and the drain valve (5)
ÎTurn the ball valves in flow (1) and in return (2) with
an open-ended spanner (wrench width 14) to a 45°
position. The non-return valves in the ball valves are
now open (fig. 4)
ÎFlush the solar thermal system by means of the flushing
and filling station until the discharged solar fluid is free
of dirt particles.
During this process, the solar pump may run in “Max.” ma-
nual mode. (Observe note in chap. 3!)
ÎSwitch off the filling pump
If the steps described in chapter 3.1,1 have not been carried
out yet, please do so before proceeding with the following
steps
ÎFlush the solar thermal system using the flushing and
filling station for at least 15 minutes to remove all air
from the system.
During this process, the solar pump may run in “Max.” ma-
nual mode. (Observe note in chap. 3!)
ÎDuring flushing, bleed the solar thermal system several
times at the AirStopp until the discharged solar fluid is
free of air bubbles
ÎConnect the expansion vessel to the solar thermal
system
ÎClose the drain valve (5) of the flushing and filling unit
with the filling pump running and increase the system
pressure to approx. 5 bar
The system pressure can be read from the manometer
ÎClose the fill valve (3) and switch off the pump of the
flushing and filling station as well as the solar pump
ÎCheck the manometer to see whether the system
pressure reduces (approx. 15 minutes) and eliminate
leaks where necessary
ÎSet the operating pressure of the solar thermal system
(approx. 0.5 bar higher than the inlet pressure of the
expansion vessel) by opening the drain valve (5)
ÎClose the drain valve (5) and open the ball valve (4)
ÎRemove the hoses of the flushing and filling station and
screw the caps onto the fill and drain valves
ÎPut the non-return valves in flow and return in operating
position by putting them in a vertical position (fig. 4)
using an open-ended spanner (wrench width 14)
If the controller is active during the flushing and / or filling
process, an implausible static pressure might be stored. If
the controller detects a stagnation directly after a flushing
and / or filling process, proceed as follows:
fig. 4
12
fig. 3
3.1.2 Bleeding and filling the solar system
(3) (5)
(4)
ball valve: 45°
non-return valve
not operating
flow passage in
both directions
ball valve: 90°
ball valve closed, no
flow passage
ball valve: 0°
non-return valve
in operation, flow
passage only in
flow direction
fig. 2

© RESOL 10263 flowcon_sensor.monen.indd
F lo w C o n S e n s o r / S e n s o r H E
| 8
The Airstopp inside the pump station
ÎOpen the non-return valves in the ball valves in flow
and return by turning the ball valves to a 45° position
with an open-ended spanner
ÎPlace a temperature-resistant collection container un-
der the drain ball valve at the lowest point of the solar
thermal system
ÎOpen the drain valve at the lowest point of the solar
thermal system
ÎOpen the bleeding devices at the highest point of the
solar thermal system, where available
ÎDispose of the heat transfer fluid in observance of local
regulations
3.2 Emptying the solar thermal system
The AirStopp (manual bleed valve) is a device for bleeding
the solar fluid in the solar thermal system. The air preci-
pitated from the solar fluid gathers in the upper area of
the manual bleed valve (see diagram) and can, if required,
be discharged at the bleeding valve. To guarantee faultless
bleeding of the collector circuit the flow rate in the flow
must be at least 0.3 m/s.
ÎCheck the system pressure after bleeding and, if neces-
sary, increase it to the specified operating pressure
4. AirStopp
Bleeding the solar thermal system directly after
commissioning
After commissioning, bleed the solar thermal system daily,
then decrease the bleeding interval to a weekly or monthly
frequency, depending on the volume of discharged air.
WARNING! Scald danger!
The discharging liquid may be very hot.
ÎLocate the collecting vessel so
that people standing nearby
are not endangered while the
system is emptied.
WARNING! Scald danger!
Discharging fluid or gas may be very hot.
ÎKeep all body parts away from
the opening of the bleeding valve
during bleeding!
Information for the operator of the system
Bleed the solar thermal system every six months
with the manual bleed valve to achieve optimal
efficiency!
ATTENTION! Pressure surge damage!
Activating the pump regardless of a
collector stagnation may cause system
damage!
ΓAssign static pressure ! ”
must only be selected if no
stagnation is possible!
ÎPress button 3 for approx. two seconds
ÎSelect “Status”
ÎScroll to “Assign static pressure!” by pressing buttons
1 and 2
ÎSelect “Assign static pressure!”
The controller will now store the current system pressure
as the new static pressure.
For more information about stagnation see chap. 14.

© RESOL 10263 flowcon_sensor.monen.indd
F lo w C o n S e n s o r / S e n s o r H E
9 |
5. Digital sensors The pump station is equipped with digital sensors in flow and
return of the station. The digital sensor in the return mea-
sures the temperature and the pressure, the digital sensor in
the flow measures the temperature and the flow rate.
In the case of maintenance work or replacement of the
sensors, observe the following steps:
ÎClose valves, drain heat transfer fluid
ÎRemove clip at the digital sensor by pulling it backwards
ÎRemove defective sensor
ÎInsert new sensor and secure with clip
ÎFlush and fill the system
The digital pressure and temperature sensor (return) has
an orifice on one side of the measurement head.
The digital flow rate and temperature sensor (flow) has an
orifice on both sides of the measurement head.
measurement
orifice
6. Mounting of the controller
The controller is already integrated in the station and ready
to plug in. In the case of maintenance or service work, the
controller is to be taken out from the station. Please pay
attention to the following steps:
ÎSwitch off the system, disconnect plug from the mains
ÎRemove the front half of the insulation
ÎUnscrew the cross-recessed screw of the front cover
and remove the cover by pulling it upwards
ÎUnscrew the lower cross-recessed screw, push the
controller upwards and remove it
ÎMounting of the controller has to be carried out in
reverse order
For further information on electrical connection, of
the controller, please see chapter 17.
The controller manual can be found on the pages
10 to 34.
7. Accessories for the station For the connection between pump station and pipework,
screw connections are required, which are not included
in the scope of delivery. Self-sealing double nipples, solder
nipples or clamp-ring connections can be used. For further
information, please see the product catalogue.
Note
Check the fit of the sensor plugs before com-
missioning the pump station!
WARNING! Electric shock!
Upon opening the housing, live parts
are exposed.
ÎAlways disconnect the con-
troller from power supply
before opening the housing!
Note:
System pressure is measured at the pump inlet.
Therefore, the values measured at the digital
sensor may differ from those shown on the ma-
nometer when the pump is active.

© RESOL 10263 flowcon_sensor.monen.indd
F lo w C o n S e n s o r / S e n s o r H E
| 10
• Controller especially developed for the pump
station F lo w C o n S e n s o r / S e n s o r H E
• Full graphic display with intuitive symbols
• Digital sensors for temperature, pressure and
flow rate
• Function control
• Graphic balancing
Technical data of the controller
Housing:
plastic, PC-ABS and PMMA
Protection type: IP 20 / EN 60 529
Protection class: I
Ambient temp.: 0 ... 40 °C
Dimensions: 173 x 110 x 47 mm
Mounting:
inte grated in the pump station F l o w C o n S e n s o r /
S e n s o r H E
Display: full graphic display for visua lisation
Operation: 3 push buttons at the front
Functions: controller integrated in the pump station; with
add-on functions. Function control, operating hours counter
for the solar pump and heat quantity measurement.
Inputs: two inputs for Grundfos digital sensors
three inputs for Pt1000 temperature sensors (optional)
Outputs:
1 semiconductor relay
1 PWM signal output (D e lt a S o l® Sensor HE only)
Bus: RESOL VBus®
Power supply:
100 ... 240 V~
Standby power consumption: 0.63 W
Max. power consumption: 1.08 W
Mode of operation: type 1.Y
Switching capacity:
semiconductor relay:
1 (1) A (100 ... 240) V~
110
30
62
172
46
8. Integrated controller D e lt a S o l® Sensor / Sensor HE
The D e lt a S o l® Sensor / Sensor HE is integrated into the
pump station F lo w C o n S e n s o r / S e n s o r H E for stan-
dard solar thermal systems. A digital sensor measures the
temperature as well as the pressure in the return and a se-
cond digital sensor measures the temperature and the flow
rate in the flow. The installation of store and collector sen-
sors is not required, as the integrated digital sensors fulfill all
requirements in combination with the control algorithm.
The controller has various functions such as speed control,
store emergency shutdown, store cooling function as well
as a range of monitoring functions and is equipped with the
RESOL VBus® for data communication. The controller is inte-
grated in the pump station and ready to plug in.

© RESOL 10263 flowcon_sensor.monen.indd
F lo w C o n S e n s o r / S e n s o r H E
11 |
9. Installation
1
2
3
downwards
SET
(selection/
confirmation)
11. Initial commissioning
11.1 Push buttons
When the hydraulic system is filled and ready for operation,
connect the controller to the mains. Upon initial commis-
sioning, the commissioning assistant will start automatically
(see chap. 11.2).
The controller is operated by means of the 3 push buttons
below the display.
Button 1 is used for scrolling upward through the menu
or to increase the adjustment values.
Button 2 is similarly used for scrolling downwards and
reducing values.
Button 3 is used for selection of the menu items and for
confirmation.
upwards
PE R1 Mains
11 12 13 14 15 16 17
N L N L
Protective earth Collector cir-
cuit pump Mains
10. Sensor and relay allocation
Sensor allocation
Relay allocation
R1
A = brown
B = green
C = white
D = yellow
Digital sensor (flow rate, temperature)
Digital sensor
(pressure,
temperature)
Digital Sensor S1 S2 S3 VBus PWM
A B C D 1 2 3 4 5 6 7 8 9 10
Digital sensors
Inputs for Pt1000 sensors
(Allocation is optional and for information
purposes only)
blue brown
D e l t a S o l®
Sensor HE only
Note:
The controller is already integrated in the sta-
tion and ready to plug in. In the case of mainte-
nance work and repair, pay attention to chap. 17
“Electrical connection”!

© RESOL 10263 flowcon_sensor.monen.indd
F lo w C o n S e n s o r / S e n s o r H E
| 12
11.2 Commissioning assistant
The next adjustment channel of the commissioning assi-
stant appears in the next menu line.
ÎTo enter the adjustment mask, press button 3
In the following, the corresponding selection and adjustment
masks are shown.
Select country ...
Country United Kingdom
Date 01.01.2010
Commissioning assistant:
The list of countries is sorted alphabetically by the interna-
tional country codes (according to ISO 3166).
ÎSelect the desired country by pressing buttons 1 and 2
ÎBriefly press button 3 to confirm the selection
ÎTo store the adjustment and get back to the commissi-
oning assistant , press button 3 again
After a country has been selected and confirmed, a menu line
showing the selection appears below “Select country..”
If the desired country is not listed in the selection,
select a random country on the same hemisphere
and enter the exact coordinates in the submenu
“Country parameters” (see pg. 29) when the com-
missioning assistant has been completed.
Ukraine (UA)
United Kingdom (UK)
Vatican City (VA)
Select country ...
The D e l t a S o l ® Sensor / Sensor HE is equipped with a
commissioning assistant, which automatically and intuitively
leads through the adjustment of the necessary system pa-
rameters upon first commissioning. Only if the commis-
sioning assistant has been successfully completed will the
controller commence normal operation and the menu will
become accessible.
The commissioning assistant queries the necessary para-
meters one after another.
As soon as a value has been entered and confirmed,
resp. the default factory setting is confirmed, the
next parameter appears in the menu line below and
can be selected.
Exiting the commissioning assistant is only possible if
all necessary parameters have been adjusted.
Thus it is ensured that no value can be left out.
Language English
Commissioning assistant:
Deutsch
English
Francais
Language
Now the next adjustment channel appears – the country
of the system location can be selected.
ÎTo enter the selection mask for the country, press
button 3
Language English
Select country ...
Commissioning assistant:
Selecting the country of the system location
The display shows the selection mask.
ÎSelect the desired language by pressing buttons 1 and 2
ÎBriefly press button 3 to confirm the selection
ÎTo store the adjustment and get back to the
commissioning assistant, press button 3 again
Selection of the menu language
The commissioning assistant starts with the selection of
the menu language.
ÎTo enter the selection mask in order to select a language
or confirm the factory setting, press button 3
Note:
If the system is located in a large country, enter
the exact coordinates (see pg. 29) in order to
achieve maximum system efficiency.

© RESOL 10263 flowcon_sensor.monen.indd
F lo w C o n S e n s o r / S e n s o r H E
13 |
angle gradation figure
ÎAdjust the hours by pressing buttons 1 and 2
ÎBriefly press button 3 to confirm
ÎAdjust the minutes by pressing buttons 1 and 2
ÎBriefly press button 3 to confirm
ÎTo store the adjustment and get back to the commissi-
oning assistant , press button 3 again
Time
12:01
23:59
00:00
ÎAdjust the year by pressing buttons 1 and 2
ÎBriefly press button 3 to confirm
Now the month is displayed, too. As soon as it has been
adjusted and confirmed, the day appears as well.
ÎAdjust and confirm the current month and day as de-
scribed above
ÎTo store the adjustment and get back to the commissi-
oning assistant, press button 3 again
Date
__.__.2010
The tilt angle of the collector field can be adjusted to 0°,
15°, 30°, 45°, 60°, 75° or 90°. Due to the generous tole-
rance of the control algorithm, an adjustment by approxi-
mate is fully sufficient. The figure to the left may be used
for support when trying to determine the tilt angle.
ÎAdjust the approximate tilt angle of the collector field
by pressing buttons 1 and 2
ÎBriefly press button 3 to confirm
ÎTo store the adjustment and get back to the commissi-
oning assistant, press button 3 again
Tilt angle
45°
90°
0°
The orientation of the collector field can be adjusted in
steps. Similar to the tilt angle adjustment, the adjustment
of the orientation can be made by approximate.
The adjustment range depends on the latitude of the se-
lected country or position.
ÎAdjust the approximate orientation of the collector
field by pressing buttons 1 and 2
ÎBriefly press button 3 to confirm
ÎTo store the adjustment and get back to the commissi-
oning assistant, press button 3 again
Orientation
S
W
O
Orientation of the collector field
Tilt angle of the collector field
Date and time

© RESOL 10263 flowcon_sensor.monen.indd
F lo w C o n S e n s o r / S e n s o r H E
| 14
After the last parameter has been entered and confirmed,
the line “Ready! ...” appears as the last menu line.
If “Ready! ...” is selected, the commissioning assistant will
be completed and exited.
ÎTo complete and exit commissioning, press button 3
The controller is now ready for normal operation and
shows the status display (see image to the left; the values
shown are exemplary and may vary from the ones actually
visible).
Orientation S
Volumes Automatic
Ready! ...
Commissioning assistant:
1.8 bar
Pressure
500 l/h
Flow rate
18.4 kW
Power
System ok
P
V
Adjust
Automatic
Volumes
In this adjustment channel, either the automatic adaptati-
on or the manual adjustment of the volume values of the
system can be selected.
ÎSelect “Adjust” or “Automatic” by pressing buttons
1 and 2
ÎBriefly press button 3 to confirm the selection
ÎTo store the adjustment and get back to the commissi-
oning assistant , press button 3 again
If “Adjust” is selected, the adjustment channels for the vo-
lumes of the different system parts appear as shown below.
Pipe material: Select from “Copper” or “Steel”
Diam. Col->St: Diameter of the pipes between collector
and pump station
Diam. HX- >St: Diameter of the pipes between heat
exchanger and pump station
Length Col->St: Length of the pipes between collector
and pump station
Length HX->St: Length of the pipes between heat ex-
changer and pump station
Volume CF: Volume of the collector field
Volume HX: Volume of the heat exchanger
As soon as “Volume HX” has been entered and confirmed,
the commissioning assistant can be completed and exited
(see below).
If “Automatic” is selected, the controller adapts the ne-
cessary volumes automatically. The adaptation process runs
until in at least five identification phases, the maximum flow
temperature has exceeded the initial flow temperature by at
least 20 K. This means that for a successful adaptation, the
standstill temperature of the collector must be significantly
higher than the temperature of the pump station.
During winter or long-term periods of weak irradiation,
the adaptation process may take up to several weeks to
complete. While the adaptation is in progress, the system is
operable and can be used at a near-normal level of efficiency.
The main difference to the regular control cycle lies in the
identification phases: they start at a later time of the day and
have a longer runtime than during normal operation.
As long as the adaptation process is in progress, the mes-
sage “Adaptation in progress” is displayed in the status
menu (see chap. 15.1). As soon as the adaptation process
has been successfully completed, the controller automati-
cally switches to its regular control cycle.
If “Automatic” has been selected, the commissioning assi-
stant can be completed and exited (see below).
Volumes Adjust
Pipe material Copper
Diam. Col->St 18 mm
Commissioning assistant:
Adjustment / Adaption of the system volume
Completing and exiting the commissioning assistant
Note:
For information about the collector and heat
exchanger volumes, see the specifications of
the manufacturer.
Status Identification
... time left (mm:ss) 14:55
Adaptation in progress
Status

© RESOL 10263 flowcon_sensor.monen.indd
F lo w C o n S e n s o r / S e n s o r H E
15 |
During normal operation, the parameters adjusted by me-
ans of the commissioning assistant can be accessed in the
expert area of the adjustment values menu (see chap. 15).
If they are to be changed, this can be done in the following
submenus:
•Volume adaptation (pipe parameters etc.)
•Country parameters (country, time zone etc.)
•System parameters (tilt angle, orientation etc.)
11.3 Adjusting the minimum pump speed
Note:
The adjustment values in the expert area should
only be altered by qualified personnel. Other-
wise, the system may not function faultlessly!
After the commissioning assistant has been successfully
completed, the minimum speed of the pump must be adju-
sted. To do so, proceed as follows:
ÎKeep button 3 pressed for approx. two seconds
The main menu appears.
ÎSelect “Adjustment values”
ÎScroll down to “Relay mode” by pressing button 2
ÎSelect “Relay mode” by pressing button 3
ÎSelect “Min.” and confirm by pressing button 3 again
In the menu line below “Relay mode”, the adjustment
channel “Min. speed” appears, in the line below that, the
current flow rate is shown.
ÎSelect “Min. speed”
ÎAdjust the minimum pump speed so that the flow rate
reaches the desired value
ÎConfirm by pressing button 3
Max.
Min.
Auto
Off
Relay mode
Relay mode Min.
Min. speed 20 %
Flow rate 500 l/h
Adjustment values
Note:
Observe the specifications of the pump and
the collector manufacturer when adjusting the
minimum pump speed!
If the flow rate remains below 100 l/h at the
adjusted minimum pump speed, the control-
ler will increase the pump speed until the flow
rate surpasses 100 l/h.
After the adjustment of the minimum pump speed,
the relay mode should be set back to “Auto”.
Otherwise, the efficiency and reliability of the system will
not be optimal.
To do so, proceed as follows:
ÎSelect the menu item “Relay mode” as described above
ÎSelect “Auto”
ÎConfirm by pressing button 3
For more information about the different relay modes see
chap. 15.3.
Note:
The system takes about 30 seconds to adjust to
a new minimum speed. Always wait for 30 se-
conds before readjusting the minimum speed!

© RESOL 10263 flowcon_sensor.monen.indd
F lo w C o n S e n s o r / S e n s o r H E
| 16
1.8 bar
Pressure
500 l/h
Flow rate
18.4 kW
Power
System OK
P
V
Display Description Adjustment range Factory setting
Info area
Status display
Pressure Current system pressure at the return sensor
Power Current power of the system
Flow rate Current flow rate at the flow sensor
System ok Everything alright – no error
In the case of an error or warning, the display illumination flashes!
For more informationen about possible errors see chap. 16 on pg. 31 of this manual.
Other possible messages (instead of “System ok”):
T-Fl defect Digital flow sensor defective
T-Re defect Digital return sensor defective
Manual mode Manual mode (Relay mode on “Min.”, “Max.” or “Off”)
DT too high DT has been larger than 50 K for 20 minutes
Overpressure Excess pressure warning
Leakage Low pressure warning
Flow rate? Flow rate warning, no flow rate has been detected
Fl pipe circ. Flow pipe circulation – significant temperature increase during three or more consecutive nights
Re pipe circ. Return pipe circulation – significant temperature increase during three or more consecutive nights
System display
For detailed information about the system display see chap. 14 on pg. 20 of this manual
Temp. / Defect Indication of the temperature, resp. of a defect at the corresponding sensor
Loading, ... Indication of the operational status above the store symbol, where applicable with a count-
down of the remaining phase runtime, see chap. 14
Balance value diagrams
Flow temp. today Flow temperature curve of the current day
Ret temp. today Return temperature curve of the current day
Flow temp. yest. Flow temperature curve of the previous day
Ret temp. yest. Return temperature curve of the previous day
Gains in kWh Bar chart showing the heat gains of the last seven days
Balance value displays
Max. pressure Maximum system pressure
Min. pressure Minimum system pressure
Max. flow temp. Maximum flow temperature
Max. return temp. Maximum return temperature
Max. power Maximum power
Heat qty. Heat quantity cumulated since commissioning or last reset
Operating hours R1 Operating hours relay 1
12. Menu structure The controller is operated and controlled via the menu.
During normal operation, the status is displayed.
Note:
The displayed values and options depend on
the functions and only appear if these are available
for the adjusted system parameters.

© RESOL 10263 flowcon_sensor.monen.indd
F lo w C o n S e n s o r / S e n s o r H E
17 |
Operating days Operating days
Main menu
Status
Status Current control phase / current operating status
for more information about the possible indications see chap. 14.1
... time left
(mm:ss) or (hh:mm)
During timed control phases (standby, pause, identification, stabilising, overrun), the remai-
ning time is indicated as a countdown.
During the standby phase, the countdown is indicated in hours and minutes. During the pause,
identification, stabilising and overrun phase, the countdown is indicated in minutes and seconds
Skip pause! Abortion of the pause in order to enforce an identification phase (only visible during a pause)
Assign
static pressure!
Abortion of an inhibition caused by stagnation, forces the storing of a new static pressure
value
Adaptation in
progress
Automatic volume adaptation is still in progress
T-Flow Current flow temperature
T-Return Current return temperature
Flow rate Current flow rate
Power Current power of the system
Speed Current pump speed
Pressure Current system pressure
S1 ... S3 Current temperature / error condition at the corresponding sensor (optional)
broken Line break at the corresponding sensor, or no sensor connected at the corresponding terminal
short Short circuit at the corresponding sensor
Balance values
Max. T-Flow Highest measured flow temperature since commissioning or last reset
Max. T-Return Highest measured return temperature since commissioning or last reset
Max. flow rate Highest measured flow rate since commissioning or last reset
Max. power Highest measured power since commissioning or last reset
Max. pressure Highest measured system pressure since commissioning or last reset
Min. pressure Lowest measured system pressure since commissioning or last reset
Max. S1 ... S3 Highest measured value at the corresponding sensor since commissioning or last reset
Heat qty. Heat quantity cumulated since commissioning or last reset
Oper. hours R1 Operating hours relay 1 since commissioning or last reset
Oper. days Operating days since commissioning or last reset
Adjustment values
Date Current date 01.01.2001 ... 31.12.2099 dd.mm.yyyy
Time Current time 00:00 ... 23:59 12:01
Language Menu language Deutsch, English, Francais English
Tstmax Maximum store temperature 0 ... 90 °C 60 °C
Relay mode Functional mode of the relay Off, Auto, Min., Max. Auto
User code Code entry mask to activate or deactivate the expert menu area
-- Expert --
Control values
Readiness Readiness function Yes, No No
Tstsec Emergency shutdown of the store 30 ... 95 °C 90 °C
Collector minimal. Minimum collector limitation Yes, No No
Tcolmin Minimum collector temperature 10 ... 60 °C 10 °C

© RESOL 10263 flowcon_sensor.monen.indd
F lo w C o n S e n s o r / S e n s o r H E
| 18
Store cooling Store cooling function Yes, No No
Speed control
Min. speed Minimum speed (HE pump)
Minimum speed (standard pump)
10 ... 100 %
30 ... 100 %
20 %
30 %
Speed control Speed control mode Off, Diff., Aim Diff.
DTset Set value for speed control 0 ... 50 K 10 K
Tflowset Set value for speed control 20 ... 90 °C 65 °C
Rise Minimum temperature difference
for speed control modulation
0.2 ... 20.0 K 1.0 K (HE pump)
2.0 K (standard pump)
Heat qty. measurement
Antifr. type Heat transfer fluid in use Tyfo LS, Ethylene, Propylene,
Water
Tyfo LS
Antifreeze ratio Volume ratio of ethylene or pro-
pylene in the heat transfer fluid
20 ... 70 % 40 %
Volume adaptation
Volumes Volume capturing Adjust, Automatic Automatic
Pipe material Material of the pipes Copper, Steel Copper
Diam. Col.->St Diameter of the pipe between
collector and pump station
0 ... 35 mm 18 mm
Diam. HX->St Diameter of the pipe between
heat exchanger and pump station
0 ... 35 mm 18 mm
Length Col.->St Length of the pipe between
collector and pump station
0 ... 50 m 10 m
Length HX.->St Length of the pipe between heat
exchanger and pump station
0 ... 50 m 3 m
Volume CF Volume of the collector field 0.0 ... 99.0 l 4.0 l
Volume HX. Volume of the heat exchanger 0.0 ... 99.0 l 9.0 l
Country parameters
Select country.. Location of the system Different countries
depends on the country
selected before
Latitude Geographical latitude 90.0°S ... 90.0°N
Longitude Geographical longitude 180.0°E ... 180.0°W
Offset to UTC Offset to UTC (formerly: GMT) -12 ... +12 h
Dayl. sav. time Automatic clock change to /
from daylight savings time
Yes, No (Yes = european day-
light savings time scheme) Yes
System parameters
Coll.-type Collector type Evac. tube, Flat-plate Flat-plate
Tilt angle Tilt angle of the collector field 0°, 15°, 30°, 45°, 60°, 75°, 90° 45°
Orientation Orientation of the collector field depends on the latitude of the country selected before
Function control
DT too high DT monitoring function Yes, No No
Overpressure Overpressure warning Yes, No No
On at Switch-on threshold 0.6 ... 6.0 bar minimum
difference pre-
set to 0.3 bar
5.5 bar
Off at Switch-off threshold 0.3 ... 5.7 bar 5.0 bar
Leakage Underpressure warning Yes, No No
On at Switch-on threshold 0.3 ... 5.7 bar minimum
difference pre-
set to 0.3 bar
0.7 bar
Off at Switch-off threshold 0.6 ... 6.0 bar 1.0 bar
Flow pipe circ. Flow pipe circulation Yes, No No
Return pipe circ. Return pipe circulation Yes, No No

© RESOL 10263 flowcon_sensor.monen.indd
F lo w C o n S e n s o r / S e n s o r H E
19 |
13. Operation and function Adjustment values
In the adjustment values menu, different function and va-
lues can be selected and adjusted.
ÎPress button 3 for two seconds to access the main
menu
ÎAccess the adjustment values menu by selecting
“ Adjustment values”
ÎSelect the desired function or value by pressing buttons
1 and 2, then confirm by pressing button 3
Adjusting a value:
ÎSelect the value by pressing buttons 1 or 2
ÎBriefly press button 3; the adjustment range is displayed
as a slide bar
ÎAdjust the desired value by pressing buttons 1 and 2;
the value is displayed both in numbers as well as by the
button on the slide bar
ÎBriefly press button 3 to confirm the adjustment
ÎPress button 3 again in order to store the adjustment
and to get back to the adjustment menu
If button 3 is not pressed after an adjustment has been
made, the display switches back to the menu after a few se-
conds. The adjusted value will not be stored in that case.
Selecting a function or option:
ÎSelect a function or option by pressing buttons 1 or 2
ÎBriefly press button 3
ÎSelect “Yes” to activate, resp. “No” to deactivate the
function
ÎBriefly press button 3 to confirm the adjustment
ÎPress button 3 again in order to store the adjustment
and to get back to the adjustment menu
An activated function is indicated by means of a marked
checkbox. The corresponding adjustment values are also
displayed.
Readiness
Tstsec 90 °C
Collector minimal.
Adjustment values
x
90
0
60 °C
Tstmax
ÎIn order to re-enter the info area, select “info area ...”
or press button 3 for two seconds
If no button is pressed within one minute, the display auto-
matically switches back to the info area.
In order to access all adjustment values, it may be ne-
cessary to enter the expert user code. Upon delivery,
the expert area of the adjustment values menu is already
activated. It can be locked again by entering a wrong code,
e. g. to avoid unqualified manipulation.
Further information about the expert user code and the
entering process can be found in the section “Expert user
code” of chapter 15.3.
Deutsch
English
Francais
Language

© RESOL 10263 fl owcon_sensor.monen.indd
F lo w C o n S e n s o r / S e n s o r H E
| 20
14. Info area
Status display In the status display, the current system pressure, fl ow rate,
and power as well as the operational status are shown.
1.8 bar
Pressure
500 l/h
Flow rate
18.4 kW
Power
System ok
P
V
78 °C
42 °C
100 %
Loading
In the system display, the fl ow and return temperatures as
well as the pump speed are displayed.
Above the store symbol, the current operational status is
displayed (“Standby”, “Pause”, “Identifi cation”, “Stabilising”,
“Loading”, “Readiness”, “Store cooling”, “Overrun”, “Stagna-
tion”, “Inhibition”).
If the operational status is “Standby”, “Pause”, “Identifi ca-
tion”, “Stabilising” or “Overrun”, the remaining runtime of
the corresponding phase is displayed as a countdown.
See below for more information about the different status:
System display
During normal operation, the controller display shows the
info area. The info area consists of a range of displays that
allow a close monitoring of the sensor and system data.
ÎTo switch between the different displays of the info
area, press buttons 1 and 2
The status is displayed graphically by means of a smiley. The
different smiley faces have the following meanings:
System ok everything is alright
Warning an error has occured, system operation
is not aborted (except for “Leakage”
and “Overpressure”, see chap. 16.2)
Error an error has occured, system operation
has been aborted
For more information about the possible error and warning
messages see chapter 16 “Messages”.
Operational status Outside the testing time frame, the controller is in standby
phase. In the system display and the status menu, the remai-
ning time until the next testing time frame is displayed as a
countdown (hh:mm).
Standby
A pause is run whenever
•an identifi cation phase has been unsuccessful
•a stabilising phase has been unsuccessful
•the DT does not rise to > 5 K during an overrun phase
•Tstmax is exceeded (resp. Tstsec if “Readiness” is active)
•an error-induced inhibition has ended
In the system display and the status menu, the remaining
time of the phase is displayed as a countdown (mm:ss).
Pause
After every pause, an identifi cation phase is run. The pump
is activated at minimum speed in order to identify the coll-
ector temperature. If a suffi ciently high difference between
the collector and the store temperature, the so-called DT,
(minimum 5 K) is measured, a stabilising phase follows. If the
DT measured is not suffi ciently high, a pause is run.
In the system display and the status menu, the remaining
time of the phase is displayed as a countdown (mm:ss).
The duration of the identifi cation phase adjusts itself to the
current fl ow rate. This may lead to sudden changes in the
countdown displayed if the fl ow rate fl uctuates.
Identifi cation
Note:
System pressure is measured at the pump inlet.
Therefore, the values measured at the digital
sensor may differ from those shown on the ma-
nometer when the pump is active.
Note:
In most cases, the pause has a duration of 30
minutes. During summer, the controller may
shorten the pause in order to avoid a collector
stagnation caused by stillstand periods.
This manual suits for next models
1
Table of contents
Other Resol Accessories manuals
Popular Accessories manuals by other brands

American Standard
American Standard Acrylux Shower Base 4834Y1.ST Product features

turck
turck FCS-GL1/2A4-NAEX-H1141 manual

PTM
PTM HL Series instruction manual

DigiGrid
DigiGrid MGB user guide

PCB Piezotronics
PCB Piezotronics IMI Sensors M080A132 Installation and operating manual

Reinston
Reinston EPB011 user manual