ReSound Unite User manual

USER GUIDE

2 3
Statement:
This device complies with Part 15 of the FCC Rules.
Operation is subject to the following two conditions: (1) this device
may not cause harmful interference, and (2) this device must ac-
cept any interference received, including interference that may
cause undesired operation.
Note: This equipment has been tested and found to comply with
the limits for a Class B digital device, pursuant to part 15 of the
FCC Rules. These limits are designed to provide reasonable pro-
tection against harmful interference in a residential installation.
This equipment generates, uses and can radiate radio frequency
energy and, if not installed and used in accordance with the
instructions, may cause harmful interference to radio communi-
cations.
However, there is no guarantee that interference will not occur in a
particular installation. If this equipment does cause harmful inter-
ference to radio or television reception, which can be determined
by turning the equipment off and on, the user is encouraged to
try to correct the interference by one or more of the following
measures:
Welcome
Congratulations on your purchase of a ReSound Unite TV.
ReSound Unite TV will provide you with high quality streamed
audio from your TV, stereo, personal computer or similar device
directly to your hearing instruments.
Please read this manual carefully to fully benefit from the
ReSound Unite TV. Ask your hearing care professional if you
have any questions.
For further information you can also visit the
www.gnresound.com/unite web site.
For your safety, carefully read the chapter, Important Information,
on pages 24-25.
FCC ID: X26SAS-2

4 5
National restrictions:
Norway: You are not allowed to operate the equipment within 20
km of the center of Ny Ålesund.
France: You are not allowed to operate the equipment outdoors.
Italy: Product is for private use. You are not allowed to operate the
equipment outside your own premises.
This product is in compliance with the following regulatory stan-
dards:
In EU: The device conforms to the Essential Requirements ac-
cording to - Annex I of Council Directive 93/42/EEC for medical
devices (MDD) and essential requirements and other relevant
provisions of Directive 1999/5/EC (R&TTE). The declaration of
conformity may be consulted at www.resound.com
In US: FCC CFR 47 Part 15, subpart C, section 15.247
Other identified applicable international regulatory requirements
in countries outside EU and US. Please refer to local country
requirements for these areas.
Products are categorized as receiver class 2 according to
EN 300 328
• Reorientorrelocatethereceivingantenna.
• Increasetheseparationbetweentheequipmentandreceiver.
• Connect the equipment into an outlet on a circuit different
from where the receiver is connected.
• Consultthedealeroranexperiencedradio/TVtechnicianfor
help.
Changes or modifications can void the user’s authority to operate
the equipment.
Intended use
ReSound Unite TV is intended to enable wearers with ReSound
hearing instruments to better follow TV or other audio programs.
The essential performance of the ReSound Unite TV is to transfer
signals from a TV set or other audio device to a ReSound wireless
hearing instrument.
List of countries
Products are intended for sale in countries within European Eco-
nomic Area as well as Switzerland.

6 7
Contents
Description ......................................8-9
Getting Started ..................................10-17
Pairing to your hearing instruments.................. 18-19
Start and stop streaming .........................20-22
Controls ...................................... 23-24
Important Information ............................ 24-25
Technical specifications .............................26
Warranty .........................................26
Troubleshooting guide ...........................28-35
Notes ...........................................36
IC: 6941C-SAS2
This Class B digital apparatus complies with Canadian ICES-
003.
Cet appareil numérique de la classe B est conforme à la norme
NMB-003 du Canada.
Operation is subject to the following two conditions: (1) this de-
vice may not cause interference, and (2) this device must accept
any interference, including interference that may cause undesired
operation of the device.

12
11
8
124
5
3
910
67
8 9
6 Increase volume
7 Decrease volume
8 Channel indicator
9 Power light (green)
10 Activity light (amber)
11 Wall plug
12 Mini-USB plug
Description
1 Mono / Stereo control
2 Left Audio connector
3 Right Audio connector
4 Mini-USB connector
5 Pairing button

10 11
Note: With this installation, most TVs will send sound to
both hearing instruments and TV speakers simultaneously.
On some TVs you can adjust the balance between the
AUDIO OUT and the speakers – consult your TV manual
for instructions.
Getting Started
Installing ReSound Unite TV
Depending on your TV, stereo, computer or other audio setup,
the installation for ReSound Unite TV may differ. The following
steps will guide you through the pairing and connecting process,
which can be easily accomplished by almost anyone. Start with
connecting the cables and finish by pairing ReSound Unite TV to
your hearing instruments.
Connect audio cables to ReSound Unite TV. For TV, Stereo and
Computer
1. Connect the power supply provided by ReSound to the
wall socket and insert the cable to the Mini-USB socket on
ReSound Unite TV
2. Connect the red and white plug of the audio cord into the red
and white plugs on ReSound Unite TV
3. Plug the other end of the red and white audio cord in the
”AUDIO OUT” terminal on the TV
4. The ”AUDIO OUT” is usually marked ”L – R” for left and right,
and ”AUDIO OUT” and can be found on the back of the TV.
Alternatively you can plug this cable into your Stereo.

12 13
3. Connect the Jack adapter on the other end of the audio
cable
4. Plug the Jack adapter into the TVs ”HEADPHONE” output
terminal, or alternatively in your computers’ audio terminal.
In the packaging box you will find screws for mounting the
streamer on a wall. Instead of using screws, you can also
velcro the streamer on the side or on top of the TV. For best
performance, the TV streamer should be placed vertically, either
mounted on the wall or placed in the table stand that comes with
the packaging.
Alternative audio cable installations:
If connecting ReSound Unite TV to the AUDIO OUTPUT jack is
not possible on your TV, there are alternative installation possibili-
ties: Jack Adapter, Scart adapter
Jack adapter – for TV and Computer:
1. Connect the power supply to the wall socket and insert the
cable to the Mini-USB socket on ReSound Unite TV
2. Connect the red and white plug of the audio cord into the red
and white plugs on ReSound Unite TV

14 15
Digital to analog audio converter
Should there only be a digital port in your TV, you will need a
‘digital to analog audio converter’ and a coaxial or Toslink optical
cable to connect ReSound Unite TV to your TV. Consult your TV
technician for these items.
1. Connect the power supply to the wall socket and insert the
cable to the Mini-USB socket on ReSound Unite TV
2. Connect the red and white plug of the audio cord into the red
and white plugs on ReSound Unite TV
3. Connect the Digital to Analog Audio Converter to the other
end of the audio cable.
4. Connect the Digital to Analog Audio Converter’s power supply
to the converter and plug into wall socket.
5. Connect the Digital to Analog Audio converter to the television
using a coaxial or Toslink optical cable. Plug one end of the
cable to the converter and the other end to the digital audio
output port on the television.
Note: The HEADPHONE output terminal is usually located
on the side or front of the TV. When using the HEAD-
PHONE terminal, usually only the person wearing the
hearing instruments will hear the sound, and the TV speakers are
muted. If it is not desired that speakers are muted, please refer
to one of the other set-up options presented in this guide. Your
TV may support speakers and HEADPHONE being on simultane-
ously, check your TV manual for instructions.
Scart adapter – for TV:
1. Connect the power supply to
the wall socket and insert the
cable to the Mini-USB socket
on ReSound Unite TV
2. Connect the red and white plug
of the audio cord into the red
and white plugs on ReSound
Unite TV
3. Connect the Scart adapter on
the other end of the audio cable
4. Plug the Scart adapter into the TVs Scart terminal
Note: The Scart output terminal is usually located on the
back or side of the TV. When using this terminal, the Video
port of your TV is usually set as the output for the sound.
Consult your TV manual if you need to make changes on the
sound transfer.

16 17

18 19
3. While pairing mode is activated, close the battery doors of
both hearing instruments and make sure they are ON. (If the
amber activity light turns off before the hearing instruments
are turned on, pairing will not be completed.) A successful
pairing will be indicated by an audible melody played in both
hearing instruments. You are now ready to use the ReSound
Unite TV!
Pairing to a 2nd or 3rd ReSound Unite TV
It is possible to pair up to three ReSound Unite TV streamers
with a given pair of hearing instruments. To pair a second Re-
Sound Unite TV, press the pairing button of the second unit two
times, which will illuminate the channel indicator (#8 on page 9)
at number 2, and then close the battery doors on the hearing
instruments. A third ReSound Unite TV can be paired by pressing
the pairing button three times and completing the procedure as
described above.
Pairing to your hearing instruments
Note! The following information is intended primarily
for your hearing care professional, who in most cases
will complete the tasks that are necessary before the
ReSound Unite TV can be used with your hearing instruments.
However, the process is designed to be simple and should be
easily accomplished by almost anyone.
Pairing is the process of setting up an exclusive communication
between your hearing instruments and your ReSound Unite TV.
Your hearing care practitioner can set up pairing during the fitting
of your hearing instruments. Alternatively, you can follow the steps
below to pair your hearing instruments to ReSound Unite TV:
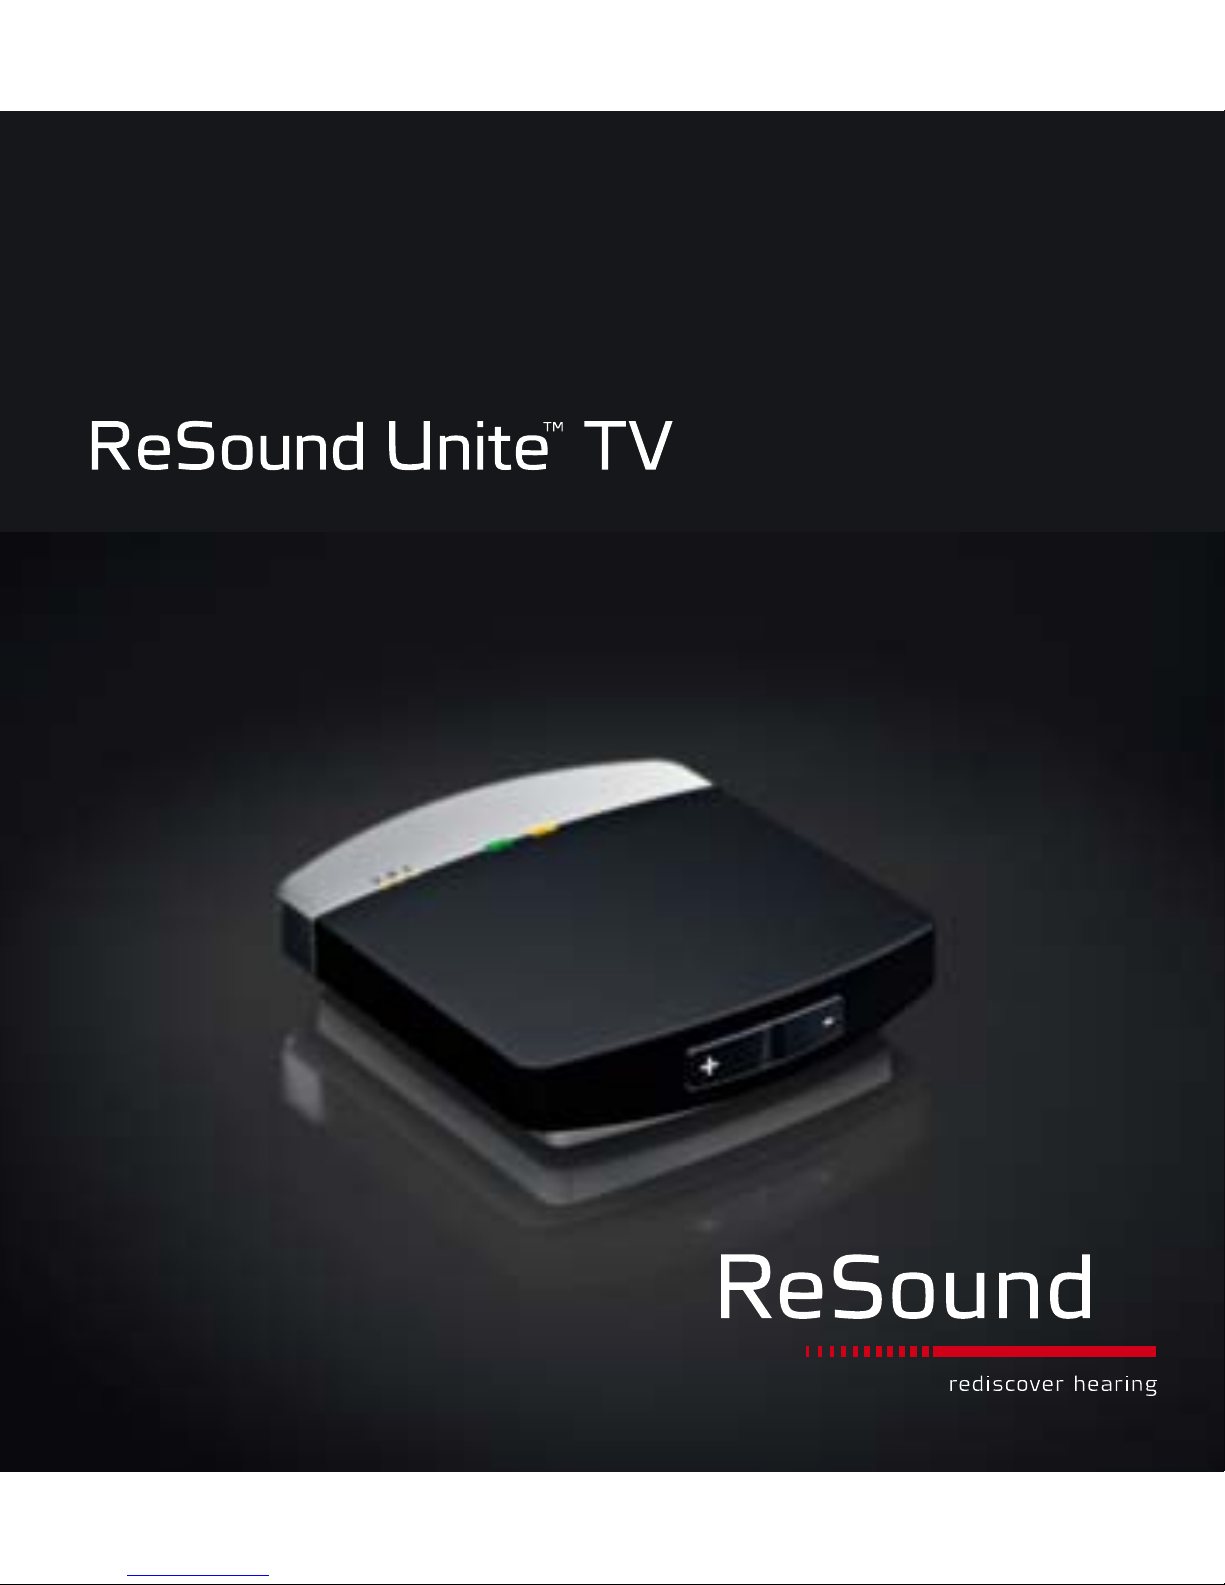
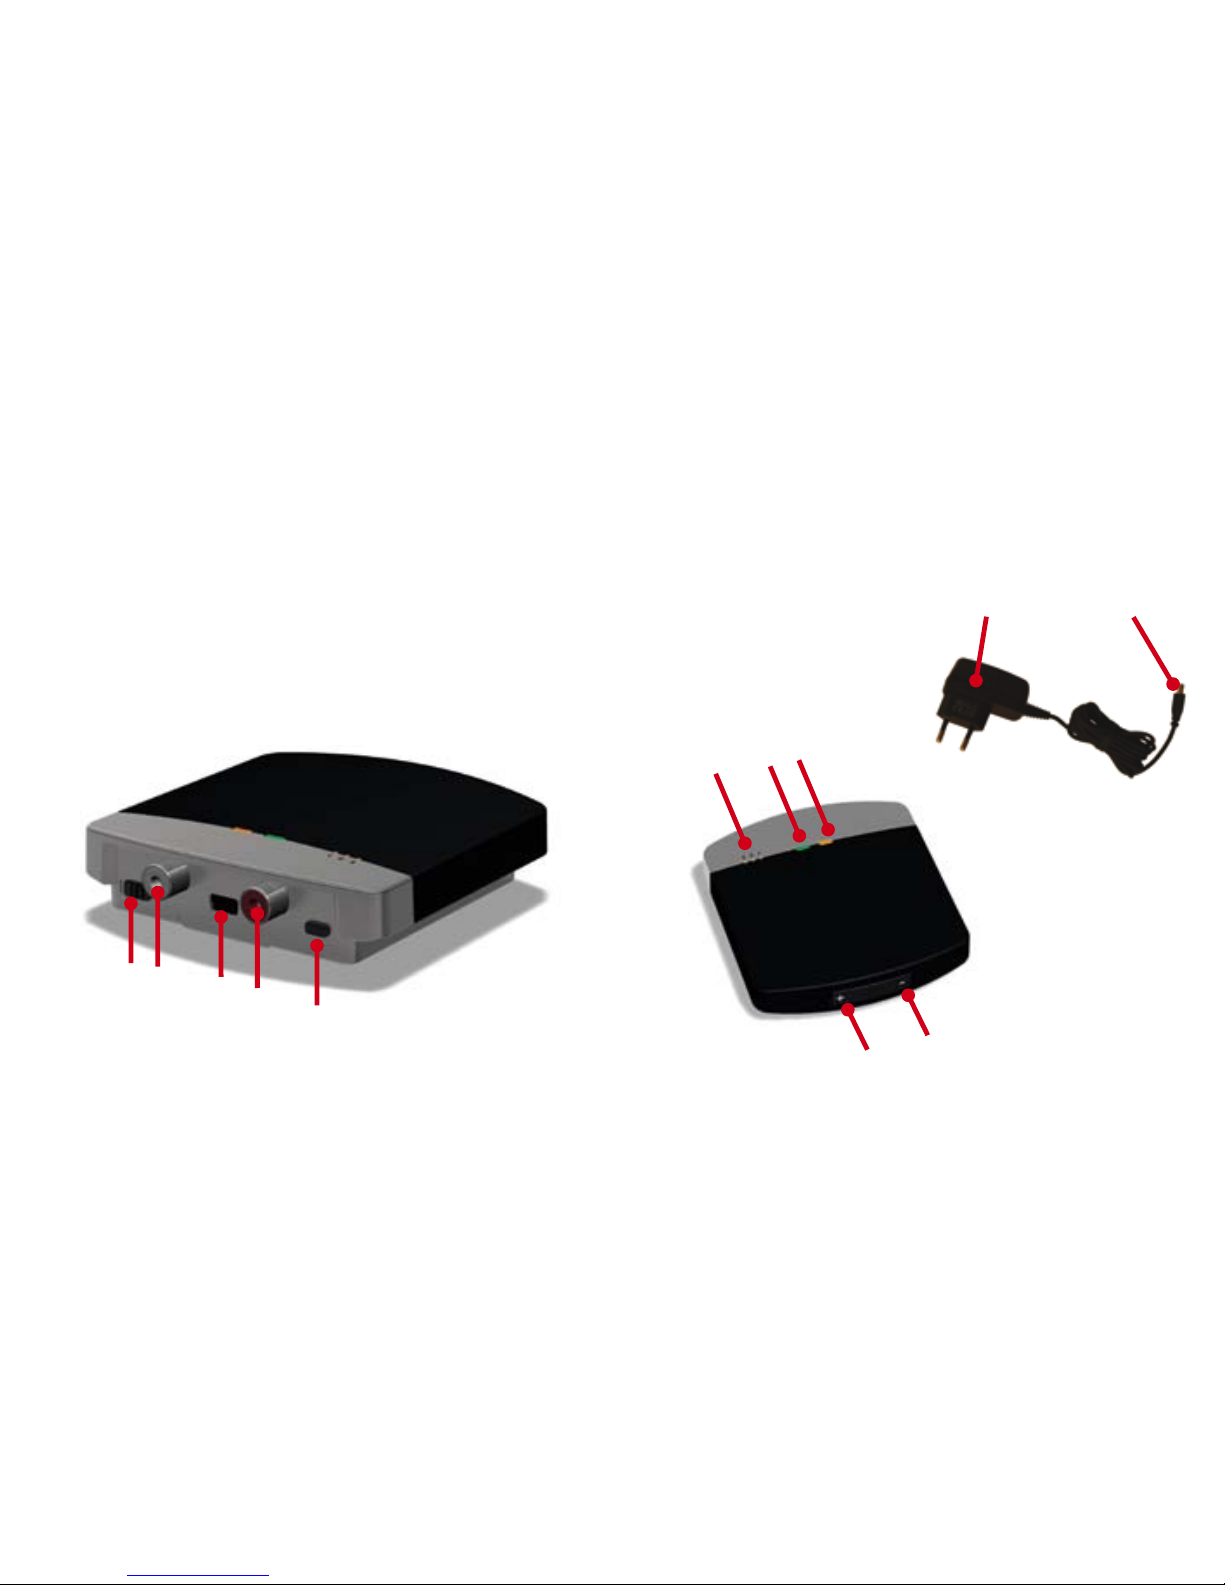
1. Make sure ReSound Unite TV is plugged into a wall socket
and that the green power light is ON. Your hearing instruments
must be off – open the battery door.
2. Press the pairing button on ReSound Unite TV (#5 on page 8)
one time. This will activate the amber activity light (#10 on page
9) indicating that pairing mode has been activated. Also, chan-
nel indicator light number 1 (#8 on page 9) will be turned on
when the pairing button has been pressed only once. Pairing
mode will be activated for 20 seconds.

20 21
Each ReSound Unite TV is initially labeled by letter designators
A, B or C, and the ReSound Unite TV in use is shown on the Re-
mote Control display. If you do not have a remote control, press
and hold the push button for about 3 seconds on the hearing
instrument a 2nd or 3rd time to access the 2nd or 3rd ReSound
Unite TV.
Start and stop streaming
Turn on the TV, Stereo, Computer or other audio device
connected to ReSound Unite TV. Make sure your hearing instru-
ments are turned on as well. Streaming may be started in one of
two ways.
1. Press and hold the push button on either hearing instrument
for about three seconds. This must be done separately on
both hearing instruments in order to hear streamed audio in
both ears. Once ReSound Unite TV has been connected, an
audible melody will play in your hearing instruments and will be
followed by the streamed sound.
2. If you have a ReSound Unite Remote Control (optional), simply
press the streaming/wireless button. Doing so will briefly show
a search icon in the remote control display. Once the hearing in-
struments connect to ReSound Unite TV, a short melody will be
played in both ears to confirm the presence of streamed audio
and a streaming icon will appear in the display. The streamed
sound can now be heard in your hearing instruments.
Start streaming on a 2nd or 3rd ReSound Unite TV
If more than one ReSound Unite TV is available, you may press
the streaming/wireless button on the Remote Control a 2nd or
3rd time, depending on which ReSound Unite TV you want to
hear from.
Connected to TV
Streaming/wireless button
Searching for TV

22 23
Controls
Adjust volume
ReSound Unite TV has been designed to provide a comfortable
listening level from the moment it is activated. However, for some
devices or listening environments it may be desirable to adjust
the listening volume, and doing so can be accomplished in a
variety of ways. Keep in mind that volume adjustments apply to
the streamed signal only, not the volume of normal environmental
sounds.
• Usethe“+”and“-“keys(#6and#7onpage9)toadjustvol-
ume to a comfortable level. Make sure that your hearing in-
struments are comfortably adjusted before you change the
settings with the volume control. In most cases this adjust-
ment should only be made one time, as Resound Unite TV is
intendedasa“setandforget”typeofdevice.
• Use the ReSound Unite Remote Control (optional) to adjust
volume. Ask your hearing care professional for more informa-
tion about this accessory.
• The volume can in some cases be further adjusted at the
signal source, for example by turning the TV itself down. In
many cases this will adjust the volume of both streamed audio
(transmitted wirelessly to your hearing instruments) and non-
streamed audio (sounds reaching the hearing instrument
microphones in the normal fashion). Of course, this will also
affect listening volume for others in the room.
Stop streaming
• Ashortpressofthepushbuttononeitherhearinginstrument
will cancel streaming in the corresponding device.
• With the ReSound Unite Remote Control (optional) you just
havetopressthe“P”button,locatedinthecenterofthekey
pad. This will return the hearing instruments to the last pro-
gram used. You may also press the home button to return to
your default settings.
• If you are using the telephone with ReSound Unite Phone
Clip or PhoneNow™, streaming of ReSound Unite TV will be
temporarily disrupted. When you have ended your phone call,
streaming will resume.
Note! You may get out of range (>7m / 20 ft) from your
ReSound Unite TV. If you get back in range within 5
minutes, your hearing instruments will automatically
reconnect and continue streaming.

24 25
• WhenusingReSoundUniteTVandthedeviceisaffectedby
electromagnetic interference, move away from the source
General precautions
• YourhearinginstrumentandReSoundUniteTVweregivena
unique communication network code during the fitting. This
ensures that ReSound Unite TV will not affect hearing instru-
ments worn by others.
• High-poweredelectronicequipment, largerelectronicinstal-
lations and metallic structures may significantly reduce the
operating range.
• UseonlyoriginalReSoundaccessories.
• DonotmakeanychangesormodicationstoReSoundUnite
TV.
• Opening ReSound Unite TV might damage it. If problems
occur which cannot be resolved by following the remedy
guidelines in the troubleshooting section of this user guide,
consult your hearing care professional.
• TheReSoundUniteTVmayonlyberepairedbyanauthorized
service center.
• DonotuseReSoundUniteTVinareaswhereRFtransmission
is prohibited, e.g. airplanes etc.
• OnlyconnectReSoundUniteTVtoconnectionsforwhichitis
explicitly intended.
Mono / Stereo control
A two-position slide switch (#1 on page 8) may be used to set
Stereo (two channel) or Mono (one channel) audio streaming. For
binaural fittings, the switch should preferably be set to Stereo. For
monaural fittings it should be set to the Mono position.
Important Information
Maintenance and Care
• Clean ReSound Unite TV using a damp cloth. Never use
household cleaning products (such as detergent or alcohol-
based solutions) to clean the device.
• When ReSoundUniteTVisnot beingusedfor anextended
period of time, unplug the power supply from the wall socket
General warnings
• Keep ReSound Unite TV out of reach of children under 3
years.
• ReSound Unite TV uses low-powered digitally coded trans-
missions in order to communicate with other wireless devices.
Although unlikely, nearby electronic devices may be affected.
In that case, move the ReSound Unite TV away from the af-
fected electronic device.
• UsetheReSoundUniteTVonlywithapowersupplyunitthat
has been supplied together with the product.

26 27
Technical specifications
Operating range: up to 7 meters / 20 feet
Power supply: External wall adapter
Wireless: 2.4 GHz
Operating temperature: 32 to 131 degree F.
Storage temperature: -4 to 140 degree F.
Temperature test, transport and storage information
The product is subject to various tests in temperature and damp
heating cycling between -13 and 158 F. according to internal and
industry standards.
Warranty
The ReSound Unite TV is covered by a limited warranty issued by
the manufacturer for a period of 12 months from the day of the
original purchase. Please contact your local hearing care profes-
sional for more information.
What is covered by this warranty?
Any electrical component, that because of workmanship, manu-
facturing or design defects fails to function properly under normal
use during life of this warranty will be replaced or repaired at no
charge for parts or labor when returned to the point of purchase.
What is not covered by this warranty?
Problems arising from improper handling or care, excessive use,
accidents, repairs made by an unauthorized party, exposure to
corrosive conditions or damage due to foreign objects entering
the device are NOT covered by the limited warranty and may void
it. The above warranty does not affect any legal rights that you
might have under applicable national legislation governing sale
of consumer products. Your hearing care professional may have
issued a warranty that goes beyond the clauses of this limited
warranty. Please consult your hearing care professional for
further information.
Serial number:
Date of purchase:

28 29
SYMPTOM
The streaming/wireless
button on the Remote Control
is pressed but with no effect
at all
The pushbutton on the hear-
ing aid has been pressed for
more than 3 seconds but
with no effect at all
The pairing button on the
Unite TV is pressed but no
pairing melody is played in
the hearing aid
CAUSE
The Unite TV and hearing aids
have not been paired
The Remote Control and hear-
ing aids are not within wireless
range
The Unite TV and hearing aid
have not been paired
The Unite TV and hearing aid are
not within wireless range
The Unite TV and hearing aid
have not been simultaneously in
pairing mode
POSSIBLE REMEDY
Carry out pairing process
Assure that Remote Control and hearing aids are within wireless
range and activate streaming again
Carry out pairing process
Assure that Unite TV and hearing aids are within wireless range,
and repeat pairing process
Repeat pairing process and assure that the battery doors on
both hearing aids are closed within 20 seconds after the pairing
button has been pressed on the Unite TV
TROUBLESHOOTING GUIDE

30 31
SYMPTOM
The streaming/wireless
button on the Remote Control
is pressed but no streamed
audio signal is found when
searched for (indicated by
an ’X’ icon on the display)
There is no sound in the
hearing aids although being
in the streaming program
The sound from the
Unite TV is distorted
CAUSE
The Unite TV and hearing aids
are not within wireless range
The Unite TV is not powered on
The Unite TV is not cabled cor-
rectly to the TV
The Unite TV is either powered
off or the sound from the TV out-
put has been muted
The Unite TV and hearing aids
are not within wireless range
The TV might have been pow-
ered off or the sound from the TV
has been muted
The audio input level from the TV
is too high
POSSIBLE REMEDY
Assure that Unite TV and hearing aids are within wireless range
and activate streaming again
Power on the Unite TV and activate streaming again
Connect the cable between the Unite TV and the TV correctly
and activate streaming again
Power on or unmute the TV and activate streaming again
Assure that Unite TV and hearing aids are within wireless range
Power on or unmute the TV
Adjust the volume using the key on the Unite TV until the sound
is no longer distorted

32 33
SYMPTOM
The volume level from
the Unite TV is very low
The sound from the Unite
TV is distorted or
drop-outs occur from
time to time
The sound from the Unite
TV is not synchronized
with the TV picture
The sound from the Unite
TV is not synchronized
with the sound from the
TV loudspeakers
CAUSE
The audio input level from the TV
is too low
The Unite TV and hearing aids
are on the edge of the wireless
range
The Unite TV and hearing aids
are not within sufficient ”line-of-
sight”
Your TV is not able to synchro-
nize the sound from the selected
audio outputs and the picture
Your TV is not able to synchro-
nize the sound from the selected
audio outputs with the sound
from the TV loudspeakers
POSSIBLE REMEDY
Adjustthevolumeusingthe”+”and”-”keysontheUniteTVuntil
the sound is sufficiently loud
Move a little closer to the Unite TV
Assure that the Unite TV is placed in an adequate position, and
that you are within normal reach without any significant obstacles
obstructing the streaming
If possible, try using another audio output from your TV and if this
does not help, contact your TV dealer.
The Unite TV audio streaming has almost no latency and does
not contribute itself to any lip sync error
If possible, try using another audio output from your TV and if this
does not help, contact your TV dealer.
The Unite TV audio streaming has almost no latency and does
not contribute itself to any perceived reverberation

34 35
SYMPTOM
The sound from the hearing
aids is either too low or too
high
A hearing aid unintention-
ally drops out of the streaming
program
You cannot hear streamed
sound after connecting and
pairing the hearing aids and
your TV with ReSound Unite
TV
CAUSE
The audio input level is not suit-
able for listening
The Unite TV and hearing aids
have been out of wireless range
for more than 5 minutes
The battery in the hearing aid is
so depleted that it no longer sup-
ports audio streaming
You may use a cable box with
your TV.
Your TV only supports ‘Audio
Out’ or speakers, but not both.
POSSIBLE REMEDY
Adjustthevolumeusingthe”+”and”-”keysontheUniteTVuntil
the sound is suitable.
Alternatively(option),usethe”+”and”-”keysontheRemoteCon-
trol for doing this operation
Assure that Unite TV and hearing aids are within wireless range
and activate streaming again
Replace the battery in the hearing aid with a new one
Connect the red and white audio output cables to the cable box
directly
It may be necessary to connect an external receiver or amplifier
to the television and connect ReSound Unite TV to the external
component.

36 37
Notes: Notes:

38 39
Be aware of information marked with the warning symbol
WARNING points out a situation that could lead to
serious injuries,
CAUTION indicates a situation that could lead to
minor and moderate injuries
Advice and tips on how to handle your ReSound Unite
accessory better.
Equipment includes RF transmitter
Product is a Type B applied part
Any issues relating to the EU Medical Device Directive
93/42/EEC and R&TTE Directive 1999/5/EEC should be
directed to GN Hearing A/S, Lautrupbjerg 7,
DK 2750 Ballerup, Denmark
Please ask your local hearing care professional con-
cerning disposal of your ReSound Unite accessory
Other manuals for Unite
8
This manual suits for next models
1
Table of contents
Other ReSound Media Player manuals