ResourceXpress Qubi Quick guide

Smart Resource Booking Technology www.ResourceXpress.com
Configuration & Installation Guide

Smart Resource Booking Technology www.ResourceXpress.com 2
Copyright
No part of this publication may be reproduced, transcribed, transmitted, stored in a
retrieval system or translated into any language, in any form or by any means mechanical,
manual, electronic, magnetic, chemical, optical, including photocopying or otherwise
without the prior written permission of QED Advanced Systems Ltd.
Confidentiality
This document is the property of QED Advanced Systems Ltd, and is provided on the
understanding that its use will be confined to the officers of your company and that no part
of its contents will be disclosed to third parties without the prior written consent of QED
Advanced Systems Ltd. This online publication is to be returned to QED Advanced Systems
Ltd when it is no longer required for the agreed purpose.
Version History
Document version
Date
Version 3
September 2015
Acknowledgements
QED Advanced Systems Ltd respectfully acknowledges all trademarks, trade names and other
unique identification symbols, whether implied or explicit, used within this document.
QED Advanced Systems Ltd.
Oakwood Business Park
Oldmixon Crescent
Weston-Super-Mare
BS24 9AY
UK
Web: www.ResourceXpress.com

Smart Resource Booking Technology www.ResourceXpress.com 3
Contents
Introduction ........................................................................................................................................ 4
Installation Procedures ..................................................................................................................... 5
Prerequisites................................................................................................................... 5
Installing Qubi Config PC Application ......................................................................... 6
Connecting Qubi for Set Up.......................................................................................... 7
Configuration.................................................................................................................. 8
Power Up Sequence....................................................................................................... 9
Assigning a Resource Profile to a Qubi ....................................................................... 9
Appendix A - Resource Profile Settings Affecting Qubi Operation ........................................... 11
Appendix B - System Settings Affecting Qubi Operation............................................................ 12
Appendix C: Troubleshooting ......................................................................................................... 13

Smart Resource Booking Technology www.ResourceXpress.com 4
Introduction
This guide covers the installation and configuration of the ResourceXpress Qubi Config PC
Application. Connection and configuration of the hardware and assigning a profile for each
Device.
Package Contents
-Qubi Unit (Model QB2-POE-001)
-Mains Power Adaptor (or USB 2.0 A to B cable if powering via USB
Port) (Option)
-Configuration Cable (Option)

Smart Resource Booking Technology www.ResourceXpress.com 5
Installation Procedures
Prerequisites
ResourceXpress Server with light resource license for each Qubi
802.3af Power Over Ethernet (POE) connection (RJ45) or
Local mains outlet & RJ45 Network drop lead

Smart Resource Booking Technology www.ResourceXpress.com 6
Installing Qubi Config PC Application
Download the latest version of the Qubi Config application from the following link:
http://goo.gl/dLvtF4
Extract the zipped files and double click Setup and follow the on screen instructions through
the installation process.
Begin the installation process by selecting Next.
Select the installation directory, by default this is set to Program Files.
Confirm the Installation by selecting Next. The Installer will now run the installation process.
NB: this may take a few moments.
Once the installer has finished select Close to exit the installer application. The Qubi Config
will now be available in All Programs from the Start menu.

Smart Resource Booking Technology www.ResourceXpress.com 7
Connecting Qubi for Set Up
Step One
Start Qubi Config
Note: Download drivers if required: http://www.ftdichip.com/Drivers/VCP.htm
Step Two
Connect the configuration cable to Qubi config
port and pc USB port
NB: Ensure the
configuration cable is
fully inserted into Qubi
Config Port
Step Three
Click “Restart application”
Step Four
Power on Qubi
Red & Green lights will show and
The Qubi configuration screen will display
The current settings
Note: If Qubi is not detected check that the configuration cable is fully inserted, then
power off the Qubi and power on again.

Smart Resource Booking Technology www.ResourceXpress.com 8
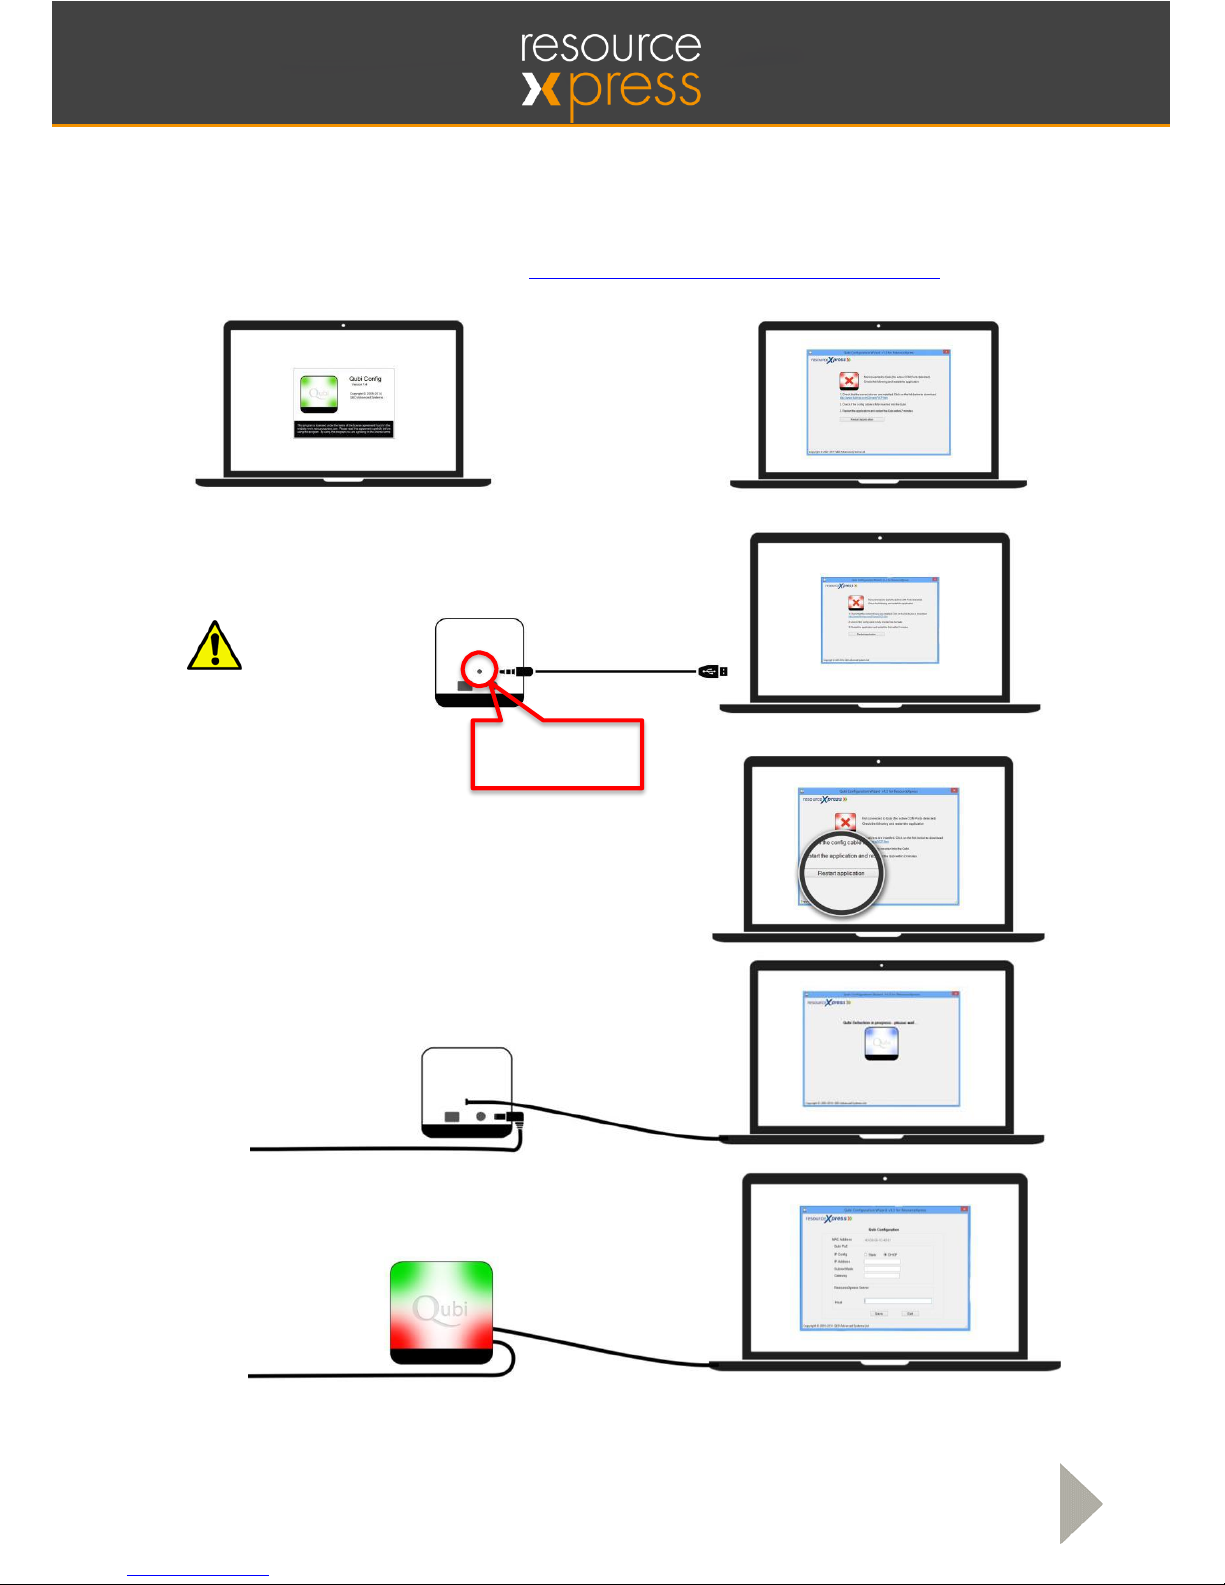
Configuration
(Above Image - After a successful connection the MAC address will be displayed as well as
the current Qubi settings.)
By default the Qubi will be set up to use DHCP, this can be changed if required by selecting
Static and filling in the correct details as shown in the example below.
The correct ResourceXpress Server IP address or Host name is required in the ResourceXpress
Server field to allow the Qubi to successfully communicate with the ResourceXpress System;
select “Save” to send any changes to the Qubi. Qubi AIR version you also gives you the option
to choose between HTTP and HTTPS depending on your server requirements.
Example of ResourceXpress Server IP address
Example of ResourceXpress Server Host Name
After pressing “Save” a success message should display as shown below
Unplug the configuration cable and power cable from the Qubi, the device can now be
powered on again. NB: Wireless Encryption should be disabled as this is currently a future
feature.

Smart Resource Booking Technology www.ResourceXpress.com 9
Power Up Sequence
If the ResourceXpress profile has been previously configured correctly the Qubi LED’s will
then change to reflect the resource status using Green (Free), Amber (Awaiting Check-in) or
Red (In Use). If the resource profile has not been configured (correctly) previously the Qubi
will continue to display all blue LED’s.
Assigning a Resource Profile to a Qubi
After Qubi has been configured to connect to the ResourceXpress Server it must be assigned to a
resource profile.
Firstly a valid Qubi Profile must be created, this is similar to a standard profile however the Qubi
check box must be ticked.
From the Admin Interface navigate to Unregistered Qubi Devices.
This will display a list of all the Qubi’s that are connected to this server, which have not yet been
allocated a profile.
Pressing the Qubi button found on the right side will bring up a list of the available profiles that the
Qubi can be assigned.
Select the checkbox for the appropriate resource, and confirm.
1
2
3
Awaiting
configuration
LAN OK
IP assigned
ResourceXpress
server found

Smart Resource Booking Technology www.ResourceXpress.com 10
The Qubi will now connect to this profile within 60 seconds and update the LED’s to Green, Red or
Amber according to the status of the configured resource.
Green -Free
Red - Busy
Red Fading –Session
Ending Shortly
Amber –Waiting for
Check-in
If Qubi status remains all blue check the MAC address has been entered correctly. See troubleshooting
guide in Appendix C for more information
Removing a Qubi from a Resource Profile
From the Resource Displays page of the ResourceXpress Server select Edit for the appropriate
resource; then the last section is Qubi Settings.
In this section remove the MAC address of the Qubi.
Save these changes, the Qubi will no longer be associated with this profile, with 60 seconds the Qubi
will appear in the ‘Unregistered Qubi Devices’ list.

Smart Resource Booking Technology www.ResourceXpress.com 11
Appendix A - Resource Profile Settings Affecting Qubi
Operation
Resource Type should be “Light Resource” and Prefix “Qubi” as below:
The duration for a Qubi booking is set in the Touch Screen Setting section of the Resource
Profile, the “Maximum duration of individual booking”.
When a booking is made using a Qubi the duration will be set to 60 minutes (default). If the
booking is extended the extension time is also this setting; if another booking is scheduled
within this time frame the booking will only extend to the maximum available time.
Any settings that have been set for Check In, Check Out and Extend will be honoured by
the Qubi, for instance if authenticated by Organiser only is enabled for all three options,
only the Organisers RFID card will work with the Qubi.
If any authentication is set to No,any RFID card can be used to Book, Check In, Check out
or extend a session. Any bookings created with authentication off will show as booked by the
“Smartbooking User name” (this is set under the Display tab in System Settings). The UID
of the card used will also be recorded in the system’s booking report.

Smart Resource Booking Technology www.ResourceXpress.com 12
Appendix B - System Settings Affecting Qubi Operation
Under system settings navigate to the Qubi tab.
Auto Checkout
This setting determines if sessions will be checked out if a valid RFID card is not present.
The Qubi will fade to warn of an Auto checkout.
Auto Checkout Trigger - (only applicable if Auto Checkout is “Yes”)
This setting determines the amount of time given before an Auto checkout takes place;
default is 5 minutes.
Temp Checkout Duration
This setting determines the temporary checkout time, once the Qubi has been tilted and
card removed it will turn Amber, this will reserve the current booking for the set time; Auto
Checkout will take place after this set time if a valid card is not used to Check back in;
default is 0 minutes (feature disabled).
LED Brightness
This allows the brightness of the LED lights in the Qubi to be adjusted to suit the surrounding
work environment; default is full brightness –9.
Device Audio
The Qubi can be set to give audible feedback to all functions using an assortment of tones;
these can be used for instance to indicate a successful or unsuccessful booking; default is
“On”.
Note –Qubi Lite Only: Auto Checkout must be disabled. The Qubi Lite model does
not have an RFID reader, if Auto Checkout is enabled any sessions will
automatically be terminated.
Qubi and Working Day
If “Enable Energy-Saving Mode for Screens” is set to “Yes” the Qubi will also follow the
working hours set in System Settings Display tab. Similar to the room screens the Qubi will
turn on AM Start -1 hour and turn off at PM Finish +1 hour.

Smart Resource Booking Technology www.ResourceXpress.com 13
Appendix C: Troubleshooting
1) Qubi lights stay off after start up
No live network found –check LAN cable is connected correctly
& cable is live.
or
IP address not assigned –check DHCP server
2) Bottom lights stay blue after start up
LAN OK but no ResourceXpress server found –check ResourceXpress
Server IP address / domain name.
3) All lights stay blue after start up
ResourceXpress server response OK but Resource Profile not assigned
correctly –Check resource profile has correct Qubi MAC address. From
base of Qubi in format A1-B2-C3-D4- E5-F6, also check for leading or
trailing spaces and remove if found.
For further support please contact your local ResourceXpress partner or QED at
This manual suits for next models
2
Table of contents
Popular Office Equipment manuals by other brands

Topaz Systems
Topaz Systems SignatureGem T-S261-HSB user guide

NComputing
NComputing OfficeStation L200 Series user guide

Spectrum Industries
Spectrum Industries Inspiration Keyboard Tray Assembly instructions

hushoffice
hushoffice hushwork.sit&stand HUS-BX-016/116 Maintenance and safety manual

NanaWall
NanaWall CSW75 owner's manual

Humanscale
Humanscale NeatTech installation manual

Sennheiser
Sennheiser SD series Safety instructions

Vivo
Vivo PP-1-V060G/D instruction manual

Wenger
Wenger Multi-Use Shield Assembly instructions

OCEE DESIGN
OCEE DESIGN SASS-0090 Assembly instructions

Hefter Systemform
Hefter Systemform OL 420 operating manual

Framery Q
Framery Q Flip 'n Fold installation instructions