manuals.online logo
Brands
  1. Home
  2. •
  3. Brands
  4. •
  5. Rev-A-Shelf
  6. •
  7. Indoor Furnishing
  8. •
  9. Rev-A-Shelf 5CCSO Series User manual

Rev-A-Shelf 5CCSO Series User manual

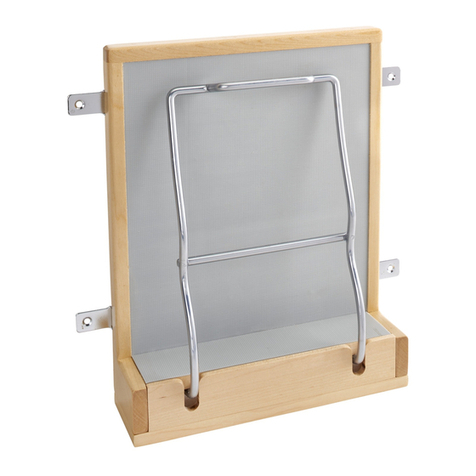
INSTALLATION INSTRUCTIONS: DOOR MOUNT CADDY
12400 Earl Jones Way
Louisville, KY 40299
rev-a-shelf.com
Customer Service: 800-626-1126
DOOR MOUNT CADDY
I-5CCSO12-0219
TOOLS REQUIRED:
5 MIN
ESTIMATED ASSEMBLY TIME:
CARE AND MAINTENANCE:
Clean with a damp cloth and
wipe parts dry. PARTS LIST
Description QTY
AWire Frame 1
BBar 1
CBasket 1
DM5 x 8mm Flat Head Machine Screw 1
E#8 x 5/8” Flat Head Screws 2
B. C.
D. E.
A.
Customer Service: 800-626-1126 | rev-a-shelf.com
2
STEP 1
Decide the placement of the wire frame to the
door and secure with (2) #8 x 5/8” at head screws
making sure it is level (See Figure A).
Note: make sure that wire frame will not hit
adjacent door or cabinet stile when closing
before securing to door. Frame may need to be
installed closer to the inside of the door for
proper clearance.
INSTALLING INTO SOLID DOOR OR INTO
THICK UPPER SECTION OF PANEL DOOR:
INSTALLING ON
5 PANEL DOOR:
Insert caddy onto the frame (See Figure B).
Note: caddy can also be installed with large
compartment facing front (turned 180°).
STEP 2
Decide the placement the wire frame to the door
and secure with (2) #8 x 5/8” at head screws
making sure it is level (See Figure D).
Note: make sure that wire/bar will not hit
adjacent door or cabinet stile when closing
before securing to door. Frame may need to
be installed closer to the inside of the door for
proper clearance.
STEP 2
Insert the caddy onto the wire frame as shown
(See Figure E).
Note: caddy can also be installed with large
compartment facing front (turned 180°).
STEP 3
Secure one side of the wire frame to the bar with
provided machine screw (See Figure C).
Note: frame will need to be installed closer to
the hinge side of the door. Right hand door
install shown. For left hand, rotate bar and
install to left side of frame.
STEP 1
FIG. A
FIG. C
FIG. D
FIG. E
FIG. B
INSTRUCCIONES DE INSTALACIÓN / INSTRUCTIONS D’INSTALLATION
INSTRUCCIONES DE INSTALACIÓN: CARRITO DE MONTAJE EN PUERTA
INSTRUCTIONS D’INSTALLATION: SUPPORT MURAL
12400 Earl Jones Way
Louisville, KY 40299
rev-a-shelf.com
Customer Service: 800-626-1126
CARRITO DE MONTAJE EN PUERTA / SUPPORT MURAL
I-5CCSO12-0219
5 MIN
Limpie con un paño húmedo y seque las
partes.
Nettoyez avec un linge humide et essuyez les
piéces pour les secher complétement.
MATERIALES / MATÉRIAUX
Descripción / Description QTY
AMarco de alambre / Cadre en l de métal 1
BBarra / Barre 1
CCesta / Panier 1
DTornillo para mentales de cabeza plana M5 x 8 mm /
Vis à métaux à tête plateM5 x 8mm 1
ETornillos de cabeza plana n. ° 8 x 5/8 “ /
Vis à tête plate no8 x 5/8 po 2
B.
C. D.
E.
A.
Herramientas requeridas:
Outils Requis:
Tiempo estimado de ensamblado:
Durée de l’installation:
CUIDADO/ ENTRETIEN:
Ubique el marco de alambre en la puerta y
asegúrela con (2) tornillos de cabeza plana n. °
8 x 5/8 ” asegurándose de que esté nivelado
(consulte la Figura A).
Nota: asegúrese de que el marco de alambre
no pegue con la puerta adyacente o el
montante del gabinete cuando se cierre
antes de asegurar la puerta. Para que quede
bien colocado, es posible que el marco deba
instalarse más cerca del interior de la puerta.
Choisissez l’endroit où vous souhaitez installer
le cadre métallique et xez-le sur la porte avec
deux (2) vis à tête plate 8 x 5/8 po, en vous
assurant qu’elles soient à la même hauteur (voir
l’image A).
Remarque : avant de faire l’installation, assurez-
vous que le cadre en l de métal ne touchera
pas à une porte adjacente ou au coin d’une
armoire lorsque vous ouvrirez la porte. Il est
possible que le cadre doive être installé plus près
de l’intérieur de la porte an qu’il n’accroche rien
lorsque celle-ci est ouverte.
INSTALACIÓN EN PUERTA SÓLIDA O EN
LA SECCIÓN SUPERIOR GRUESA DEL
PANEL DE LA PUERTA: INSTALLATION
DANS UNE PORTE PLEINE OU DANS LA
PARTIE SUPÉRIEURE ÉPAISSE D’UNE PORTE
À PANNEAUX :
PASO 1 / ÉTAPE 1
FIG. A
Customer Service: 800-626-1126 | rev-a-shelf.com
4
INSTALACIÓN EN PUERTA DE 5 PANELES:
INSTALLATION SUR PORTE À 5 PANNEAUX:
Inserte el carrito en el marco (Vea la Figura B).
Nota: el carrito también se puede instalar con un
compartimiento grande orientado hacia el frente (girado
180 °).
Fixez le support sur le cadre (voir l’image B).
Remarque : vous pouvez également installer le support avec le
grand compartiment faisant face vers l’avant (tourné à 180°).
Ubique el marco de alambre en la puerta y asegúrelo con
(2) tornillos de cabeza plana n. ° 8 x 5/8 ” asegurándose de
que esté nivelado (consulte la Figura D).
Nota: asegúrese de que el cable/barra no pegue con la
puerta adyacente o el montante del gabinete cuando se
cierre antes de asegurar la puerta. Es posible que el marco
deba instalarse más cerca del interior de la puerta para que
quede bien colocado.
Choisissez l’endroit où vous souhaitez installer le cadre
métallique et xez-le sur la porte avec deux (2) vis à tête plate
8 x 5/8 po, en vous assurant qu’elles soient à la même hauteur
(voir l’image D).
Remarque : avant de faire l’installation, assurez-vous que le
cadre en l de métal ou la barre ne touchera pas à une porte
adjacente ou au coin d’une armoire lorsque vous ouvrirez la
porte. Il est possible que le cadre doive être installé plus près
de l’intérieur de la porte an qu’il n’accroche rien lorsque celle-
ci est ouverte.
Inserte el carrito en el marco de alambre como se muestra
(Vea la Figura E).
Nota: el carrito también se puede instalar con un
compartimiento grande orientado hacia el frente (girado
180 °).
Fixez le support sur le cadre métallique de la manière illustrée
(voir l’image E).
Remarque : vous pouvez également installer le support avec le
grand compartiment faisant face vers l’avant (tourné à 180°).
Fije un lado del marco de alambre a la barra con el tornillo
para mentales provisto (vea la Figura C).
Nota: el marco deberá instalarse más cerca del lado de la
bisagra de la puerta. Se muestra la instalación de la puerta
derecha. Para la mano izquierda, gire la barra e instálela en
el lado izquierdo del marco.
Fixez un côté du cadre métallique à la barre à l’aide de la vis à
métaux à tête plate fournie (voir l’image C).
Remarque : le cadre devra être installé plus près du côté de la
porte où se situe la charnière. L’installation sur une porte droite
est illustrée. Pour une porte gauche, tournez la barre et installez-
la du côté gauche du cadre.
FIG. C
FIG. D
FIG. E
FIG. B
PASO 2 / ÉTAPE 2
PASO 1 / ÉTAPE 1
PASO 2 / ÉTAPE 2
PASO 3 / ÉTAPE 3

This manual suits for next models

3

Other Rev-A-Shelf Indoor Furnishing manuals
Rev-A-Shelf 445 Series User manual

Rev-A-Shelf

Rev-A-Shelf 445 Series User manual

Rev-A-Shelf Wood Classics 444 Series User manual

Rev-A-Shelf

Rev-A-Shelf Wood Classics 444 Series User manual

Rev-A-Shelf 5WB-DMKIT User manual

Rev-A-Shelf

Rev-A-Shelf 5WB-DMKIT User manual

Rev-A-Shelf Glideware User manual

Rev-A-Shelf

Rev-A-Shelf Glideware User manual

Rev-A-Shelf 5330 Series User manual

Rev-A-Shelf

Rev-A-Shelf 5330 Series User manual

Rev-A-Shelf 5UPD User manual

Rev-A-Shelf

Rev-A-Shelf 5UPD User manual

Rev-A-Shelf 4WDBSC Series User manual

Rev-A-Shelf

Rev-A-Shelf 4WDBSC Series User manual

Rev-A-Shelf 4WDB4-18SC-1 User manual

Rev-A-Shelf

Rev-A-Shelf 4WDB4-18SC-1 User manual

Rev-A-Shelf 5WB2-1522CR-1 User manual

Rev-A-Shelf

Rev-A-Shelf 5WB2-1522CR-1 User manual

Rev-A-Shelf 1550DM1-343-FL User manual

Rev-A-Shelf

Rev-A-Shelf 1550DM1-343-FL User manual

Rev-A-Shelf ML-450SC-WS-1 User manual

Rev-A-Shelf

Rev-A-Shelf ML-450SC-WS-1 User manual

Rev-A-Shelf 5PD Series User manual

Rev-A-Shelf

Rev-A-Shelf 5PD Series User manual

Rev-A-Shelf R.4WV.15WN User manual

Rev-A-Shelf

Rev-A-Shelf R.4WV.15WN User manual

Rev-A-Shelf 4SH-15-1 User manual

Rev-A-Shelf

Rev-A-Shelf 4SH-15-1 User manual

Rev-A-Shelf 5786-900-CW-1 User manual

Rev-A-Shelf

Rev-A-Shelf 5786-900-CW-1 User manual

Rev-A-Shelf 4WKB Series User manual

Rev-A-Shelf

Rev-A-Shelf 4WKB Series User manual

Rev-A-Shelf 5365-08-FOG User manual

Rev-A-Shelf

Rev-A-Shelf 5365-08-FOG User manual

Rev-A-Shelf GLIDEWARE GLD Series User manual

Rev-A-Shelf

Rev-A-Shelf GLIDEWARE GLD Series User manual

Rev-A-Shelf 486-30VSBSC-BM-1 User manual
Rev-A-Shelf

Rev-A-Shelf 486-30VSBSC-BM-1 User manual

Rev-A-Shelf 548-10 User manual

Rev-A-Shelf

Rev-A-Shelf 548-10 User manual

Rev-A-Shelf Wood Classics 432 Series User manual

Rev-A-Shelf

Rev-A-Shelf Wood Classics 432 Series User manual

Rev-A-Shelf 9" Two-Tier Basket User manual
Rev-A-Shelf

Rev-A-Shelf 9" Two-Tier Basket User manual

Rev-A-Shelf Elite 53PSPE Series User manual

Rev-A-Shelf

Rev-A-Shelf Elite 53PSPE Series User manual

Rev-A-Shelf TWO-TIER FILE DRAWER SYSTEM User manual

Rev-A-Shelf

Rev-A-Shelf TWO-TIER FILE DRAWER SYSTEM User manual

Popular Indoor Furnishing manuals by other brands

mlmeble SOPHIE 06 Assembling Instruction

mlmeble

mlmeble SOPHIE 06 Assembling Instruction

Concept2 GS 2 Assembly instructions

Concept2

Concept2 GS 2 Assembly instructions

Jason.L Horizon Quadro A 2P Run workstation Assembly instructions

Jason.L

Jason.L Horizon Quadro A 2P Run workstation Assembly instructions

HOLLY&MARTIN DN744000TX Assembly instructions

HOLLY&MARTIN

HOLLY&MARTIN DN744000TX Assembly instructions

SouthShore 3159010 Assembly instructions

SouthShore

SouthShore 3159010 Assembly instructions

HAMPTON BAY FRS80961-ST-1 Use and care guide

HAMPTON BAY

HAMPTON BAY FRS80961-ST-1 Use and care guide

Polywood Vineyard Adirondack ADD600 Assembly instructions

Polywood

Polywood Vineyard Adirondack ADD600 Assembly instructions

mlmeble SOPHIE 01 Assembling Instruction

mlmeble

mlmeble SOPHIE 01 Assembling Instruction

Home Styles 88 5436 09 Assembly instructions

Home Styles

Home Styles 88 5436 09 Assembly instructions

PB TEEN Stuff-Your-Stuff instructions

PB TEEN

PB TEEN Stuff-Your-Stuff instructions

Simpli Home ARTISAN AXCHOL005-BL USER ASSEMBLY GUIDE

Simpli Home

Simpli Home ARTISAN AXCHOL005-BL USER ASSEMBLY GUIDE

Simpli Home Brooklyn+Max WyndenHall AXCHRP-06WH manual

Simpli Home

Simpli Home Brooklyn+Max WyndenHall AXCHRP-06WH manual

Coaster 300170Q Assembly instructions

Coaster

Coaster 300170Q Assembly instructions

RIGHT ANGLE 4 Vuelta Series Assembly instructions

RIGHT ANGLE

RIGHT ANGLE 4 Vuelta Series Assembly instructions

FLORABEST GS-1599 Instructions for use

FLORABEST

FLORABEST GS-1599 Instructions for use

Jason.L Spine Assembly instructions

Jason.L

Jason.L Spine Assembly instructions

System Build 9668015 Instruction booklet

System Build

System Build 9668015 Instruction booklet

J D Williams Chinoiserie XK091 Assembly instructions

J D Williams

J D Williams Chinoiserie XK091 Assembly instructions

manuals.online logo
manuals.online logoBrands
  • About & Mission
  • Contact us
  • Privacy Policy
  • Terms and Conditions

Copyright 2025 Manuals.Online. All Rights Reserved.