manuals.online logo
Brands
  1. Home
  2. •
  3. Brands
  4. •
  5. Rev-A-Shelf
  6. •
  7. Indoor Furnishing
  8. •
  9. Rev-A-Shelf 486-30VSBSC-BM-1 User manual

Rev-A-Shelf 486-30VSBSC-BM-1 User manual

This manual suits for next models

1

Other Rev-A-Shelf Indoor Furnishing manuals

Rev-A-Shelf 5322BCSC11GR User manual

Rev-A-Shelf

Rev-A-Shelf 5322BCSC11GR User manual

Rev-A-Shelf 548 Series User manual

Rev-A-Shelf

Rev-A-Shelf 548 Series User manual

Rev-A-Shelf 53WC Series User manual

Rev-A-Shelf

Rev-A-Shelf 53WC Series User manual

Rev-A-Shelf 4WKB-1 User manual

Rev-A-Shelf

Rev-A-Shelf 4WKB-1 User manual

Rev-A-Shelf JEWELRY DRAWER User manual

Rev-A-Shelf

Rev-A-Shelf JEWELRY DRAWER User manual

Rev-A-Shelf E-ZHIDER Instruction manual

Rev-A-Shelf

Rev-A-Shelf E-ZHIDER Instruction manual

Rev-A-Shelf SIDEMOUNT PULLOUT 150 MM User manual

Rev-A-Shelf

Rev-A-Shelf SIDEMOUNT PULLOUT 150 MM User manual

Rev-A-Shelf TWO-TIER BASKET User manual

Rev-A-Shelf

Rev-A-Shelf TWO-TIER BASKET User manual

Rev-A-Shelf 5PD Series User manual

Rev-A-Shelf

Rev-A-Shelf 5PD Series User manual

Rev-A-Shelf 5UPD User manual

Rev-A-Shelf

Rev-A-Shelf 5UPD User manual

Rev-A-Shelf 448 User manual

Rev-A-Shelf

Rev-A-Shelf 448 User manual

Rev-A-Shelf GLIDEWARE GLD Series User manual

Rev-A-Shelf

Rev-A-Shelf GLIDEWARE GLD Series User manual

Rev-A-Shelf 5WB-DMKIT User manual

Rev-A-Shelf

Rev-A-Shelf 5WB-DMKIT User manual

Rev-A-Shelf 9" Two-Tier Basket User manual

Rev-A-Shelf

Rev-A-Shelf 9" Two-Tier Basket User manual

Rev-A-Shelf RV-DM-FDKIT User manual

Rev-A-Shelf

Rev-A-Shelf RV-DM-FDKIT User manual

Rev-A-Shelf CRC-36CR User manual

Rev-A-Shelf

Rev-A-Shelf CRC-36CR User manual

Rev-A-Shelf 5300 Series User manual

Rev-A-Shelf

Rev-A-Shelf 5300 Series User manual

Rev-A-Shelf 5743 User manual

Rev-A-Shelf

Rev-A-Shelf 5743 User manual

Rev-A-Shelf 5365-08-FOG User manual

Rev-A-Shelf

Rev-A-Shelf 5365-08-FOG User manual

Rev-A-Shelf ML-450SC-WS-1 User manual

Rev-A-Shelf

Rev-A-Shelf ML-450SC-WS-1 User manual

Rev-A-Shelf 447-BCBBSC-5C User manual

Rev-A-Shelf

Rev-A-Shelf 447-BCBBSC-5C User manual

Rev-A-Shelf 445 Series User manual

Rev-A-Shelf

Rev-A-Shelf 445 Series User manual

Rev-A-Shelf CO Series User manual

Rev-A-Shelf

Rev-A-Shelf CO Series User manual

Rev-A-Shelf 5743 User manual

Rev-A-Shelf

Rev-A-Shelf 5743 User manual

Popular Indoor Furnishing manuals by other brands

Regency LWMS3015 Assembly instructions

Regency

Regency LWMS3015 Assembly instructions

Furniture of America CM7751C Assembly instructions

Furniture of America

Furniture of America CM7751C Assembly instructions

Safavieh Furniture Estella CNS5731 manual

Safavieh Furniture

Safavieh Furniture Estella CNS5731 manual

PLACES OF STYLE Ovalfuss Assembly instruction

PLACES OF STYLE

PLACES OF STYLE Ovalfuss Assembly instruction

Trasman 1138 Bo1 Assembly manual

Trasman

Trasman 1138 Bo1 Assembly manual

Costway JV10856 manual

Costway

Costway JV10856 manual

moss DESIGN Caisson Credenza Assembly instructions

moss DESIGN

moss DESIGN Caisson Credenza Assembly instructions

Aquaglide FULL DECK 15.0 owner's manual

Aquaglide

Aquaglide FULL DECK 15.0 owner's manual

AREBOS AR-HE-SW30 user manual

AREBOS

AREBOS AR-HE-SW30 user manual

Till-Hilft Fulda 87005.330 Assembly instructions

Till-Hilft

Till-Hilft Fulda 87005.330 Assembly instructions

Twoey Outside 2010 quick start guide

Twoey Outside

Twoey Outside 2010 quick start guide

Hettich Easys 200 operating instructions

Hettich

Hettich Easys 200 operating instructions

The bedboss RELAX 404 Series owner's manual

The bedboss

The bedboss RELAX 404 Series owner's manual

Oeseder Möbelindustrie Bern 991 720 Assembly instructions

Oeseder Möbelindustrie

Oeseder Möbelindustrie Bern 991 720 Assembly instructions

Costway HW68469 user manual

Costway

Costway HW68469 user manual

Next ALIX A27743 Assembly instructions

Next

Next ALIX A27743 Assembly instructions

BROSA Hans Assembly guide

BROSA

BROSA Hans Assembly guide

Prodigg MINIKA PBA015T-FUR installation manual

Prodigg

Prodigg MINIKA PBA015T-FUR installation manual

manuals.online logo
manuals.online logoBrands
  • About & Mission
  • Contact us
  • Privacy Policy
  • Terms and Conditions

Copyright 2025 Manuals.Online. All Rights Reserved.

12400 Earl Jones Way
Louisville, KY 40299
rev-a-shelf.com
Customer Service: 800-626-1126
VANITY BOTTOM MOUNT U-SHAPED PULLOUT TEMPLATE
TOOLS REQUIRED:
30 MIN
ESTIMATED ASSEMBLY TIME:
CARE AND MAINTENANCE:
Clean with a damp cloth and
wipe parts dry.
PARTS LIST
1
16
T-486VBM-1217
1. Install the feet to the slides using (8) #8-32 at head screws
and (8) lock nuts as shown.
2. Measure the cabinet opening and mark the center line.
4. Use an awl and mallet or a pencil to mark the cabinet
oor at the (4) screw locations (denoted by center
marks on the template) and remove template.
3. Align this template with your marked center line and tape in place.
Note: You may have to fold or cut template to t in cabinet.
A. Frameless cabinet - align front of template to front of cabinet.
B. Face frame cabinet - cut or fold template to the second line and place
to back of face frame.
C. Inset cabinet - set template back the thickness of the door.
5. Lay your slide assemblies in the cabinet, aligning
the holes to the marks from step 4 and attach using
(4) #8 x 3/4” truss head screws.
6. Turn drawer box upside down and place Blum triggers against the
front and side walls of drawer box.
NOTE: The orange cover of trigger faces the inside of the frame.
7. Attach triggers to drawer box using (4) #6 x 1/2” pan head screws.
8. Place the drawer box onto the slide assembly and push back until the
unit locks to slides.
NOTE: You will hear a “click” when it locks.
9. Cycle a few times to check function of slides and check to make sure
the door will not hit the drawer box when closed. Then remove the
drawer box by squeezing the triggers on the front underside and pull
up. Add (4) truss head screws to the holes of the feet, (1) per foot to
lock the unit in place. Re-install the drawer box.
1. Insert clips into desired holes as shown.
2. Insert divider over clips.
DIVIDER INSTALLATION
CENTER LINE
Frameless cabinet
align to front of cabinet
Screw locations
Screw locations
Face frame cabinet
align to back of face frame
- Drawer Box – 1
- Slides – 1 pair
- Feet – 4
- Blum Trigger – 1 pair
- #6 x 1/2” Pan Head Screws – 4
- #8-32 Flat Head Screws – 8
- #8 Lock Nuts – 8
- #8 x 3/4” Truss Head Screws - 8
19.40”
2.03”
1.28”
12400 Earl Jones Way
Louisville, KY 40299
rev-a-shelf.com
Customer Service: 800-626-1126
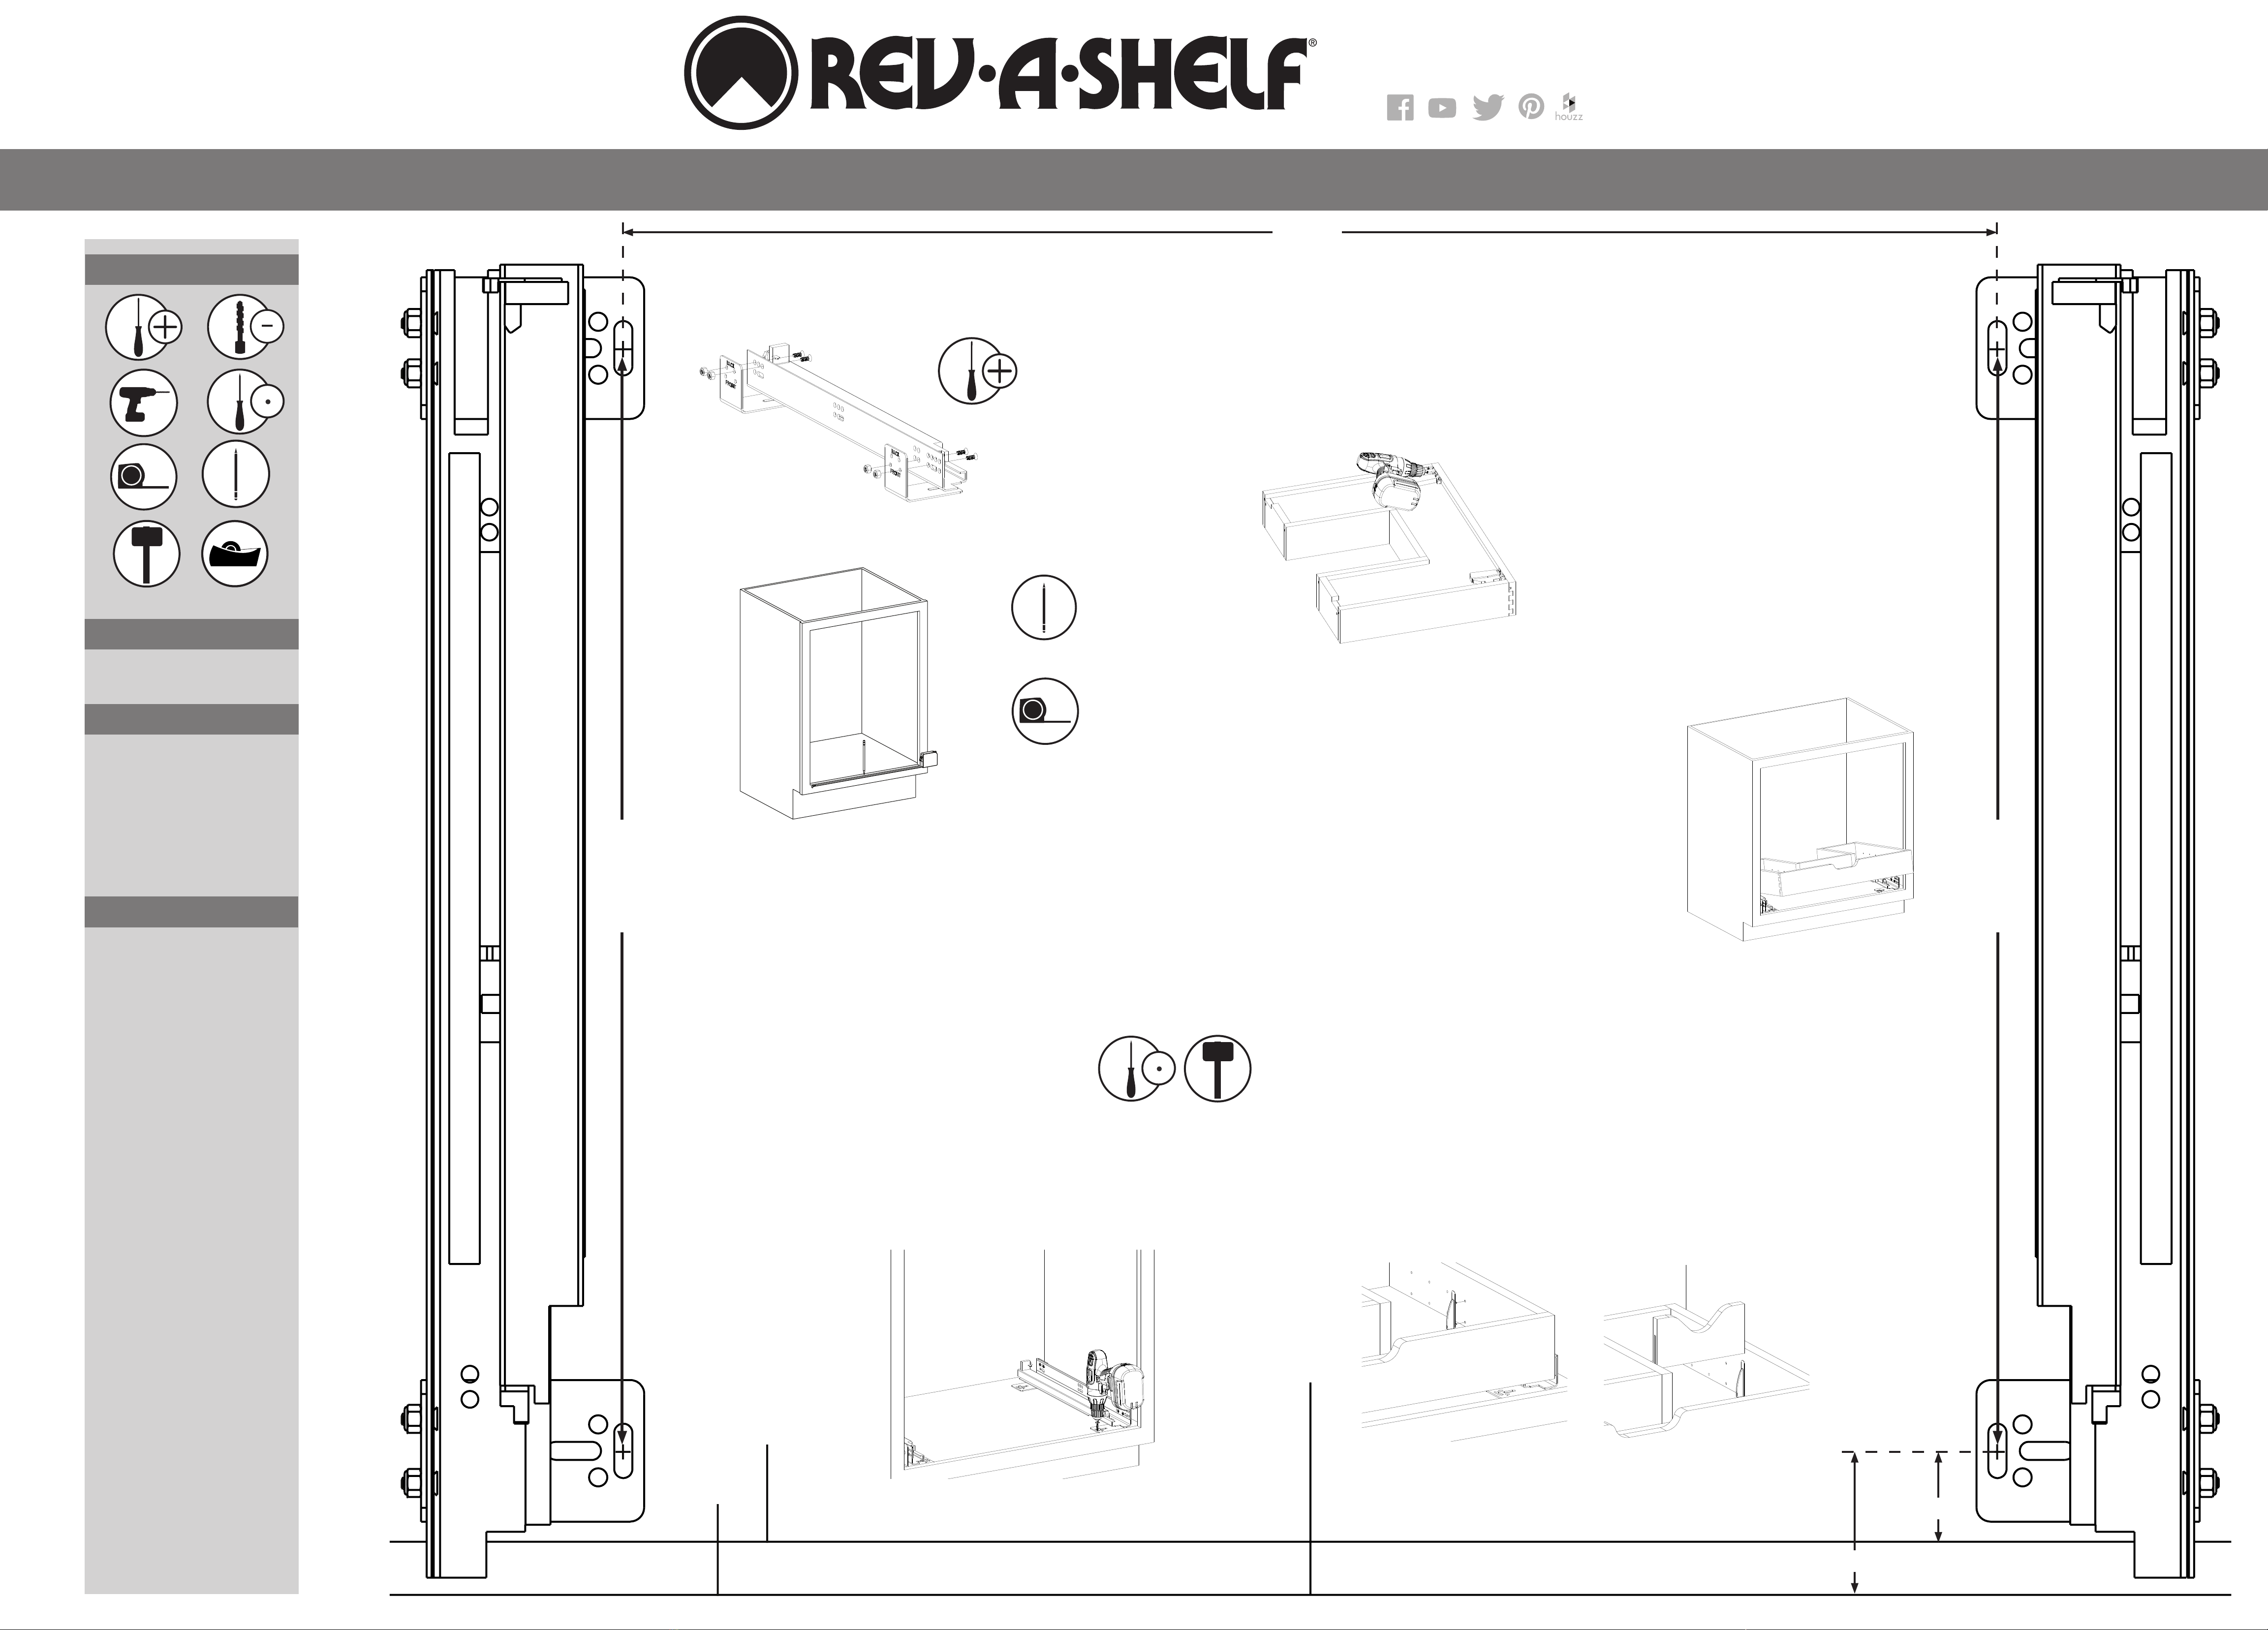
PLANTILLA DE MONTAJE INFERIOR DE TOCADOR DESPLEGABLE EN FORMA U
MODÈLE POUR ÉLÉMENT COULISSANT EN U DE VANITÉ AVEC MONTAGE PAR LE BAS
30 MIN
Clean with a damp cloth and
wipe parts dry.
1
16
T-486VBM-1217
1. Instale el pie a los deslizantes usando ocho tornillos de cabeza
plana del #8-32 y ocho tuercas de seguridad como se muestra.
1. Installez les pieds sur les coulisses en utilisant 8 vis à tête plate #
8-32 et 8 écrous de blocage comme indiqué.
2. Mida la apertura del gabinete y marque la línea central.
2. Mesurez l’ouverture de l’armoire et marquez la ligne centrale.
4. Use una lezna y un mazo o un lápiz para marcar el piso del gabinete a
las cuatro ubicaciones de tornillo (denotados por las marcas centrales
en la plantilla) y quite la plantilla.
4. Utilisez un poinçon et un maillet ou un crayon pour marquer le plancher
de l’armoire aux 4 emplacements des vis (indiqués par les marques
centrales sur le modèle) et retirez le modèle.
3. Alinee esta plantilla con la línea central marcada y pegue en su lugar.
Nota: Usted podría tener que doblar o cortar la plantilla para que quepa en el gabinete.
A. Para gabinetes sin marco - alinee el frente de la plantilla al frente del gabinete.
B. Para gabinetes con marco - corte o doble la plantilla en la segunda línea y coloque a la parte posterior del
marco.
C. Recuadro de gabinete - coloque la parte posterior de la plantilla al grosor de la puerta.
3. Alignez ce modèle avec votre ligne centrale marquée et attachez en place avec du ruban adhésif.
Remarque: Vous devrez peut-être plier ou couper le modèle pour l’adapter à l’armoire.
A. Armoire sans cadre – Alignez l’avant du modèle avec l’avant de l’armoire.
B. Armoire avec cadrage avant – Coupez ou pliez le modèle à la deuxième ligne et placez-le à l’arrière
du cadrage avant.
C. Armoire Encastrée – Placez le modèle en retrait de l’équivalent de l’épaisseur de la porte.
5. Coloque los ensambles del deslizante en el gabinete, alineando los oricios a las marcas
del paso 4, y sujete usando los cuatro tornillos de cabeza enroscada del #8 x 3/4”.
5. Posez vos assemblages de coulisses dans l’armoire, en alignant les trous sur les marques de
l’étape 4 et xez-les avec 4 vis à tête bombée #8 x 3/4 po.
6. Voltee el cajón hacia arriba y coloque el gatillo Blum en contra del frente y los lados de
las paredes del cajón.
NOTA: La cubierta anaranjada del gatillo se localiza en frente del marco.
6. Retournez la boîte du tiroir et placez les gâchettes Blum contre les parois avant et latérales
de la boîte du tiroir.
REMARQUE: Le couvercle orange de la gâchette fait face à l’intérieur du cadre.
7. Sujete los gatillos al cajón, usando cuatro tornillos de cabeza hexagonal del #6 x 1/2”.
7. Fixez les gâchettes à la boîte du tiroir en utilisant 4 vis à tête cylindrique # 6 x 1/2 po.
8. Coloque el cajón dentro del deslizante ensamblado y empuje hacia
atrás hasta que la unidad se cierre con los deslizantes.
NOTA: Usted escuchará un click cuando cierre.
8. Coloque el cajón dentro del deslizante ensamblado y empuje hacia atrás
hasta que la unidad se cierre con los deslizantes.
NOTA: Usted escuchará un click cuando cierre.
9. Opere varias veces para revisar el funcionamiento de los deslizantes y revise para
asegurarse de que la puerta no va a pegar en el cajón cuando se cierre. Luego quite
el cajón, apretando los gatillos del frente de la parte inferior y jale. Añada los cuatro
tornillos de cabeza enroscada a los oricios del pie, uno por pie, para cerrar la unidad en
su lugar. Vuelva a instalar el cajón.
9. Effectuez plusieurs cycles avec l’unité pour vérier le fonctionnement des coulisses et
vériez que la porte ne heurte pas la boîte du tiroir lorsqu’elle est fermée. Ensuite, retirez
la boîte du tiroir en appuyant sur les gâchettes sur le dessous avant et tirez vers le haut.
Ajoutez 4 vis à tête bombée aux trous des pieds, 1 par pied pour verrouiller l’unité en place.
Réinstallez la boîte du tiroir.
1. Inserte clips en los oricios deseados como se muestra.
1. Insérez les attaches dans les trous désirés comme indiqué.
2. Inserte la división sobre los clips.
2. Insérez le diviseur sur les attaches.
INSTALACIÓN DE LA DIVISIÓN / INSTALLATION DU DIVISEUR
LÍNEA CENTRAL
LIGNE CENTRALE
Para gabinetes sin marco,
alinee al frente del gabinete.
Armoire sans cadre alignez avec
l’avant de l’armoire
Ubicación de los Tornillos
Emplacements des vis
Para gabinetes con marco, alinee a
la parte posterior del marco.
Armoire avec cadrage avant - Alignez
avec l’arrière du cadrage avant
- Cajón / Boîte du Tiroir -1
- Deslizantes - un par
/ Coulisses -1 paire
- Pie / Pieds – 4
- Gatillo Blum - un par
Gâchette Blum - 1 paire
- Cuatro Tornillos de Cabeza Hexagonal
del #6 x 1/2”
Vis à Tête Cylindrique #6 x 1/2 po – 4
- Ocho Tornillos de Cabeza Plana del #8-32
Vis à Tête Plate #8-32 – 8
- Ocho Tuercas de Seguridad del #8
Écrous de Blocage #8 – 8
- Ocho Tornillos de Cabeza Enroscada
del #8 x 3/4”
Vis à Tête Évasée #8 x 3/4 po - 8
Herramientas requeridas:
Outils Requis:
Tiempo estimado de ensamblado
Durée de l’installation:
Cuidado/ Entretien:
Lista de partes
Liste des pièces:
19.40”
1.28”
2.03”