manuals.online logo
Brands
  1. Home
  2. •
  3. Brands
  4. •
  5. REVELL
  6. •
  7. Motorized Toy Car
  8. •
  9. REVELL KIT 2616 User manual

REVELL KIT 2616 User manual

This manual suits for next models

3

Other REVELL Motorized Toy Car manuals

REVELL Bentley 4 User manual

REVELL

REVELL Bentley 4 User manual

REVELL KIT 2033 User manual

REVELL

REVELL KIT 2033 User manual

REVELL 1993 Honda Civic Coupe 2 ‘n 1 TUNER Series User manual

REVELL

REVELL 1993 Honda Civic Coupe 2 ‘n 1 TUNER Series User manual

REVELL Sauber Mercedes C-9 User manual

REVELL

REVELL Sauber Mercedes C-9 User manual

REVELL Road Rider 42 User manual

REVELL

REVELL Road Rider 42 User manual

REVELL 2006 Corvette Z06 User manual

REVELL

REVELL 2006 Corvette Z06 User manual

REVELL 599 GTB Fiorano User manual

REVELL

REVELL 599 GTB Fiorano User manual

REVELL 1963 CORVETTE STING RAY COUPE User manual

REVELL

REVELL 1963 CORVETTE STING RAY COUPE User manual

REVELL KIT 0883 User manual

REVELL

REVELL KIT 0883 User manual

REVELL '69 Chevy Nova Yenko User manual

REVELL

REVELL '69 Chevy Nova Yenko User manual

REVELL '72 OLDSMOBILE INDY 500 PACE CAR User manual

REVELL

REVELL '72 OLDSMOBILE INDY 500 PACE CAR User manual

REVELL 7226 User manual

REVELL

REVELL 7226 User manual

REVELL KIT 1589 User manual

REVELL

REVELL KIT 1589 User manual

REVELL 2061 User manual

REVELL

REVELL 2061 User manual

REVELL 65 Corvette Sting Ray Series User manual

REVELL

REVELL 65 Corvette Sting Ray Series User manual

REVELL 86 CHEVY MONTE CARLO SS User manual

REVELL

REVELL 86 CHEVY MONTE CARLO SS User manual

REVELL Ferrari F2003-GA User manual

REVELL

REVELL Ferrari F2003-GA User manual

REVELL Ferrari 458 Italia User manual

REVELL

REVELL Ferrari 458 Italia User manual

REVELL 1999 Mitsubishi Eclipse 2‘n1 TUNER SERIES... User manual

REVELL

REVELL 1999 Mitsubishi Eclipse 2‘n1 TUNER SERIES... User manual

REVELL 83 HURST OLDSMOBILE Series User manual

REVELL

REVELL 83 HURST OLDSMOBILE Series User manual

REVELL DOMINIC'S 1970 DODGE CHARGER User manual

REVELL

REVELL DOMINIC'S 1970 DODGE CHARGER User manual

REVELL 77 Jeep CJ-7  Renegade 2’N 1 User manual

REVELL

REVELL 77 Jeep CJ-7 Renegade 2’N 1 User manual

REVELL CM191 User manual

REVELL

REVELL CM191 User manual

REVELL KIT 1960 User manual

REVELL

REVELL KIT 1960 User manual

Popular Motorized Toy Car manuals by other brands

Reely Dune Fighter 3S operating instructions

Reely

Reely Dune Fighter 3S operating instructions

Team Losi Micro Rally Car Operation guide

Team Losi

Team Losi Micro Rally Car Operation guide

Jamara Mercedes-AMG GLE 63 Instruction

Jamara

Jamara Mercedes-AMG GLE 63 Instruction

Eduard Humber Scout Car Mk.I exterior quick start guide

Eduard

Eduard Humber Scout Car Mk.I exterior quick start guide

Jamara VW T1 Bus Instruction

Jamara

Jamara VW T1 Bus Instruction

Schumacher Pro Cat instruction manual

Schumacher

Schumacher Pro Cat instruction manual

Tamiya TT-01 TYPE E instruction manual

Tamiya

Tamiya TT-01 TYPE E instruction manual

Eduard Krupp Protze 6x4 1/48 quick start guide

Eduard

Eduard Krupp Protze 6x4 1/48 quick start guide

New Bright 61072UEP quick start guide

New Bright

New Bright 61072UEP quick start guide

Team Durango DEX410v5 manual

Team Durango

Team Durango DEX410v5 manual

Jamara Mercedes Actros Muldenkipper 2,4 GHz Instruction

Jamara

Jamara Mercedes Actros Muldenkipper 2,4 GHz Instruction

PLAYMOBIL 9536 manual

PLAYMOBIL

PLAYMOBIL 9536 manual

Atomic BZ3 instruction manual

Atomic

Atomic BZ3 instruction manual

Jamara McLaren Senna 2,4GHz instructions

Jamara

Jamara McLaren Senna 2,4GHz instructions

Aiyaplay 370-290V00 user manual

Aiyaplay

Aiyaplay 370-290V00 user manual

ZEROTRIBE Zetricks ZT1144 instruction manual

ZEROTRIBE

ZEROTRIBE Zetricks ZT1144 instruction manual

INJUSA 412 Assembly instructions

INJUSA

INJUSA 412 Assembly instructions

Maverick MSC-30BR-WP instruction manual

Maverick

Maverick MSC-30BR-WP instruction manual

manuals.online logo
manuals.online logoBrands
  • About & Mission
  • Contact us
  • Privacy Policy
  • Terms and Conditions

Copyright 2025 Manuals.Online. All Rights Reserved.

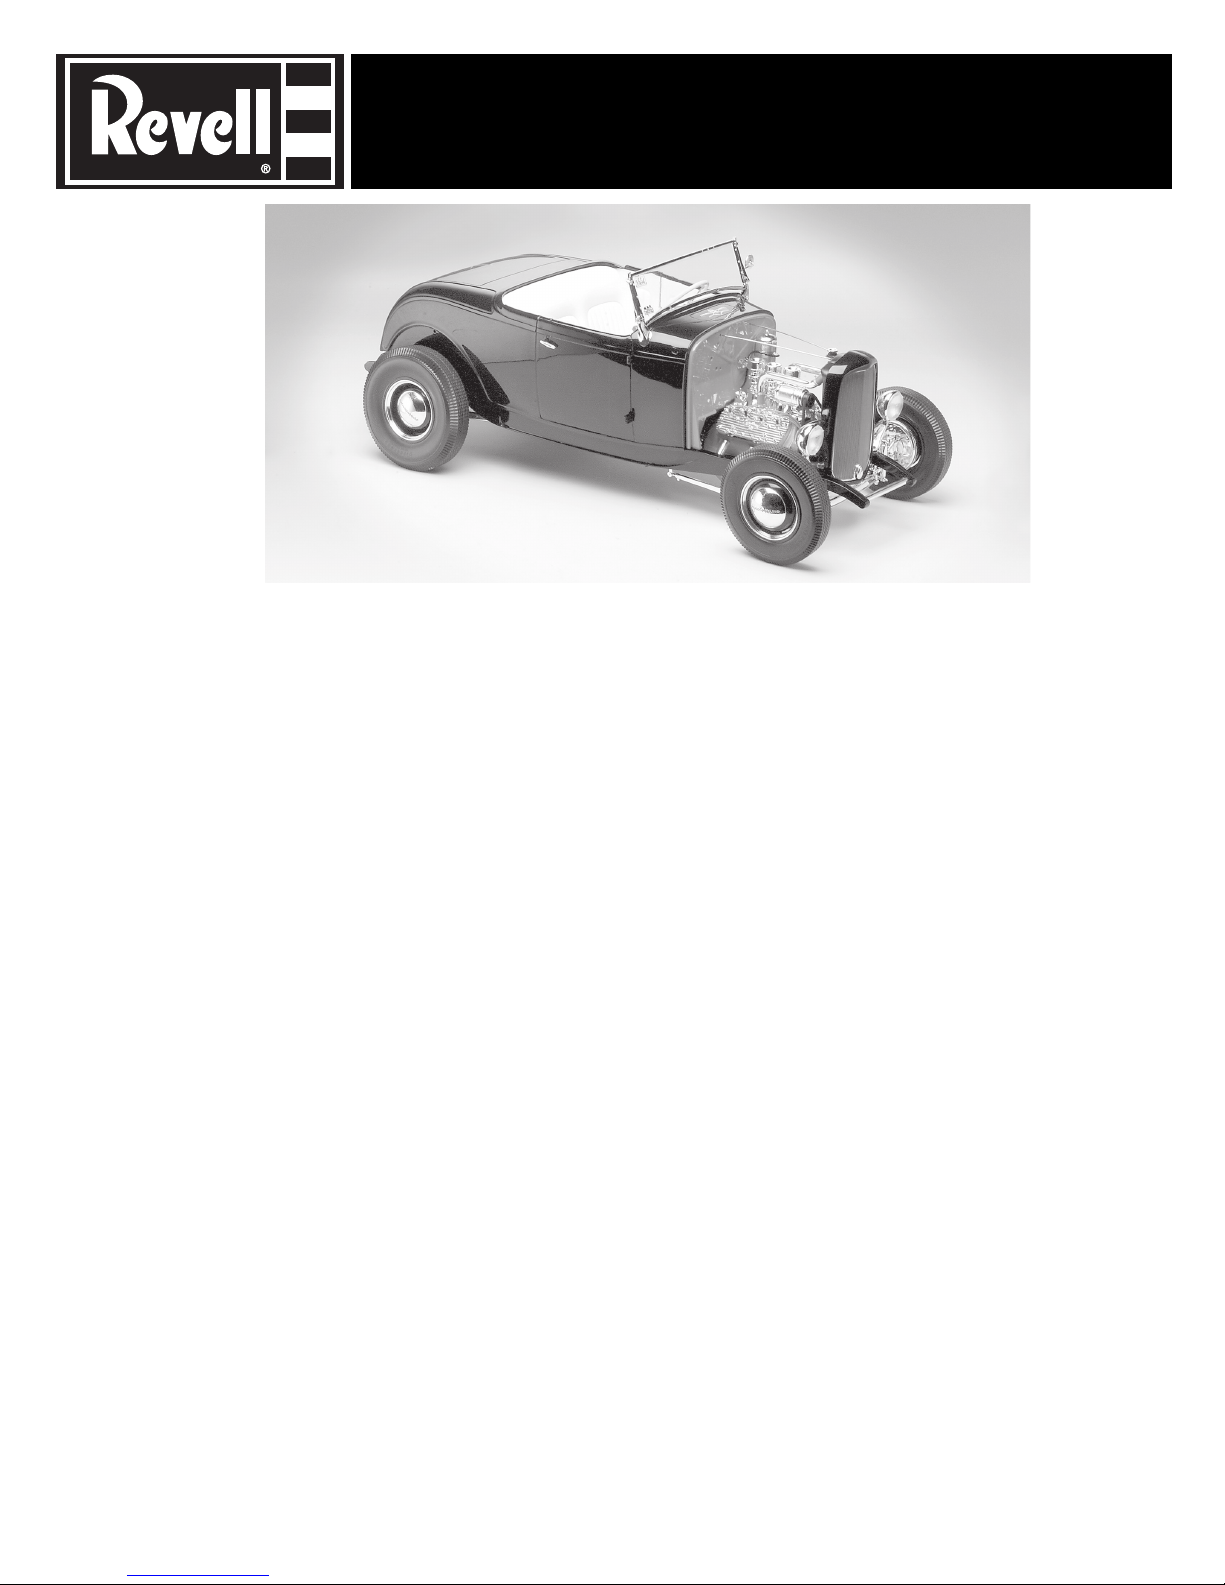
‘32 FORD HIGHBOY HOT ROD
AND THE ORIGINAL BIG DEUCE 3`N 1
KIT 2616 85261600200
The 1932 Ford roadster is the paragon hot rod.
Why? Some reasons are strictly obvious, others are purely
emotional. A few are completely illogical. First, you have to
remember that 1932 was the depth of the recession in the
United States. Most corporate types would not calculate this
as the best time to introduce an all-new, low production run,
low-cost "everyman's car" with styling queues echoing from
high-class marquees like Lincolns and Duesenbergs, and--of
all incredible things--the first assembly-line, low-cost, high-
volume-production V8 engine ever made. A young man's
auto sport that would one day be called hot rodding was
already gaining a strong foothold in Southern California by
this time, and you know their attention was riveted by this
flashy new Ford and its unheard-of engine. This was, hands
down, power to the people.
Some might think that Henry Ford predestined the
'32 Ford to be a collector's classic. The smooth, rounded,
body-color grille shell, the flowing body contours, and the
gentle, conforming body accent lines all broke trend from
the boxy, squared-up Model A. The "Deuce" was offered
not only in the sporty roadster, but also in two completely
different coupes, a couple of sedans, a classy phaeton, a
jaunty Victoria, and even a drop-head version of this model
(B-400), among others. The most amazing part is that this
all-new line was offered for only one short year, with the
V8 models not being introduced until halfway through it.
By 1933, everything changed again (except the V8 engine,
which would last through 1953--as the hot rodders' favorite).
But, of all this, what the rodders saw was a relatively
inexpensive, light, powerful new Ford that came with an
unheard-of affordable V8 engine and a considerably more
rugged (and good-looking) frame. Of course, the young
depression-era rodders couldn't afford new V8s at the time--
they were still stripping down cast-off Model T's and hopping
them up with obsolete race parts from the Teens to compete
on the smooth, dusty dry lakes above L.A.
But after the War, the rapidly swelling throngs of new
rodders latched onto the '32 Roadster (now obsolete itself),
as their car. Why? The roadster was the lightest, cheapest,
and (with fenders, lights, and windshield removed) by far the
most aerodynamic model in the early Ford line (remember
that speed at the dry lakes depends as much on streamlin-
ing as it does on power). The '32 was a bit bigger and wider
than the T's and A's, but it came with the V8 in place, and it
was sporty--a darn good-looking car, with or without fenders.
Not only is the Deuce roadster the classic hot rod,
this is a classic model kit. The Big Deuce followed closely
on the heels of the ground-breaking Big T, offered at the
zenith of the model car hobby in the early '60’s (along with
a 1:1 counterpart of each by Darryl Starbird). It was a stun-
ner then, and is even more so now. All the crispness and
exactness of those original dies and molds remain, but, fully
reflecting the healthy diversity of rodding today, you can
build this value-added kit in any number of styles, ranging
from the original '60s full-fendered, mag-wheeled version, to
a right-on '40s-'50s highboy with a full-dressed flathead, to
a contemporary, throw-back "rat rod" version for which the
multi-carb OHV V8 with open outside headers is perfect (and
the Mexican seat blanket is de rigueur. The Big Deuce was
done right by Monogram the first time around, and it's done
even better in this impressive multi-build kit by successor
Revell-Monogram. Welcome
back, Big Deuce.
Pat Ganahl
Pat Ganahl has been the Editor of Street Rodder, Hot Rod, Rod & Custom,
and Rodders Journal magazines. Pat created the Modellers Corner in
Street Rodders magazine and is an avid model builder.
The Big Deuce is dedicated to Roger Harney, without his continual support and dedication at Revell Monogram this kit would have not been possible
INFORMATION
i
Aluminum
Flat Black
Flat Medium Gray
Flat Red
Gloss Black
Gloss Red
Gloss White
Graphite Metallic
Semigloss Black
Steel
Transparent Blue
Transparent Red
If you have any questions or comments, call our hotline at: (800) 833-3570
or, please write to:
Revell-Monogram Consumer Service Department, 725 Landwehr Road, Northbrook, Illinois 60062
Be sure to include the plan number (85261600200), part number, description, your return address and phone number.
Visit our website: www.revell-monogram.com
REVELL-MONOGRAM, LLC Northbrook, IL. Copyright © 2003. All rights reserved.
* REPEAT SEVERAL TIMES
* A REPETER PLUSIEURS FOIS
* OPTIONAL PARTS
* PIECES EN OPTION
* DECAL
* DECAL COMANIE
* ALTERNATIVE ASSEMBLY
* ENSEMBLAGE ALTERNATIVE
* CEMENT TOGETHER
* A COLLER
* REMOVE AND THROW AWAY
* A RETIRER ET JETER
* DO NOT CEMENT
* NE PAS COLLER
Aluminum
Noir mat
Grid moyen mat
Rouge mat
Noir brilliant
Rouge brilliant
Blanc brilliant
Graphite métallisé
Noir satiné
Acier
Bleu transparent
Rouge transparent
This paint guide is provided to
complete this kit as shown on the box.
Ce guide de peinture est fourni pour reproduire le
modèle réduit qui apparaît sur la boîte.
* Study the assembly drawings.
* Each plastic part is identified by a number.
* In the assembly drawings, some parts will be
marked by a star (★) to indicate chrome
plated plastic.
* For better paint and decal adhesion, wash
the plastic parts in a mild detergent solution.
Rinse and let air dry.
* Check the fit of each piece before cementing
in place.
* Use only cement for polystyrene plastic.
* Scrape plating and paint from areas to be
cemented.
* Allow paint to dry thoroughly before
handling parts.
* Any unused parts may be discarded.
DECAL APPLICATION INSTRUCTIONS
1. Cut desired decal from sheet.
2. Dip decal in water for a few seconds.
3. Place wet decal on paper towel.
4. Wait until decal is movable on paper backing.
5. Place decal in position on model, face up
and slide backing away.
6. Press out air bubbles with a soft damp cloth.
7. Milkiness that may appear is for better decal
adhesion and will dry clear. Wipe away any
excess adhesive.
8. Do not touch decal until fully dry.
9. Allow the decals 48 hours to dry before
applying clear coat.
NOTE: Decals are compatible with
setting solutions or solvents.
READ THIS BEFORE YOU BEGIN LIRE CE QUI SUIT AVANT DE COMMENCER
* Etudier les schémas de montage.
* Chaque pièce en plastique est identifiée par un numéro.
* Sur les schémas de montage, certaines pièces sont
marquées d'une étoile (★) pour indiquer qu'elles sont en
plastique chromé.
* Pour une meilleure prise de la peinture et
des autocollants, laver les pièces en plastique avec une
solution détergente peu concentrée. Les rincer et les
laisser sécher à l'air.
* Vérifier que chaque pièce s'ajuste bien avant de la coller
en place.
* N'utiliser que de la colle pour polystyrène.
* Gratter les parties à coller pour enlever le chrome et
la peinture.
* Laisser la peinture bien sécher avant de manipuler
les pièces.
* Toute pièce inutilisée peut être jetée.
DIRECTIVES D'APPLICATION DES AUTOCOLLANTS
1. Découper l'autocollant désiré de la feuille.
2. Tremper l'autocollant dans de l'eau pendant quelques
secondes.
3. Placer l'autocollant mouillé sur une serviette en papier.
4. Attendez que l'autocollant puisse être déplacé sur son
support en papier.
5. Mettre l'autocollant en position sur le modèle face sur le
dessus et faire glisser le support pour l'enlever.
6. Appuyer avec un chiffon doux humide pour éliminer
les bulles d'air.
7. La substance laiteuse qui peut apparaître est destinée à
améliorer l'adhésion de l'autocollant et devient incolore
au séchage. Essuyer pour enlever tout excédent
d'adhésif.
8. Ne pas toucher l'autocollant tant qu'il n'est pas bien sec.
9. Laisser l'autocollant sécher pendant 48 heures avant
d'appliquer une couche transparente.
REMARQUE: Les autocollants sont compatibles avec
les solutions de fixage ou les solvants.
The `32 Ford Highboy Hot Rod instruction manual is
divided into three separate sections. Each section con-
tains instructions for building a particular type of “Hot Rod”
Please read the instructions carefully and decide which
version you prefer to build. Parts may be interchanged
between different versions but it is strongly suggested only
for the advanced model builder.
*OUVERTURE DE COUPURE
* CUT OPEN
BIG DEUCE ENGINE ASSEMBLY
1
★103
GENERATOR
CHROME
★104
GENERATOR
FRONT
CHROME
★36
GENERATOR
PULLEY
CHROME
★208
OIL FILTER
CHROME
★90
OIL FILTER
CHROME
★92
BREATHER CAP
CHROME
★89
VALLEY COVER
CHROME
(PAINT SHADED AREA
GLOSS YELLOW)
86
RIGHT HALF
ENGINE
BLOCK
GLOSS BLACK
87
LEFT HALF
ENGINE
BLOCK
GLOSS BLACK
★93
SHIFT LEVER
HOUSING
CHROME
★91
TRANSMISSION
HOUSING
CHROME
★101
RIGHT STARTER
HOUSING
CHROME
★102
LEFT STARTER
HALF
CHROME
A
B
★100
REAR HALF PUL-
LEY
CHROME
★99
FRONT HALF
PULLEY
CHROME
★97
REAR DRIVE
PULLEY
CHROME
★98
FRONT DRIVE
PULLEY
CHROME
35
CYLINDER HEAD
GLOSS BLACK
85
CYLINDER HEAD
GLOSS BLACK
★109
ROCKER COVER
CHROME
(PAINT SHADED AREA
GLOSS YELLOW)
★109
ROCKER COVER
CHROME
(SEE ROCKER COVER ON
OPPOSITE SIDE)
88
WATER PUMP
HOUSING
GLOSS BLACK
BIG DEUCE ENGINE ASSEMBLY CONTINUED
1
84
SPARK PLUGS
GLOSS WHITE
(PAINT SHADED
AREA ALUMINIUM)
✱
✱
✱
✱
✱
✱
✱
✱
✱
★117
RIGHT EXHAUST
CHROME
★118
LEFT EXHAUST
CHROME
★113
OIL CAP
CHROME
★113
OIL CAP
CHROME
★107
CARBURETOR
LINKAGE
CHROME
★107
CARBURETOR
LINKAGE
CHROME
C
D
★94
RIGHT INTAKE
MANIFOLD
CHROME
★95
LEFT INTAKE
MANIFOLD
CHROME
MANIFOLD
TUBING
★96
WATER
OUTLETS
CHROME
★105
RIGHT HALF CAR-
BURETOR
CHROME
(PAINT ALUMINIUM)
★106
LEFT HALF CARBURETOR
CHROME
(PAINT ALUMINIUM)
NOTE: SEE DETAILS ON THIS PAGE
OF FOR INFORMATION ON
INTAKE MANIFOLD LINES
★108
AIR CLEANER
CHROME
BIG DEUCE ENGINE ASSEMBLY CONTINUED
1
3
3
5
5
7
7
1
1
6
6
4
4
8
82
2
11&2
7&8
3&4
2
8
4
3
6
5
7
1
2
834
6
5
7
7 9/16"
5 5/8"
8-SPARKPLUG
CONNECTORS
6 5/8"
5&6
5 15/16"
NOTE: SEE DETAILS ON THIS PAGE
FOR INFORMATION ON FUEL LINES
E
★112
FUEL LOG
CHROME
★110
MAGNETO
FRONT
CHROME
★111
MAGNETO REAR
CHROME
★110
MAGNETO
FRONT
CHROME
★110
MAGNETO
FRONT
CHROME
F
NOTE: SEE DETAILS ON LAST
PAGE OF THIS SECTION OF THE
INSTRUCTION MANUAL FOR INFOR-
MATION ON SPARK PLUG LINES
AND SPARK PLUG CONNECTORS
MAGNETO FRONT
VIEWED FROM INSIDE
FOR WIRING GUIDE
RUBBER
BAND
NOTE: HOSE ATTACHES
TO HIGHLIGHTED PIN
ON THE CARBURETOR
NOTE: IF THE FUEL
LINES ARE TOO SMALL
TO FIT THE DIAMETER
OF THE PINS USE A
PENCIL TIP TO SPREAD
FUEL LINES BEFORE
ATTACHING TO PINS
NOTE: IF THE IGNITION WIRES AND
SPARK PLUG CONNECTORS ARE
TOO SMALL TO FIT THE DIAMETER
USE A PENCIL TIP TO SPREAD THE
DIAMETER BEFORE ATTACHING
LONG
FUEL
LINE
MEDIUM
FUEL
LINE
SHORT FUEL
LINE
BIG DEUCE BODY ASSEMBLY
2
1
LEFT UPPER
HINGE HALF
2
LEFT UPPER
HINGE HALF
3
LEFT LOWER
HINGE HALF
4
LEFT LOWER
HINGE HALF
5
RIGHT UPPER
HINGE HALF
6
RIGHT UPPER
HINGE HALF
8
RIGHT LOWER
HINGE HALF
7
RIGHT LOWER
HINGE HALF
★17
INSTRUMENT
PANEL
CHROME
★20
STEERING COLUMN
SUPPORT
CHROME
19
DASHBOARD
11
LOCK
★10
DOOR HANDLE
CHROME
11
LOCK
★10
DOOR HANDLE
CHROME
NOTE: CUT DECAL FROM PAPER BUT DO NOT SLIDE FROM PAPER
BACKING. GLUE TO THE BACK OF THE INSTRUMENT PANEL
A
B
C
D
EF
25 OR 26
9
BODY
BIG DEUCE BODY ASSEMBLY CONTINUED
2
★16
FIREWALL
PANEL
CHROME
18
FIREWALL
30
TRUNK
UPHOLSTERY
42
GAS TANK
HALF
162
GAS TANK
HALF
41
REAR CROSS
MEMBER
40
CENTER CROSS
MEMBER
39
FRONT CROSS
MEMBER
45
LEFT FRAME RAIL
38
RIGHT FRAME
RAIL
23
RIGHT REAR
INTERIOR
22
RIGHT DOOR
INTERIOR
21
RIGHT FRONT
INTERIOR
26
LEFT REAR
INTERIOR
25
LEFT DOOR
INTERIOR
24
LEFT FRONT
INTERIOR
NOTE: CUT DECAL FROM PAPER BUT DO NOT SLIDE FROM PAPER
BACKING. GLUE TO THE BACK OF THE INSTRUMENT PANEL
BIG DEUCE FRAME ASSEMBLY
3
NOTE: OPEN HOLES SHOWN TO ATTACH
HANDLES AND ANTENNA IN A LATER STEP
G
H
JK
I
A
27 OR 28
BIG DEUCE FRAME ASSEMBLY CONTINUED
3
EYELET #2
EYELET #2
EYELET #1
EYELET #1
★51
RIGHT IDLER ARM
CHROME
★50
SPINDLE TOP
CHROME
EYELET #2
EYELET #2
EYELET #1
EYELET #1
★52
LEFT IDLER ARM
CHROME
★50
SPINDLE TOP
CHROME
★53R
RIGHT FRONT
BRAKE PLATE
CHROME
★54
BRAKE DRUM
CHROME
★55
GREASE CAP
CHROME
★55
GREASE CAP
CHROME
★56L
LEFT FRONT
BRAKE PLATE
CHROME
★54
BRAKE DRUM
CHROME
★80
STEERING ARM
CHROME
3 1/2” BRAKE LINE
EYELET #2
EYELET #1
EYELET #2
EYELET #1
NOTE: CAVITY AND
PINS FACE REAR ON
(★49) FRONT AXLE
★49
FRONT
AXLE
CHROME
★49
FRONT
AXLE
CHROME
NOTE: CAVITY AND
PINS FACE REAR ON
(★49) FRONT AXLE
47
CYLINDER
HOUSING
STEEL
48
CYLINDER
HOUSING
STEEL
NOTE: BRAKE LINE FITS
INTO PIN ON FRAME
BCRIGHT
LEFT
DE
F
GH
RIGHT
LEFT
LEFT
BIG DEUCE FRONT END ASSEMBLY
4
58
RETAINER
58
RETAINER
★57
TIE ROD
CHROME
★60
RIGHT RADIUS
ROD
CHROME
★59
LEFT RADIUS
ROD
CHROME
★62
LEFT SHOCK
BRACKET
CHROME
★61
RIGHT SHOCK
BRACKET
CHROME
★63
FRONT SHOCK
ABSORBER
CHROME
NOTE: BRAKE LINE CONNECTS FROM
THE COMPLETED BRAKE DRUM TO THE
FRAME AS SHOWN IN ILLUSTRATION
2 1/4” BRAKE
LINE
COMPLETED
BRAKE DRUM
ASSEMBLY
FRAME
ASSEMBLY
REPEAT FOR
OTHER SIDE
A
B
C
BIG DEUCE REAR END ASSEMBLY
5
★64
TOP HALF AXLE
HOUSING
CHROME
★65
BOTTOM HALF
AXLE HOUSING
CHROME
★66
LEFT HALF Q.C.
REAR END
CHROME
★67
RIGHT HALF
Q.C. REAR END
CHROME
★68
QUICK CHANGE
COVER
CHROME
★69
REAR SPRING
CHROME
★72
LEFT REAR
RADIUS ROD
CHROME
★71
RIGHT REAR
RADIUS ROD
CHROME
★70
REAR BACKING
PLATE
CHROME
★70
REAR BACKING
PLATE
CHROME
METAL AXLE
EYELET #3
EYELET #3
★73
BRAKE DRUM
REAR
CHROME
★73
BRAKE DRUM
REAR
CHROME
NOTE: USE (35) AXLE TOOL TO
PRESS METAL WHEEL RETAINER
TO (★73) BRAKE DRUM REAR
THROUGH METAL AXLE.
EYELET #3
METAL RETAINER
35
AXLE TOOL
AB
CD
E