Rexing V1P Max User manual

2Table of ContentsEnglish
Overview
What’s in the Box
Camera Overview
Installation
Basic Operation
日本語概説本製品の同梱物カメラの概説画面のアイコン基本操作Français
Aperçu
Que contient la Boîte
Aperçu de la Caméra
Installation
Opération de Base
Italiano
Descrizione
Nella Confezione
Descrizione Telecamera
Installazione
Funzionamento Base
page
4
5
6
8
12
18
19
20
22
27
32
33
34
36
41
46
47
48
50
55

3Español
Visión General
Qué hay en la Caja
Resumen de la Cámara
Instalación
Operación Básica
Deutsch
Übersicht
Verpackungsinhalt
Kamera übersicht
Installation
Grundbedienungen
60
61
62
64
69
74
75
76
78
83
page

41.OverviewThank you for choosing REXING! We hope you love your new
product as much as we do.
If you need assistance, or have any suggestions to improve it,
please contact us. You can reach us via [email protected] or
call us at (203) 800-4466. Our support team will respond you as
soon as possible.
Always a surprise in Rexing. Check us out here.
https://www.facebook.com/rexingusa/
https://www.instagram.com/rexingdashcam/
https://www.rexingusa.com/support/registration/
FacebookInstagramSiteProduct Support

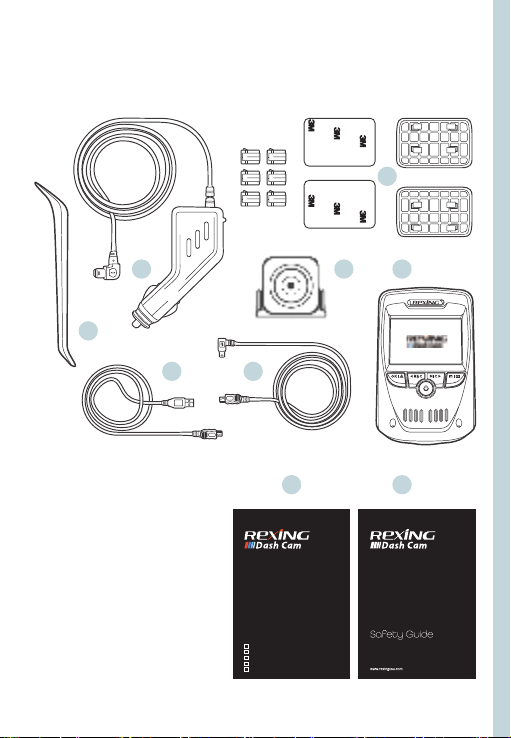
51. Overview1. Rexing V1P Max Dashboard
Camera
2. Full HD Rear Camera
3. Rear Camera Cable (20ft)
4. Car Power Connector
(12ft)
5. 3M Adhesive Mount
6. USB Cable
7. User Manual
8. Safety Guide
9. Cable Management Tool
2. What’s in the box2.
5.
4.
6. 3.
7. 8.
9.
1.
V1P MaxQuick Start Guide
FR Guide de démarrage rapide de la V1P MaxIT Guida di avvio rapido V1P MaxDE V1P MaxSchnellstartanleitung
SP Guía de inicio rápido V1P MaxJP V1P Maxクイックスタートガイド

63. Camera Overview1. OK (Confirm) Button / Emergency Lock Button
2. Up Navigation Button / Record Button*
3. Power Button / Screen Toggle Button
4. Down Navigation Button / Mic Button**
5. Menu Button / Mode Button
6. Micro SD Card Slot
7. Reset Button
8. USB Charging Port
9. Rear Camera Port
10. GPS Logger Port (Built-in GPS logger)
*The camera is recording when the LED is flashing red.
**The device is charging or powered on when the LED is solid white.
2. 4. 5.
3.
1.
9.
10.
6.
8.
7.

7Screen IconsRecording (ON) GPS Signal
(Connected)
Wi-Fi
(ON)
MIC(ON)
Current Date
(MM/DD/YYYY)
Time(24h)
Emergency
Lock
GPS Signal
(Not Connect)
MIC (OFF)

84.InstallationStep 1: Install the Dash CamPlace the 3M tape on the Mount and properly orient the
Mount square to the roof and hood line of the vehicle.
Important! Ensure the T-interlock on the Mount is oriented in
the correct direction.
Firmly press the Mount onto the windshield. Wait at least 20
minutes before mounting the camera.
On the illustration Orient the mount as shown.
Step 2: Insert the Memory CardThe Rexing V1P Max accepts [Class 10/UHS-1 or higher]
Micro SD memory cards up to 256GB. You will need to
insert a memory card before you can begin recording. Before
inserting or removing a memory card, first ensure
you’ve powered down the device. Gently push the
memory card in until you hear a click, and allow the spring
release to push the card out.
Orient the
mount as shown
Press the Power
button to turn the
the power off

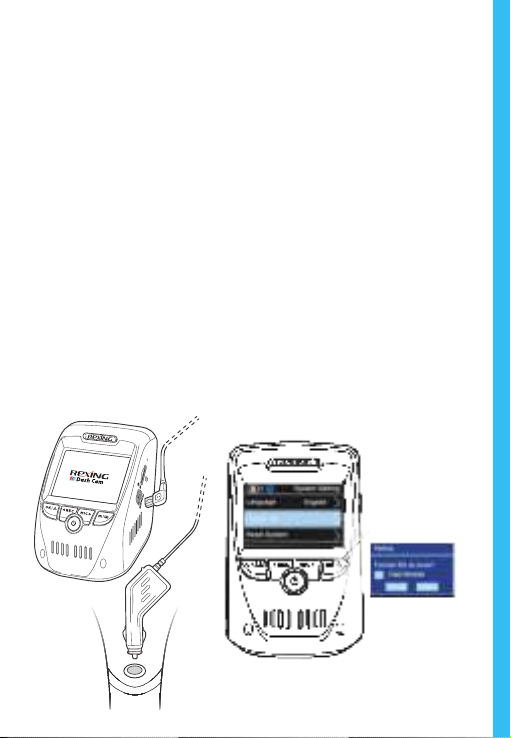
9Step 3: Power the Camera and Format the Memory CardPower the camera by connecting the charger to the
car cigarette lighter and camera. To ensure the V1P Max
records to your memory card properly and without error.
Before you start using a new memory card, you must
format the card within the camera using the format
function. Always backup important data stored on the
memory card before formatting.
To format the memory card, make sure you have inserted
your memory card, then turn on the device by connecting to a
power source. Press REC to stop recording. Then press
the MENU button twice to enter the System Setup Menu.
Use the REC and MIC buttons and go to the Format
setting. Press the OK button to confirm the selection.
You may now disconnect from power. The camera will shut
down after 3 seconds. The camera should begin
recording automatically the next time it is powered on.
Press the Menu
button
twice
Press the
Confirm button
to confirm
formatting the
card

10Step 4: Mount the Rear CameraMount the rear camera as shown below. Use the provided rear
camera cable to connect the rear camera to the front camera.
Rear Camera
Instalation
Plug the Rear Camera
into the Dashcam

11Step 5: Installing the Camera onto the WindshieldPlace the camera on the mount and carefully route the power
cable around the windscreen and tuck in under the trim.
Plug the Car Charger Cable into a 12V DC power outlet or the
car cigarette lighter.
Connect car charger to the camera. The camera will auto-start
recording once powered on.
Route power cable
to the Dashcam
Plug Mini USB
Connector to the
Dashcam
Plug charger into
power outlet or
cigarette lighter

125. Basic OperationDevice PowerThe device is automatically powered on when plugged into a
12V accessory socket or cigarette lighter and received a charge
(i.e.: the vehicle is started).
To turn the device on manually, press and hold the Power
button until the welcome screen appears.
The camera will automatically start recording when power on.
Press and hold the Power
button to turn the device on
manually
Menu SettingsPower the camera On. If the camera is recording, press the REC
button to stop recording.
Hold the MODE button and toggle to the desired mode. Press
the MENU button once to enter the settings menu for a Mode.
Press the MENU button twice to enter the System Settings (Set
up).

13Video RecordingThe camera will automatically start recording when the device
receives charge. The LED lights and red dot will blink red device
when recording. Press the REC button to stop recording.
The camera automatically
starts recording when
powered on
Control playback with OK,
REC and MIC button
Playback mode
EMR Mode To use the Emergency Record Mode, press the "OK/EMR"
button to manually record a 20 second video that is
automatically saved and locked.
View EMR recordings by pressing the menu/playback button.
Video PlaybackPlayback of videos can be done on the device or a computer.
To playback a video on the device, toggle to the
Playback mode. Use the REC and MIC buttons to
toggle to the desired video. Press the OK button to play.
During playback use the OK (pause), REC (rewind) and MIC
(fast forward) buttons to control the video playback.

14To playback a video on the computereither use an
SD card adapter or connect the device to the computer directly
using the USB cable.
To playback a video using an SD card adapter,
remove the memory card and insert it into an SD card adapter.
Place the adapter in the computer.
Connect USB
connector to
computer
Select Mass Storage
To playback a video using USB cable, connect the USB
Cable to the device and the computer. After the device powers
up, press the OK Button to select Mass Storage.
On the computer, navigate to device drive. The videos are
stored at: the “Front_xxx” and “Back_xxx” subfolders
respectively. Locked videos can be found on the memory card
under the “front_emr” and "back_emr" folder.

15Wi-Fi ConnectDownload “Rexing Connect” app from the App Store/Google
Play Store.
1. To access or exit the Wi-Fi feature, press the menu button/
playbackbutton twice to access system settings. Find "Wifi"
from the list, tap OK Button , set the Wi-Fi feature "ON"
and "OFF". Find “SSID” from the system setting > About.
2. Open Wi-Fi settings on your phone, find “SSID” from the
list, tap to connect. (Default password: 12345678)
3. Open the Rexing Connect app, tap “Connect” to enter the
realtime video streaming page.
2.
3.
1.
4. Once connected, the dash cam screen will switch to the
camera view and will display “WiFi Connected” message.
Using the Rexing Connect app, you can view a live preview
of the dash cam screen, start / stop recording, as well as
view and save your captures with your mobile device.
For further instruction regarding the Wi-Fi Connect feature,
please visit www.rexingusa.com/wi i-connect/.

16Parking MonitorConnect the dash cam to the Smart Hardwire Kit (need to purchase
separately) to activate the parking monitor function. Please visit
www.support.rexingusa.com to watch a video tutorial.
GPS Logger When connected to the camera, it will record the speed and
location of your vehicle as you drive.
You can then access this information while playing back your
recordings using the GPS Video player (For windows and Mac,
available at rexingusa.com).
The dash cam will automatically search for the GPS signal once
it’s connected to the power source. Press the MENU
button twice and go to System Settings. Toggle the GPS
Speed Unit setting, and select your favorite speed unit.
After a GPS signal is found, the screen icon will turn from not
connected to active - as per the below icons.
GPS function active
GPS Signal
(not connected)

17Taking PhotosTo take a photo, stop video recording
and hold down the REC button.
To view a photo, stop video recording
and hold on MENU button to
the Playback Mode.
Press the REC and MIC Buttons to
toggle through your photos.
To delete a photo, stop video
recording and toggle to the Playback
Mode and toggle through the videos
and photos to the one you want to
delete.
Hold the MENU to toggle the Delete
option.
Press the OK Button and select
Delete Current or Delete All.
Toggle to the
Playback mode and
select a photo to view
Toggle to the Delete
option
Choose
the desired
option

181.概説REXINGをお選びいただきありがとうございます! 私たちはお客様が私たちと同じくらいこの新製品を気に入っていただくことを願っています。サポートが必要な場合、または製品を改善するための提案がある場合は、ご連絡ください。[email protected]に電子メールを送ることができます。当社のサポートチームは、できるだけ早くお客様からのお問い合わせにお答えいたします。でいつも驚きを。こちらから最新情報をチェックしてください。https://www.facebook.com/rexingusa/
https://www.instagram.com/rexingdashcam/
https://www.rexingusa.com/support/registration/
FacebookInstagramホームページ 製品サポート

191. 概説2.本製品の同梱物1.RexingV1PMaxドライブレコーダー2.フルHDリアカメラ3.リアカメラケーブル(20フィート)4.車の電源コネクタ(12フィート)5.3M接着マウント6.USBケーブル7.クイックスタートガイド8.安全ガイド9.ケーブル管理ツール2.
5.
4.
6. 3.
7. 8.
9.
1.
V1P MaxQuick Start Guide
FR Guide de démarrage rapide de la V1P MaxIT Guida di avvio rapido V1P MaxDE V1P MaxSchnellstartanleitung
SP Guía de inicio rápido V1P MaxJP V1P Maxクイックスタートガイド

203.カメラの概要1.OK(確認)ボタン/緊急ロックボタン2.UPナビゲーションボタン/録音ボタン*3.電源ボタン/画面切り替えボタン4.Downナビゲーションボタン/マイクボタン**5.メニューボタン/モードボタン6.マイクロSDカードスロット7.リセットボタン8.USB充電ポート9.リアカメラポート10.G P Sロガーポート ( G P Sロガーを内蔵)*LEDが赤く点滅している時、カメラは録画中です。**LEDが白く点灯している時、機器は充電中または電源が入っている状態です。2. 4. 5.
3.
1.
9.
10.
6.
8.
7.
This manual suits for next models
1
Table of contents
Languages:
Other Rexing Dashcam manuals

Rexing
Rexing V1P User manual

Rexing
Rexing M2 User manual

Rexing
Rexing V1P SE User manual

Rexing
Rexing M1 User manual

Rexing
Rexing MTC1 User manual

Rexing
Rexing M1 Pro User manual

Rexing
Rexing V1P Pro User manual

Rexing
Rexing V33 Plus User manual

Rexing
Rexing V5 Plus User manual

Rexing
Rexing V1 Max User manual