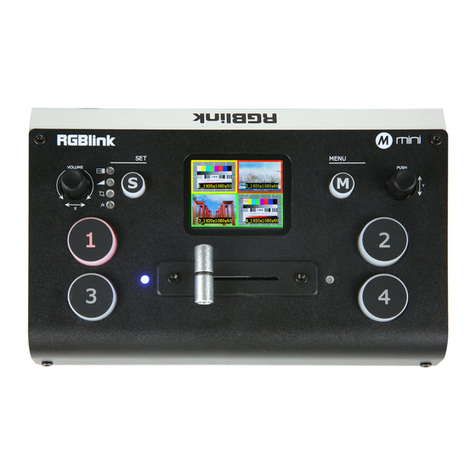
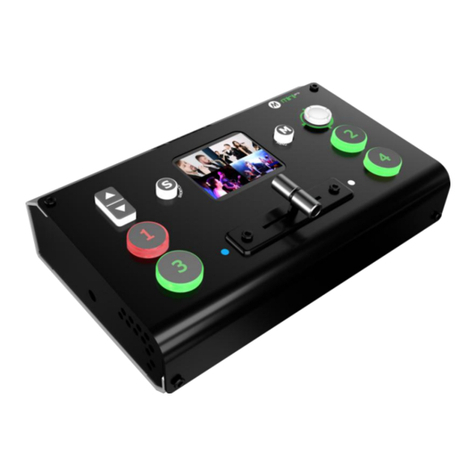
RGBlink Mini User manual

● USB capture video complying with UVC for live streaming
● 4CH HDMI inputs
● 2’’TFT display on board to Live preview four inputs
● Auto cut and manual switch (T-Bar)
● 14 transition effects on T-Bar
● Support PIP (Picture-In-Picture)
● Audio offers embedded or external source to select
● Support switch between 6-Picture PVW and PGM to HDMI Out
● Advanced features on mini+
◎Logo
◎Chroma Key
◎PTZ control
● Control by PC or mobile phone (via APP)
● Compact design
Quick Start

© Xiamen RGBlink Science & Technology Co., Ltd.
1 / 35
CONTENTS
Product Introduction...................................................................................................................................................2
Packing Configuration................................................................................................................................................. 3
Hardware Orientation................................................................................................................................................. 4
Front Panel.......................................................................................................................................................... 4
Interface Panel.....................................................................................................................................................5
Use Your Product......................................................................................................................................................... 6
MENU.................................................................................................................................................................. 6
Input............................................................................................................................................................ 6
HDMI........................................................................................................................................................... 7
USB3.0......................................................................................................................................................... 7
Audio........................................................................................................................................................... 7
IP Setting......................................................................................................................................................8
LANGUAGE.................................................................................................................................................. 8
Factory Reset...............................................................................................................................................8
INFO.............................................................................................................................................................9
Button S............................................................................................................................................................... 9
MIX.............................................................................................................................................................. 9
MODE........................................................................................................................................................ 10
PIP..............................................................................................................................................................10
FX............................................................................................................................................................... 10
Switch Input Source...........................................................................................................................................11
PIP (Picture-In-Picture or Picture by Picture) Operation.................................................................................. 11
Software Operation...........................................................................................................................................12
OBS Streaming...................................................................................................................................................24
OBS Setting................................................................................................................................................24
Streaming Setting.............................................................................................................................................. 26
Upgrade............................................................................................................................................................. 28
Contact Information.................................................................................................................................................. 34

© Xiamen RGBlink Science & Technology Co., Ltd.
2 / 35
Product Introduction
mini/mini+ is a “mini” signal switcher and mixer which is able stream 6-picture PVW or PGM from any one out
of the 4 HDMI inputs to any live broadcasting platform via third party live streaming software such as OBS. It
adopts compact design, equipped with a 2 inch TFT screen to preview the 4 inputs in real time. 14 transition
effects on board to collaborate with T-Bar to do transition switching. Along with feature of seamless switch,
there are other outstanding features such as audio embedding, de-embedding, and automatically identifying
color depth of RGB4:4:4, YUV4:4:4, YUV4:2:2,YUV4:2:0. mini+ is based on mini but with advanced features
including Chroma Key, Logo, PTZ camera control. It is also easy to operate either on board or on dedicated app
XPOSE on PC.
System Connection Diagram
mini /mini+System Connection Diagram

© Xiamen RGBlink Science & Technology Co., Ltd.
3 / 35
Packing Configuration
Note:
Power adapter of US/EU standard supplied as standard accessory.
Power Adapter
USB3.0 Cable

© Xiamen RGBlink Science & Technology Co., Ltd.
4 / 35
Hardware Orientation
Front Panel
TFT display
To display 4 inputs and menu
PUSH/Y
1. Knob, turn to select menu item, push to confirm
2. Work as a quick button to switch HDMI Out between 6-Picture
PVW and PGM when TFT is under the state of previewing 4 inputs.
3. On mini+, control camera lens position, moving up and down
under PTZ control menu-Pos.
4. On mini+, control camera lens zoom in and out under PTZ control
menu-Zoom.
M( menu)
Menu and Back Button
S
Function Select button, to select Transition effect, Switch Mode (Fast
or T-Bar), PIP and FX (reserved licensed feature for future)
VOLUME/X
1. Turn to adjust volume of PGM
2. On mini+, control camera lens move left and right under PTZ
control menu.
1,2,3,4
4 inputs, red is on air (PGM), static green is signal standing by to
switch, flash green is the ready to be switched
T-Bar
Manual switch, push to left end or right end to switch signal to PGM.

© Xiamen RGBlink Science & Technology Co., Ltd.
5 / 35
Interface Panel
HDMI OUT
1 HDMI Output port, connect to display to show Preview (6
pictures) or PGM.
HDMI IN
4 HDMI Inputs, connect to input source from HD camera or PC
DC 12V
1 DC Jack for power input, connect to 12V/4A power adapter.
LAN
Communication port to link dedicated software for control
USB
USB3.0 output, capture signal via third party streaming software
and push to live broadcasting websites
AUDIO IN/OUT
AUDIO In, analog audio input port, connect to microphone
AUDIO OUT, analog audio output port, connect to loudspeaker.

© Xiamen RGBlink Science & Technology Co., Ltd.
6 / 35
Use Your Product
MENU
Main Menu
Input
Push MENU and select the first menu item <Input>
Push knob to enter <Input> menu
When mini is power on, the native TFT
display show starting up page.

© Xiamen RGBlink Science & Technology Co., Ltd.
7 / 35
HDMI
USB3.0
Audio
Push MENU and select the second menu item <HDMI>
Push knob to enter <HDMI> menu
HDMI means HDMI output, select Preview output and
PGM output for HDMI.
Output:Preview or PGM
Format:1920×1080@60
Push MENU and select the third menu item<USB3.0>
USB3.0 means USB3.0 output ,push knob to enter
<USB3.0>menu,select Preview output and PGM output
for HDMI.
Output:Choose PGM or Preview
Format:1920×1080@60
Choose <AUDIO>
SOURCE:EMBEDED or EXTREANAL
AUDIO BAR:ON/OFF

© Xiamen RGBlink Science & Technology Co., Ltd.
8 / 35
IP Setting
LANGUAGE
Factory Reset
LANGUGE, select Chinese or English
Factory Reset: Yes or No
Manually set IP address

© Xiamen RGBlink Science & Technology Co., Ltd.
9 / 35
INFO
Button S
On mini push button S, the TFT will show the transition effect menu <MIX>.The <MIX> led indicator beside will
light up. Push again, it will skip to next menu MODE, and again to PIP and again back to MIX . On mini+, pushing
S button is also to open up <MIX>, <MODE>, <PIP> one by one before FX but keep pushing S button, there is PTZ
control menu available on mini+. The led indicators beside light up meaning the corresponding feature menu is
open. Use knob to select and confirm the desired items after it enters the menu.
MIX
INFO:show the SN, IP,
MAC,MCU version and VIDEO
version.
Push button S once to open up the transition effect
menu, Use knob to select the desired transition effect
icon and push the knob to confirm.

© Xiamen RGBlink Science & Technology Co., Ltd.
10 / 35
MODE
PIP
FX
Push the button S twice to open up MODE menu.
MODE:FAST or T-Bar
TIME:0.5~5.0S
Choose FAST, the switching will be with transition effect
in set time.
Choose T-Bar, the switching will be with selected
transition effect by pushing T-Bar
Push Button S three time to open PIP menu.
PIP menu offers 9 layouts for main picture and sub picture.
FX only works on mini+ and it leads to PTZ control menu on device.
Camera:choose the desired camera from index 1~8,or ALL. One
mini+ is able to connect up to 8 PTZ cameras.
Load View:from View index 1~11,
Save View:to View index 1~11,
In terms of “View” it means lens position and zoom setting on PTZ
control.
Control:POS(position)and ZOOM(Zoom in/out)
Position control: use X knob to control camera lens move left and
right, Y knob to move camera lens up and down.
Zoom control:use Y knob to zoom in and out.
Enable:Enable or disable the LAN communication of Camera 1~8
IP Setting:Match the IP address of those PTZ cameras connecting
to mini+

© Xiamen RGBlink Science & Technology Co., Ltd.
11 / 35
Switch Input Source
After selecting transition effect and switch mode
1.Under Fast+Time mode, pushing green button will switch the input source in the selected time with set
transition effect. After switching , green turns to red.
2.Under T-Bar mode, pushing green button, it will flash and push T-bar to the end (left or right), the source will
be switched with selected transition effect. After switching , green turns to red.
Note: when T-Bar is not in the end position, users can not select any source .
PIP (Picture-In-Picture or Picture by Picture)
Operation
1. Decide which source to be the main picture, select and switch it to PGM when PIP is OFF
2. Select the PIP layout mode in PIP menu
3. Select the input source and switch it to sub-picture on PGM
4. After switching, the selected green button turns to red.
after PIP mode is selected, the background can not be changed unless turn off the PIP mode and restart
the above steps.

© Xiamen RGBlink Science & Technology Co., Ltd.
12 / 35
Software Operation
After software is installed, click the icon
XPOSE and login the software.
After searching, all available mini devices in
the sub-net can be found, up to 128 devices
can found if there are.
Click Search to search mini
device.
Install dedicated software named XPOSE to
control mini or mini+.
Right click the setup exe file .
Choose Run as administrator to open the
exe and install the software.

© Xiamen RGBlink Science & Technology Co., Ltd.
13 / 35
Select the desired device by SN and IP and
enter the management interface. The
software interface is a simulation of
operation panel on real mini device.
For example, clicking Button M can open
up menu as on the device. If it is the first time for
you to use mini/mini+ we suggest you watch our
User Guide video.
Click the drop down arrow and click to play the
user guide video.

© Xiamen RGBlink Science & Technology Co., Ltd.
14 / 35
INPUT INFO
HDMI Output
USB3.0 Output

© Xiamen RGBlink Science & Technology Co., Ltd.
15 / 35
MIX
Choose switch time and transition
effect.

© Xiamen RGBlink Science & Technology Co., Ltd.
16 / 35
Live Streaming
Capture Device:choose RGBlink USB3.0 Capture
H.265: When it is ON, users can watch 4 inputs
streaming back on XPOSE software.
Import the related OBS application if users need
to do live streaming, click Relate to confirm.
OBS: slide on to start streaming.
Note: H.265 and OBS cannot work at the same
time. User choose either H.265 or OBS, not
both.
PIP
Choose layout mode for PIP

© Xiamen RGBlink Science & Technology Co., Ltd.
17 / 35
TEST PATTERN
AUDIO

© Xiamen RGBlink Science & Technology Co., Ltd.
18 / 35
Password Protection
Set password for the device. After password is set,
password will be required when enter the software
operation interface.
HDMI Output Setting

© Xiamen RGBlink Science & Technology Co., Ltd.
19 / 35
IP Setting
Manually set Gateway, MASK and IP for the
device.
Other manuals for Mini
6
This manual suits for next models
1
Table of contents
Other RGBlink Switch manuals

RGBlink
RGBlink VSP 628PRO User manual

RGBlink
RGBlink Mini User manual

RGBlink
RGBlink M2 User manual

RGBlink
RGBlink VENUS X1PRO-E User manual

RGBlink
RGBlink mini pro User manual

RGBlink
RGBlink VSP 168HD User manual

RGBlink
RGBlink VSP 1314 User manual

RGBlink
RGBlink mini pro User manual

RGBlink
RGBlink VENUS X1 PRO-E User manual

RGBlink
RGBlink Mini User manual