RHINOMOTIVE R3106 User manual

USER MANUAL
VEHICLE POSITIONING
HYDRAULIC JACK - 12IN
Scan QR Code
RHINOMOTIVE LTD - UK
71-75 Shelton Street, London, United Kingdom
www.rhinomotive.com
PN: R3106

1. UNPACKING
2. ASSEMBLY
3. BLEEDING/VENTING TRAPPED AIR
When unpacking the Vehicle Positioning Hydraulic Jack, carefully inspect each component for damage that may
have occurred during transit.
1. Check for any missing or damaged components and report these to the supplier for instructions.
2. Ensure all packaging materials are disposed of as per your local council guidelines.
The Vehicle Positioning Hydraulic Jack comes fully assembled. No assembly is required!
NOTE: Before use, the Hydraulic system of the Vehicle Positioning Jacks, may need to be purged. Some air may be
present in the hydraulic system due to movement during shipping. Air bubbles can become trapped inside the
hydraulic system, preventing the jack from functioning, or reducing its efficiency. Purge air from the system if
efficiency drops.
1. Once the product is assembled, open the Release Valve (4) by rotating it 1-1/2 turns, counterclockwise.
2. Using the foot pedal (2), rapidly pump continuously 15-20 full strokes to purge air from the hydraulic system.
3. Close the Release Valve (4) clockwise until tight (DO NOT over-tighten).
4. If the Vehicle Positioning Jacks, (4) does not feel like it is operating correctly, repeat the above process until all air
has been purged from the system. If the problem continues contact RHINOMOTIVE Customer Service.
2/6 www.rhinomotive.com
PN CAPACITY NET WEIGHT WORK RANGE
R3106 680 KG 14 KG 33.5 CM - 650 CM
4. PREPARING WORK AREA
Before using vehicle positioning jacks, it is important to prepare work area properly. Follow this procedure each
time the vehicle positioning jacks are used to help prevent property damage and or serious injury.
1. Keep work are clean, free of clutter and well lit. Cluttered and dark workplaces can cause accidents.
2. Keep children and bystanders away while operating this jack. Distractions can cause you to lose control, so
visitors should remain at a safe distance from the work area.
3. Be aware of all power lines, electrical circuits, water pipes and other mechanical hazards in your work area,
particularly those hazards below the work surface hidden from the operators view that may be unintentionally
contacted and may cause personal harm or property damage.
4. Be alert of your surrounds. Using Jacks in confined work areas may put you dangerously close to cutting tools
and rotating parts.

3/6
www.rhinomotive.com
5. OPERATING INSTRUCTIONS
6. MAINTENANCE
WARNING! Only use the vehicle positioning jack on a flat & leveled surface.
Ensure your work area is clean and tidy before use of the vehicle positioning jack.
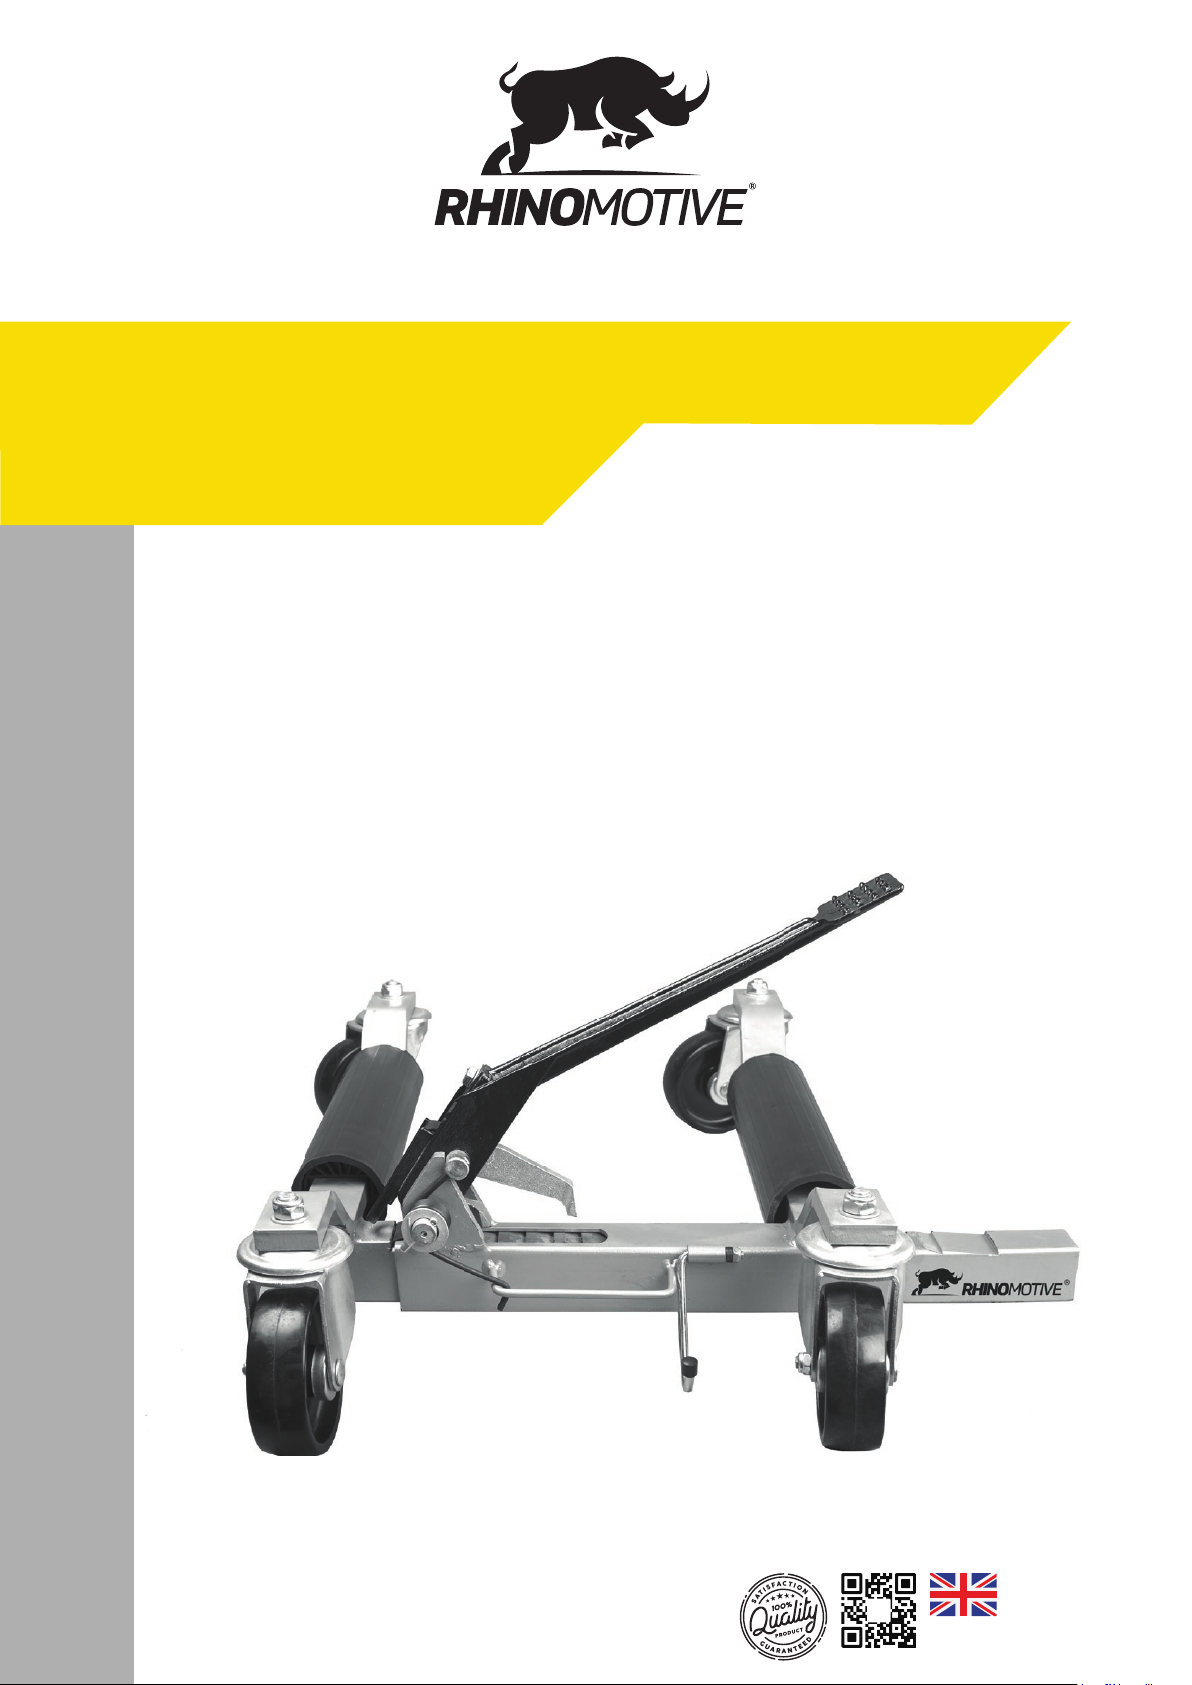
1. Position the Vehicle Positioning Jack beside the vehicles wheel
2. Remove the pedal retaining clip (3).
3.Ensure the rear locking castors (1) are UNLOCKED in the OFF position.
4. Ensure the pump release valve (4) is open, by rotating 1- 11/2 turns anti-clockwise.
5. Spread the jack arms apart until they fit the vehicle wheel.
Note: Ensure tyres are sitting on the steel rollers (6).
1. Close the pump release valve (4) by rotating clockwise, DO NOT overtighten
2. Pump the foot pedal (2) until the tire is raised from the ground, and the locking pin hole is exposed.
3. Install the safety locking pin (7) and LOCK the rear castors in the ON position.
4. Release pressure from the ram using the pump release valve (4), as locking pin will hold the weight.
Note: It is not recommended that you leave the ram pressurised while not in use, as it may lead to premature failure.
1. Repeat steps 1 - 8 on the remaining wheels you wish to lift.
2. Once the vehicles wheels are raised on both sides/or all four wheels (and the rear castors (1) are not locked), the
vehicle can easily be moved by pushing on the side of the vehicle to the desired position.
3. Once the vehicle has been located to the desired location, ensure both rear locking castors (1) are LOCKED.
4. To lower the vehicle, UNLOCK the rear locking castors (1) by putting them in the OFF position, remove the safety
locking pin (7) and open the pump release valve (4) by turning anti-clockwise 1- 11/2 turns.
5. Grasp the grab handle, located on the right of the pump release valve (4) and slide the jacks from underneath the
vehicles wheels.
Caution: Prior to making any adjustments ensure the pressure is removed from the hydraulic system.
Caution: These procedures are in addition to the regular checks and maintenance explained as part of the regular
operation of the hydraulically operated tool. Lubrication of this product is critical. Any contaminants such as dirt,
rust, etc. may damage internal components of the hydraulic assembly.
1. BEFORE EACH USE, inspect the general condition of the tool. Check for:
a. loose hardware or housing.
b. misalignment or binding of moving parts.
c. cracked or broken parts.
d. any other condition that may affect its safe operation.
2. When not in use, store the equipment in a dry location with the vehicle positioning jacks fully retracted with the
pressure released via the pump release valve (4).
3. Periodically check the unit for signs of rust or corrosion. Clean exposed areas with a clean oiled cloth.
4. Check and maintain the hydraulic oil level. Only use high quality Hydraulic Jack oil.
5. Lubricate the hydraulic piston, linkage, and foot pedal with a light machine oil.
6. Lubricate the castors and axles with bearing grease.
7. Clean all the surfaces regularly and maintain all labels and warnings on the vehicle positioning jacks.
8. Clean the castors regularly to ensure they are free from dirt etc. before use. Doing so will prevent
possible damage.

4/6 www.rhinomotive.com
8. PERSONAL SAFETY
9. CARING THE ENVIRONMENT
7. SAFETY INSTRUCTIONS
1. DO NOT operate the jacks on surfaces which are not leveled. Jack must be used on hard, flat surfaces only. The
vehicle may shift as soon as the jacks lift the wheel from the surface.
2. DO NOT overload the jack beyond the Maximum Load Capacity which is 680kg per unit. Refer to your vehicle’s
manual for weight of your car.
3. DO NOT start the vehicles engine or drive while the jacks are in use. Jacks are designed for hand maneuvering of
vehicles only.
4. DO NOT use the jacks to lift tyres wider than 12” or 300mm. Refer to the side wall of your tyres. (eg. 265/40R18
tyres are 265mm wide).
5. DO NOT attempt to push the jack over obstacles. They are designed to be used on hard, smooth and flat level
surfaces only.
6. After lifting, be sure to ALWAYS secure the jacks in place with the locking pin. To lower the vehicle, remove the
locking pin before using the release valve.
7. Do NOT force the tool. Tools do a better and safer job when used in a manner for which they are designed. Plan
your work and use the correct tool for the job.
8. When tools are not in use, store in a dry, secure place out of reach of children. Inspect tools for good working
conditions prior to storage and before re-use.
9. ONLY use accessories which are recommended by the manufacturer for your model. Accessories that may be
suitable for one tool may create a risk of injury when used on another tool.
10. NEVER leave the jacks unattended, while in use.
1. Stay alert. Watch what you are doing and use common sense when operating the tool. Do not use the tool while
tired or under the influence of drugs, alcohol, or medication. Inattention while operating the tool increases the
risk of injury to persons.
2. Dress properly. Do not wear loose clothing or jewelry. Tie long hair. Keep hair, clothing, and gloves away from
moving parts. Loose clothes, jewelry, or long hair increases the risk of injury to persons because of being caught
in moving parts.
3. Do not overreach. Always keep proper footing and balance. Proper footing and balance enable better control of
the tool in unexpected situations.
4. Use safety equipment. safety shoes must be used for the applicable conditions.
5. Have a qualified person maintain the equipment in good condition. Keep it clean for best and safest performance.
6. If the equipment needs repairing and/or there are parts that need to be replaced, have it repaired by authorized
technicians. Only use the replacement parts supplied by the manufacturer.
When a tool is no longer usable it should not be disposed of with household waste, but in an environmentally
friendly way. Please recycle where facilities exist. Check with your local council authority for recycling advice.
Recycling packaging reduces the need for landfill and raw materials. Reuse of recycled material decreases pollution
in the environment. Please recycle packaging where facilities exist. Check with your local council authority for
recycling advise.

5/6
www.rhinomotive.com
10. TROUBLESHOOTING
11. PARTS LIST
Symptom Cause Remedy
Pump unit will not work 1. Release valve (4) is open.
2. Dirt on valve seals.
3. Worn seals.
1. Close the release valve (4).
2. Replace the oil.
3. Should be checked by a professional.
Pump unit will not produce pressure 1. The reservoir could be overfilled or low
on hydraulic fluid.
2. Air trapped in the system.
3. Leaking seals.
1. Check the fluid level. Do not
overfill.
2. Open the release valve (4).
Pump the handle a couple of full strokes.
Close the release valve (4).
3. Should be checked by a professional.
Pump unit will retract completely 1. Air trapped in the system.
2. The reservoir could be overfilled or low
on hydraulic fluid.
1. Open the release valve (4) .
Pump the pump peddle (2) a couple of full
strokes. Close the release.
2. Check the fluid level is correct. Do not
overfill.
Ram will not fully extend Low on hydraulic fluid. 1. Check that oil level is correct.
2. Check oil with ram fully retracted.
3. Add hydraulic fluid.
Fluid leaking from release valve Worn O-ring. 1. Replace O-ring.
2. Should be checked by a professional.
Fluid leaking around hydraulic ram piston Worn seal or piston. 1. Should be checked by a professional.
No. Description Qty
1 Inner Body & Axle Assy 1
2 Inner Body & Axle Assy 1
3 Roller 2
4 Roller Raceway 4
5 Wheel Frame 4
6 Wheel 4
7 Lock Nut 4
8 Foot Pedal 4
9 Small Pawl 1
10 Big Pawl 1
11 Spring 1
12 Roll Pin 1
13 Torsion Spring 1
14 Washer 1
15 Circlip 1
16 Roll Pin 1

17 Spring Plate 1
18 Screw 1
19 Wrench 1
20 Hook 1
21 Limit Block Plate 1
22 Limit Block 1
Scan QR Code
6/6 www.rhinomotive.com
Table of contents
Other RHINOMOTIVE Jack manuals