Ricoma MT-1502 User manual

MT-1502 MULTI-HEAD
QUICK START GUIDE:
RICOMA INTERNATIONAL CORPORATION
3450 NW 114th Ave., Miami, FL 33178
Telephone: (305) 418-4421 | Toll Free: 1-888-292-6282
www.ricoma.us
Copyright 2017 Ricoma International Corporation
All rights reserved

Ricoma Quick Start Guide2
LEVELING THE MACHINE 06
POWER CORD CONNECTION 07
SECURITY LOCK 07
THREAD RACK, PANEL AND EMERGENCY STOP 08
Raising the thread rack 08
Adjusting the position of the panel 08
Emergency stop button 09
THREADING 09
Initial threading 09
How to replace a spool 11
Threading sequence 12
Knot tying 15
THREAD BREAK TROUBLESHOOTING 15
ADJUSTING THE TIMING OF A NEEDLE AND HOOK 16
REASONS WHY THREAD BREAKS OCCUR 16
The garment or fabric 16
The embroidery design 17
Thread break prevention 17
NEEDLES 17
Anatomy of the needle 17
How long do needles last? 18
How do I know when to change a needle? 18
Why do needles break? 18
Changing a needle 18
Selecting a needle 19
BLADE SIZES 20
Size 75/11 20
Size 70/10 20
Size 65/9 or 60/8 20
Size 80/12 20
Size 90/14 20
Needlenishes 20
Types of needlepoints 21
THE RELATIONSHIP BETWEEN NEEDLE AND THREAD 22
THE BOBBIN 22
Spun 23
Filament 23
Magna glide bobbins 23
INSERTING THE BOBBIN 24
TENSION 25
TABLE OF CONTENTS

Ricoma Quick Start Guide 3
Spring lever 25
Bobbin tension 26
Adjusting the bobbin tension. 26
Adjusting the top thread tension 27
BOBBIN FIBER CHOICES 29
Cotton 29
Nylon 29
Continuouslamentpolyester 29
Spun polyester 29
TOP THREAD 30
Fiber choices 30
Rayon thread 30
Polyester thread 30
Metallic thread 31
Cotton thread 31
Thread consumption 32
BACKING 32
Cut-away 33
Tear-away 34
Specialty backings 34
Topping 34
Foam 34
Poly mesh backing 34
Fusible backing 35
BACKING AND NEEDLE RECOMMENDATIONS 35
Canvas 35
Canton fleece 35
Coated or waterproof fabrics 35
Corduroy 35
Cotton sheeting 35
Denim 35
Dress shirt (woven) 36
Golf shirt 36
Headwear 36
Leather and vinyl 36
Lingerie or silk 36
Lycra or spandex 36
Nylon windbreaker 36
Satin jacket 36
Sweater knit 37

Ricoma Quick Start Guide4
Sweatshirt 37
T-shirt 37
Terry cloth 37
HOOPS AND BRACKETS 37
HOW TO ATTACH THE FLAT FRAME BRACKETS 38
HOW TO REMOVE THE FLAT FRAME BRACKETS 39
HOW TO INSERT THE HOOP INTO THE MACHINE 40
HOW TO REMOVE THE HOOP FROM THE MACHINE 40
HOW TO HOOP AND HOOPING RECOMMENDATIONS 41
HOOPING A POLO OR GOLF SHIRT 43
HOOPING A HOODIE OR JACKET 44
HOOPING PLACEMENT RECOMMENDATIONS 45
Beach towels 45
Bath towels 45
Hand towels 45
Fingertip towels 45
Washcloths 45
Napkins 45
Pillowcases 45
Sheets 45
Robes – Men’s 45
Robes – Women’s 45
HOOPING CAPS 46
Hooping the front or sides of a cap 46
Hooping the back of the cap using a round hoop 47
HOW TO INSTALL THE CAP DRIVER 48
HOW TO REMOVE THE CAP DRIVER 49
HOW TO INSTALL THE EXTENDED TABLE 49
ATTACHING THE SASH FRAME 51
OPERATING SPEEDS FOR FLATS AND CAPS 52
OPERATION PANEL AND KEY FUNCTION INTRODUCTION 53
NETWORK CONNECTION 55
HOW TO UPLOAD A DESIGN 55
DELETING A DESIGN FROM THE MACHINE’S MEMORY 56
EXPORTING A DESIGN FROM THE MACHINE’S MEMORY 57
EMBROIDERY STATUS SWITCHING 57
DESIGN SET PARAMETERS 59
PARAMETER RANGES AND FUNCTIONS 59
SELECTING THE PRESET HOOPS ON YOUR MACHINE 62
TRACING THE EMBROIDERY AREA 63
TABLE OF CONTENTS

Ricoma Quick Start Guide 5
CONTOURED TRACING 63
EMBROIDERY PARAMETERS 63
COMPREHENSIVE MENU SETTINGS 63
RETURN TO ORIGIN (STARTING POINT) 64
FRAME OFFSET HOOP OPERATION 64
GO TO ENDPOINT 64
NEEDLE SWITCH DISPLAY/WORKING NEEDLE 64
SET COLOR SEQUENCE 65
SET COLOR CHANGING SEQUENCES 65
APPLIQUE OFFSET, LOW SPEED EMBROIDERING AND NEEDLE BAR PLACEMENT 66
CHANGE WORKING MODE 67
EMBROIDERING MODE SWITCHING– FLOATING MODE 67
OPERATION OF RETURNING TO EMBROIDERING POINT IN POWER FAILURE 68
EMBROIDERY RUNNING SPEED STATUS 69
ON-BOARD LETTERING 69
MANUAL TRIMMING 71
START AND STOP EMBROIDERING 71
MACHINE HEAD INDICATOR LIGHTS 71
HOW TO REWIND YOUR DESIGN 72
EMBROIDERY PROCESS FROM START TO FINISH 72
1. Exit work status 72
2. Select a design 72
3. Select a hoop 73
4. Select the color sequence 73
5. Trace your design 74
6. Press start 74
CAP OPERATION 74
CAP SELECTION 75
CAP FRAMING 75
CAP SEWING TECHNIQUES 75
CAP PROGRAMMING 76
LUBRICATION 76
CARE OF THE BOBBIN CASE 79
COMMON ERRORS 79
Emergency stop error 79
Needle error / color change error 80
Main axis error 80
Resolving a thread break 81
Bobbin runs out 81

Ricoma Quick Start Guide6
Leveling your embroidery machine is essential, as
this step will ensure your machine is secured into
place. Skipping this step may result in injury, loss of
registration of your design, movement of the machine
while sewing, and other issues.
Before leveling your machine, make sure the four
level pegs are attached to the stand legs. You will nd
these pegs inside your accessory box. See Figure 1.
To attach the level pegs, insert the holding screws
on each of the stand legs, and rotate each screw
clockwise. Then, secure the hex nut using the black
wrench included in your toolkit.
To level your machine, take all four level pegs on your
machine stand and rotate them counterclockwise by
hand until they reach the oor. Once the pegs have
reached the oor, rotate each nut clockwise using the
provided wrench. Do NOT skip this important step, as
this will to ensure the pegs are xed to the ground.
Once you have tightened all four pegs, the wheels on
the machine’s stand will lift, immobilizing the stand.
Last, conrm the stand is secure. If it is no longer
able to move with the wheels, you have correctly
completed this step. See Figure 2.
LEVELING THE MACHINE
Figure 2
Figure 1

Ricoma Quick Start Guide 7
TURNING ON YOUR MACHINE
–POWER CORD CONNECTION
SECURITY LOCK
The power socket is located on the right side of the machine’s body.
Connect your power cord into the socket displayed in Figure 3. Then,
plug the power cord into a power outlet.
We highly recommend using a power supply (surge protector) rather
than connecting the cord directly into the wall.
The power switch can be found above the power socket. The switch
displays a circle (O) and a line (—). (O) indicates the machine is off
and (—) indicates the machine is on.
The Ethernet cable socket is located to the left of the power cord
connection. See Figure 3.
Your Ricoma MT-1502 may have a security lock in between the machine heads. Before operating your
machine, be sure to remove this lock. See Figure 4.
To locate the security lock, remove the metal cover displayed in Figure 5. The cover is attached to two
magnetic locks. To remove the cover, simply slide it off. To remove the security lock, loosen its screws
using an Allen wrench. You will nd a set of Allen wrenches in your toolkit. Once the security lock is
removed, return the metal cover to its original position.
Figure 3
Figure 5Figure 4
Ethernet cable

Ricoma Quick Start Guide8
THREAD RACK, PANEL
AND EMERGENCY STOP
Adjusting the position of the panel
Raising the thread rack
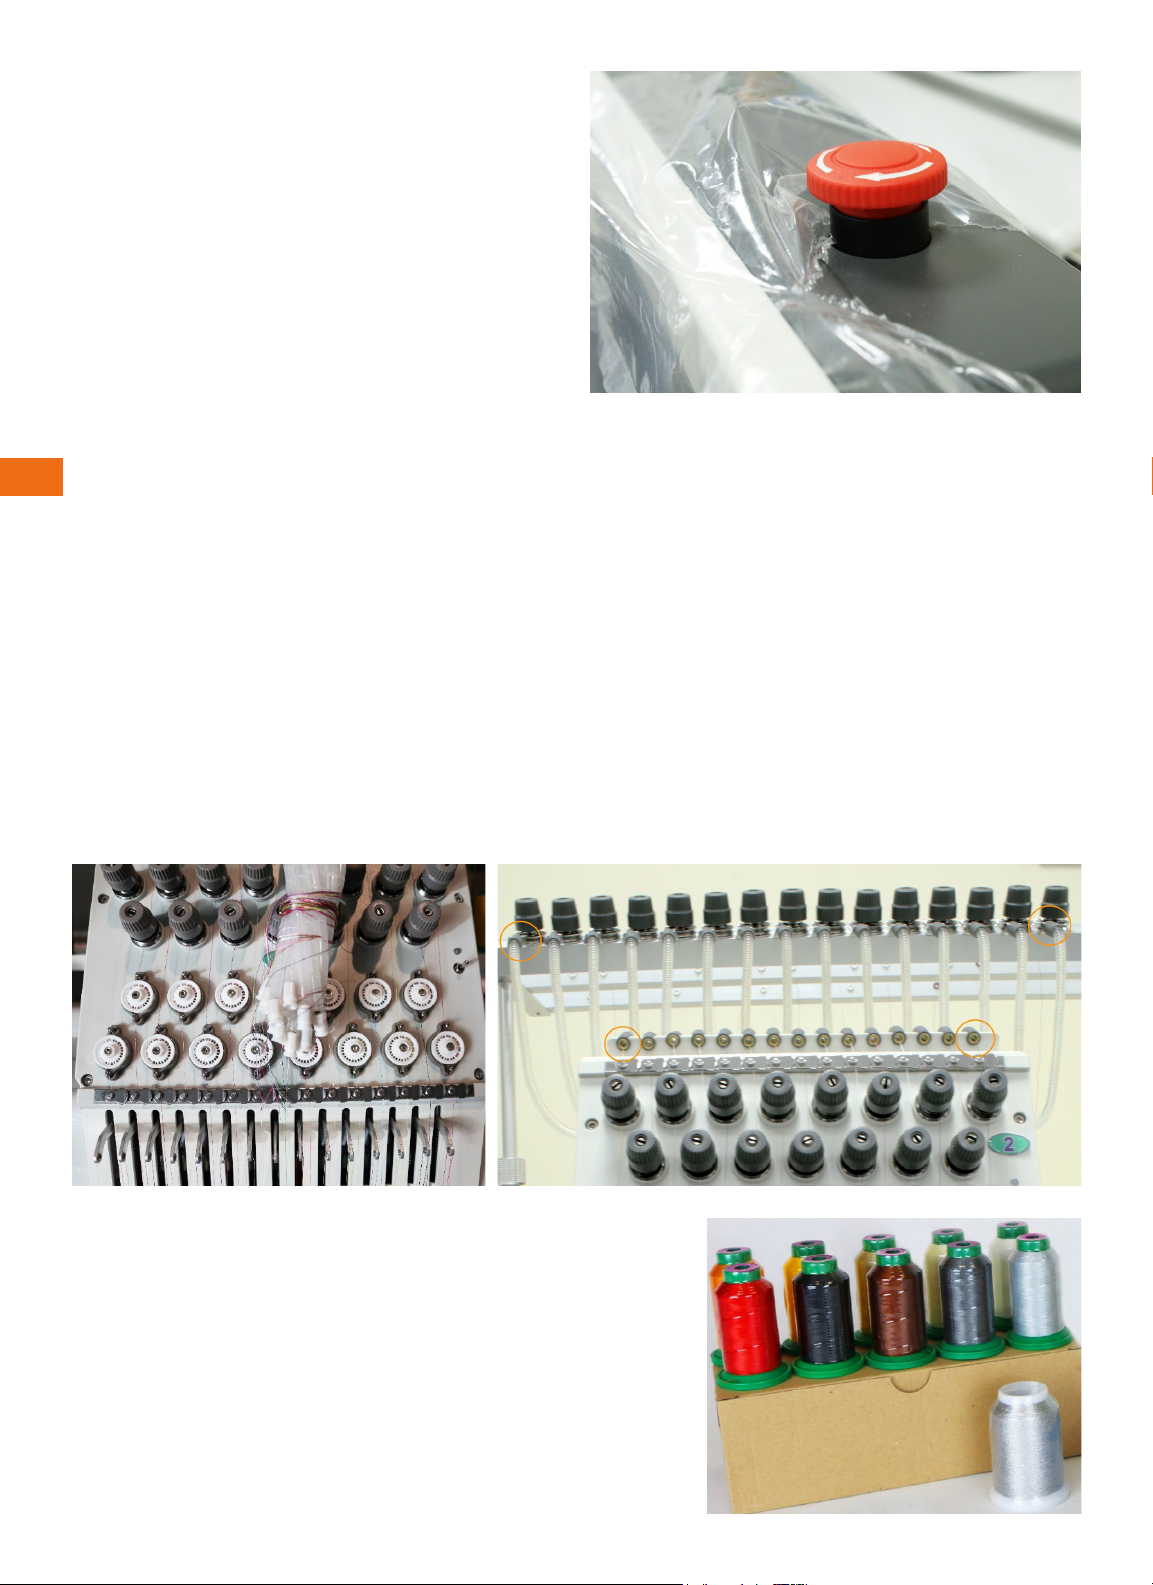
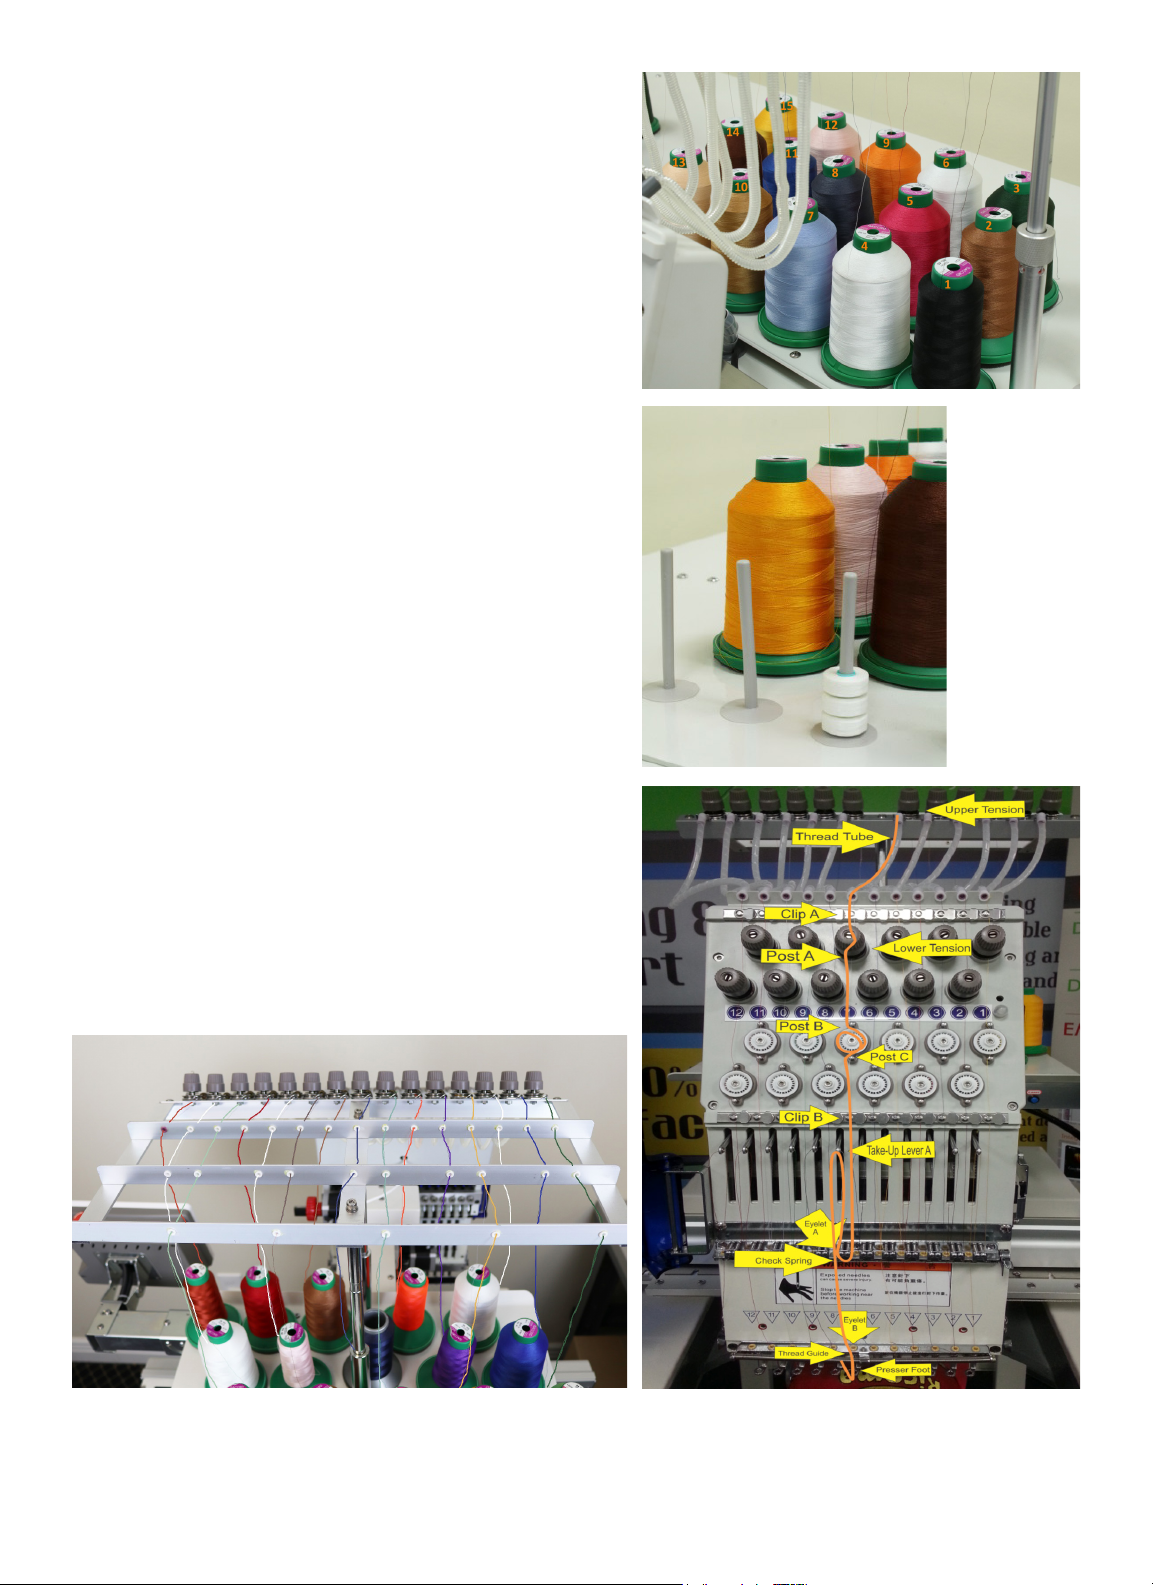
Before threading your machine, you must rst raise the thread rack. See Figure 6. To do so, locate the
knob on each side of the thread rack support. See Figure 7. Rotate each knob counterclockwise to
loosen them. Now, lift the thread rack as far up as possible, making sure both sides of the rack remain
even as it rises. Last, rotate each knob clockwise to secure the rack into place.
First, be sure to remove the plastic wrap that
protects the panel. After removing it, you will nd
two Phillip screws, which will allow you to adjust
the placement of the panel. Your touch-screen
panel can be adjusted in two ways: up and down
or from side to side. To adjust the panel, use the
Phillip screw driver included in your tool box.
To move the panel from side to side, loosen the
screw with the adjustment path located on top of
the panel arm. See Figure 8. Then, adjust the panel
assembly until it’s facing the desired position.
Next, tighten the screw.
To move the panel up or down, loosen the screw
with the adjustment path located on the side of
the panel arm. See Figure 8. Next, adjust the panel
assembly until it’s facing the desired position.
Last, tighten the screw.
TIP:
If possible, raise
the thread rack on
both sides while
adjusting it. This
will ensure it is
positioned evenly.
Figure 6 Figure 7
Figure 8
KEEP IN MIND:
This step is important, as you need to position
the panel away from the machine head in order
to avoid the head hitting the panel when it
moves to the far right.

Ricoma Quick Start Guide 9
THREADING
Emergency stop button
Initial threading
The thread tubes will be used during the threading process. See Figure 10. These tubes will carry the
thread from the thread rack to the machine’s head. Before threading your machine, make sure these
tubes are in place. Attach one end of the tube to the slot just below the top thread tension knob. Attach
the other end of the tube to the slot on the machine’s head.
You may nd it easiest to work from the center out. Guide yourself by counting the slots on the top and
bottom to make sure you are attaching the tubes to their corresponding slots. The rst slot on the top
should go with the rst slot on the bottom and so forth. Refer to Figure 11.
In case of an emergency, press the emergency
stop button located on top right side of the panel.
Then, rotate the knob clockwise following its
directional arrows. The knob will then release, and
the machine will stop.
Figure 9
Figure 10 Figure 11
Figure 12
Your welcome kit contains two boxes of embroidery thread.
You will need 15 spools of thread for each of the machine’s
heads. See Figure 12.
If you haven’t done so yet, remove the wrappers on the provided
thread spools.

Ricoma Quick Start Guide10
To release the tail of the thread, unsnap the base of
the cone, and unwind until the thread is completely
out of the base.
Before positioning the spools, refer to Figure 13 to
view which thread spool pin corresponds with each
needle.
To begin threading your machine, snap each thread
spool onto the spool pins. The spool pins are the
15 pins secured with grey foam and a clear plastic
reel behind each of the machine heads. Do not get
confused with the 3 pins on each of the far ends, which
are for storing bobbin thread for easy reach when you
are replacing your bobbin. See Figure 14.
Beforethreading,youshouldbefamiliarwiththethread
path. The back row of thread will be threaded through
the back metal rack. The middle row of threads will
be threaded through the middle metal rack. And the
front row of threads will be threaded through the front
metal rack. See Figure 15-A and 15-B.
Figure 13
Figure 14
Figure 15-A Figure 15-B
TIP: It is best practice to allow enough room to walk
behind your machine. That way, you can place the
colors that you will use the most on the front row.
This will allow you to tie new threads to old threads
on the back rows while the machine is running.

Ricoma Quick Start Guide 11
Figure 16
Figure 17
Figure 19
Figure 20
KEEP IN MIND: The color spools will
need to be placed in the same order on both
heads. For example, if you place the white
thread on needle 1 on one head, you need
to place the white thread on needle 1 on the
remaining head as well.
How to replace a spool
Because your machine comes pre-threaded, you will only need to
replace the spools at rst rather than threading the machine from
the very beginning.
Figure 18
To do so, clip the thread from the existing thread spool. Make
sure you clip the thread right above the spool and not inside the
thread path. See Figure 16.
Then, replace the existing spool with a new
spool. Next, take the loose end of the thread
from the existing spool and tie it to the loose
end of the new thread in a simple knot. See
Figure 17 and 18. Repeat this process on all
spools before proceeding.
Now, go to the front of your machine and unravel
the thread that’s wrapped to each of the wheels on
both sides of the machine head. Once you unravel
it, make sure the threads are separated and hanging
individually.
Next, grab the thread from the presser foot, and pull
each thread all the way through until you no longer
see any of the old thread. See Figure 19. While you
pull the thread, you’ll see the new thread and the knot
you created traveling through the thread path.
Continue to pull until you see the knot you created
reaches past the needle bar. Now, clip the thread
right above the knot, and repeat the process on all
remaining needles.
Once you have completed all needles, it’s time to
thread the needle. Pass the thread through the eye
of the needle starting from the front to the back.
Once your thread has gone through the needle, pass
the thread down the presser foot. Now, you can rest
your thread on the spring as shown in Figure 20. You
should leave about two inches of thread hanging and
trim the excess.

Ricoma Quick Start Guide12
To thread your machine from the very beginning, follow these
simple steps. You will use the eyelets on the thread rack to
guide the thread in a straight path toward the rst tension
knob. Make sure the thread passes through each eyelet.
See Figure 21.
You will need to thread the rst three cones in order from
back to front. Then, repeat this order with the next three
cones and so forth.
Threading sequence
TIP: If possible, try not to place colors that are similar,
such as black and navy blue, close to each other. This
could lead to accidental misuse of similar color.
Correct
Incorrect
Figure 21
Figure 23
1. Thread each spool through the eyelets on the upper
thread rack until they reach the top tension knobs.
See Figure 22.
Figure 22
2. Next, pass the thread through the small eyelet located
behind the rst tension knob. Position the thread to
the right side of the top tension knob in between the
tension disks, making sure the thread is inside the tab
at the 3 o’clock position. To ensure you’ve completed
this step correctly, make sure the metal plates on the
tension knob are touching after you’ve positioned the
thread. See Figure 23

Ricoma Quick Start Guide 13
TIP: If you run out of
thread completely on
a needle bar, re-thread,
matching the thread path
to a correctly threaded
neighboring needle bar.
Figure 24
and 25
3. Unhook the thread tube from each
side. Next, using the included
threading tool from your toolkit, hook
the thread to the end of the tool and
feed the thread through the plastic
tube. Once the thread has been fed
through the tube, unhook the thread.
See Figure 24 and 25.
Figure 26-A
4. Reattach the thread tube to each end.
5. Pass the thread through the clip located just above the top tension knobs. Be sure to gently pull the
clip up with your nger, rather than just sliding the thread under the clip to avoid damaging the thread
and threading the machine incorrectly. See point A in Figure 26-A.
6. Next, pull the front disk of the tension knob toward you, and slip the thread to the right side of the
knob. See point B in Figure 26-A. You will know which path to follow for each needle by using the
numbers as guides. The photo displays the thread path for needle six. Notice the tension knob is
aligned just above the number “6.”
7. Locate the post right above the corresponding thread break wheel (these are the white wheels on
the machine’s head.) Pass the thread through the left side of the post as displayed in point C in
Figure 26-A. Then, guide the thread to the right and wrap it under the thread break wheel. See the
path from point C to E in Figure 26-A. Make sure you make one full clockwise rotation until the
thread exits through the left side of the bottom post. See Point E in Figure 26-A.
8. Place the thread under the
bottom clip by pulling the
clip up. Slide the thread
underneath. See point F in
Figure 26-A.

Ricoma Quick Start Guide14
Figure 26-A Figure 27
9. Next, you will thread the check spring and the lever arm. Begin by lifting the lever to place the
check spring into threading position. Now, coming down from the right side, pass the thread over
the outer right side of the rollers and then in through the opening in the center. See point G in
Figure 26-B. Next, pass the thread through the spring from the right to the left. See point J in
Figure 26-B. Then, take the thread and pull it through the opening in the center and out over the
outer left side of the rollers. Follow the path from point G to I in Figure 26-B to complete this step.
10. Now, pull the thread up toward the lever arm and pass the thread through the opening of the lever
arm from the right to the left as seen in point I in Figure 26-B. Then pass the thread back down
until it runs through the ceramic eyelet pictured in point J in Figure 26-B and 27. Continue running
the thread down the same path until it passes through the following ceramic eyelet as pictured
in point K in Figure 27. Then, place the thread behind the thread guide near the top of the needle
as seen in point L in Figure 27. You will need a bit of practice to do this quickly, but don’t skip this
important guide, which keeps the thread straight as it feeds through the needle
11. Pass the thread through the eye of the needle from the front to the back. To ensure your needle is
placed correctly, make sure the curved side is facing the back. Then, pass the thread through the
presser foot. See point M in Figure 27. Now, you can pull the thread back up to rest your thread
on the spring until you’re ready to embroider. We recommend leaving one to two inches of thread
hanging and trimming the excess. This is optional, but will eliminate the need to snip the thread
tail that will remain after the rst stitch is made while the thread tail is still held on the wire.
12. Last, take a step back and look at the front of the machine to make sure that all needles appear to
be threaded correctly. If they seem to be uniform, you are ready to stitch a test pattern.

Ricoma Quick Start Guide 15
Figure 28
Mastering basic knot tying will save you time and materials.
When tying new threads to old threads while replacing a spool,
you want to create a knot that will pull easily through the
needle’s eye. See Figure 28.
There are a number of reasons why you may be experiencing recurring thread breaks.
To ensure it is not a technical issue, follow these steps.
Knot tying
THREAD BREAK TROUBLESHOOTING
1. Check the thread path to make sure your machine is threaded correctly. It shouldbe following
the correct path detailed in the Threading section of this guide.
2. Make sure your thread tension is correct. Tight tension may lead to missed stitches, thread
breaks, pulling, puckering and thread stress. Loose tension will cause thread to pile up and loop.
3. Inspect the needle position to determine if an actual thread break has occurred. Sometimes
your machine may read a thread break, but the thread will still be attached to the fabric. If this is
the case, check all the thread paths. Then, do a manual trim and check the bobbin supply. If the
thread is broken, follow the correct thread path and rethread the needle.
4. Make sure the thread you’re using is not defective. If so, pull out a few yards of thread until you’ve
gotten rid of the defective thread. If that doesn’t work, try replacing the thread with a new cone.
5. Check for defective needles or needles not inserted properly. You will be able to tell if a needle is
defective or not positioned correctly by verifying if the problem is on one or some needles and
not others. Replace any damage or bent needles.
6. Make sure the bobbin is installed properly. Remove any lint or dirt build-up in the bobbin case.
Make sure the thread trimmer knife is fully retracted.
7. If thread breaks are occurring on all the needles, you need to adjust the hook timing. Refer to
Adjusting the timing of a needle and hook for details.

Ricoma Quick Start Guide16
NEEDLE AND HOOK TIMING
REASONS WHY
THREAD BREAKS OCCUR
The timing of the needle is set up to 200 degrees
and the relationship between the needle and the
hook is as follows. The proper space between
the needle and the hook should be 0.1 mm to 0.3
mm. See Figure 30.
1. Thick fabric: If the fabric is too thick, needles will tend to bend slightly as thread passes
through. This causes the thread to scrape against the needle plate, shredding the thread. To
correct this issue, replace the existing needle with a larger needle.
2. Hidden obstructions in the garment: Obstructions such as bulky seams, inside pockets and
hidden buttons may cause thread breaks.
3. Improper hooping: Make sure the item is hooped properly. Loosely hooped fabric will bounce
up and down during sewing.
4. Excessive backing: Excessive backing results in thread and needle breaks, as it applies greater
friction to the thread and needle.
TIP: If the space between the needle and the hook point
is out of range, the thread will not catch. This will cause
thread breaks. If the space between the needle and hook
point is too close, it will cause broken needles.
Figure 29
Figure 30
The garment or fabric

Ricoma Quick Start Guide 17
1. Very high thread density: Designs with high thread densities may cause needle deection,
which leads to thread shredding and thread breaks. Too many stitches in a small area may also
cause thread breaks. Try deleting short stitches or increasing the design by 5 to 10 percent.
2. Extremely short stitch lengths: Short stitch lengths may cause thread to pile up in one area.
Also called “nesting,” this issue may result in thread shredding and thread breaks.
1. Proper thread care is necessary to prevent thread breaks. We recommend storing thread in
a dark, cool place. Old threads that have not been stored properly will cause thread breaks.
Prolonged exposure to air, light, age and heat will cause threads to become brittle. If this
occurs, replace the old thread and store the new thread in a dark, cool place.
2. Do NOT use tape to tie off thread ends. Tape leaves a sticky residue that causes friction and
thread breaks.
3. Check for burrs in the thread guides, needle eye, thread plate and hook.
1. Shank: The top section of the needle that attaches to the needle bar (into the machine).
2. Shaft/Blade/Shank: The part of the needle that ranges from the end of the shank to the top
point of the needle.
3. Taper: The narrowed end of the needle that lies below the eye.
4. Point: The very bottom of the needle. The part of the needle that pierces through the fabric.
5. Eye: The opening where the thread passes through the needle.
6. Groove/Thread Groove/Front Groove: The indented surface that runs along the face (front)
of the needle.
7. Scarf: The half-moon-shaped cut out on the back of the needle, located just above the eye.
Figure 31
The embroidery design
Thread break prevention
Anatomy of the needle
NEEDLES

Ricoma Quick Start Guide18
There are several factors that determine the lifetime of a needle.
This includes but is not limited to:
• The material the needle is made of
• The style of the needle
• The material you are sewing on
• How often you use the needle
Several performance changes in your machine will indicate when it’s time
to change a needle. This includes but is not limited to:
• Thread breaks
• Poor stitch quality
• Pulls in the fabric
• Machine making unusual noises
• Machine operating at reduced speeds
Needles break for a number of reasons. This includes but is not limited to:
• The needle being worn out or old.
• The design having too many stitches and/or too high density for the design area.
• The fabric inside the hoop area being too loose (the material is not hooped tight enough)
• The needle hitting the hoop.
• The movement of fabric while the needle is penetrating.
A basic guideline that many professional embroiderers use to determine when to change needles is
the “three strikes” rule. When there have been three consecutive thread breaks on a needle, it should
be changed.
When changing a needle, ensure the scarf of the needle always faces the BACK of the machine. If
the needle is not positioned correctly, the machine will not work properly, and the needle will break.
How long do needles last?
How do I know when to change a needle?
Why do needles break?
Changing a needle
Figure 33Figure 32

Ricoma Quick Start Guide 19
Choosing the right needle is important to ensure quality stitches. Embroidering with a needle that
is too small or too big for the thread and/or fabric may result in thread breaks or skipped stitches.
There are three things to consider when choosing the right needle for the job: nish, size and point.
DBxK5 is an established standard system for machine embroidery. This style needle has a medium
point with a larger eye, which allows the thread to ow smoothly and helps reduce thread breaks. Its
only downfall is that it is slightly less durable due to its thinner eye wall. For stretch materials, use
ballpoints. For cottons, use sharp-points.
DBx7ST is ideal for metallic threads. It has an extremely large rectangular eye that allows for easy
passage of thread. You may also use size 80/12 needles for metallic threads.
Selecting a needle
TIP: CHANGING NEEDLES
When changing the needle, set the needle aside while you determine
whether a fresh needle corrects the problem. If you determine that the
needle was the likely cause of the problem, discard in an old medicine
bottle or other sharp-safe container.
1. Begin by removing the broken needle excess from the garment. If it is not
on the garment, check the bobbin area. See Figure 34.
Figure 34
Figure 35
Figure 36
2. Proceed by loosening the set screw above the needle with a straight slot
screwdriver. Loosen only enough to remove the screw.
3. Discard the spent needle in a childproof pill bottle or other sharp-safe
container.
4. Needles have a long groove on the front and a short half-moon-shaped
section called the scarf on the rear. With the long groove facing the front
of the machine, insert the new needle by placing the point through the
presser foot, and then inserting the shank into the needle bar until it can
be inserted no further. See Figure 35.
5. Verify that the long groove of the needle is still facing forward. Tighten
the needle screw while holding the needle rmly to keep it from slipping
down. See Figure 36. If necessary, hold the needle with a wooden toothpick
inserted into the eye. Never place a metal object in the needle’s eye, as it
could scratch the eye of the needle, causing thread breaks.

Ricoma Quick Start Guide20
BLADE SIZES
One of the rst things to consider when selecting a needle is the blade size, such as size 75/11 or
90/14. If you have ever wondered why there are two numbers in this designation, the reason is that it is
a combination of the European and American size designation numbering systems. The rst number,
such as 75 or 90, is the European designation. This refers to the actual measurement of the blade
diameter. For example, a size 80 needle has a .80 mm blade width. The second number, such as 11 or
14, is an Asian numbering system. In this system, a smaller number indicates a smaller blade diameter.
Most sewing and embroidery needles have chromium plating that enhances durability and
appearance. Titanium-coated needles are more expensive than chromium-plated needles, but they
can last as much as ve to seven times longer than their chromium-plated counterparts. These
types of needles also reduce thread friction. Reduced thread friction lessens the frequency of thread
breaks, and saves time and labor. Titanium needles are a beautiful golden color and are available in
the most popular sizes.
Good overall needle. It is used to sew everyday items like golf shirts, sweatshirts, dress shirts,
light jackets, light canvas, aprons, holiday stockings and more.
Size 75/11
Size 70/10
Good needle for the newer tech garments. It is used to sew moisture management (wicking),
anti-bacterial and body temperature management garments, such as t-shirts and golf shirts.
Size 65/9 or 60/8
Good needle for very light or delicate materials. It is used to sew silks and ne linens. It is also
used to sew detailed designs on small areas, such as intricate patches or very small lettering.
Size 80/12
Good needle for heavy materials. It is used to sew heavy canvas, vinyl, light leather, ball caps,
visors and more.
Size 90/14
Good needle for metallic thread. It has a larger eye, which allows the thread to easily pass
through the eye. Used to sew canvas and belts too since it is a very stiff needle.
TIP: The point must be able to pierce through the fabric easily to avoid deflecting when the needle
contacts the material. Otherwise, the needle will strike the surrounding metal or the needle plate,
potentially causing damage to the needle or the machine. Choose a ner blade for more ne-woven
or knit fabrics. Use a larger blade for tough fabrics that could cause needle deflection.
Needle finishes
Table of contents
Other Ricoma Sewing Machine manuals

Ricoma
Ricoma EM-1010 User manual

Ricoma
Ricoma EM-1010 User manual

Ricoma
Ricoma RCM-1201TC-7S User manual

Ricoma
Ricoma CHT2 User manual

Ricoma
Ricoma SWD Series User manual

Ricoma
Ricoma EM-1010 User manual

Ricoma
Ricoma RCM-1201PT User manual

Ricoma
Ricoma RCM 1501 PT User manual

Ricoma
Ricoma 8S User manual

Ricoma
Ricoma TCS1501 User manual