Ricon 30-240 User manual

30-240
www.rikontools.com
30-240M3
20” Floor Drill Press
Operator’s Manual
Record the serial number and date of purchase in your manual for future reference.
Serial Number: _________________________ Date of purchase: _________________________
For technical support or parts questions, email [email protected] or call toll free at (877)884-5167

Operator Safety: Required Reading
IMPORTANT! Safety is the single most important consideration in the operation of this equipment. The following
instructions must be followed at all times.
There are certain applications for which this tool was designed. We strongly recommend that this tool not be modied and/
or used for any other application other than that for which it was designed. If you have any questions about its application,
do not use the tool until you have contacted us and we have advised you.
General Safety Warnings
KNOW YOUR POWER TOOL. Read the owner’s manual carefully. Learn the tool’s applications, work
capabilities, and its specic potential hazards.
ALWAYS KEEP VISITORS AWAY FROM RUNNING MACHINES.
All visitors should be kept a safe distance from the work area.
ALWAYS MAKE THE WORKSHOP CHILDPROOF.
Childproof with padlocks, master switches, or by removing starter keys.
NEVER OPERATE A TOOL WHILE UNDER THE INFLUENCE OF DRUGS,
MEDICATION, OR ALCOHOL.
ALWAYS WEAR PROPER APPAREL.
Never wear loose clothing or jewelry that might get caught in moving parts. Rubber-soled footwear is
recommended for the best footing.
ALWAYS USE SAFETY GLASSES AND WEAR HEARING PROTECTION.
Also use a face or dust mask if the cutting operation is dusty.
NEVER OVERREACH.
Keep your proper footing and balance at all times.
ALWAYS GROUND ALL TOOLS.
If your tool is equipped with a three-pronged plug, you must plug it into a three-hole electric receptacle.
If you use an adapter to accommodate a two-pronged receptacle, you must attach the adapter plug to a
known ground. Never remove the third prong of the plug.
ALWAYS AVOID DANGEROUS ENVIRONMENTS.
Never use power tools in damp or wet locations. Keep your work area well lighted and clear of clutter.
ALWAYS REMOVE THE ADJUSTING KEYS AND WRENCHES FROM TOOLS AFTER USE.
Form the habit of checking to see that keys and adjusting wrenches are removed from the tool before
turning it on.
ALWAYS KEEP YOUR WORK AREA CLEAN. Cluttered areas and benches invite accidents.
NEVER STAND ON TOOLS.
Serious injury could occur if the tool is tipped or if the cutting tool is accidentally contacted.
2

ALWAYS CHECK FOR DAMAGED PARTS.
Before initial or continual use of the tool, a guard or other part that is damaged should be checked to
assure that it will operate properly and perform its intended function. Check for alignment of moving
parts, binding of moving parts, breakage of parts, mounting, and any other conditions that may affect its
operation. A guard or other damaged parts should immediately be properly repaired or replaced.
ALWAYS DISCONNECT TOOLS.
Disconnect tools before servicing and when changing accessories such as blades, bits, and cutters.
ALWAYS AVOID ACCIDENTAL STARTING.
Make sure switch is in “OFF” position before plugging in cord.
NEVER LEAVE TOOLS RUNNING UNATTENDED.
Special Safety Rules For Drill Press
SAVE THESE INSTRUCTIONS.
Refer to them often.
3
1. Do Not operate the Drill Press until it is assembled
and you have read the instructions.
2. Do not operate the Drill Press unless you are familiar
with its safe operation. If you are not familiar with
the operation of a Drill Press seek advice from your
supervisor, instructor or other qualied individual.
3. If you are using a bench top Drill Press, it must be
securely fastened to a stand or bench.
4. If you are operating a oor Drill Press it must be
securely fastened to the oor.
5. Always clear the table and work area before turning
on the Drill Press.
6. Always use drill bits, cutting tools and accessories
with a 1/2” shank or less.
7. Never place hands near the drill bit, cutting tool or
accessory.
8. Never wear loose clothing, gloves or ties while
operating the Drill Press.
9. Always have a rm footing while operating the Drill
Press.
10. Always keep work surface and work areas clear of
debris.
11. Never attempt to do set-up work, assembly or layout
work on the Drill Press while it is in operation.
12. Never start the Drill Press with the drill bit, cutting
tool or accessory in contact with the work-piece.
13. Always lock all table, column and head locks before
turning on the Drill Press.
14. Never operate the Drill Press with a damaged drill
bit, cutting tool or accessory.
15. Always check the drill bit, cutting tool or accessory
in tight in the chuck.
16. Never operate the Drill Press with the chuck key
in the chuck.
17. Always adjust the depth stop to avoid drilling into
the table surface.
18. Never drill material unless it is properly supported.
Non at work-pieces require additional support.
19. Always clamp the work piece to the table.
20. Always support large work-pieces at the same
height as the table.
21. Never remove the work-piece or clear the table
until the Drill Press comes to a complete stop.
22. Always wear a face shield and safety glasses
while operating the Drill Press.
23. Never operate the Drill Press with missing,
damaged, worn, loose or defective parts.
24. Never adjust, change speeds or perform
maintenance on the Drill Press while it is
operating.
25. Always clean the work surface and work area
when nished operating the Drill Press.
26. Always disconnect the power when adjusting or
performing maintenance on the Drill Press.
27. Always disconnect the power when nished using
the Drill Press to prevent accidental operation.
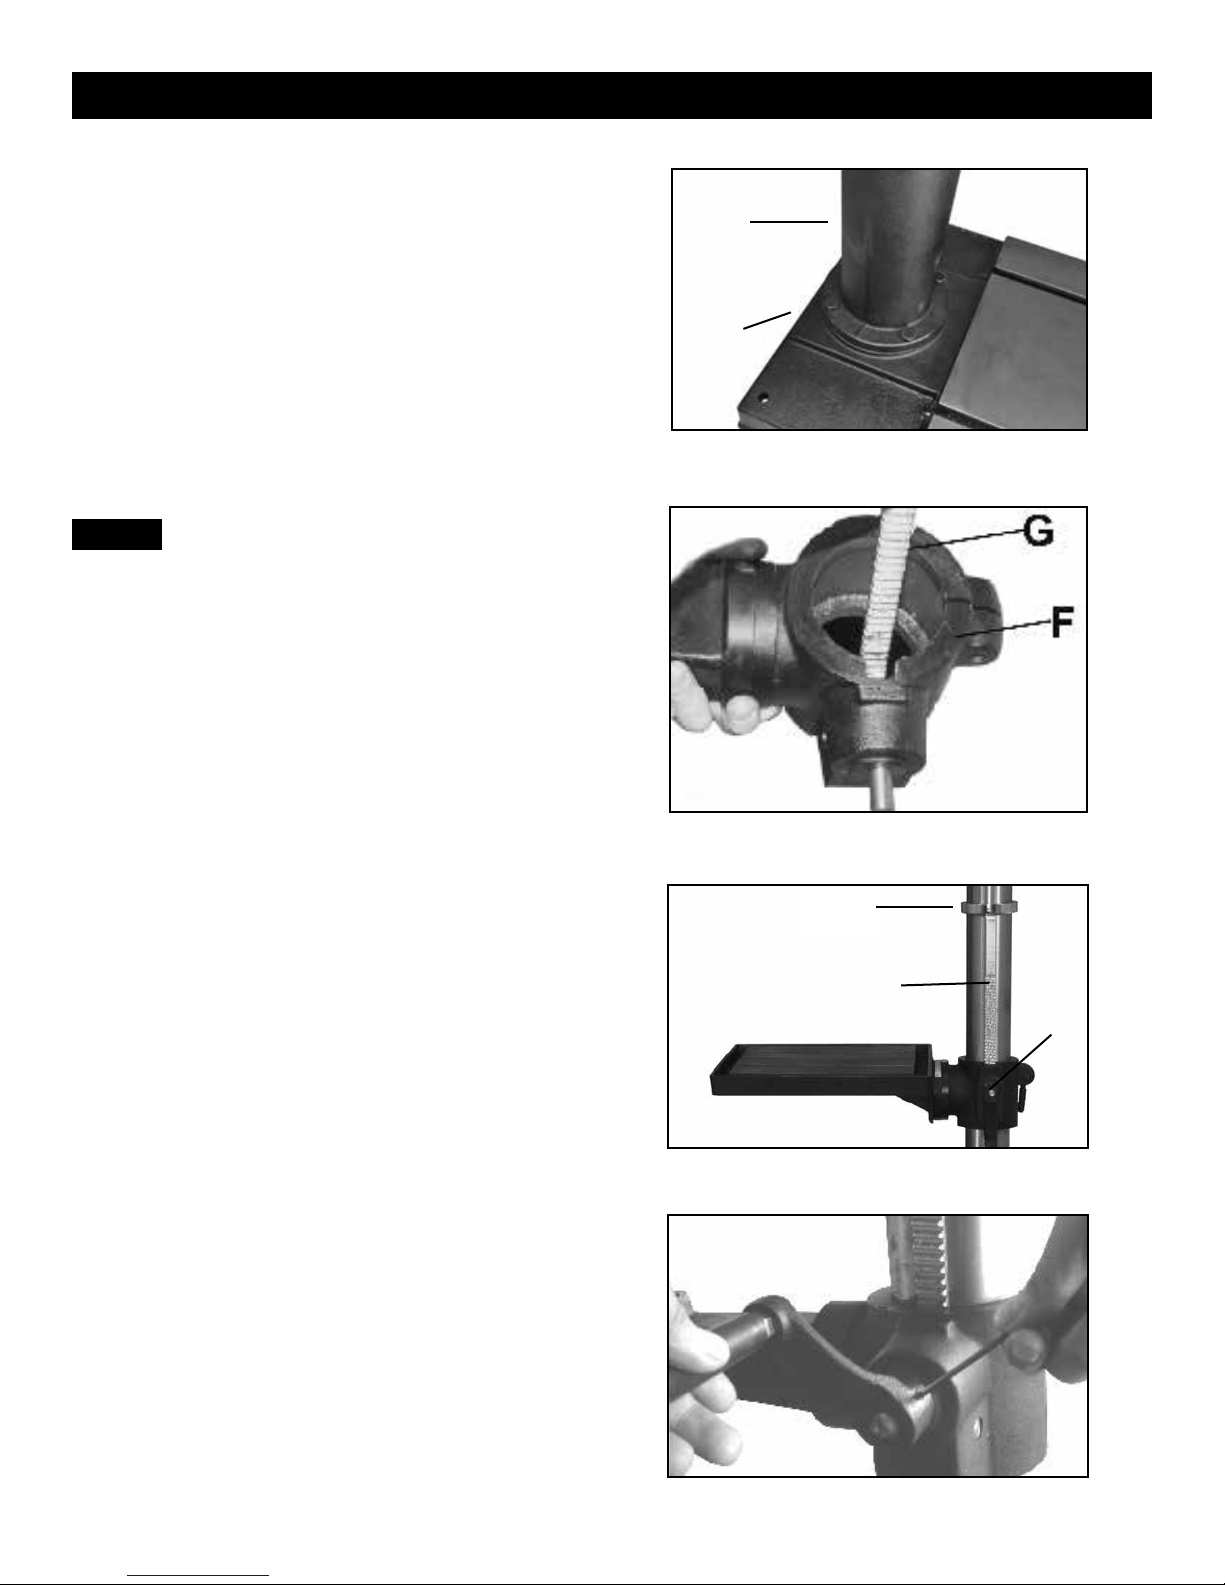
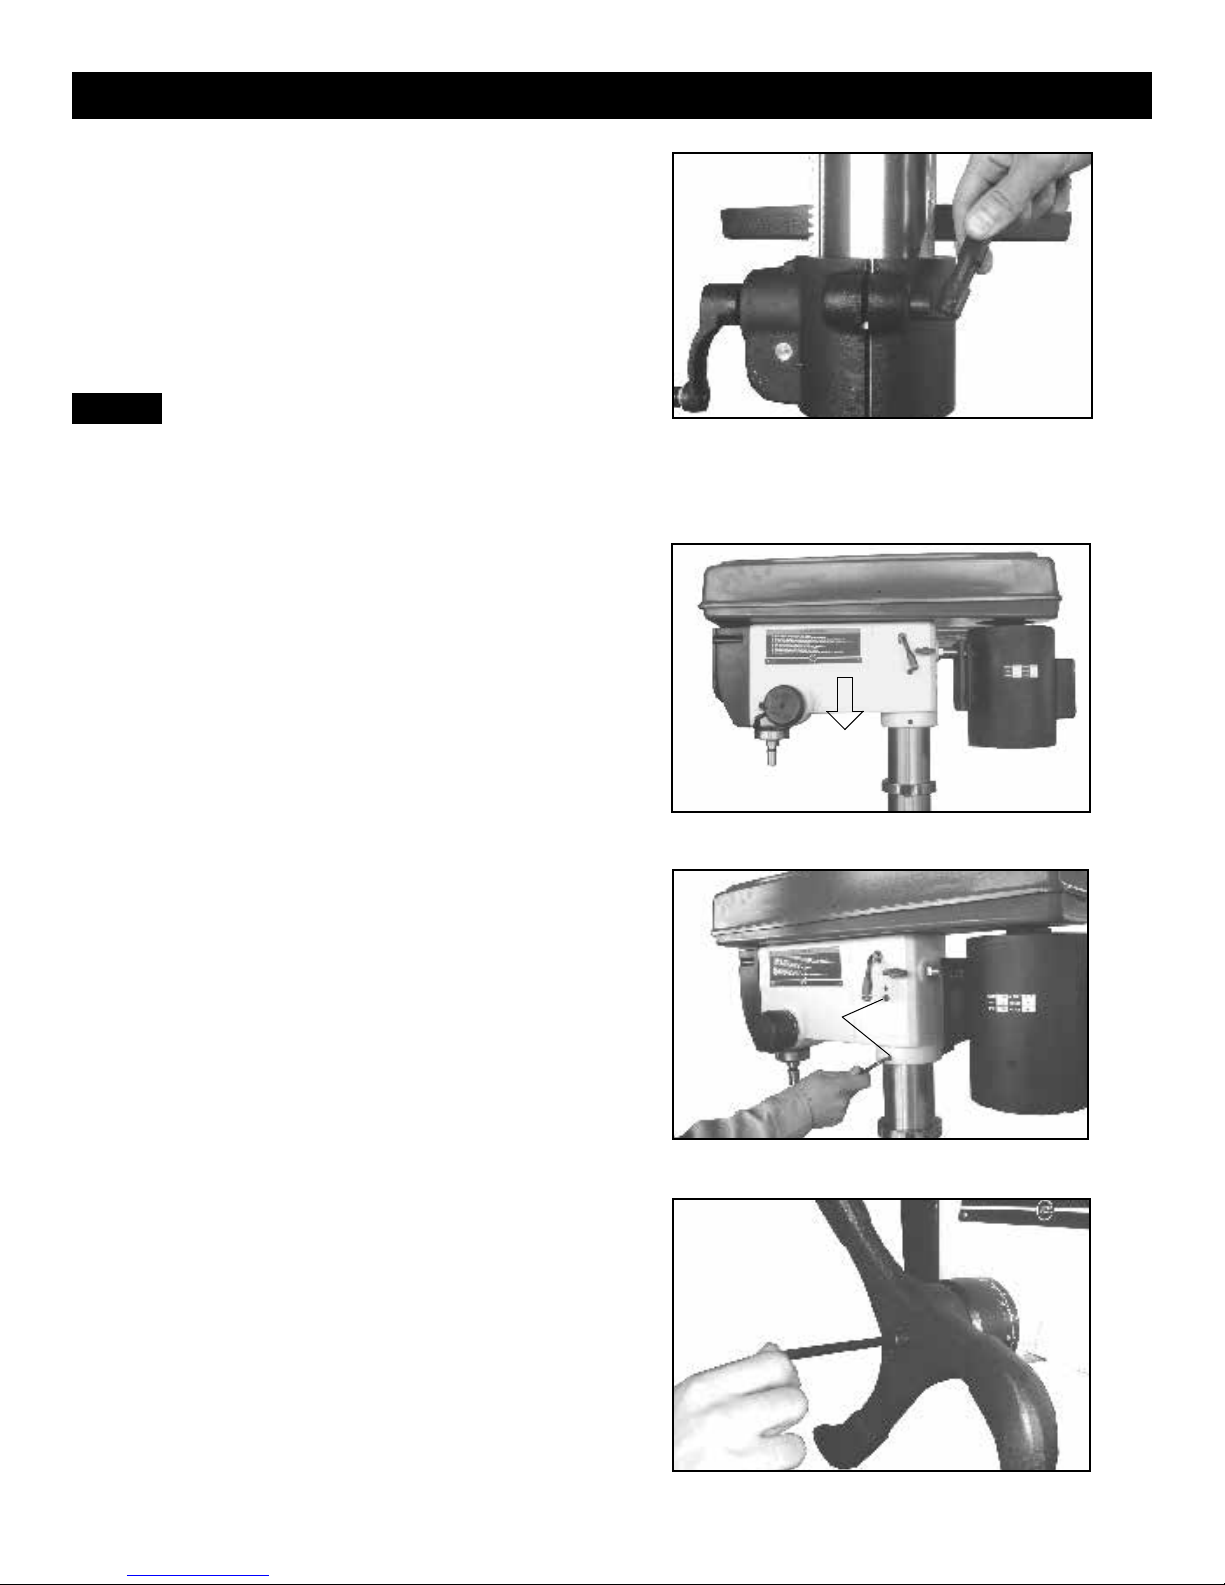
Note: This owner’s manual is not a teaching aid. Use of this owner’s manual is intended to
show assembly, adjustments, and general use.

Safety Warnings....................................................................................................................................2-3
Drill Press Safety Rules ..........................................................................................................................3
Specications ........................................................................................................................................4
Contents of Package...................................................................................................................5
Getting To Know Your Drill Press...........................................................................................................6
Assembly ............................................................................................................................7-10
Changing spindle speeds............................................................................................................11
Setting the spindle lock and drill depth..........................................................................................12
Maintenance.......................................................................................................................................13
Wiring Diagram.......................................................................................................................................13
Electrical Requirements..........................................................................................................................14
Troubleshooting ..................................................................................................................................15
Parts Explosion ................................................................................................................................16-18
Parts List ........................................................................................................................................19
Notes ..................................................................................................................................................20
Warranty .............................................................................................................................................21
4
Table of Contents
NOTE: The specications, photographs, drawings and information in this manual represent the
current model when the manual was prepared. Changes and improvements may be made at any
time, with no obligation on the part of Rikon Power Tools, Inc. to modify previously delivered units.
Reasonable care has been taken to ensure that the information in this manual is correct, to provide
you with the guidelines for the proper safety, assembly and operation of this machine.
Specications
Model No.
Specifications
Type
Horsepower
Amps
Volts
Speed Range (RPM)
Speed Range (RPM)
Speeds
Chuck Size
Drilling Capacity
Spindle Travel
Spindle Taper
Quill Diameter
OverallOverall
Table
Table Tilts
Table Rotates
Column Diameter
Height
Base Size
NetNet Weight
Shipping Weight
Shipping Carton
Warranty
30-240
Floor
1 HP, TEFC
13.5
120V, 60 Hz
180 - 3,865
1212
3/4"
1"
4-3/4"
MT3
3"
16-1/2" x 18-3/4"
45°
45°
360°
3-5/8"
68"
22-3/4" x 16-1/2"
250 lbs.
260 lbs.
57" x 25-1/2" x 12-1/4"
5 Years

Model 30-240 20” Floor Drill Press is shipped complete in one box.
Unpacking and Checking Contents
a. Separate all “loose parts” from packaging materials and check each item with “Table of Loose
Parts” to make sure all items are accounted for, before discarding any packaging material.
b. With the help of another person, carefully lift the Drill Press head out of the box.
c. Remove protective oil that is applied to the table and column before assembly. Use any ordinary
house hold type grease or spot remover.
d. Apply a coat of paste wax to the table and column to prevent rust. Wipe all parts thoroughly with a
clean dry cloth.
TABLE OF LOOSE PARTS
Item Part Name Qty
A Table Assembly 1
B Box with Chuck & Key 1
C Bag of Loose Parts 1
D Drill Press Head 1
E Feed Handle 1
F Column Assembly 1
G Base 1
H Bag of 2 Belts 1
I Owner’s manual 1
Contents of Package
5

6
Getting to Know Your Drill Press
Belt Cover
Feed
Handle
Table
Table Support
Base
Motor
Crank Handle
On/Off
Switch
Chuck
Table Support
Column Locking
Handle
Column
Column Support
California Propsition 65 Warning
WARNING: Some dust created by power sanding, sawing, grinding, drilling, and other construction
activities contains chemicals known to the State of California to cause cancer and birth defects or
other reproductive harm. Your risk from exposure to these chemicals varies, depending on how often
you do this type of work. To reduce your exposure, work in a well-ventilated area and with approved
safety equipment, such as dust masks that are specially designed to lter out microscopic particles.
For more detailed information about California Propostion 65 visit www.rikontools.com.
Table Tilting
Locking Bolt
Rack
Collar
Spindle
Depth
LocK
Pulley
Tension
Lever &
Lock Knob

7
Base and Column Assembly
1. Place the base (A-Fig. 1) on a level oor where
the machine will be used.
2. Attach the column (B-Fig.1) to the base
(A-Fig. 1) using four M10x40 hex bolts.
Tighten all four bolts.
Figure 1
Assembly
B
A
Assistance is needed for this next
step.
NOTE:
INSTALLING THE TABLE
1. Using a hex wrench, remove the Collar and
Rack from the column.
2. Place rack (G-Fig. 2) inside the table support
bracket (F-Fig. 2), lining up the rack’s teeth with
the worm gear that is inside of the table bracket.
3. Lift up and slide the table assembly with the
rack together onto the column, and slide them
down the column until the rack ts back into the
column support base.
4. Replace the column collar on top of the rack,
and secure it in place with a hex wrench.
5. Install the raising/lowering handle with a hex
wrench (Figure 4). The handle's set screw must
line up and be secured on the at section of the
table support's worm ger shaft.
Figure 3
Figure 2
Figure 4
Continued on page 8
Rack
Collar
Table
Bracket

8
Figure 6
Assembly
Head Assembly
1. Place the drill press head onto the column as
far as it will go (Figure 6). Align the drill press head
with the base of the drill press.
2. Tighten the drill press head to the column by
tightening the two set screws on the right side of
the head as shown (A-Figure 7).
3. Place the feed handle to the hub. Tightening
the set screw into the hub through the central
hole of feed handle (Figure 8).
Assistance is needed for this next
step.
NOTE:
Figure 7
A
Figure 8
Figure 5
6. Install the locking lever onto the table support
bracket and tighten the locking lever (Figure 5).
Continued from page 7

9
4. Install the idler pulley and drive belts. Simply
slide the pivot post of the idler pulley into the
corresponding hole in the drill press head. The
small drive belt (A-27) is mounted to the motor
pulley and the large drive belt (A-29) is mounted
to the spindle pulley (Figure 9).
Figure 9
A-29
A-27
Assembly
Figure 10
Figure 11
5. Release the locking knobs on the both sides
of drill press head. Release the tension on the
belt by swinging the tension lever from right to left
(Figure 10).
Choose the desired speed by referring to the
speed selection chart under the belt cover.
6. To install the belt cover handle, open the belt
cover and insert the Philliips head screw through
the hole in the center from the inside. Thread the
handle on the outside of the belt cover and tight-
en with a screwdriver (Figure 11).

10
INSTALLING/REMOVING CHUCK
It is important that the chuck
and arbor are free of any grease or rust
protection. Use ordinary household grease
remover.
INSTALLING THE CHUCK
Carefully insert the chuck into arbor, making sure
to align the at part of the chuck with the arbor
(Figure 12). Using a mallet or wood hammer,
drive the chuck into the arbor. This will properly
seat the chuck on the arbor.
NEVER HIT THE CHUCK ASSEMBLY
WITH A METAL HAMMER. This could damage the
chuck assembly or spindle.
IMPORTANT!
NOTE:
Assembly
Figure 12
REMOVING THE CHUCK
1. Open the chuck jaws as wide as possible to
prevent damage.
2. Lower the spindle until the slot in the spindle is
exposed. (Fig. 13)
3. Position the table approximately 1/2” below
the extended chuck.
4. Turn the chuck until a through hole is exposed
in the spindle.
5. Insert the Key-drift provided into the slot.
(Fig. 14)
6. Gently tap the key-drift with a mallet to release
the chuck.
Figure 13
Figure 14

11
Disconnect machine from the power source.
WARNING!
1. Turn off and disconnect the power to the Drill
Press.
2. Open belt cover.
3. Release the locking knobs on the both sides
of drill press head. Release the tension on the
belt by swinging the tension lever from right to left
(Figure 15).
4. Choose the desired speed by referring to the
speed selection chart.
5. Place the belt on the pulleys in relation to the
speed chosen on the speed selection chart start-
ing with the motor pulley rst. (Figure 16).
6. Swing back the tension lever until there is ap-
proximately 1/2” deection in the belt.
7. Tighten the locking knob on the both sides of
drill press head.
8. Close the belt guard.
Changing spindle speeds
Figure 15
Figure 16

12
SETTING THE SPINDLE LOCK
1. Loosen the depth stop collar lock (A-
Figure.16).
2. Lower the spindle to the desired depth. (Figure.18)
3. Turn the depth stop collar clockwise until the
collar stops (B-Figure.17).
4. Tighten the depth stop collar lock.
Figure 23
Figure 17
SETTING THE DRILL DEPTH
1. With the spindle in the up position, loosen the
depth stop collar lock (A-Figure.17) as shown.
2. Turn the depth stop collar clockwise until the
pointer reads the desired drill depth on the scale
(B-Figure.17).
3. Tighten the depth stop collar lock.
Setting the spindle lock and drill depth
A
B
Figure 18

Maintenance
To avoid injury due to unexpected starting, before cleaning or carring out maintenance
work, switch off and disconnect the drill press from the power source.
1. Never use water or other liquids to clean the drill press. Use a dry brush.
2. Regular maintenance of the drill press will prevent unnecessary problems.
3. Keep the table clean to ensure accurate cutting.
4. Keep the outside of the machine clean to ensure accurate operation of all moving parts and
prevent excessive wear.
5. Frequently blow out any dust that may accumulate on the motor.
6. Apply paste wax to the table and column, to help keep the surface clean.
7. Check belts for wear and replace.
WARNING:
LUBRICATION
All of the ball bearings are packed with grease at the factory. They require no further lubrication.
Periodically lubricate the worm gear (part# 18A) in the table elevation mechanism, the rack bar
(part# 15A), and the spline (grooves) in the spindle (part#11B). This will keep the operation of the drill
press smooth.
WIRING DIAGRAM
This machine must be grounded. To avoid electrocution or re, any repairs to
electrical system should be done only by a qualied electrician, using genuine replacement parts.
WARNING:
13

Electrical Requirements
In the event of a malfunction or breakdown, grounding provides a path of least resistance for electric
current to reduce the risk of electric shock. This tool is equipped with an electric cord having an
equipment-grounding conductor and a grounding plug. The plug must be plugged into a matching
outlet that is properly installed and grounded in accordance with all local codes and ordinances.
Do not modify the plug provided. If it will not t the outlet, have the proper outlet installed by a
qualied electrician.
Improper connection of the equipment-grounding conductor can result in a risk of electric shock. The
conductor, with insulation having an outer surface that is green with or without yellow stripes, is the
equipment-grounding conductor. If repair or replacement of the electric cord or plug is necessary, do
not connect the equipment-grounding conductor to a live terminal.
Check with a qualied electrician or service personnel if the grounding instructions are not completely
understood, or if in doubt as to whether the tool is properly grounded.
Use only three wire extension cords that have three-prong grounding plugs and three-pole
receptacles that accept the tool’s plug.*
Repair or replace a damaged or worn cord immediately.
This tool is intended for use on a circuit that has an outlet that looks the one illustrated in Figure
A below. The tool has a grounding plug that looks like the grounding plug as illustrated in Figure A
below. A temporary adapter, which locks like the adapter as illustrated in Figure B below, may be
used to connect this plug to a two-pole receptacle, as shown in Figure B if a properly grounded outlet
is not available.** The temporary adapter should only be used until a properly grounded outlet can
be installed by a qualied electrician. The green colored rigid ear or tab, extending from the adapter,
must be connected to a permanent ground such as a properly grounded outlet box.
* Canadian electrical codes require extension cords to be certied SJT type or better.
** Use of an adapter in Canada is not acceptable.
14

15
Troubleshooting
TROUBLE PROBABLE CAUSE REMEDY
Noisy Operation 1. Incorrect belt tension. 1. Adjust tension.
2. Dry Spindle. 2. Lubricate spindle.
3. Loose spindle pulley. 3. Checking tightness of retaining nut
4. Loose motor pulley. on pulley and tighten if necessary.
4. Tighten set screws in pulleys.
Drill Bit Burns 1. Incorrect speed. 1. Change speed.
2. Chips not coming out of hole. 2. Retract drill bit frequently to clear chips.
3. Dull drill bit. 3. Resharpen drill bit.
4. Feeding too slow. 4. Increase the speed.
5. Not Lubricated 5. Lubricate drill bit.
Drill bit leads off 1. Hard grain in wood or lengths 1. Resharpen drill bit correctly.
hole not round. of cutting lips and/ or angles 2. Replace drill bit.
not equal.
2. Bent drill bit.
Wood splinters 1. No "back up material" 1. Use "back-up material"
on underside. under workpiece.
Wood piece turn 1. Not supported or 1. Support workpiece or clamp it.
loose from hand. clamped properly.
Drill bit binds 1. Workpiece pinching drill bit 1. Support workpiece or clamp it.
in workpiece. or excessive feed pressure. 2. Adjust tension.
2. Improper belt tension.
Excessive drill bit 1. Bent drill bit. 1. Use a straight drill bit.
runout or wobble. 2. Worn spindle bearings. 2. Replace bearings.
3. Drill but not properly 3. Install drill bit properly.
installed in chuck. 4. Install chuck properly.
4. Chuck not properly installed.
Quill Returns too 1. Spring has improper tension. 1. Adjust spring tension.
slow or too fast.
Chuck will not stay 1. Dirty, grease, or oil on the 1. Using a household detergent clean the
attached to spindle, tapered inside surface of tapered surface of the chuck and spindle
it falls off when trying chuck or on the spindles to remove all dirt, grease and oil.
to install it. tapered surface.

16
Parts Explosion

17
Parts Explosion
17
NOTE: Please reference the Model Number and Key Number when calling for Replacement Parts.
For Parts under Warranty, the Serial Number of your machine is required.

Parts Explosion
18

DESCRIPTION
Collar-Rack
Screw-Hex soc Set M6x1.0-10
Support-Table w/Indicator
Crank
Handle crank
Rack
Screw-Hex Soc Set M10x1.5-12
Support-Column
Screw-Hex Hd M12x1.75-40
Base
Tube-Column
Pin-Table Lock
Nut-Hex Hd M8x1.25
Screw-Hex Hd M20x2.5-50
Table w/Scale
Pin-Gear
Clamp-column
Gear-Helical
Worm-Elevation
Nut-Lock M20x1.5
Ring-Locking
Washer
Bearing-Ball 20mm
Washer-Rubber
Tube-Quill
Key-Drift
Key-Chuck
Chuck
Arbor
Spindle
Bearing-Ball 30mm
Belt-”V” A29
Bearing-Ball 15mm
Pulley Center
Pivot-Idler
Pulley-motor
Screw Soc Set M8x1.25-12
Screw Pan Hd M5x0.8-12
Clamp-Cord
Screw-Rd Washer Hd M6x1.0-12
Guard-Pulley w/Labels
Ring-Retaining
Bearing-Ball 30mm
Spacer-Bearing
Insert-Pulley
Pulley-spindle
Nut-Pulley
Belt-”V” A33
Knob
Parts List
KEY NO.
1A
2A
3A
4A
5A
6A
7A
8A
9A
10A
11A
12A
13A
14A
15A
16A
17A
18A
19A
1B
2B
3B
4B
5B
6B
7B
8B
9B
10B
11B
12B
1C
2C
3C
4C
5C
6C
7C
8C
10C
13C
14C
15C
16C
17C
18C
19C
20C
21C
KEY NO.
1D
2D
3D
4D
5D
6D
7D
8D
9D
11D
12D
13D
14D
15D
16D
17D
18D
19D
20D
21D
22D
24D
25D
26D
27D
28D
29D
30D
31D
32D
33D
34D
36D
37D
38D
39D
40D
41D
42D
43D
44D
45D
46D
47D
48D
DESCRIPTION
Screw-Hex Hd M8x1.25-16
Lever-Adjusting
Support-Motor Bracket
Mount-Motor
Lock washer 12mm
Nut-Hex M12
Motor
Nut-Hex M8x1.25
Washer 8
Screw-Hex Hd M8x1.25-20
Support Motor Bracket
Knob-Motor Adjusting
Handle-Belt Tension
Screw-Sco Ser M10x1.5-12
Lock depth screw
Guide Scale
Cast iron handwheel
Hex socket screw
Hub
Ring-Depth Stop w/Scale
Pin-Stop
Lock washer-Ext.5
Screw-Pan Cr M5x8
Box-Switch
Screw-Pan Cr M5x16
Switch
Screw-Self Tap Pan Hd
Key-Switch
Cover-Switch Plate
Switch-Rocker
Switch-Pan Cr M6x12
Lead Asm.3
Screw-special Set M10x1.5-27
Nut-Hex M10x1.5
Seat-Spring
Pin-roll 6x16
Spring-Torsion
Cap-Spring
Nut-Hex M12-1.5-8
Cord-Power
Pin-Roll 2.5x10
Head w/Pointer&Trim
Connector-Wire
Screw-Pan Cr M6x1.0-12
Socket-Bulb
19
NOTE: Please reference the Model Number and Key Number
when calling for Replacement Parts.
For Parts under Warranty, the Serial Number of your machine
is required.

20
Notes
Use this section to record maintenance, service and any calls to Technical Support:
Table of contents
Other Ricon Power Tools manuals