Ride JAVA User guide

Ride JAVA®
Adjustable Back Support
Owner’s Handbook
Warranty Policy
Installation and Use Instructions
toll-free: 866.781.1633
phone: 303.781.1633
www.ridedesigns.com
Ride Designs®
a branch of Aspen Seating, LLC
4211- G South Natches Court
Sheridan, Colorado 80110
▲
▲
Warranty Policy
Your Ride Designs®JAVA®Adjustable Back Support has been carefully
constructed to meet your posture and skin integrity needs. This Limited
Warranty is effective for 24 months from the date of delivery to the
original purchaser. If any defect in material or workmanship is found,
Ride Designs will repair or replace the component, at our discretion.
This limited warranty does not cover daily wear and tear or damage that
is a result of mishandling, misuse, neglect, or not following the care and
maintenance instructions.
Claims and repairs should be processed through your nearest authorized
Ride Designs rehab technology supplier. A copy of the Bill of Sale issued to
the purchaser of the product might be required prior to processing a
warranty claim.
Maximum client weight capacity is 300 pounds.

General Product Safety
Safe application of this product depends upon your good judgment and
common sense, as well as that of your provider, caregiver, and/or healthcare
professional, and your attentiveness in following the warnings, cautions, notes,
and instructions in this manual.
NOTE: Denotes important things to remember when using this product.
WARNING: Indicates a potentially dangerous situation that, if not heeded, could
result in serious injury.
CAUTION: Failure to heed cautions might result in damage to your product.
NOTE: Ride Designs is not liable for damage to property or personal injury
arising out of unsafe use of this product. Ride Designs is also not liable for any
property damage or personal injury arising out of the failure of any person
and/or user to follow the instructions or recommendations set forth in 1) this
manual, or 2) any other instructions or recommendations contained in related
literature issued by Ride Designs, or 3) contained on the product itself, or
4) on our website www.ridedesigns.com.
NOTE: We have compiled this manual from the latest specifications and product
information available at the time of publication. We reserve the right to make
changes as they become necessary. Any changes to our products might cause
slight variations between the illustrations and explanations in this manual and the
product you have purchased.
WARNING: All Ride Designs support surfaces are designed to help reduce the
incidence of pressure sores. However, no back support can completely eliminate
sitting pressure or prevent pressure sores. The Ride JAVA back support is not
a substitute for good skin care including proper diet, cleanliness, and regular
pressure relief techniques.
Available Sizes
The JAVA®Back is available in a range of sizes. Please visit www.ridedesigns.com
for the most current information on size availability.
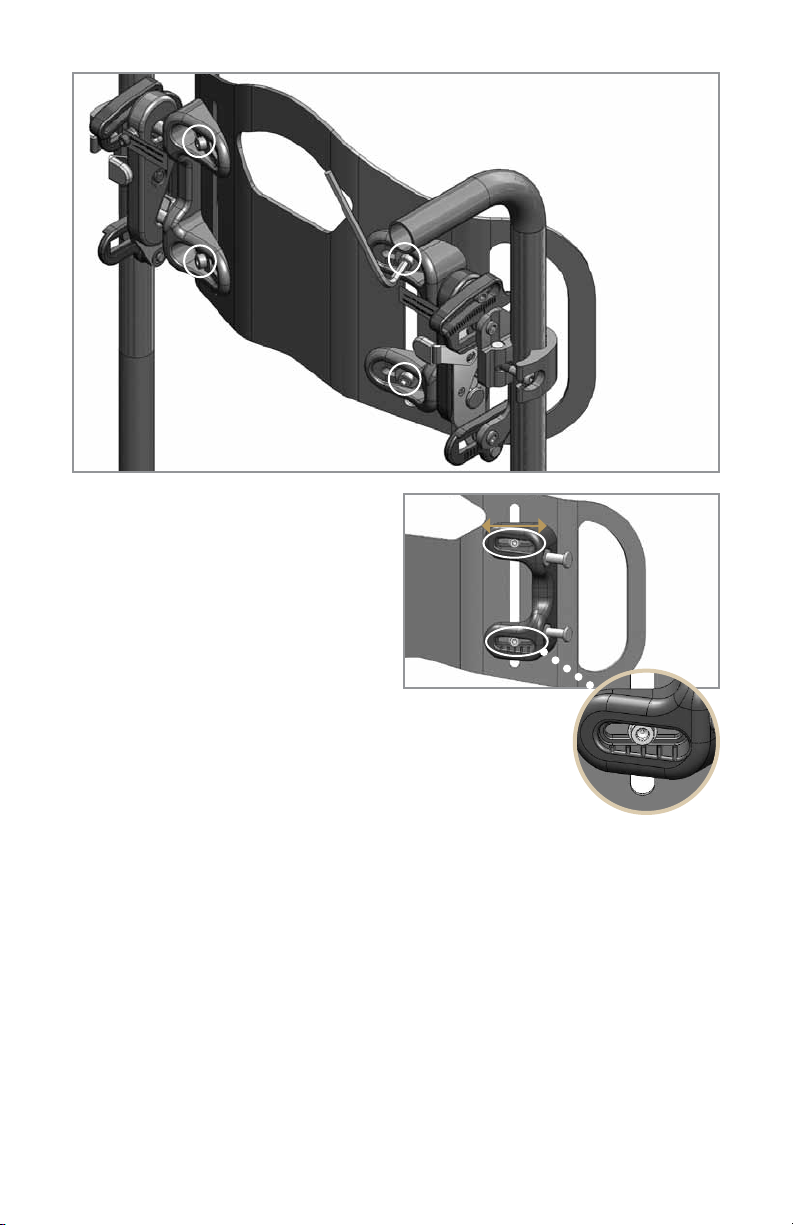
Installation Instructions
We recommend that a therapist or authorized Ride Designs supplier perform
the initial fitting of your back support. Your JAVA Back is designed so that pelvic
support and trunk balance can be adjusted independently of each other. Lateral
pelvic wedges and the new Flexa-just™support provides additional support and
stability when needed.
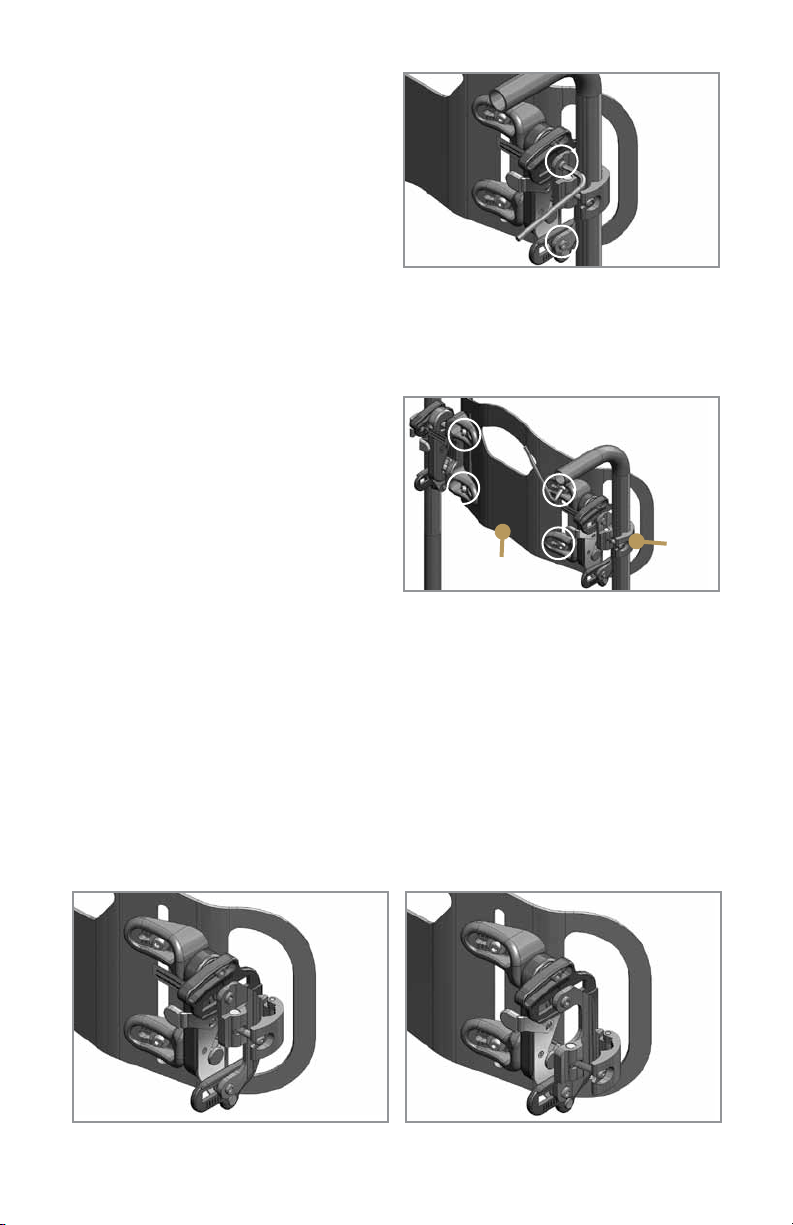
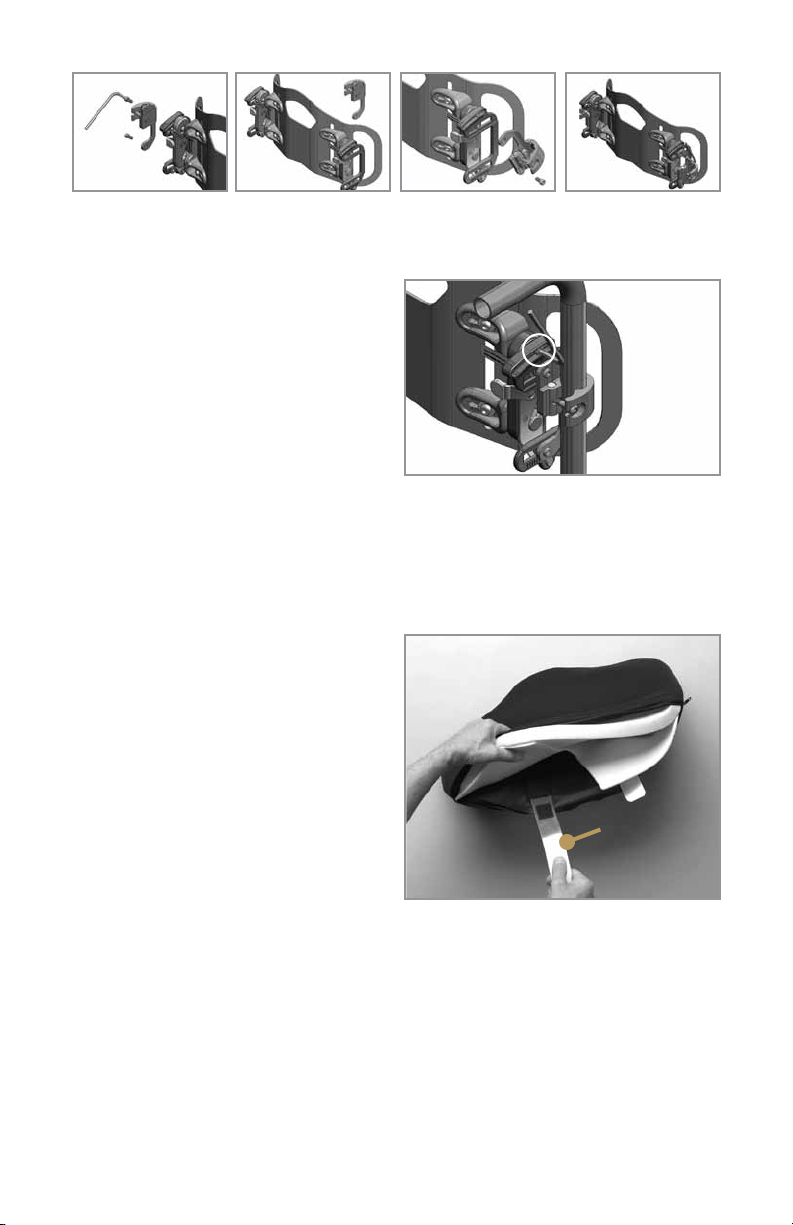
The JAVA Back consists of four components: 1) mounting hardware, 2) Flexa-just
accessories, 3) the back shell, and 4) the removable foam insert and cover.
WARNING: Installation of any back rest on your wheelchair might alter your
center of gravity within the wheelchair. A recessed back position might cause
the wheelchair to tip backwards, potentially resulting in injury. Always assess
1Ride Designs, Java Back and the RIDE logo are registered trademarks of Aspen Seating, LLC.

the need for anti-tippers or amputee axle adapter brackets to be added to your
wheelchair to help increase stability. Similarly, a more forward back position
might reduce the forward stability of the wheelchair, increasing risk of tipping
forward, with potential for injury.
WARNING: Do not use your JAVA Back without the foam insert and cover in
place.
WARNING: Failure to properly place and secure the JAVA Back to your
wheelchair might result in serious injury.
WARNING: Failure to accurately assess and adjust the fit of the JAVA Back might
result in serious injury.
CAUTION: Do not lift the wheelchair by the JAVA Back.
I. Tools and Hardware
The JAVA Back comes fully assembled and ready to install. The tools you need to
install and adjust the JAVA Back are included in the package:
•one4mmAllenwrench
•one5mmAllenwrench
•twoclampscrewsformountingbackto¾"diameterbackcanes.
II. The Mounting Hardware
Themountinghardwaretsallcommonwheelchairframetubingfrom¾"to1"
diameter. Use the screws that are already in the clamps for 7/8 inch and 1 inch
diameter tubing. Use the shorter screws, included in the Java Back Tools kit, for
¾"tubing.
2
Figure 1

III. Installing the Mounting Hardware
WARNING: No one should be seated in the wheelchair during the first four steps.
NOTE:Fastenertorquesnottoexceed35in.-lbs.
1. The Java Back ships with the
back shell engaged with the
mounting hardware to assist in
visualizing final assembly on
to the wheelchair.
2. Press the release latch button
(Figure 2) on one of the hardware
assemblies to separate the mounting
hardware from the back shell.
3. Loosen the clamp screw and swing
it out of the recess in the clamp to allow
the clamp to open fully (Figure 3).
4. Position the clamp over the
appropriate (left/right) wheelchair
cane, pull the two halves of the clamp
together around the tubing. Swing the
screw back into position within the
clamp recess (figure 4). Orient the clamp
to approximate the desired back height.
You will adjust for correct back height
once the user is sitting in the wheelchair.
Rotate the hardware about the canes
so the hardware is square with the chair
(Figure5).
5. Repeatsteps2through4forthe
opposite clamp ensuring the clamp is
set at the same height as the opposite
side previously installed. Attach the
back shell by guiding the bottom
attachment pins into the lower receiver
slots and then pushing the top attach-
ment pins into the latch mechanism.
Be sure both latch buttons pop back,
and tug the back shell forward to verify
that it is secure.
6. Wheelchair frame widths can vary
from chair to chair. If you have any
trouble aligning the mounting brackets
with the attachment pins, you can easily
adjust the width of the JAVA Back to
fit perfectly.
3
Figure 2
Figure 3
Figure 4
Figure 5
Release
latch button
Hardware
square with chair

Usethe5mmAllenwrenchtoloosen
the height and width adjustment screws
indicated in Figure 6. Move the pin
brackets on the shell inward/outward
enough to allow all four attachment pins
to align and latch securely into the
mounting hardware. Use the index
marks provided (Figure 7) to center the
back shell on the pin brackets. Tighten
the height and width adjustment screws
securely.
NOTE: The Java Back is assembled at the factory to fit a
wheelchair matching the width of the Java Back. The width
adjustment screws allow for fine tuning of width as outlined
above, and also have sufficient range of movement to permit
installationof15"andwiderJavaBacksonwheelchairs+/-1"from
speciedwidth,e.gthe16"wideJavaBackcanbeadjustedtot15",
16"and17"widewheelchairs.
7. Check to make sure the back shell detaches easily by pushing both latch
release buttons and pulling the back shell upward and forward. Make sure the
back shell reattaches easily and securely by guiding the bottom attachment pins
into the lower receiver slots and then pushing the top attachment pins into the
latch mechanism. Be sure both latch buttons pop back, and tug the back shell
forward to verify that it is secure. If there is any binding or if you have any trouble
removing or replacing the back shell, repeat step 6 as necessary for smooth
operation.
8. Place the appropriate wheelchair cushion on the wheelchair and have the user
transfer to the wheelchair. Ensure the user is correctly positioned on the cushion.
4
Figure 6
Figure 7
Height
and width
adjustment
screws are
circled
Index
marks

IV. Adjusting the Seat Depth
If you need to adjust the seat depth,
follow the instructions below.
1. Loosen the depth adjustment screws
indicated in Figure 8.
2. Move the back shell to the
appropriate seat depth for the user.
3. Tighten the screws just enough to
hold the back in position, and use the index marks near the adjustment slots to be
sure that both sides of the back are at the same depth.
5.Whenthedepthissetcorrectly,tightenallfourdepthadjustmentscrewssecurely.
V. Adjusting the Back Height
1. Loosen the clamp screws and move
the mounting brackets up or down on
the back canes as necessary to set the
back height so that the PSIS alignment
line labeled near the bottom center of
the JAVA back shell is at the level of the
posterior superior iliac spines (PSIS).
2. Tighten the two clamp screws.
3. If you need to position the mounting brackets to clear armrests, a rigidizer bar,
or other wheelchair hardware, you can adjust the height of the back independently
of the clamps. Begin by positioning the mounting clamps as close as possible to
thedesiredbackheight.Thenusethe5mmAllenwrenchtoloosentheheightand
width screws in the horizontal slots on the back shell brackets (Figure 9), move
the back shell to the desired height, and retighten the screws. Make sure the back
shell is level from left to right, and that you have preserved the width adjustment for
smooth and safe removal and replacement.
NOTE: Java Clamp Reversal Instructions
Clamps can be flipped upside down to achieve a higher backrest or to avoid
interferences. See steps A-D on page 6.
5
Figure 8
Depth
adjustment
screws are
circled
Figure 9
PSIS
Height and width adjustment
screws are circled
Clamp
screw
Java clamp
reversal option
Java clamp
as shipped

6
VI. Adjusting Seat to Back Angle
1.Usethe5mmAllenwrenchtoloosen
the back angle adjustment screws
indicated in Figure 10.
2. Adjust the JAVA Back to the desired
seat-to-back angle.
3. Tighten the screws just enough to
hold the back in position, and use the
index marks near the adjustment slots to be sure that both sides of the back are at
the same angle.
4. When the angle is set correctly, tighten the screws securely.
VII. Adjusting the Flexa-just Stays
1. The Flexa-just stays are thin
aluminum strips inserted into pockets
on the inside surface of the back cover,
behind the foam pads. NOTE: The
Flexa-just stays can be bent to provide
comfortable support to the gluteal area
below the level of the back shell.
Depending on the unique needs of the
user, you can easily adjust the stays to
provide the correct amount of support.
The stays are easy to bend using hand
pressure—no tools are required
( F i g u r e 11).
2. The stays can be bent while the user is sitting in the wheelchair. Simply insert
your hand between the foam insert and the sitter, grasp the lower portion of the
stays through the cover and foam insert, and bend in the amount and direction
needed to apply comfortable support.
3. If opening the back angle causes undesirable pressure or discomfort in the
gluteal area, simply bend the Flexa-just stays posteriorly to accommodate and
comfortably support the gluteal soft tissue.
4. If there is insufficient contact with the gluteal soft tissue, bend the stays
anteriorly to provide optimum support.
Figure 10
Back
angle
adjustment
screw is
circled
Figure 11
Flexa-just stays
Remove the two clamp
screws and two slot nuts
from the mounting bracket
and set aside.
A B
Move clamp to opposite
side of back.
Flip clamp upside down. Attach clamp to mounting
bracket using the two clamp
screws and two slot nuts
from A.
C D

VIII. Installing the Pelvic Wedges
NOTE: If you determine that further
posterior lateral pelvic support is
necessary, use the pelvic wedges to
provide greater control at the posterior
lateral iliac crests. See Figure 12 for
suggested orientation of pelvic wedges.
1. For evaluation, have the user lean
forward enough for you to position the
pelvic wedges on the front of the foam
insert cover to establish where they
should be installed.
2. Have the user lean back, and fine-tune the height and distance from the center
for each pelvic wedge.
3. Have the user lean forward or transfer from the chair, and remove the foam
insert and cover from the back shell.
4. Open the cover and attach the pelvic wedges to the front surface of the
Flexa-just platform, behind the foam pad, at the height and width you determined
during assessment. Press the hook and loop fasteners together firmly to hold the
pelvic wedges in place.
5.Closethecoverandreinstallthefoaminsertandcoveronthechair.
6. The user can now transfer back into the wheelchair.
7. Check the position of the pelvic supports and verify that the user has
appropriate balance and control.
IX. Installing the Optional Lateral Trunk Supports
NOTE: If you are not installing the
optional lateral trunk supports, go to
Section X.
1. With the user in the chair and
the foam insert and cover installed,
estimate where the lateral trunk
supports will be installed by slipping
them between the back shell and the
foam insert and cover (Figure 13).
2. Once you have established the approximate position of the lateral trunk
supports, transfer the user from the wheelchair.
3. Remove the foam insert and cover from the back shell.
4. Attach each lateral support using the mounting hardware supplied with them.
With the lateral trunk support positioned on the front of the back shell, insert the
7
Figure 12
Figure 13
Pelvic
Wedges
A
B
C

8
provided screw (A) and flat washer (B) from the outside of the back shell through
the vertical slot in the back shell and the horizontal slot in the trunk support, and
hand tighten into the threaded slot nut (C).
5.Repeatforadditionaltrunksupports.
6. Reattach the foam insert and cover.
7. The user can now return to the wheelchair for final adjustment of lateral trunk
support alignment.
8. When you have determined the final position of the trunk supports, tighten the
mountinghardwaresecurelywitha5mmAllenwrench.
X. Adjusting Dynamic Back Movement
NOTE: As supplied by Ride Designs,
the dynamic back adjustment is set to
allow maximum movement. To reduce
or eliminate dynamic back movement,
follow the instructions below.
1. Use the 4mm Allen wrench to set
the amount of travel for dynamic back
movement (Figure 14).
2. With the adjustment screws turned
all the way in (clockwise), there is no
dynamic back movement. Turning the adjustment screws out
(counterclockwise) permits the back to move against spring tension.
CAUTION: If you choose an intermediate amount of dynamic back movement, be
sure that the screws on each side are adjusted equally by turning them all the way
in and then backing them out the same number of turns.
XI. Installing a Universal Headrest Mount
The tall JAVA back shell has provisions for attaching
a Universal Headrest Mount, which is available
through your Ride Designs supplier. The Universal
Headrest Mount accepts most commercially available
headrests. To attach the Universal Headrest Mount,
remove the four small plastic plugs from the threaded
inserts near the top of the back shell and use the
mountinghardwareprovided(Figures15and16).
XII. Ensure all Fasteners are secure
Usingthe4mmand5mmAllenwrenches,recheck
all of the fasteners and tighten them securely.
Figure 14
Figure 15
Figure 16
Dynamic
back
adjustment

9
Initial wearing schedule
Prior to prolonged sitting, you should use your Ride JAVA Back for a short period
of time and visually check any area that contacts the back support. Any reddened
area should fade within 10-30 minutes. Contact your doctor or therapist if redness
persists for longer than 30 minutes. As long as skin inspections do not show red
areas persisting more than 30 minutes, you are safe to continue use. Make a
careful skin check at least daily, even after skin tolerance is established. Continue
to perform routine intermittent pressure relief techniques (forward lean) as advised
by your healthcare professional.
WARNING: If any redness associated with the use of the JAVA Back persists
for longer than 30 minutes, cease using and contact your therapist or doctor
immediately.
Follow-up
We recommend you have your seated posture and skin integrity checked by your
healthcare professional at least annually, or whenever you experience a change
in your weight, posture, or general condition that could impact your ability to sit
safely, comfortably, and functionally.
Retighten all of the fasteners regularly, and
periodically check the hardware for security
and wear.
Use of your Ride JAVA Back
Your Ride JAVA Back is designed to provide
optimal pelvic support and trunk balance while
allowing upper body freedom.
You can remove or attach the back shell
with one hand.
To remove the back shell from
the wheelchair
1. Push each of the two latch release buttons
on the mounting hardware (Figure 17).
2. Rotate the back shell forward then lift
upward (Figure 18 and 19).
To attach the back shell
to the wheelchair
1. Guide the bottom two attachment pins into
the lower receiver slots on the latch brackets
(Figure 20).
Figure 17
Figure 18
Figure 19
Latch
release
button
Rotate
forward
Lift
upward

2. Push the back shell down and back firmly
to engage the top two attachment pins into the
upper receiver slots (Figure 21).
3. Check that both latch release buttons have
popped back, indicating that the latches are
engaged (Figure 21).
4. Tug the back shell forward to verify that it is
attached securely.
Care and Maintenance
of your Ride JAVA Back
Cleaning the JAVA Back
foam insert and cover
1. Remove the foam insert and cover from the
JAVA back shell.
2. Open the cover and remove the foam pad,
Flexa-just stays (make note of left and right,
and direction of bend), and flexa-just platform with pelvic wedges from the outer
cover. Note: Ride Designs recommends using a permanent marker to carefully
outline the position of the pelvic wedges so that you can reattach them in the same
positions if moved during cleaning.
3. Close the cover. Machine or hand wash the cover in warm water (regular
detergent, no bleach).
4. Hang dry.
5.Whenre-insertingtheFlexa-juststays,returnthemtotheircorrectpockets,
facing in the correct direction.
6. Insert the foam pad and Flexa-just platform with pelvic wedges. Be sure the
inserts are not folded or wrinkled inside the cover.
7. Close the cover and reattach the foam insert and cover to the back shell.
WARNING: Installing the Flexa-just stays or pelvic wedges in the wrong positions
might result in serious injury to the user.
Cleaning the JAVA back shell and hardware
Using a damp cloth or mild disinfectant, clean the shell, pelvic wedges, and
mounting hardware as needed.
CAUTION: Do not clean your JAVA Back with isopropyl alcohol or any other
chemical solvents.
10
Figure 20
Figure 21
Latch
release
button
popped
back

© 2013, Ride Designs.
OH009 2.13 Rev. D.
The Ride JAVA Back support works best when
used with the Ride Forward™or Ride Custom Cushion.
The Ride Forward cushion is most appropriate for people with mild to moderate
risk for skin breakdown.
For people at higher risk for skin breakdown, and/or more challenging postural
control needs, the Ride Custom Cushion is the ultimate in postural support
and skin care. It is specifically contoured to support a person’s unique size,
shape, posture and functional requirements.
*Cut away view of spacer mesh integrated cushion cover.
The Ride Forward™Cushion
▲
The Ride Custom Cushion*
▲
Table of contents
Other Ride Personal Care Product manuals