WARNING: KEEP ALL FLAME AND HEAT
SOURCES AWAY FROM THIS TENT FABRIC.
THIS TENT MEETS THE FLAMMABILITY REQUIRE-
MENTSOFCPAI-84.THEFABRICMAYBURNIFLEFT
IN CONTINUOUS CONTACT WITH ANY FLAME
SOURCE. THE APPLICATION OF ANY FOREIGN
SUBSTANCE TO THE TENT FABRIC MAY RENDER
THE FLAME RESISTANT PROPERTIES INEFFECTIVE.
18-To have use of the vehicle for the day, disconnect the
tent’s upper and lower sleeves and close the vehicle open-
ing. Move the vehicle away from the tent. Secure the upper
and lower sleeves to the tent’s body with the dowel and
loop fasteners (Fig 20).
Fig 20
Take Down The Tent
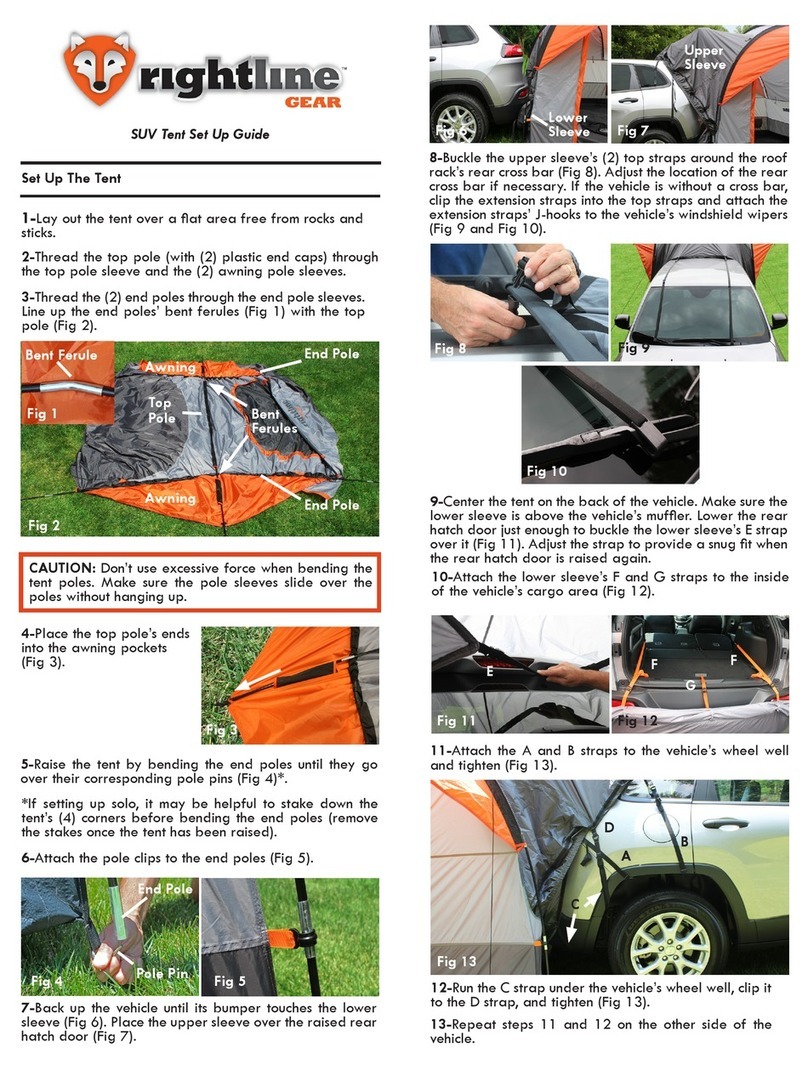
1-Disconnect the upper and lower sleeves and move the
vehicle away from the tent.
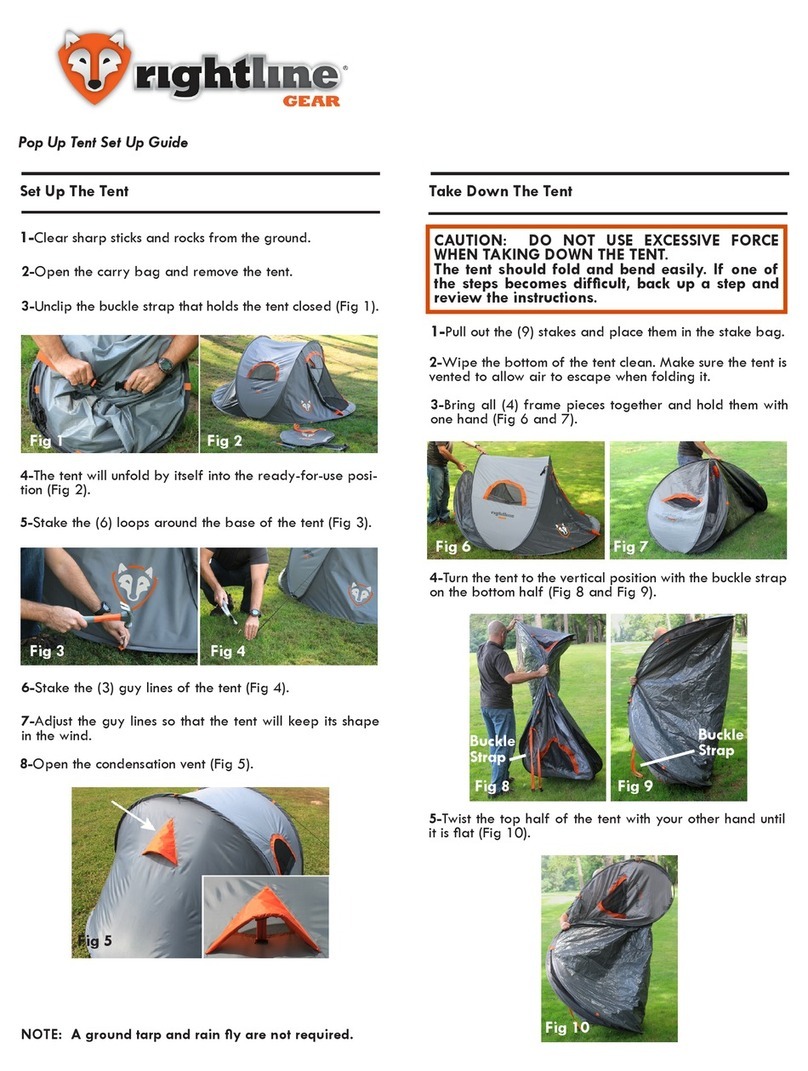
2-Zip up all windows and doors, leaving a small opening
for air to escape.
4-Release the pole clips, lift the end poles from the pole
pins, and lower the tent to the ground.
6-Push all poles out of their pole sleeves and place them
in the pole bag.
8-Fold the sides of the tent in, leaving a 6-8” gap in the
middle (Fig 25). Fold side A over side B. Fold the (2) ends
of the tent in, leaving a gap in the middle (Fig 26).
9-Place the pole bag, stake bag, and rainy on one of the
folded ends (Fig 26). Roll the tent as tightly as possible
and place it in the carry bag.
1-Position the rainy over the tent with the curved side
towards the vehicle (Fig 21).
Fig 21 Fig 22
Fig 26
Fig 24
Fig 23
3-Pull out all stakes and place them in the stake bag.
Pole Bag
Gap
Fig 25 Stake Bag
A
B
Fasteners
Rainy
1 Year Manufacturer’s Limited Warranty
www.rightlinegear.com/product-warranty.html
5-Pull the top pole out of the awning pole pockets.
7-Make the tent into a square shape on the ground.
15-Attach the A and B straps’ J-hooks to the vehicle’s
fenders and tighten (Fig 16 and 17).
Fig 16
16-Run the C straps under the rear bumper, clip them to
the D straps, and tighten (Fig 16).
Fig 17
B
A
C
D
Vehicle
Opening
Set Up The Rainy
The use of the rainy is optional, depending on weather
conditions.
2-Connect the rainy’s (2) male buckles to the awnings’ (2)
female buckles (Fig 22).
2-Fasten the (2) hook-&-loop tabs around the end poles
(Fig 23).
3-Hook the (4) elastic tensioners to the corner rings (Fig
24).
Corner
Ring
J-hook
17-If experiencing windy conditions, tie the guy lines to
the (4) corners of the tent (Fig 18) and stake them down
(Fig 19).
Fig 18 Fig 19
Elastic
Tensioner


