RINN PETLY Guide

Instruction Manual
+ Warranty
01
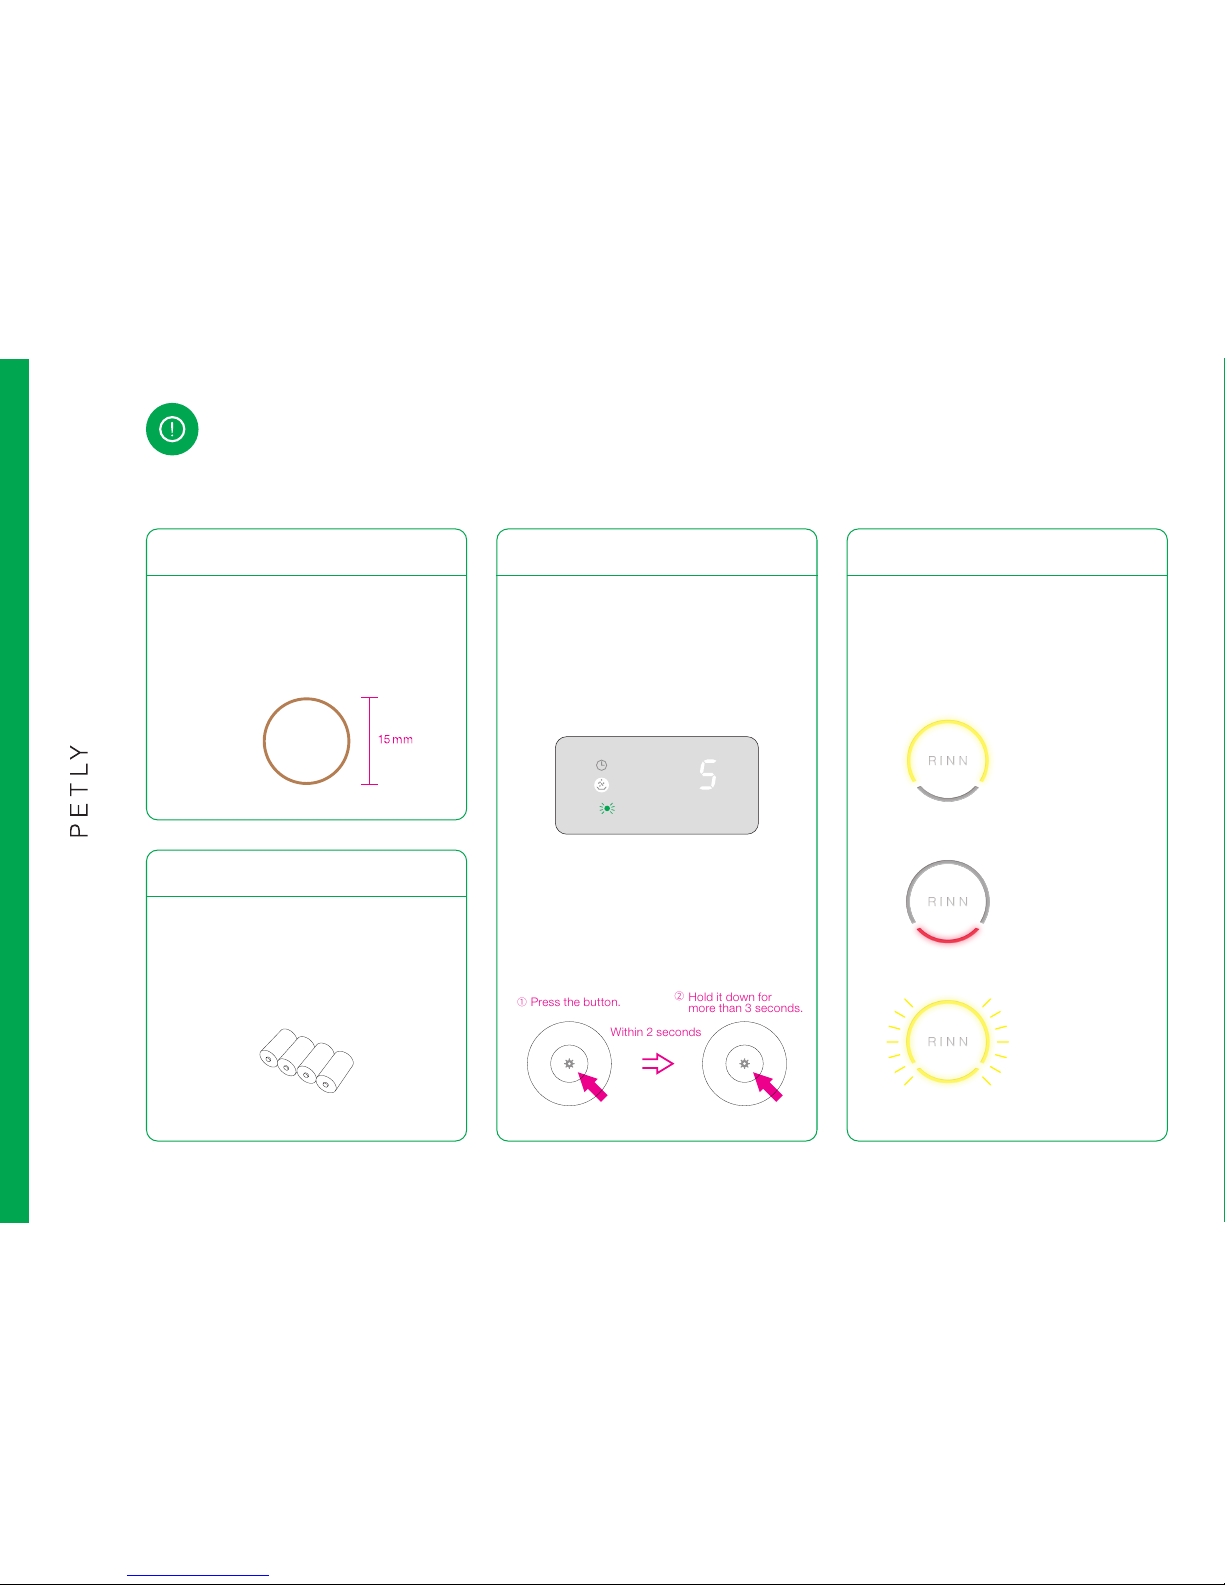
Always ac tivate the manu a l mode (pre s s
the Setu p b u t to n, and within 2 sec o n d s
pre s s i t again and ho l d it down f or more
th a n 3 s e co n d s) a f t e r refi l li n g th e f oo d
container. Pu t th e d i s p ensed fo od b a c k
into the food container, and the pet feeder
can now be used.
Test the pet feeder before using it
Batteries are sold separately
Batteries are not included with this product.
Please purchase them separately.
Mang a n e se Batterie s a n d r e c hargeabl e
batteries are not recommended as they may
cause the feeder to malfunction.
D A l k a li n e B a t te r y ×4
D o n ot u s e dr y f o od t h at s t ate s
l a r g e
kibbles,
or kibbles th a t a r e l a rger than
15 m m . This may jam up the fe eder and
cause it to malfunction.
Take note of the size of dry food
①Press the button.
Within 2 seconds
Please set the serving amount to 5g.
Measure the exact amount (g) of dr y food
t h a t t h e f e e d e r s e r ve d . B a s e d o n t h e
mea s ured a mount, ca l culate t he num b er
o f t i m e s / a m o u n t y o u s h o u l d s e t . T h e
actual serving amount may dif fer accord-
ing to the type and size of the food.
Please read the instructions before use
Hold it down for
more than 3 seconds.
②
If there is a problem that af fects usability,
then the LED ring in the center will let you
know by lighting up.
If the LED ring is lit, please refer to page 6 of
this manual for further action.
If the LED Ring is lit
F e e d J a m
L o w B a t t e r y
Low Feed Amount
02
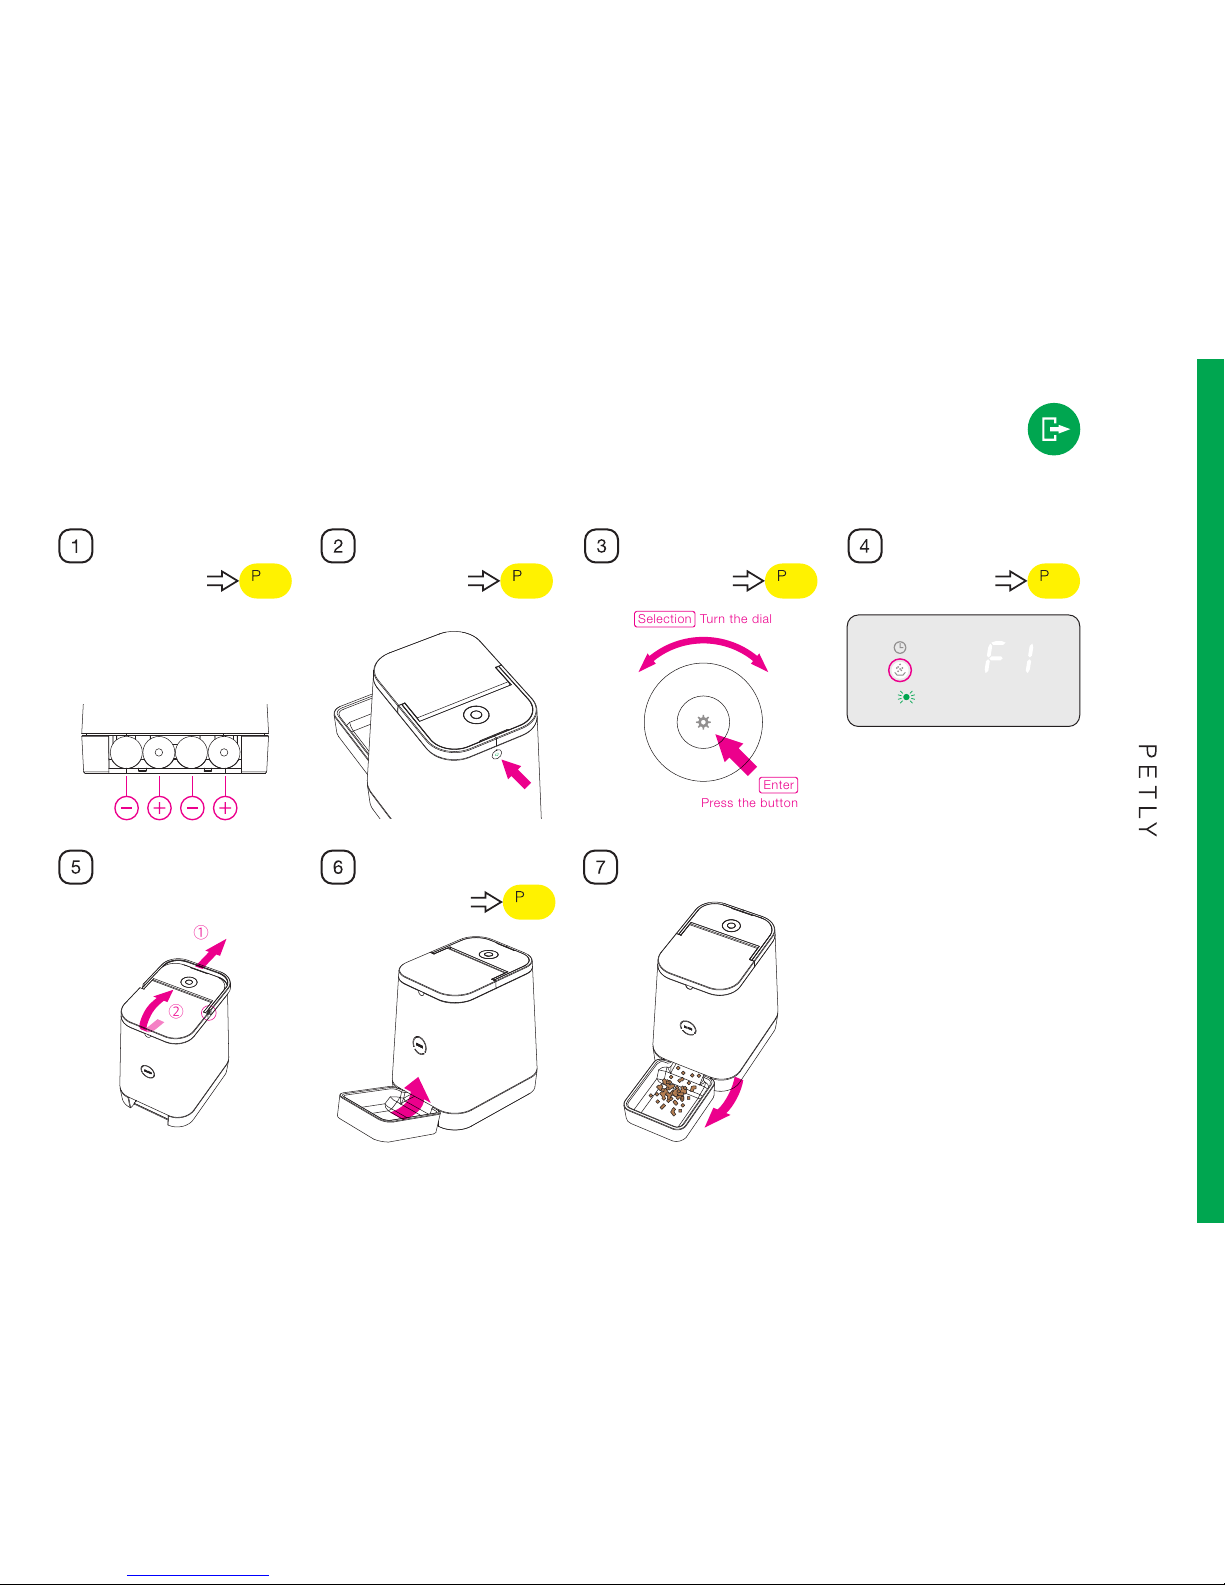
Quick Start Guide
Insert battery Tur n po wer ON Set current time Set feed amount/time
Fill feed Attach tray
①
②
Perform a feeding test
Set in the order of :
feed amount →feed time.
Max feeding frequency that can be
set is four times.
07 10
12
08 09
Selection Turn the dial
Enter
Press the button

03
01
02
03
04
05
06
07
08
09
10
11
12
13
14
15
17
18
Contents
Instructions Before Use
Quick Start Guide
Contents
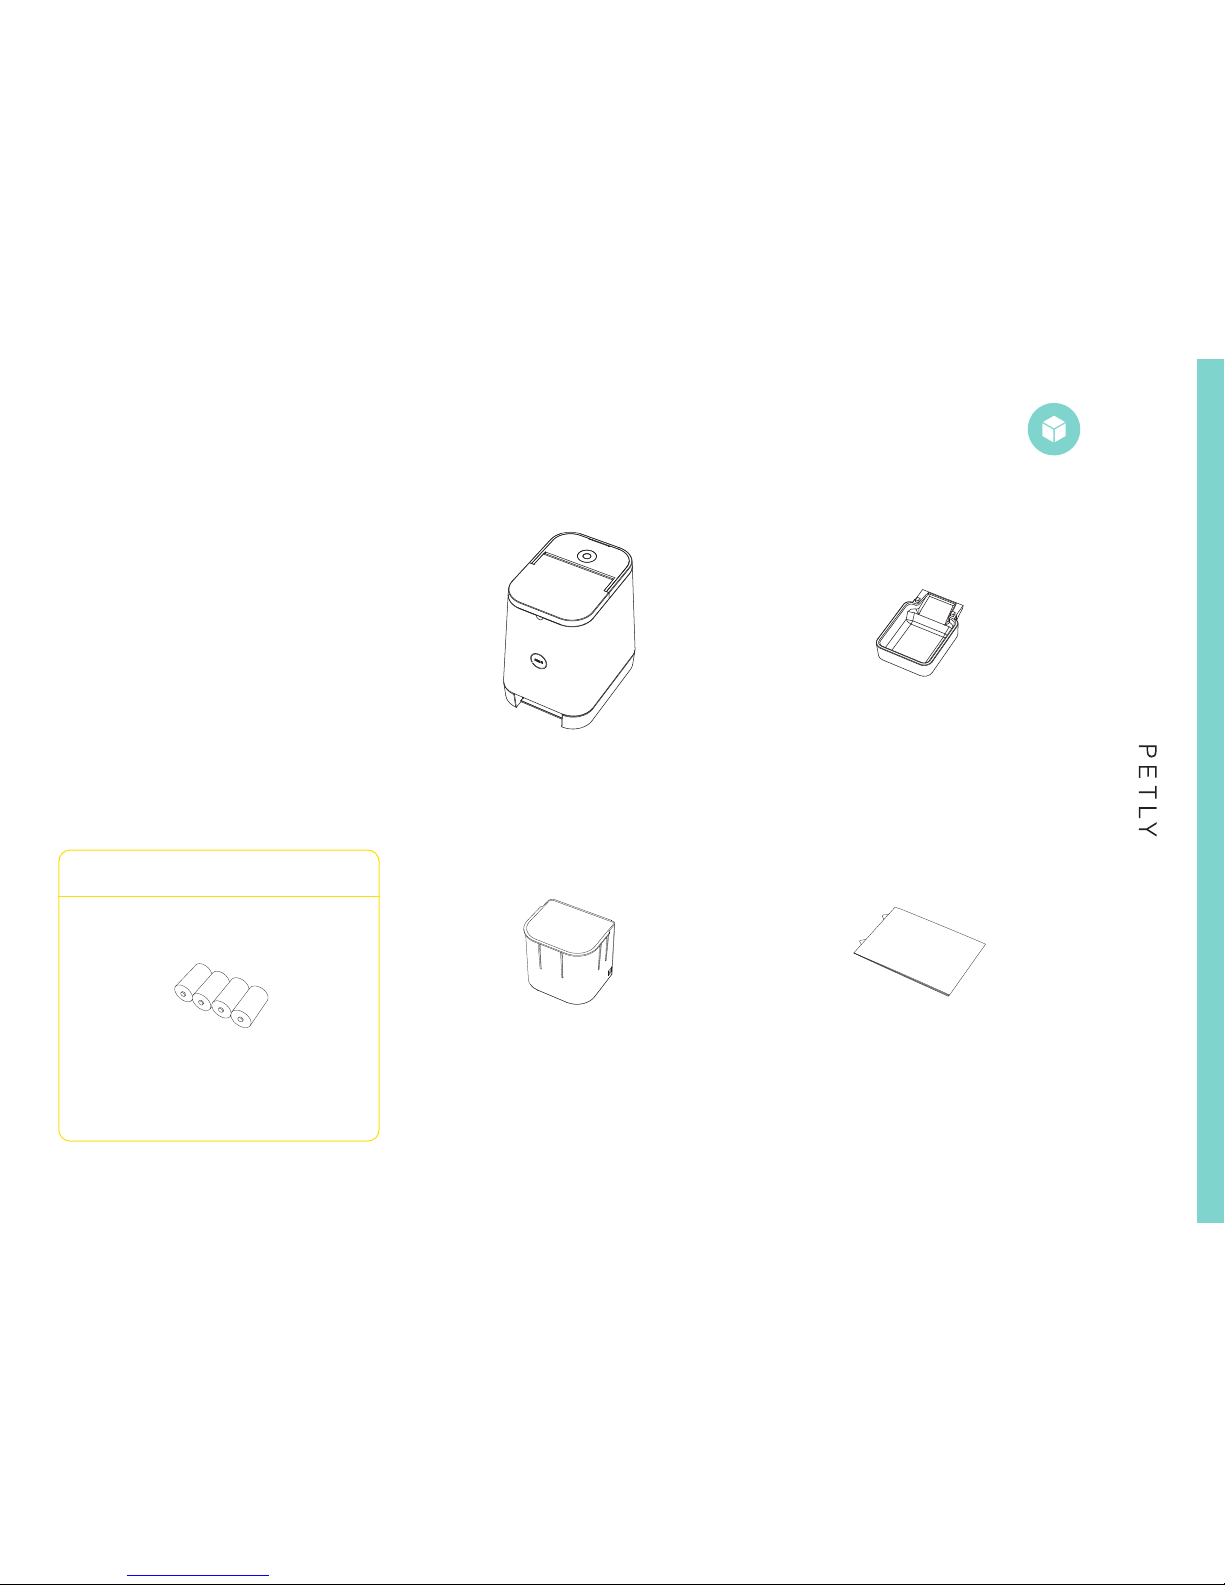
Package contents
Names of parts
LED Ring Indications
How to Change Batteries
How to Operate the Feeder
How to Set the Clock
How to Set the Feeding Time and Amount
How to Fill
Maintenance
Precautions
Precautions for Safety
About Warranty
FAQ
Warranty
Customer Support
04
Feeder ×1
Instruction Manual + Warranty ×1
D Alkaline Battery ×4
Food Tray ×1
washable
Food Tank ×1
pre-attached to the main body
washable
Batteries Sold Separately
Package Contents

05
Names of Parts
Setup Dial
Setup Button
Lid
LED Ring
LED Disp lay
Handle
Power Button
B at te r y B ox
Ser ial Nu mber
※Written on the bottom
Clock Icon
Feeding Icon
Feeding Frequency Icon
(F1 to F4)
Setup Dial
Digital Counter
Setup Button
P r o d u c t n a m e
D i m e n s i o n s
M a te r i a l s
W e i gh t
B a t t e r y
M a n u f a c t u r in g
S t a n d a r d s
Mad e i n
F e e d i n g s e t u p
S e r v i n g a m o u n t
(of pet food)
Ta n k s i z e
Clo c k d i s p lay
PETLY
L 20 x W 26 x H 28.2cm
Body: ABS Lid: PC Plate: PP
2.2kg
4 D Alkaline batteries
(sold separately)
RoHS Standard
Japan
30-minute interval
Up to 4 times by hour
(Repetitive over 24 hours)
5g to 50g per serving
(0g also possible)
Approx. 2L
(1kg of dry food)
24 hour setting
Specifications and appearance are subject to change without notice
du e to up gr ade s.
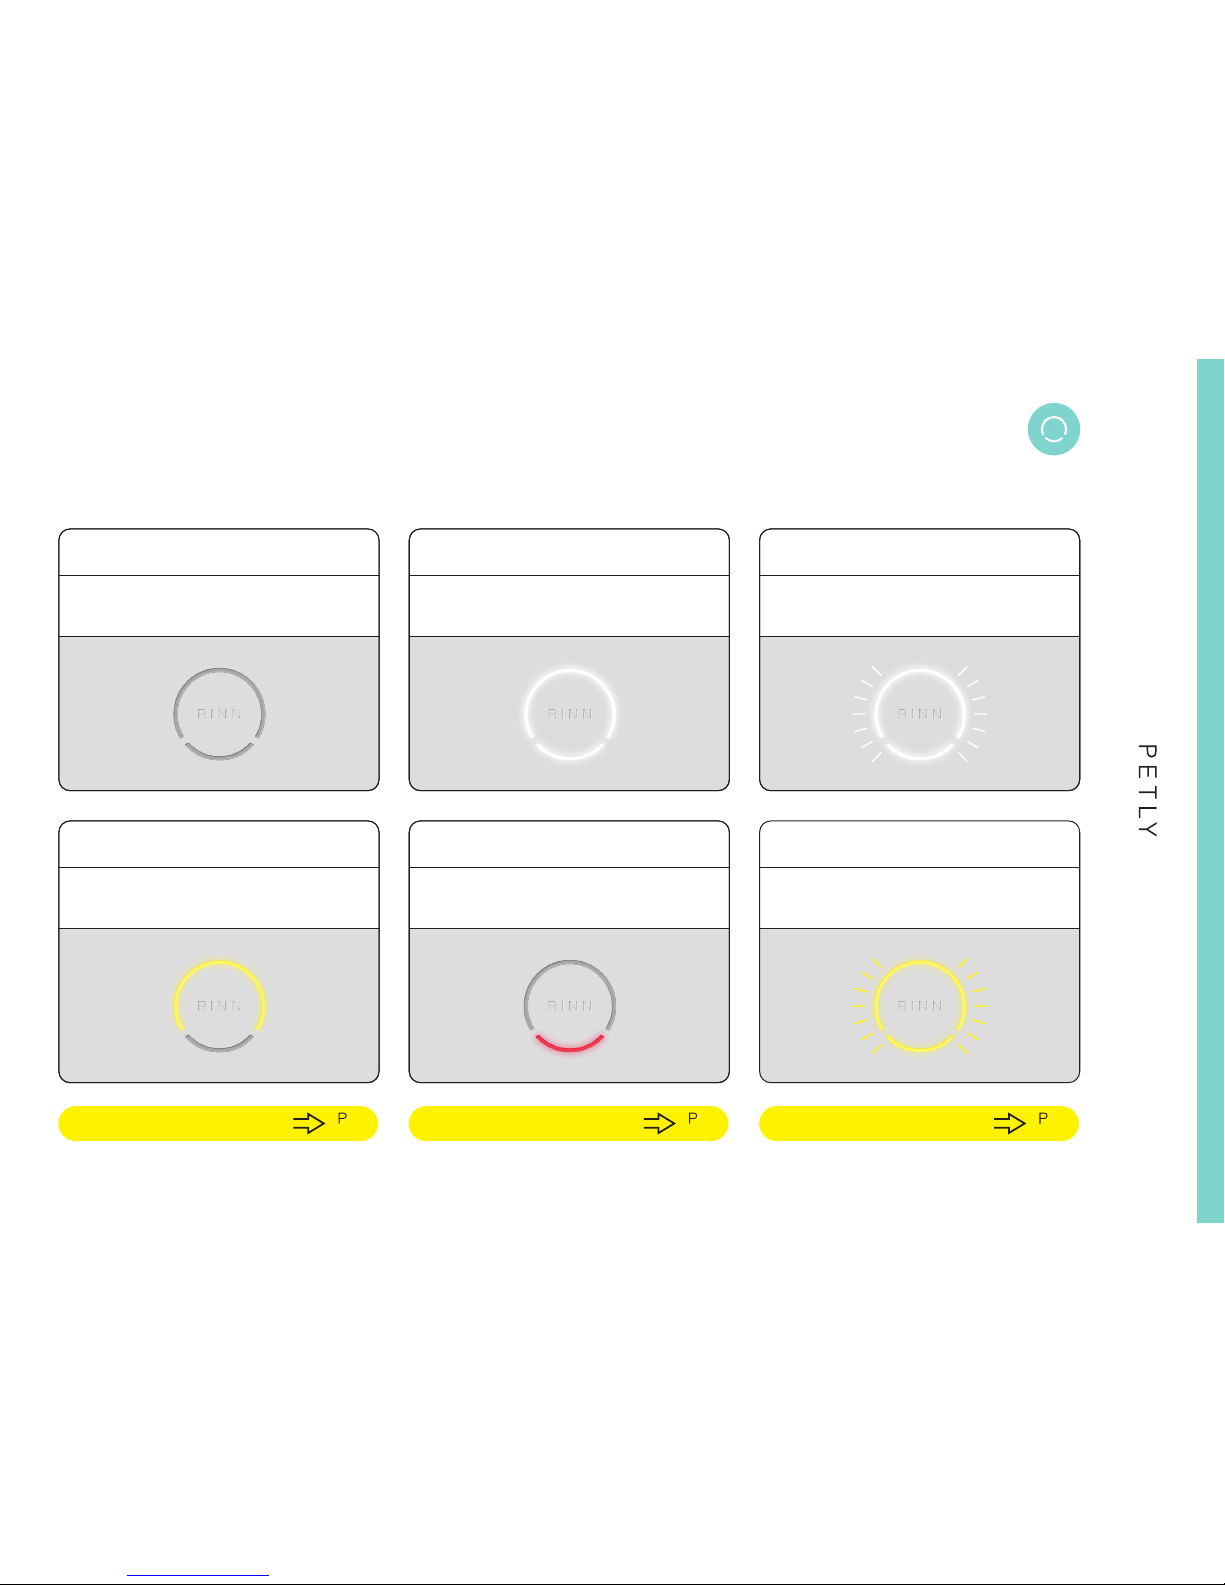
06
No light White light flashes 2times. White light flashes 3times.
Normal Power ON Power OFF
The upper ring shines yellow. For 1 minute every 30 minutes,
the bottom ring shines red. The ring flashes yellow.
When the amount of food is low When the amount of remaining
battery is low When food is stuck
11
Fill up the food. 07
Change the batteries. 11
Perform maintenance.
LED Ring Indications
07
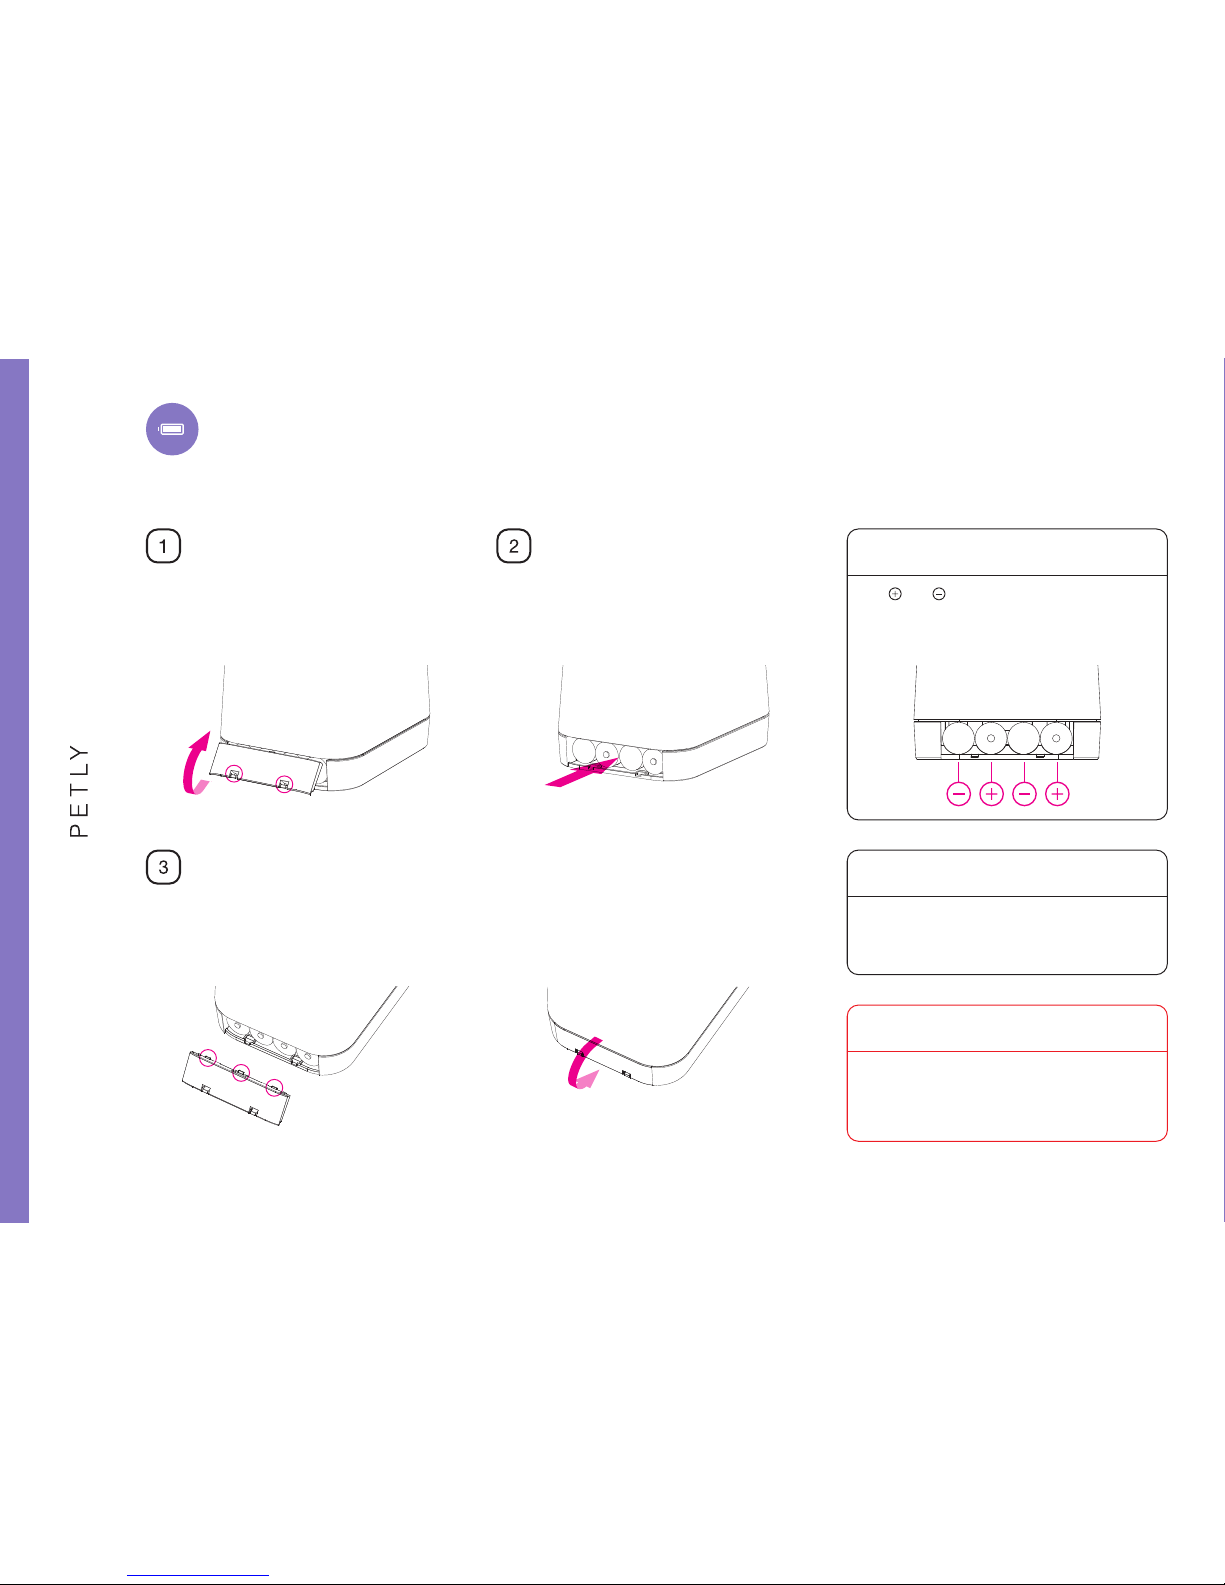
Fit the protruding top part of the lid onto the
upper part of the battery compartment.
Slide it in until the 2 tabs click to close it firmly.
While pressing down on the clips,
lift the lid upward.
Use four new D batteries (alkaline)
and insert them as shown.
The clock will be reset when the batteries are
changed. After changing the batteries, make
sure to reset the clock.
Please remove and store the batteries when not
using PETLY for long periods of time. Deteriora-
tion of the insulation of batteries can cause
electric shocks, leak, fire, and various injuries.
Remove the batteries
when not in use for long periods of time
Set the clock
after changing the batteries
The and ends of the batteries are shown
in this figure.
The electrodes in the diagram below are
shown as they would be facing the user.
Direction of batteries
How to Change Batteries
Lift the lid to the battery box Change the batteries
Close the battery box lid

08
To activate manual feeding, press the Setup button once, and within 2 seconds press it again
and hold it down for more than 3 seconds. Food will be dispensed continuously as long as the
Setup button is being held down.
Manual feeding
Press the Power button on the back to turn
the feede r o n o r o f f. Even if the feedin g
set ting s are set, it will not f u nction if the
power is turned off.
Power ON / OFF
Press the button
※Automatically stops after about 50g of food.
How to operate the feeder
①Press the button.
Hold it down for
more than 3 seconds.
②
Within 2 seconds
The Power button is located at the back of
the main body.
Power button location
When the power is turned off, the LED light
will flash white three times.
When the power is turned on, the LED light
will flash white twice.
LED Ring

09
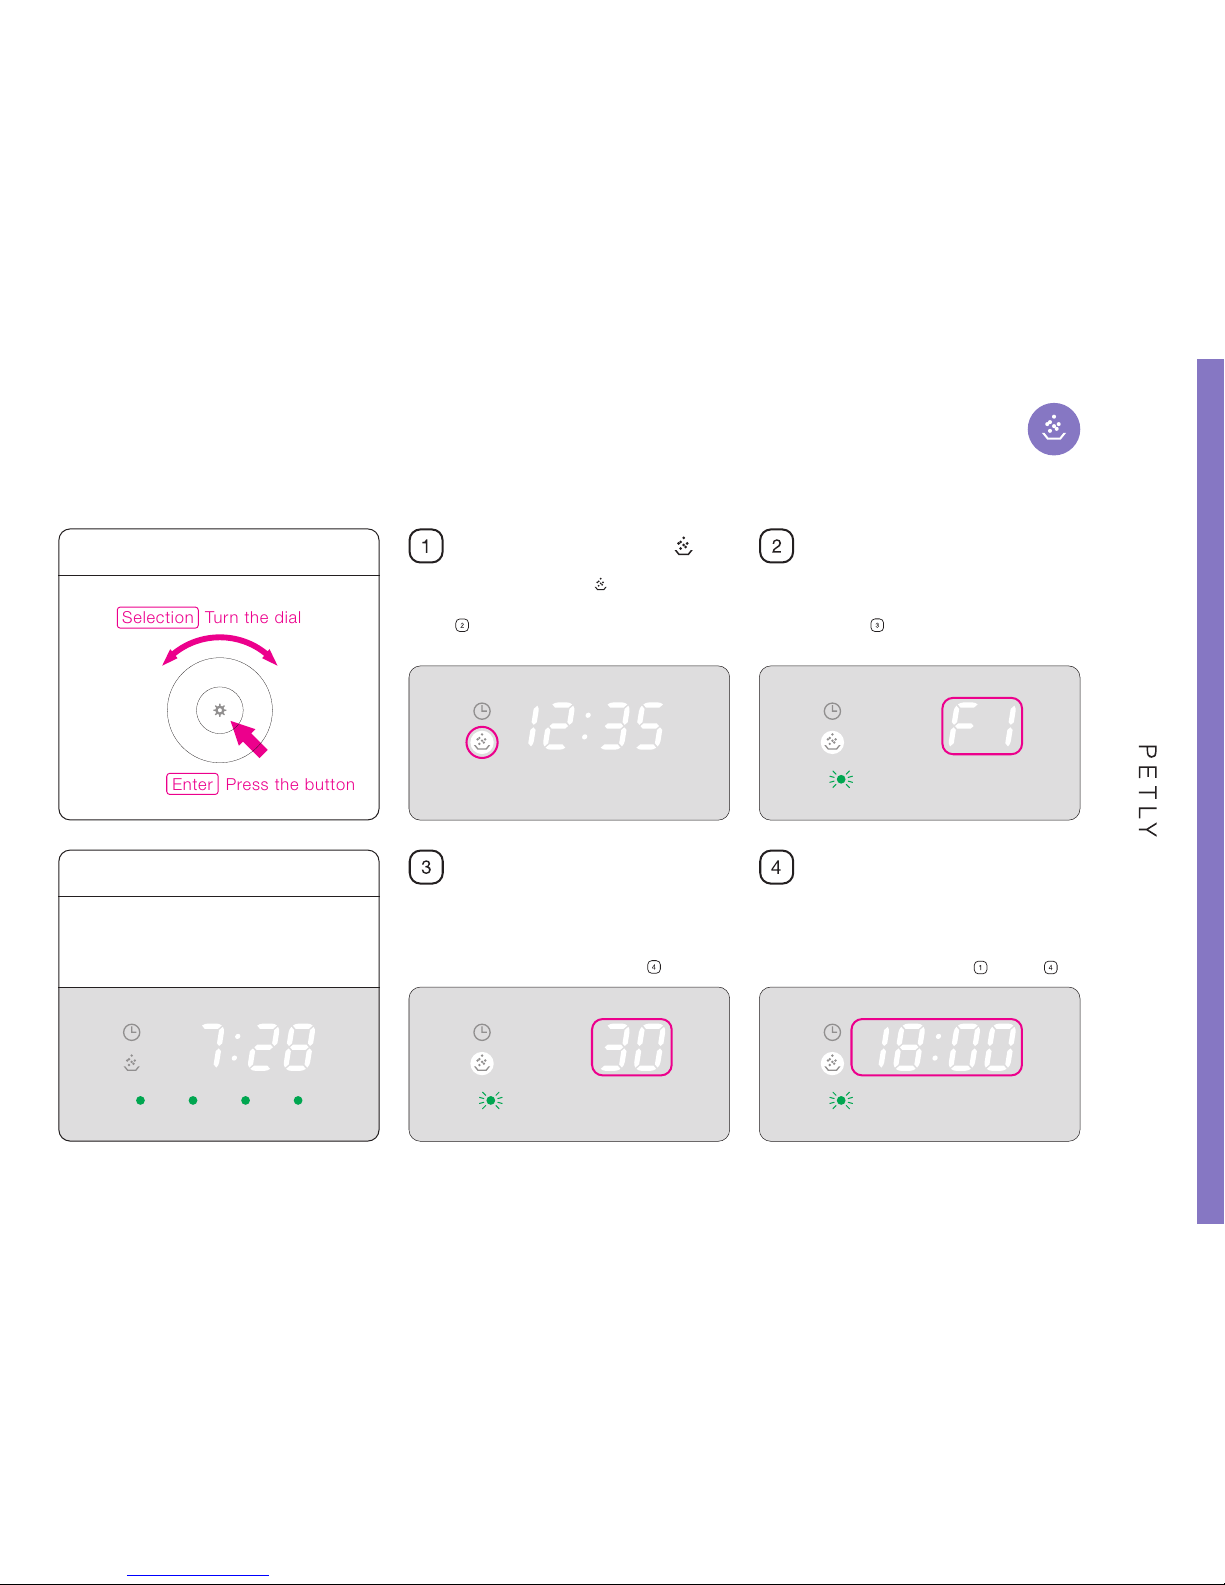
Turn the dial and select the icon.
Press the Setup button to go to the next step
(Step )
.
Turn the dial and set the current hour.
Press the Setup button to go to the next step
(Step )
.
Turn the dial and set the minutes.
Press the Setup button. The display will stop
flashing when the setup is complete.
Turn the dial and select the icon
Usually, the display does not show the
current time. To see it, press the Setup
button once.
Display the current time
Setup
※The screen will return to the main screenafter 20 seconds of inactivity.
Setting the Clock (Current Time)
Selection Turn the dial
Enter Press the button
Set the hour Set the minutes
※
Set by the hour from 0:00 to 23:00
The clock will be reset when the batteries are
changed. After changing the batteries, make
sure to reset the clock.
Se t th e cl oc k
af ter c ha ng in g the batt er ie s
Press the button
Turn the dial and select the icon
Turn the dial and set the amount of food released
in one feeding. You can set the feeding amount
from 0g to 50g in 5g intervals. Press the Setup
button to go to the next step (Step )
.
10
Turn the dial and select the icon.
Press the Setup button to go to the next step
(Step )
.
Turn the dial and select the Feeding Frequency
(F1~F4)
. Press the Setup button to go to the
next step (Step )
.
When the amount /time is set, the icon that
indicates the number of feeding (F1~F4) will turn
green. Check if the number of set feeding times
matches the number of green indicators.
Turn the dial and set the time for each feeding.
Press the Setup button, The display will stop
flashing and setup is complete. When setting the
time for F2 and up, repeat steps through .
About the Feeding Frequency Icons
※The Feeding Frequency Icons will not shine for amounts set at 0g. ※If the amount is set to 0g, then the next automatic feeding will not take place. ※Every 30 minutes from 00:00~23:30 can be set.
How to set the feeding time and frequency
Setup
※The screen will return to the main screenafter 20 seconds of inactivity.
Selection Turn the dial
Set the feeding time
Select the feeding frequency
Set the amount of food
Enter Press the button
11
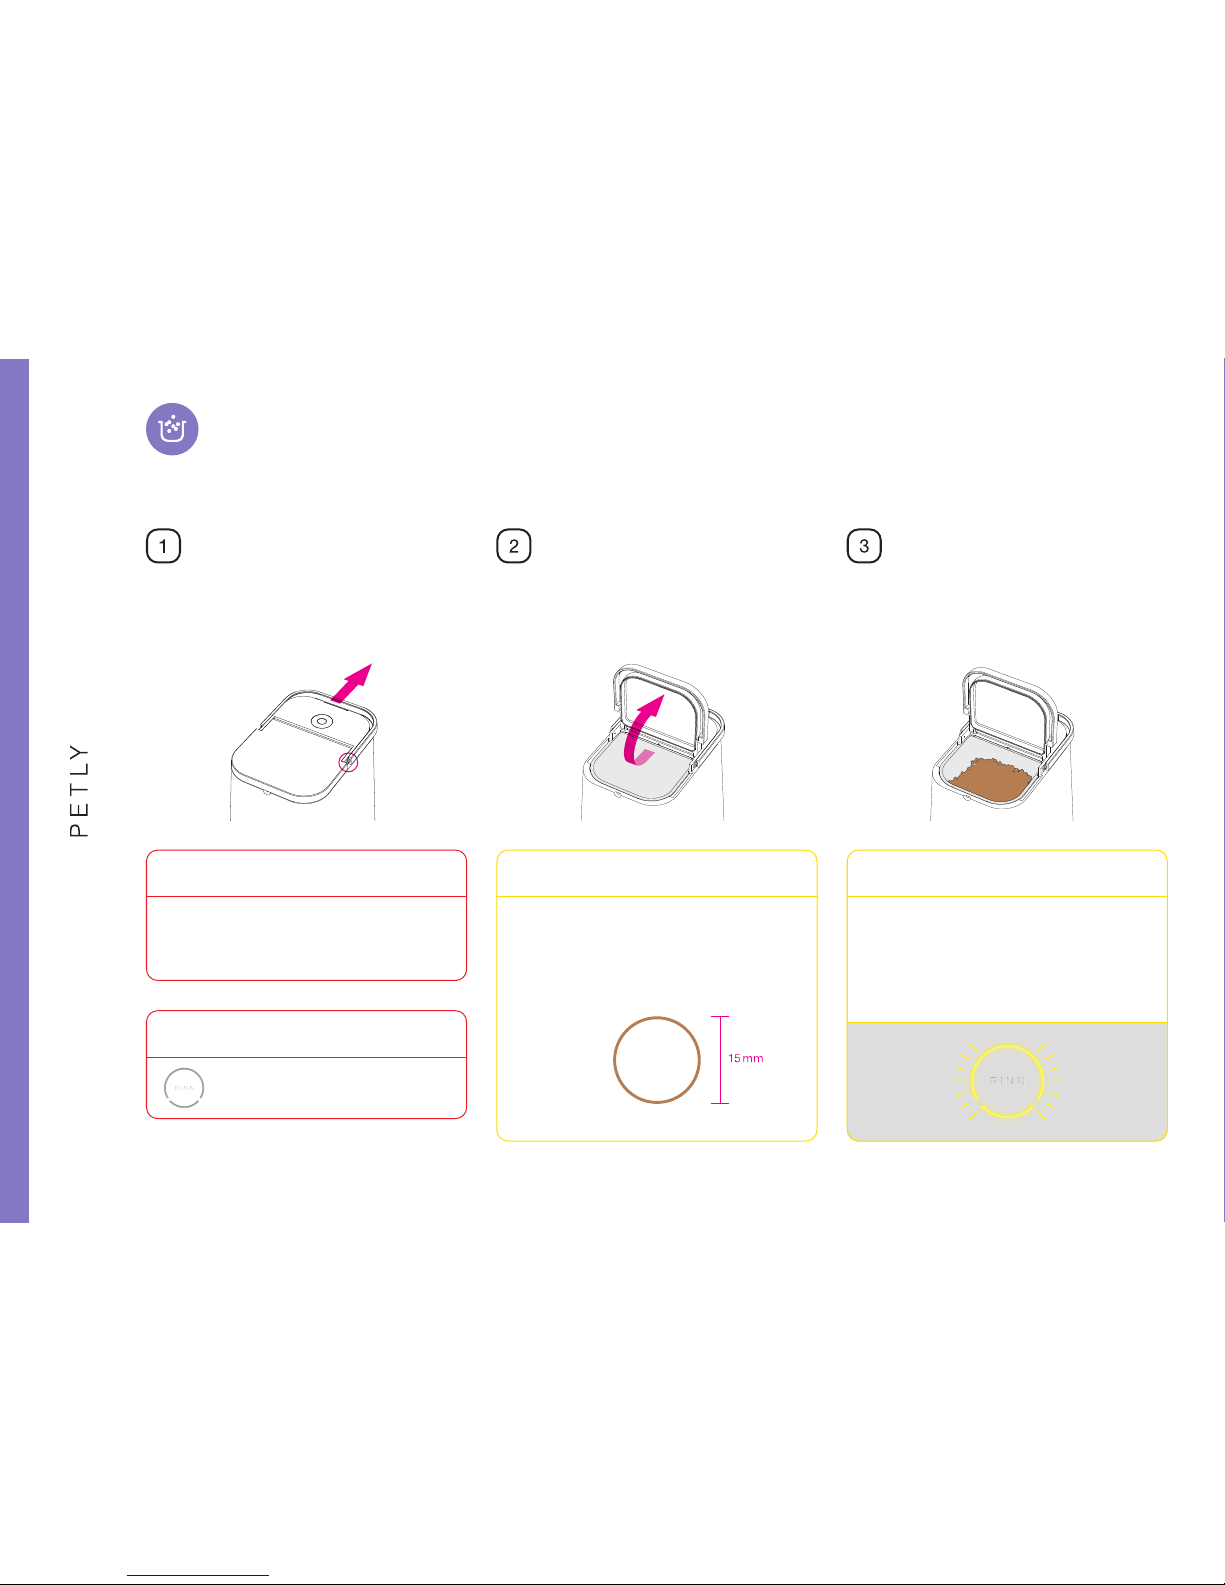
Pull the handle towards the back and unlock
the lid.
Check that the food tank is inserted correctly. Slowly pour food into the food tank.
The food tank holds approximately 1kg of
dry food.
If the pet feeder is jammed, clean the affected
areas gently with a dry cloth. After cleaning,
check if the feeder operates properly by
manual feeding. The blinking of the LED ring
can be resolved by turning the power off.
When food is stuck
Food that has large pellets or has pellets that
are over 15mm in diameter cannot be used in
this product. Large sized pellets can cause
jamming and damage to the machine.
Be careful of the food pellet size
Please do not use any other food besides dry
food
(such as canned food)
.
Using wet food can cause damage.
Only use dry food
Press the Setup button to confirm
the LED Ring is not lit.
After lling feed,
conrm the LED Ring is not lit
How to unlock Open the lid Add food
How to ll PETLY
12
After cleaning with water, please wipe the
moisture from the entire body of the feeder.
Leaving moisture on the body can cause short
circuiting and damage.
Dry thoroughly after washing
Please regularly perform maintenance on the
feeder. If left dirty, clogging and the cultivation
of bacteria may result.
Do maintenance regularly
During maintenance and inspection, remove
the batters for safety.
R em ove b a t te ri e s
du ri ng m ai nte nan ce
Maintenance
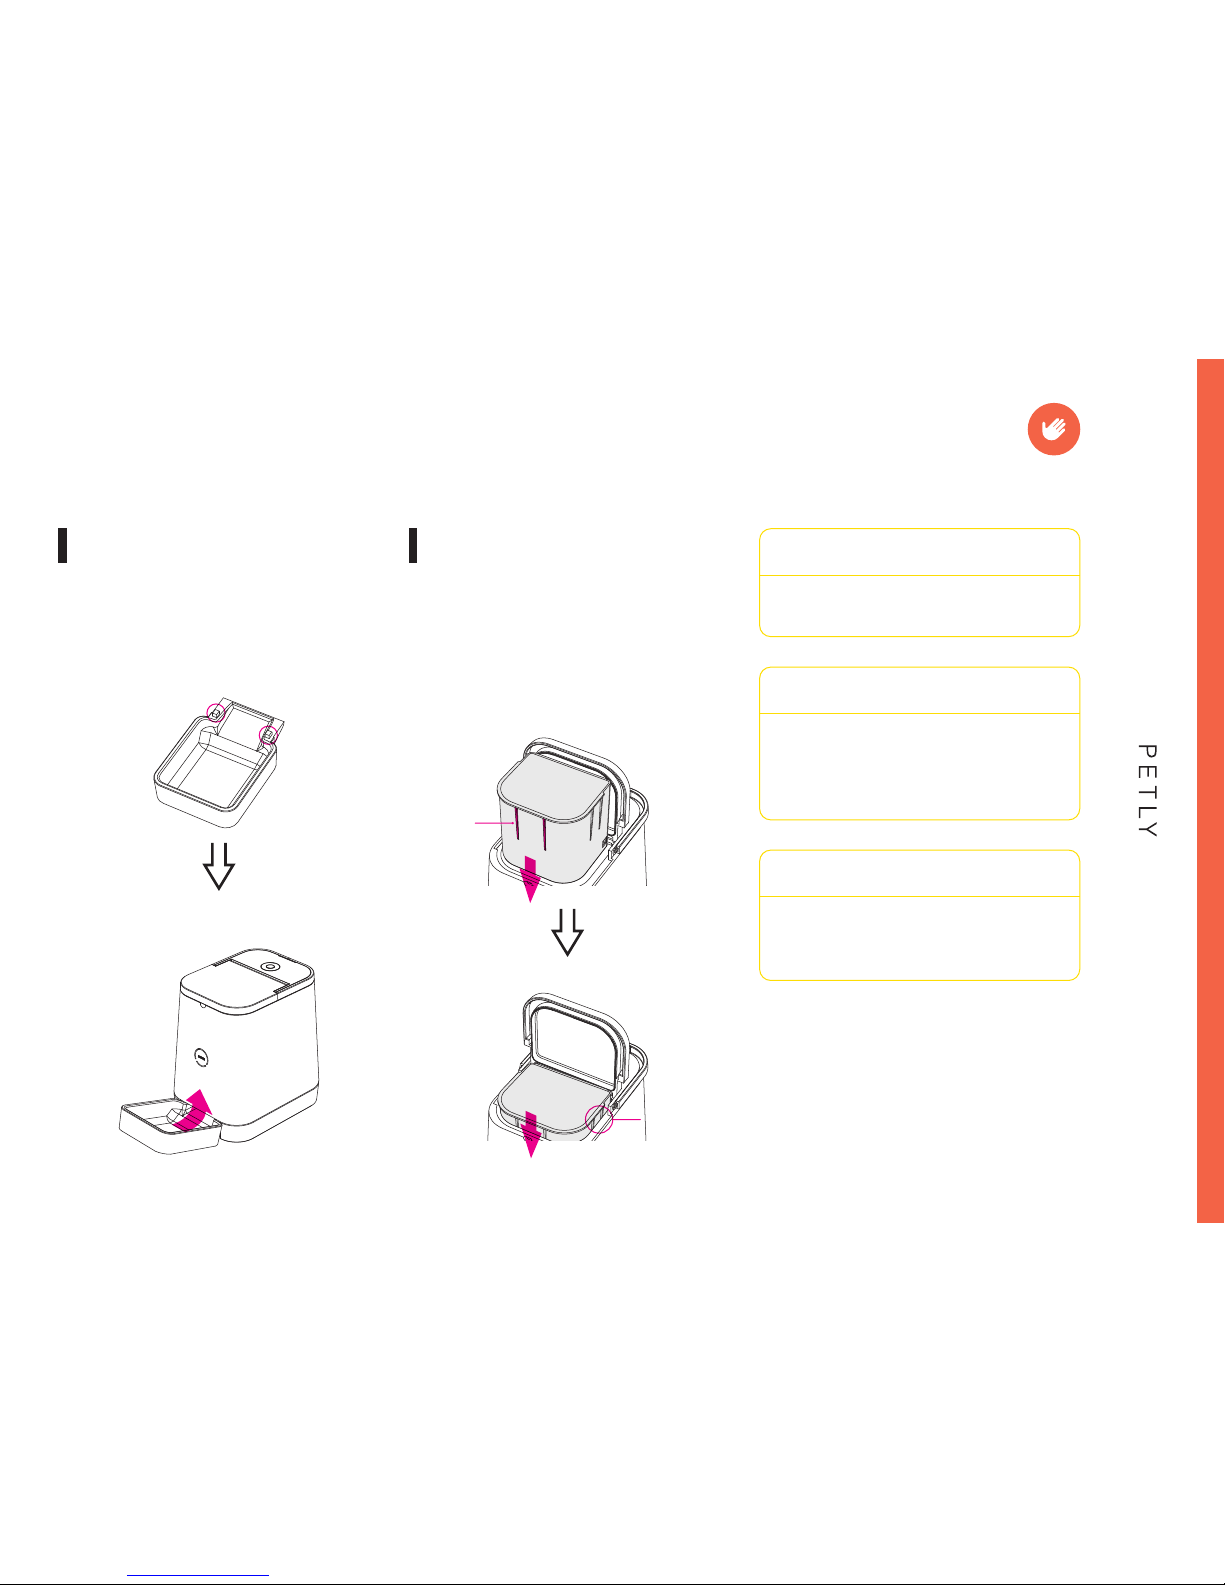
Insert and hook the two claws on the upper part
of the tray onto the opening in the main body
With the two lines in front of the container as a
guide, insert the food container into the feeder.
Slide the container in, and release it when there is
about a finger
s width left at the end of the
feeder. Then the rest will slide in smoothly.
Lines
①Slide the container in along the lines
①Check the location of the clawson the tray
②Release it
②Inser t the tray into the opening of the main body
How to insert the food tray How to insert the food tank
A finger
s width

13
Please make sure the feeder operates and functions properly before use.
Failure to check the feeder can lead to food not being released, getting stuck, and other problems.
Making alterations or repairs, or taking apart the feeder can lead to fire damage, electric shocks, and other injuries. For repairs,
please consult the retailer or RINN Inc.
Please do not put your hands in the food tank or in the opening where the food is released during automatic or manual feedings.
Doing so may cause injuries.
failure to remove batteries during maintenance may cause injuries.
Avoid electric shocks, injuries, or accidental swallowing of pet food.
This can lead to short-circuiting, electric shocks, and fire damage.
Cleaning other parts with water can lead to short circuiting, electric shocks, and fire damage. Make sure to dry thoroughly.
This can lead to short circuiting, electric shocks, and fire damage.
Biting the feeder can cause unexpected injuries, electric shocks, and fire damage. Please train pets not to bother the feeder.
Only use feeder after conrming it operates properly
Please do not alter or take apart without a professional
Please do not touch the machine while it is in operation
Remove batteries during maintenance
Keep out of reach of children
Do not insert metallic items in the feeder
Only clean designated parts with water (food tray and food tank)
Do not place outside, in the bathroom, or in moist areas
Do not let pets damage the feeder
Warnings

14
Precautions
Please do not use this feeder for anything other than small dogs or cats
Please test the pet feeder before using it
Open the tray when you use the feeder
Watch the battery power level
Note the display
food is stuck
Please do not place outside and keep out of direct sunlight for long hours. Do not place near heaters
Do not place on unsteady surfaces
Do not shake the feeder
Remove the batteries when not in use for long periods of time
Store after proper maintenance
Set the clock after changing the batteries
PETLY is customized for small breeds of dogs and cats only. Please do not use it for medium to large dog breeds or any other animals.
Also do not use for any other purposes.
The actual serving amount may differ according to the type and size of the food. Please make sure you test the pet feeder before using it.
Leave the tray out in an opened state when you use the feeder as it doesn
t open or close automatically.
When the battery light blinks, please replace the batteries with four new ones soon.
Forgetting to change the batteries can cause the feeder to stop unexpectedly and not run when you are out of the house.
If the pet feeder is jammed, turn the power off and clean the affected areas gently.
After cleaning, turn the power on and check if the feeder operates properly by manual feeding.
Placing in direct sunlight or near heaters can cause deformation and malfunctioning.
Doing so could cause the feeder to lean and fall, spilling the pet food.
Shaking the feeder can cause food to spill out of the opening. Pets may learn to shake the feeder to pour out food, and this may cause
damage. Please train pets not to shake the feeder.
Deterioration of the insulation of batteries can cause electric shocks, short circuiting, fire damage, and various injuries.
When not using the feeder for long periods of time, please store after properly removing batteries and remaining pet food,
as well as cleaning and drying the feeder thoroughly. Storing without proper maintenance can cause mold and foul smells.
The clock will be reset when the batteries are changed. After changing the batteries, make sure to reset the clock.
15
About Warranty
○Failure or damage due to improper use, repair, or alterations.
○Failure or damage due to use of anything other than dry pet food.
○Failure or damage due to transport, moving, or dropping after purchase.
○Failure or damage due to natural disasters, such as fire, earthquakes, water damage, lightning, pollution, or abnormal voltage.
○Warranty is missing.
○Purchase date, customer name, or retailer are not recorded on the warranty,
or when wording has been deliberately changed on the warranty.
Automatic Pet Feeder PETLY is for dry food use only.
In the case that damage or malfunction occurs when the device is used properly as directed on the labels
and Precaution section of the manual, free repair service will be provided.
Please save this warranty, as a new one cannot be reissued.
In the event that repairs are necessary during the warranty period, please bring and present the product
with this manual to RINN Inc.
In the following cases, charges will be applied to repairs even within the warranty period
:
Repair Consulting Service Hours
Wee kday s 10A M~5PM
Closed
Sa tur day, S un day, H oli day s
RINN Customer Support
Toll Free
:
+81-12 0 -788 -028
※When toll free is not available (e.g. cell phones), dial +81-3-6880-3180
Email Address
:
te ga mi @r in n.co.jp

16
About Warranty
This warranty promises free repair service based on the time period and requirements written in this document. Therefore,
this warranty does not intend to limit the rights of the customer given by law.
After the warranty period, RINN Inc. will provide repair services upon request when a diagnosis and repair are possible.
The breakdown of repair fees is as follows.
Please direct questions about repair after the warranty period to RINN Inc.
The holding period for supplementary components and repair parts after the warranty period is for 3 years after the product is
discontinued.
Regardless of free or charged repairs, charges will be added if break down of the product is necessary for cleaning or disinfecting,
or various auxiliary work during repairs.
Personal information obtained from the customer will only be used for repairs designated by this warranty and other services and
will not be shared with a third party without the customer
s consent. However, when either part of or the entire service is entrusted
to a third party, only the necessary information will be disclosed to the respective third party.
To improve reliability and functionality or to comply with changes in the law, this model or future models of PETLY are subject to
change without notice.
For repair requests and questions about how to use this product, please contact RINN Customer Support.
[]
Parts and supplementary materials
[]
Diagnosis, repair, adjustments, inspection expenses
[]
Expenses incurred from receiving the damaged product by package delivery service and from sending
the repaired product to the customer
Technical fees
Parts fees
Shipping fees

Please use four D alkaline batteries. Manganese and rechargeable batteries have low voltage, and thus cannot be used.
In addition, please be aware that battery adapters cannot be used.
Can we use rechargeable batteries?
Q
A
It may be that the D alkaline batteries do not have enough power left,
so please replace all four batteries with new D alkaline batteries.
Q
A
What if the set amount of feed does not come out?
Dishwashers and dish dryers cannot be used. Please detach the food tank/food tray from the main body and wash by hand.
Clean the main body using a cloth with detergent and water, and then wipe it with a dry cloth.
Q
A
Can we use dishwashers and dish dryers for the food tray/food tank?
Change the set feed amount to 0g. This will clear the settings and turn the feed lamp OFF
Q
A
How can I turn OFF the feed lamp after it is set?
First, please try replacing the batteries with new D alkaline batteries.
Try per forming the troubleshooting procedure in the manual, and contact RINN customer support if the problem is not resolved.
We will ask about the condition, and will ask you to send the main body to the repair factor y if necessary.
Q
A
What do I do if it breaks?
17
FAQ

If there is no signature or personal seal in the designated area, the warranty will not be valid.
Please check if there is a signature or personal seal in the column.
Warrant y
This warranty promises free repair service based on the information written in this manual.
In the event that any failure occurs during the following period after purchase,
please present the product with this warranty to RINN Inc. and request repair.
One year from purchase date
Body, Food Tank, Food Tray
Month Day Year
Please attach the receipt of the purchase with the retailer name, address, and telephone number for safekeeping.
Product Name
Warranty Period
Object of Warranty
Purchase Date
Customer Name
Retailer
SAMPLE
18

R I N N Customer Suppor t
Saturday, Sunday, Holidays
C l o s e d
Toll Free Number
+81-120-788-028
S e r v i c e H o u r s
Weekdays 10 A M -5 P M
Wh e n to ll f re e is not av ai la bl e (e.g . ce ll p ho ne s), d ia l : + 8 1- 3 - 6 8 8 0 - 3 18 0
Em ai l Addre s s
RI NN Website
PE T LY We bs ite
te ga mi @r in n.co.jp
ri nn .co.j p
pe tl y.jp
Table of contents
Popular Pet Care Product manuals by other brands

Petsafe
Petsafe Deluxe In-Ground Radio Fence Operating and training guide

Wellturn
Wellturn T600 instruction manual

PAPIFEED
PAPIFEED PF028 instruction manual

IRIS
IRIS FC-550 instructions

Closer pets
Closer pets Mi Bowl CP500 manual

Harbor Freight Tools
Harbor Freight Tools 96695 Assembly and operation instructions


