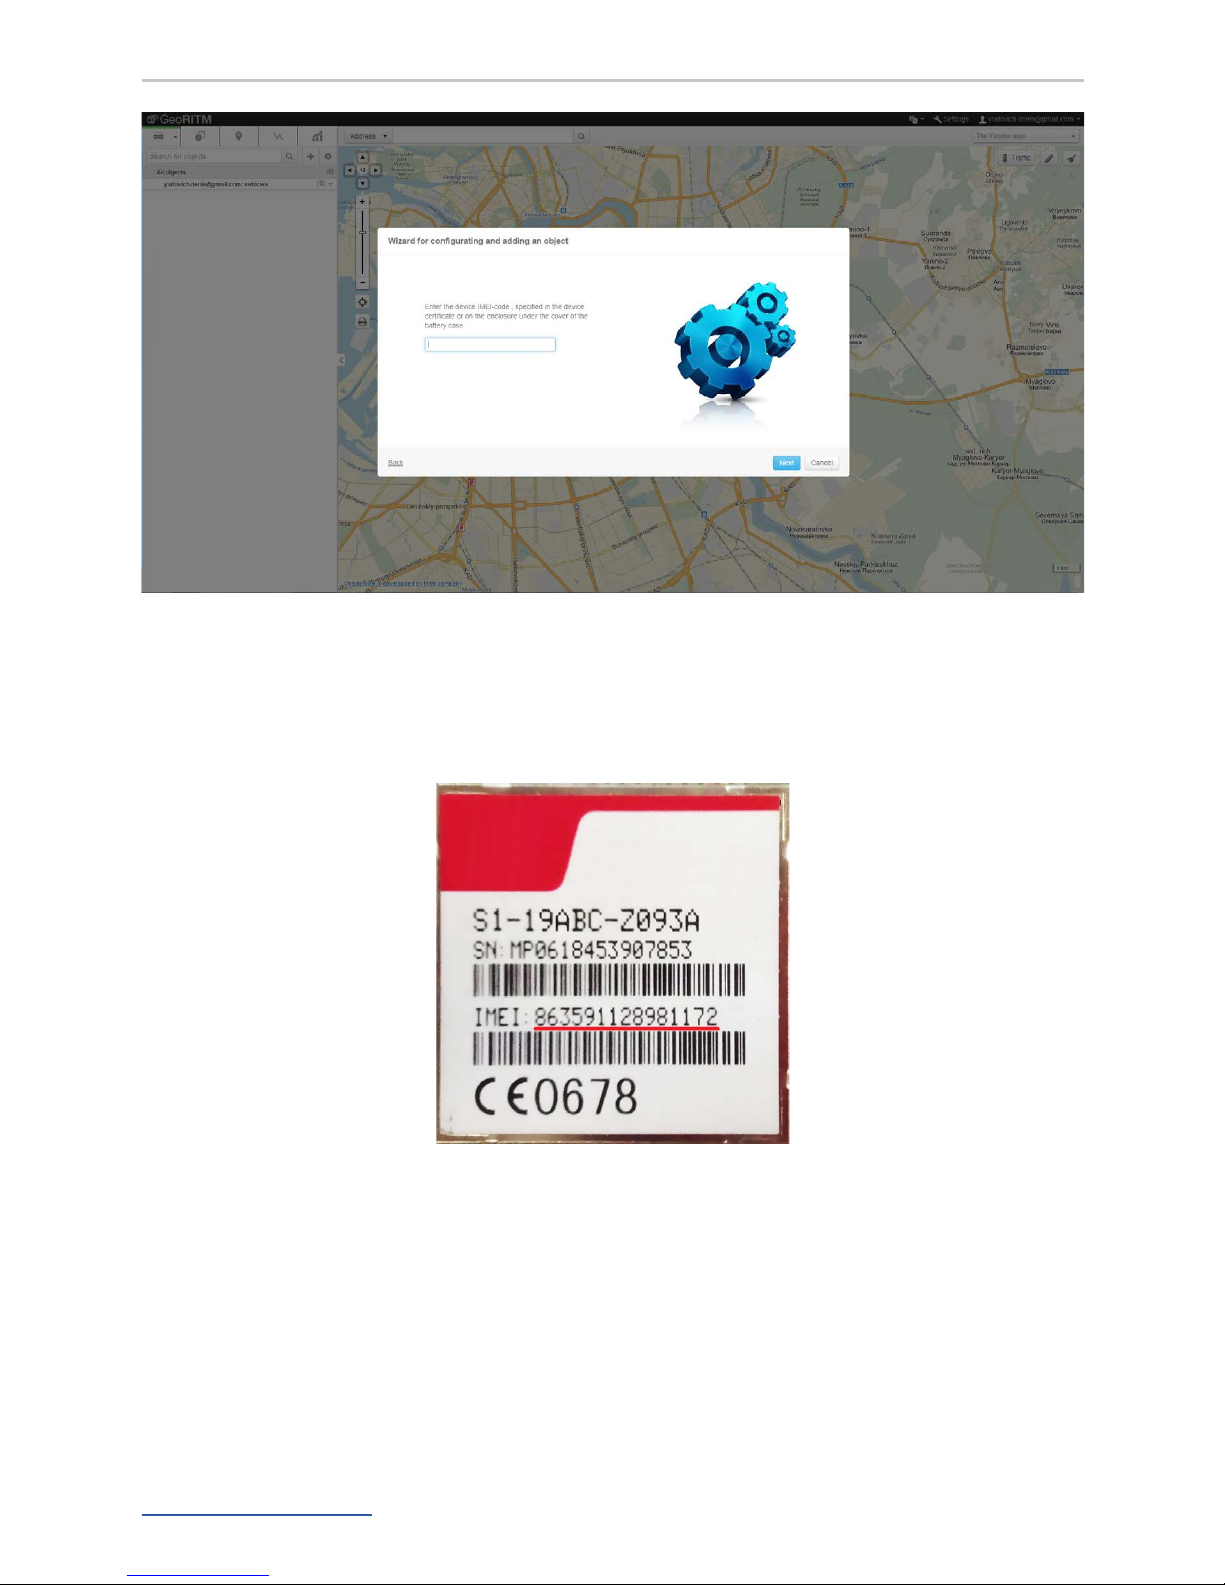
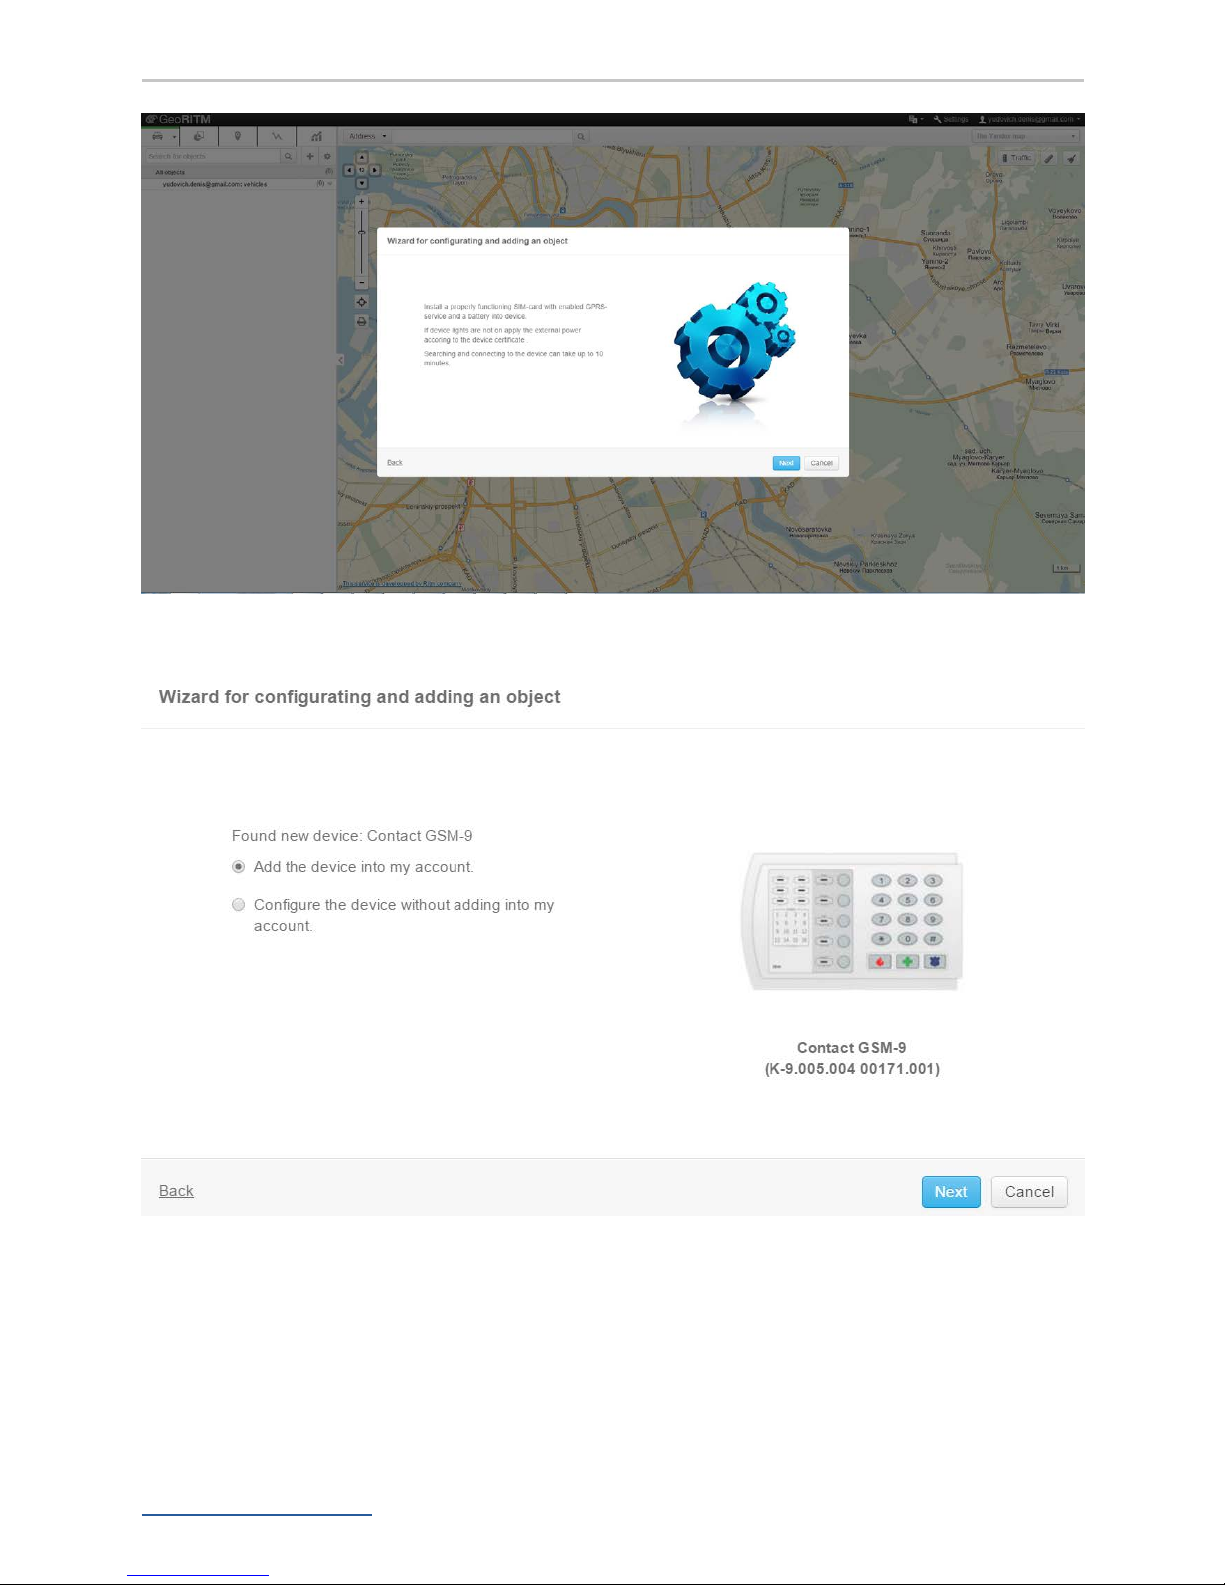
ritm Contact GSM-9N User manual

Saint Petersburg, 2017
Contact GSM-9N
Quick start guide
Ver. 1.0

www.ritm.ru/en 2
Contact GSM-9N. Quick start guide.
Prepare your device
Prepare your device for connection according to the Data sheet.
• Open the lid.
• Connect your device to 12 V power supply.
• Put your SIM cards into the SIM slots. Please make sure,
that your SIM Card does not require a password.
• Connect the GSM antenna to the SMA terminal.
<7
7%
7-1
1234
5678
9 10 11 12
13 1514 16
ZONES
STAY
ZONES
EXIT
BYPASS
CANCEL
ARMED
INSTANT
FIRE
READY
POWER
SERVICE
1 2 3
4 5 6
7 8 9
0
*#
7-1
−
+−
+−
+
1 2 3 GND
TM LED
ОК2 U(OK) ОК1 CPW +12V GND +12V GND
71%

www.ritm.ru/en 3
Contact GSM-9N. Quick start guide.
Online Conguration
The easiest and the fastest way to congure the device is via
Online Conguration.
Go to www.eu.ritm.ru. You can choose the language in the
upper right corner. Click the “Registration” link to sign up.
Fill out the registration form.

www.ritm.ru/en 4
Contact GSM-9N. Quick start guide.
After that you will get the e-mail for authorization, follow the
link in that email and you will see this page.
Click on the button “Open Monitoring interface”. You can select
“Run Object Add Wizard automatically”, or open this wizard
later.
Now you should see the main page of GEO.RITM interface.

www.ritm.ru/en 5
Contact GSM-9N. Quick start guide.
If you didn’t open the “Add Object Wizard” yet, you can click on
“plus” button.
And add a group and an object. You will see this page.
Just click “Next”.

www.ritm.ru/en 6
Contact GSM-9N. Quick start guide.
Here you should put the IMEI of your device. You can nd it out
from the Data sheet of your device, or written on the modem in
your device.
Click “Next”.

www.ritm.ru/en 7
Contact GSM-9N. Quick start guide.
Click “Next“.
If you see this page, the server now identied your
Contact GSM-9N. Click “Next”.

www.ritm.ru/en 8
Contact GSM-9N. Quick start guide.
Here you can give a name for your object and add it to the
group. You can choose an existing group, or add a new one
right here.
After that click “Next”. Your Contact GSM-9N is ready to work.
You can give Coordinates, or Address to your device, and you
will see it on the map.

www.ritm.ru/en 9
Contact GSM-9N. Quick start guide.
You can click on the image of your Contact GSM-9N on the map
and see the events, general report and object’s card (you can
open it from the left menu as well).
When you will open object’s card, you can choose the
“Equipment” section and under the picture of Contact GSM-9N
you will see the link “Setup a device”.
It will open the wizard of settings of your Contact GSM-9N, and
you can congure it.

www.ritm.ru/en 10
Contact GSM-9N. Quick start guide.
Congure your device
After the successful connection you will see this page.
If you have an item Available update (red color), you should
click on it. Then click on “start updating”, you will see updating
progress.

www.ritm.ru/en 11
Contact GSM-9N. Quick start guide.
Set-up via USB-cable
The alternative way to set-up your device is via the USB-cable.
Prepare your device for set-up:
• Connect the Contact GSM-9N to your PC via the
MicroUSB cabel.
Download the software
• Go to our website www.ritm.ru, in the right top corner
you can choose the English language.
• Then go to “Downloads”.
• Open the “Common software for the set-up of all of
Ritm’s devices”, click on the link and download le.
• Then open “A set of drivers for connecting Ritm’s devices
to the common setup software”, click on the link and
download this le as well.

www.ritm.ru/en 12
Contact GSM-9N. Quick start guide.
Install the software
Unzip archive Drivers, and Install the downloaded Driver
(Drivers\CP210x_VCP\CP210x_VCPInstaller_x64 or Drivers\
CP210x_VCP\CP210x_VCPInstaller_x32), depending on the
version of your operating system:
• Accept the agreement, click “Next”.
• Click “Finish”.

www.ritm.ru/en 13
Contact GSM-9N. Quick start guide.
Also, you will need to install driver of virtual COM port (from \
Drivers\ST_VCP\VCP_V1.3.1_setup, or \Drivers\ST_VCP\VCP_
V1.3.1_setup_x64), depending on your operating system:
• Same steps: click next, and nish.

www.ritm.ru/en 14
Contact GSM-9N. Quick start guide.
Check the connection of the device to your PC
Open the PC manager.
Click on the Device Manager and look at COM ports. Port for
RITM USB is called “Silicon labs CP210x USB to UART Bridge
(COM4)”.

www.ritm.ru/en 15
Contact GSM-9N. Quick start guide.
!
Please remember the number of your COM
port, it will be important in the future.
The number of your COM port may vary
from that shown in the illustration.
Open the conguration wizard
Run the downloaded conguration program from the le, it will
look like this:
In the right bottom corner you can choose the language.
After that, for the rst time, it may be necessary to download
the latest version of the software.
Here you can choose your COM port (use the port which you
saw in device manager), leave the “Master code” empty and
click “connect”.
Thereafter, set-up the device as described previously.

www.ritm.ru/en 16
Contact GSM-9N. Quick start guide.
GPRS and Communication channels Congurations
Next step, you have to go to Global settings, where you can nd
common information about your Contact GSM-9N.
Here you can change the number of the object. Also, here you
can nd the IMEI of your Contact GSM-9N, and check the
registration in GSM network.
If you have bad reception conditions of GSM, or SIM card
doesn’t work, you will see, that SIM is “not dened”.
!
When you change some settings, you have to click on
the button “Save changes” before you leave the page.
The rebooting/resetting of your device might take up to
a few minutes. It may be necessary to
re-connect your device, in the conguration program.
You have to congure the GPRS connection.
Go to the section GPRS parameters and ll it according to your
own settings.

www.ritm.ru/en 17
Contact GSM-9N. Quick start guide.
You can nd out the settings from your GSM provider. Make
sure, there is no tick on “Specify APN conguration
automatically”.
Here you have two connection channels.
To congure the rst channel, type:
• into the boxes of “Main IP address, server port and
password” address dev1.eu.ritm.ru
• into the box “Server port 1” a port number 9426.
• into the password – “TestTest”.
To congure the second channel, type:
• into the boxes of “Backup IP address, server port and
password” address dev2.eu.ritm.ru
• into the box “Server port 2” a port number 9426.
• into the password – “TestTest”.

www.ritm.ru/en 18
Contact GSM-9N. Quick start guide.
Now go to the Communication channels settings.
Just click on “Turn on GPRS(TCP/IP) via SIM 1”, if you put your
SIM card into slot # 1 or “Turn on GPRS(TCP/IP) via SIM 2”, if
you put your SIM card into the slot # 2.
Later, you can make more connection channels if you have to.
!
When you change some settings, you have to click on
“Save changes” before you leave the current page!
Now you can login into eu.ritm.ru and add your object to the
system.

www.ritm.ru/en 19
Contact GSM-9N. Quick start guide.
Change History
Revision Revision date Description
1.0 28.03.2017 Full revision of document
Other manuals for Contact GSM-9N
1
Table of contents
Other ritm Security System manuals
Popular Security System manuals by other brands

Klaxon
Klaxon Nexus Pulse 105 Red installation instructions

DEXAPLAN
DEXAPLAN FA 602 - 10-2006 Operating and safety instructions

Robotics Technologies
Robotics Technologies Bus-Scan ALERT Installation & operation manual

ELRO
ELRO CZ60RIP11S extended manual

Konig Security
Konig Security SEC-ADW10 instructions

NAPCO
NAPCO XP-400 Using instruction