RoadHawk RH?2 Pro User manual

1
AutomatedDriveRecorder
User Manual
RoadHawkRH‐2Pro

2
Main Features
The RoadHawk RH-2 Pro is used to record both video and audio data in a continuous
loop fashion. If the vehicle is involved in an accident such as a collision, impact, and
sudden acceleration-related incident, this data is marked and stored. The user can also
manually mark the video by pressing on the remote emergency button. When the system
is being used as a teaching aid for driving instructors the USB memory stick can be
removed and given to the student to allow them to analyse and review their driving skills
in the comfort of their own home.
Continuous recording
The video and audio data from the front and interior views are continuously recorded
when the camera receives power. When the capacity of the SD card or USB memory
stick has been reached, the oldest files are overwritten by the newest ones in a “round-
robin”, first in, first out fashion.
Emergency recording
When an impact or an unusual acceleration or deceleration is detected by the built-in G-
Sensor and has exceeded the preset limit the RH-2 creates an “EVENT”. An “EVENT” can
also be triggered by pressing the emergency button. At this point, the recorded video
data is locked-in and is erased only by an authorised party and by using a PC or laptop,
accessing the SD card. “EVENT” data records 1 minute before and 1 minute after the
event. (Note : The User may set the pre-event time to either 1 minute, 2 minutes or 3
minutes of pre-event recording).
Changing the settings such as the Pre-Event record time is done using the supplied
software. When you insert the card in to the camera it looks for the config file and
behaves accordingly.
GPS Location and Speed recording
Once the RH-2 has had chance to lock on to a GPS satellite signal it will start recording
GPS Data in the form of vehicle speed and location. Upon playback using the supplied
viewing software you will see this data in graphical form using Google maps.
Playback of video/audio data
The recorded data can be played back using the provided playback software supplied
on CD. This software is FREEWARE and you are allowed to send it to any person for the
purposes of replaying back video recorded by the RH-2 Pro.
With the RH-2 Pro you can also instantly playback video using the supplied IR remote
controller direct back to a connected TFT monitor inside the vehicle. This is especially
useful if you need to show a driving student an error.
Data analysis
The recorded data can be easily analysed for speed, vehicle location and direction of
travel using the software player that is supplied on the CD-ROM.

3
Contents
Before using the product -------------------------------------------------------------------------------------- 4
Preparing for the safety ---------------------------------------------------------------------------------------- 5
Components ---------------------------------------------------------------------------------------------------- 7
Technical Specifications ---------------------------------------------------------------------------------------- 7
Name of the Parts ---------------------------------------------------------------------------------------------- 8
SD Card ------------------------------------------------------------------------------------------------------- 11
Installing the RH-2 Pro --------------------------------------------------------------------------------------- 12
To Hard Wire the RH-2 Pro Camera ------------------------------------------------------------------------- 13
System LCD Display ------------------------------------------------------------------------------------------ 16
Operation Sequence ------------------------------------------------------------------------------------------ 17
Preparation for video recording ------------------------------------------------------------------- 17
Continuous recording while driving -------------------------------------------------------------- 17
Running the viewer program after driving ------------------------------------------------------- 17
Running Player (viewer program) --------------------------------------------------------------------------- 18
PC System requirements ------------------------------------------------------------------------- 18
Player installation ---------------------------------------------------------------------------------- 18
Player screen review ------------------------------------------------------------------------------ 19
Control menu -------------------------------------------------------------------------------------- 20
Playback interface controls ------------------------------------------------------------------------ 20
Playback -------------------------------------------------------------------------------------------- 21
Pop-up display window --------------------------------------------------------------------------- 22
Interfacing with a GIS/City map ------------------------------------------------------------------ 23
Converting into AVI file format ------------------------------------------------------------------- 24
System configuration ----------------------------------------------------------------------------- 25
Parking surveillance setting ---------------------------------------------------------------------- 26
Analysing G-SENSOR data ---------------------------------------------------------------------------------- 27
TV-OUT Viewer ---------------------------------------------------------------------------------------------- 28
Software Update --------------------------------------------------------------------------------------------- 30
Warranty ----------------------------------------------------------------------------------------------------- 30

4
Beforeusingtheproduct
Warrantyandresponsibilities
◆Damageduetoproductionmalfunction,lossofdata,orotherdamagesoccurring
whenusingthisproductshallnotbetheresponsibilityofthemanufacturer.
◆AlthoughtheDriveRecorderisadeviceusedforrecording/storingvideos,thedevice
isnotguaranteedtorecordinformationoneveryaccidentinthecaseofamalfunction.
◆Inthecaseofanaccident,aminorforcewillnottriggertheG‐Forcesensortoactivate
EmergencyRecording.ThereforetheusermustusetheManualRecordButton
locatedonthedeviceitself.
◆Forstableuseoftheproduct,checktheproductandSDcardregularlytoensureits
properoperation.ItisimportanttoregularlyformatyourSDcardtokeepitingood
condition.
Tip.Forsafeandlong‐termuseoftheSDcard.
◆PleasemakesuretoturnoffthedevicepowerwheninsertingorejectingtheSDcard.
◆Generally,theSDcardhasasetlifespanandmaynotbeabletostorenew
dataafteracertainperiodoftime.Insuchacase,pleasepurchaseanewSD
cardforuse.LossofdataduetooveruseoftheSDcardshallnotbethe
responsibilityofthemanufacturer.
◆Alwaysstoredatawithinastoragecaseasdatalossmayoccurduringstorage
ortransportduetostaticelectricityorexternalvoltage.
◆Alwaysbackupallimportantdatainadifferentstoragemedia.
(Harddiskdevice,CD,portablediskdrive,etc)
◆PleaserefertotheSDcardprecautionforsafeandlongtermuseofproduct.
(Referto11p)

5
Safety
Cautionforuse
UserManual
●Toensureproperoperationpleasereadthemanualbeforeinstallationanduse.Failureto
followthissafetynoticemaycauseamalfunctionandmayvoidthewarranty.
Power
●Useonlytheprovidedcablesandspecifiedpowerinput.
Acablenotsuppliedbythemanufacturermaycauseproductdamage,afireora
shortcircuit.
●Pleaseuseratedcapacityforthefuseandconfirmthemessageiftheproductcorrectly
connectedaftertheinstallation.
SDcardorUSBMemoryStick
●InserttheSDcardintotheproduct.
●EnsurethatthecapacityoftheSDcardisnotexceeded.
AfullSDcardwillnotallowonetorecordmanualalarmsorG‐sensorbased
triggers.
●PleasemakesuretoturnoffthedevicepowerwheninsertingorejectingtheSDcardorUSB
stick.
Caution!
● DonotremovetheSDcardorUSBMemorystickduringproductoperationwhilepowerison.
Productormemorycardcouldbedamaged.
● EjectingtheSDcard
‐Withoutparkingsurveillancemode
Aftertheignitionisoff,pleasechecktheLCD&systemareoffandthenwithdrawtheSDcardfrom
theproductafter1minute.
‐Withparkingsurveillancemode
Aftertheignitionisoffpressandholdtheemergencybuttonfor3seconds.WaitfortheLCDtogooff
andthenremovetheSDcardorUSBmemorystick.

6
UsingtheRH‐2Safely
●Stopthevehicleinasafeplacebeforeoperatingthedevice.
Donotoperatetheproductwhendriving.
●Donotobstructtheviewoftheproductthroughthefrontwindshield.
TheGPSreceivermaynotworkproperly.
●Donotdisassemble,repairormodifythedevice.
Thisvoidsthewarrantyandwherewetakenoresponsibilityforproductdamageor
problemscausedbytheuser.
●Whenreplacingthefuse,pleaseuseafusewiththeratedcapacityundertherecommended
powerguidelines.Usingthisproductinalternativepowersituationswillvoidtheproduct
warrantyandcouldresultinfire.
●Anyexcessivewindowtintingmaycauseanunclearordistortedimageonplayback.
Firstrecordandthenplaybackthevideotoseeiftherecordedvideoisacceptable.
●Useonlytheprovidedcablesandspecifiedpowerinput.
Acablenotsuppliedbythemanufacturermaycauseproductdamage,afireorashort
circuit.
●Whenusingdouble‐sidedtape,wipethewindowcleanandcleanthesurfaceofthedevicewith
dryclothbeforestickingdownthetape.
Whennotinuse
Archive
●Donotinsertforeignsubstancesintotheproduct.
●Donotcoverthecameralenswithanymaterialsorobjects.
Thismayaffectrecordingquality.
●Donotdroporapplyexcessiveshock.Thismaycauseproductdamage.
●Avoidhightemperaturefromheatingdevice.
●Avoidplacingtheproductunderhighmoistureordustlevel.
Cleaning
●Turnthedeviceoffbeforecleaningthedevice.
●Onlycleanthedevicewithadryclothifitisnecessary.

7
Components
*Productpackagemaychangeforproductenhancementwithoutanynotification.
TechnicalSpecifications
Built‐inCamera2CH‐Built‐in:1.3MpixelCMOSSensor
Extra1:VGACMOSSensor
Compression H.264/AVC
Resolution VGA(640X480)
Video
TV‐OUT○(PIPMode)
Audio1CH,Mono(in&out)
GPSBuilt‐inGPS
G‐Sensor3Daccelerationsensorbuilt‐in
Maincarbatterysupported Supported(ParkingSurveillanceAvailable)
Monitoringofparking0~24hour
SupportedmemorySDCardupto32GB
PowerDC12V~24V
*Thismanualmaybechangedwithoutpriornoticetousersforproductimprovements.
Components
T
V
‐
OUT/IRcabl
e
Produc
t
&Cigaret
t
eLighterPlu
g
TerminalBox EmergencyRecordingButton
HolderSDCardManualRemote
Controller

8
NameoftheParts
………………………………………………………………………………………………………………………..
Displaywindow
Displaystimeandspeed
information.
SDcardSlot
InsertSDcardintotheunit.
Emergency(Event)
Recordingbutton
Presstoperformanemergency
GPSBuil
t
‐in&Holderslo
t
1)GPSBuilt‐in
2)Forattachingtheholdertothe
vehicle.
EmergencyRecording
Releasebutton/
Systempoweroffbutton
Cancelstheemergencybutton.
SystempoweroffontheParking
surveillancemode:Pressfor
morethan3secondsafterthe
carengineoff.
FrontCamera
Recordsforwardimagesof
thevehicle.
InwardFacingCamera
Recordsimagesofthedriver
andpassenger.

9
Remotecontroller
MOVE&MENUButton
Usethearrowbuttonstonavigate
themenus.PressOKtoselectorto
enteramenu.
Playbackcontrolbutton
Playbacktheselectedfile.Skip
forwardorbackwardsin10sec
segments.
MODEbutton
ActivatePIPfunction
PresstoswapPiPimage
MENUcancelbutton
Cancelthepreviousfunction
PageUp/Down
Adjusttheplaybackfilelist
page.
Menubutton
Pressthisbuttontoactivatethe
TV‐Outsignalandtoaccessthe
main menu.

10
T‐BOX
Fixingholder
ToinstallT‐boxtothe
vehicle.
USBPort
Useonlyrecommended
USBmemorysticks.
TV‐out&RemotecontrollerIRport
UsethisporttoconnecttheLCDscreenand
IRreceiverfortheremotecontroller.
DataPort
Thisportisusedbythefactoryto
programtheproduct.
Emergencybuttonslot
Toconnecttotheexternalemergency
buttonforeventrecording.
Caution!
WhenaUSBmemorystickisinsertedintotheUSBport.Thedatawillbesavedontothe
USBmemorystick.
●IfthereisanSDcardinthecameraandaUSBmemorystickintheUSBporttheUSB
memorystickwilltakepriority.
●PleaseusetherecommendedSDcardand/orUSBMemorySticksONLY.
(Theusermustusetherecommendedproductonly.)
11
SDCard
Recordingtimebyframespersecond
QualitySetting/MaximumRecording Time(Mins)TotalFrame
(Frame/Sec.)LowestLower Normal Hi
g
her Hi
g
hest
30Frame2.521.3148mins
25Frame3012.21.61.11.1
22.5Frame 3.32.51.81.21
2
0
Frame42.72.71.31.1
15Frame54521.6
10Frame8542.71.6
7.5Frame 106.753.32.7
5Frame13.3106.753.3
3Frame2013.3106.75
2Frame26.72013.3106.7
1Frame33.326.72013.310
*Timevariesdependingontheamountofmotionseenbythecamera&lightingconditions.
(Basedon2GB)
Caution!
1. DonotremoveSDcardwhenthepowerisconnected.(ItmightcausepermanentdamagetotheSDcard.)
2. Donotusethecardforanyotherpurposeorcopyingunrelatedfilesfromanotherdevice.
3. CheckfordataabnormalitiesonceaweekforstableoperationsandformattheSDcardatleast
twiceamonthforstableuseofproduct.
4. IfyourPCdoesnotsupporttheSDcardandtheSDSDHC2.0cardstandard,useaseparate
SDHC2.0USBreader.(SDcardtoUSBadapter)
5. SDcardneedstobereplacedwithanewcardonceitreachesendofproductlifeandmaynotbe
abletostorenewdataafteracertainperiodoftime.
6. OnlyusetheprovidedSDcardfromthemanufacturer.
Productmaynotfunctioncorrectlyifun‐testedSDcardisused.
(Werecommendtheuseover“SDHCClass4Card”.)
Caution!
●IfthecomputerdoesnotsupportSDHC2.0,pleaseuseanextra(recommended)SDcard
reader.
●SDCardshouldbeformattedregularityinordertopreventerror.
●AfterformattingSDcard,pleasesetupthetimezoneinconfigurationmenuontheviewer
program.(RefertoPage28)
●Iftheuserdoesnotre‐setupthetimezone,thedatamaybesavedwithincorrecttimeandit
takesalongertimetobootuptheproduct.
●FormattingtheSDcardwilldeleteallthedataintheSDcard.Ifinneed,pleasebackupthe
databeforeformattingSDcard.

12
InstallingtheRH‐2Pro
Caution!
● Makesuretoinstallwiththeignitionturnedoffandcarkeysremoved.
Onlyconnecttothepowersupplyonceithasbeenfullyinstalled.
● ReceptionwillimprovewhentheGPSreceiverisfullyexposedthroughthefrontwindow.
MakesurethecamerahasanunobstructedviewbothinsideandoutBEFOREstickingthe
adhesivepaddown.
● Makesurethecameraisalignedverticallyandhorizontally.
Installingtheproduct
Installingtheaccessories
Cleanthewindowsurface
withadryclothbefore
applyingthetape.
ConnectthedeviceandT‐box.
Removetheplasticfrom
thedouble‐sidedtapeon
theholder.
Thedevicemustbe
installedandmounted
straightboth
horizontallyand
vertically.
Locatethebestpositionforthe
remotealarmbutton.Securethe
buttonbyremovingtheadhesive
filmattachedtothepadonthe
externalbutton,pressandhold.
Locatethebestpositionfor
RemotecontrolIRreceiver.
Keeptheremotecontrol
inasafeplacetobe
reachedeasily.
Connectthevideocable
totheconnectionportof
theTBox.

13
ToHardWiretheRH‐2ProCamera
Notice
● Eachvehiclehasitsownsystemandfeatures.Pleaseconsultitsmanualbeforewiringtothe
vehicle.
● Ensuretheignitionisoffwheninstallingthesystemandcontactavehicletechnicianifrequired.
● Inordertohardwire,thecigarlighterpowerplugshouldbecutofftousethecableforthe
wiring.
EachpartofT‐BOX
1REDPOWERSUPPLYVCC(+)
POWERSUPPLY (+12V~+24V)
2WHITE IGN(Ignition)
RH‐2Prosignalforoperation
3BLACK GND(‐)
Connecttotheground
1.Connecttheblackwire(GND)(‐)withcarframe
orgroundwire.
2.Connecttheredwire(powersupplycable)(+)
withpermanent12vto24vpower.Thiswill
allowtheRH‐2Protooperateinanemergency
eveniftheignitionisoff.
3.Connectthewhitewire(IGN)onthepower
cabletoignitionpowersothatthecamera
operateswhentheignitionisturnedon.
Caution!
●Forthesafetyreasons,wheninstallingthiscamera,pleaseconnectthegroundwire
first.
●Pleaseconnectthepowercableandignitioncablethroughthefusesinside.

14
T‐BOXInstallation
1.Checkthelocationofthefuseboxinthevehicle.
2.FindasuitableplacetomounttheT‐Box.You
mightwantthistobeconcealedoryoumight
wanttohaveeasyaccessforquicklychangingthe
USBmemorystick.
3.AdjustthelengthofthewirefromT‐BOXtothefusebox
(NOTE:theRH‐2isfittedwithaciglighterplugifyoudonotwantto
hardwirethesystemitcanbepluggedintoyourcar’saccessory
socket.
4.Removetheliningasperpicture(1)andinsert
(install)thecableinthegapbetweensealingand
windshieldlikepicture(2)

15
5.Afteradjustingthecable,connectthepowercable.
(1) Redwireisconnectedtopermanentlive.
(2)Blackwireshouldbeconnectedtothegroundofvehicle.
(3)Whitewireshouldbeconnectedtoignitionlive.
6.CheckthewiresandpoweronandChecktocheckthecameraisworking.
Afterthepowerisoff,parkingsurveillancewillbeinoperationanditisnormalifLCDontheproductisblinking.
IftheLCDstaysON(notblinking),theinstallationmightnotbecorrect.
7.UsecabletiestotidythewiringgoingtoandfromthecameraandT‐Box.
T‐BOXsystemoperation
Item(s)Description
InputpowervoltageMin.12V~Max.24V
LowvoltagedetectionMin.11.6V(12Vbattery)orMin.23.2V(24Vbattery)

16
SystemLCDDisplay
Display StatusorMeasure
DisplaysTime&Speed
ThesignisONwhennormalrecordingistaking
Place.
ThesignisONwheneventrecording.
ThesignisONwhenfrontcameraisrecording.
ThesignisONwheninternalcameraisrecording.
ThesignisONwhenTV‐outisconnected.
ThesignisONwhenUSBisconnected.
ThesignisONwhenGPSsignalisbeingreceived.
Designatedspeedmeasurementunit.
F_UP Firmwareupdate
OFF PowerOFF
Troubleshooting
Indication Troubledescription Howtocheck
Sd_E SDcardERRORorNOGOODChecktheSDcardintheproductorformattheSDcard
Err1 CMOSSensorerrorProblemwithCamerasensor.Pleasecontactyourdealer.
Err2 G‐sensorerrorPleasecontactyourdealer.
Err3 GPSerrorPleasecontactyourdealer.
Err4 RTCerrorPleasecontactyourdealer.
Err5 RearcameradisconnectChecktherearcamera’sconnection
※ If the above instruction is not working out, please contact your dealer.

17
OperationSequence
Preparationforvideorecording
1. AfterinsertinganSDcardintotheproductandthenturnon,[‐‐‐‐]willbeshownon
LCDdisplay.
2. Iftheproductisoperatingwithinnormalconditions,itchimesonce.
3. Videowillberecordedwith[HELLO],REC,V1,V2onLCDdisplay.
Continuousrecordingwhiledriving
1. ThisProductinformsyouofyourvehicle’sspeed,whenstopped,theunititdisplaysthetime.
2. WhenthecapacityoftheSDcardhasbeenreached,theoldestfilesareoverwrittenfor
continuousrecording.TheEVENTfilesthataretriggeredbyeithertheunit’sinternalG‐Sensoror
externalmanualrecordbuttonarenotoverwritten.(ThisEVENTdatamustbeerasedbyauser
withtheSDcardinsertedinacomputer,erasingeventdatastoredintheDATAfolder.)
3. Whenyoustoptheengineorremovethepowercablefromthecigarettelighterplug,the
devicestopsrecording.
Runningtheviewerprogramafterdriving
1. TheplayerisbuiltintheSDcardsotheuserisabletoviewtherecordeddataonanyPC.
2. ChecktherecordedSDcarddataregularlyforstableoperationofthedeviceandtheSDcard.
3. Alwaysbackupallimportantdataonadifferentstoragemedia.
(Harddiskdrive,CD,portablediskdrive,etc)
18
RunningPlayer(viewerprogram)
PCsystemrequirements
Com
p
onentRe
q
uirements
CPUPentium4/1GHzprocessororhigher
Menor
y
512MBofRAMorhigher
OrperatingSystemMicrosoftWindowsXPHomeEditionorhigher
GraphicsDirectX8.1borhigher
HDDspace200MBorhigher
※WhenusingMSWindowsVistaandPlayersoftwareforthefirsttime,youmayhavetorunthePlayerin
AdministratorMode.Todothisrightclickontheplayericonandselect“runasadministrator”
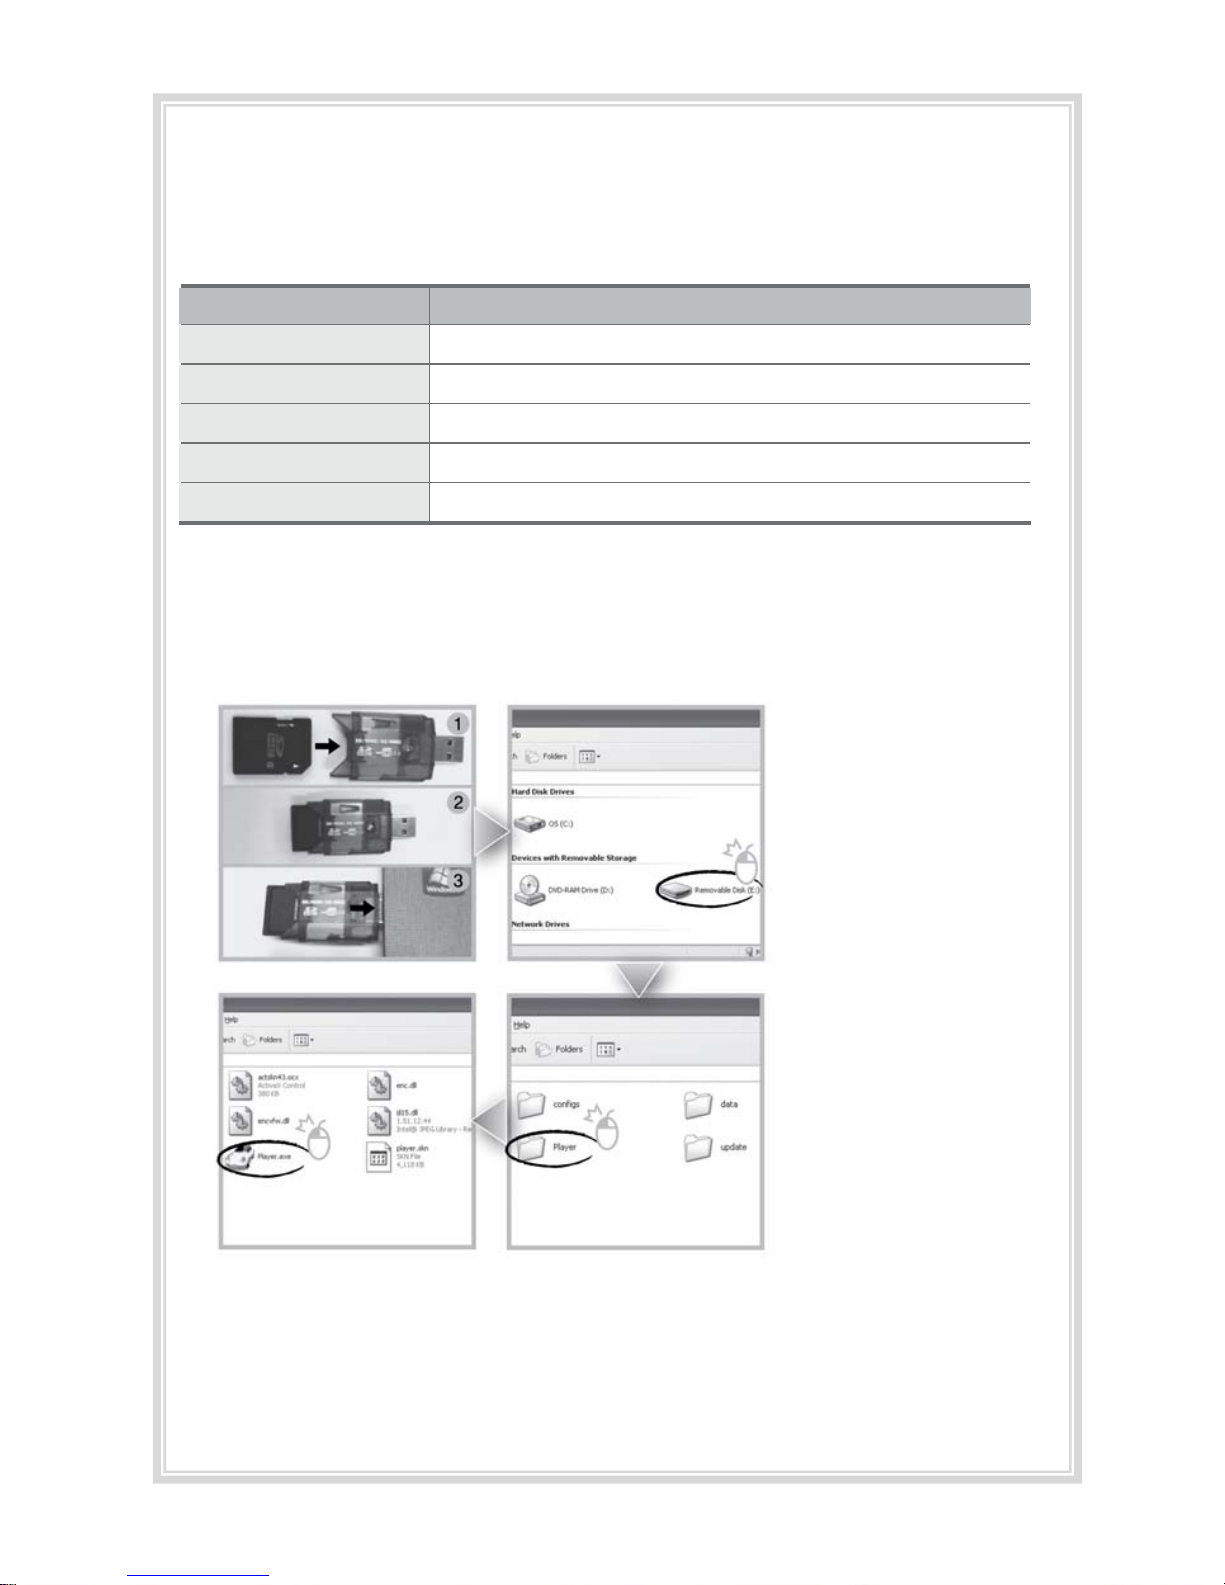
Playerinstallation
1. InserttheSDcardintoa
PCorSDcardreaderand
connectittoPC.
2. SelectSDcardreader
drive.
3. Double‐clickthe“Player”.
4. Double‐click“Player.exe”
toexecutetheprogram.

19
Playerscreenreview
Toplaybackvideo,selectthe“OpenaFile”button,exploretheSDcardorotherlocation
wheretherecorded(orsaved)dataislocated,(filecalledDATAisontheSDcard),then
doubleclicktheselectedfilefromthelistinordertoplay.
No.NameDescription
1ForwardCameraviewDisplaysthevideoimagesrecordedbytheforwardfacingcamera.
2RearCameraviewDisplaysthevideoimagesrecordedbytheinteriorfacingcamera.
3VehicleSpeedDisplaysthespeedofyourvehicle.
4VehicleLocationDisplaysthecoordinates(latitudeandlongitude)ofthevehicle.
(RequiresGPSsignallock)
5DirectionofTravelDisplaysthevehicle’sdirectonoftravel.
6ShockgraphsDisplaysvehiclemotionandanyimpactdetectedbytheG‐Sensor
withagraphicallyin3‐axis.

20
Controlmenu
No.NameDescription
1VolumeControlAdjuststhevolumelevelwhileplayingbacktherecordeddata.
2Playbackspeed
control
Adjuststhevideoplaybackspeed.
Playbackinterfacecontrols
ButtonFunctionButton Function
MovetothepreviousfileMovetothenextfile
Playbackthepreviousframe
Openafile
PausethePlayback
ConvertthefileintoanAVIformat
Stop
PlaybackLinktherecordeddata
withmapPlaybackAccessSystem
Playback
SetUpMenu
MovetothenextframeClosePlayer
MovetothepreviousfileHide/Closethewindow
VolumecontrolPlaybackspeedcontrol
Other manuals for RH?2 Pro
1
Table of contents
Other RoadHawk Dashcam manuals


