Roadmaster RM-V700 XBG User manual
RM-V700 XBG RM-V700 XBG


1 1
1.SETUP BEFORE USAGE
2.FEATURE INSTRUCTION
3.USAGE CAUTIONS
4.SAFETY ATTENTION
5.RE-SETTING UNIT
6.PANEL FUNCTION DEFINITION
7.BASIC OPERATION
8.INTERFACE OPERATION INSTRUCTION
8.1 MAIN INTERFACE OPERATION
8.2 RADIO INTERFACE OPERATION
8.3 DVD INTERFACE OPERATION
8.4 GPS NAVIGATION INTERFACE OPERATION
8.5 TV INTERFACE OPERATION
8.5 AV IN INTERFACE OPERATION
8.6 CDC INTERFACE OPERATION
8.7 BLUETOOTH INTERFACE OPERATION
8.8 BLUETOOTH MUSIC INTERFACE OPERATION
8.9 USB/SD/IPOD/CDC INTERFACE OPERATION
9. SYSTEM SETUP
9.1 AUDIO EFFECT SETUP
9.2 DISPLAY SETUP
9.3 CLCOK SETUP
9.4 SYSTEM SETUP
10. GPS NAVIGATION INTERFACE DETAILED ANNOTATION
10.1 CONSOLE INTERFACE
NAVIGATION
ELECTRIC BOOK
MUSIC
PICTURE
MOVIE
10.2 SYSTEM SETUP
NAVIGATION SETUP
BASIC SETUP
GPS MONITOR
TOUCH SCREEN
SREEN DISPLAY
TIME
SKIN
SYSTEM
11. GPS PARAMETER
12. REMOTE CONTROL INSTUCTION
13. CIRCUIT CONNECTION
14. INSTRUCTION OF SETTING UP EXTERNAL STEERING WHEEL
16. MAIN FUNCTION
17. TROUBLESHOOTING SOLUTION
18. AUDIO KNOWLEDGE
CONTENT
2
2
3
4
4
5
6
9
9
11
13
22
23
24
25
27
28
29
30
30
31
35
35
37
37
38
39
39
39
40
40
41
41
42
42
43
46
47
48
49
51
15. ATTACHMENT ACCESSORY LIST 4 7
1-
ماﺪﺨﺘﺳﻻا ﻞﺒﻗ ﺔﺌﻴﻬﺘﻟا
2-ﺺﺋﺎﺼﺨﻟا
3-ماﺪﺨﺘﺳﻻا ﺕﺎﻬﻴﺒﻨﺗ
4- ﺔﻣﻼﺴﻟا ﺕﺎﻬﻴﺒﻨﺗ
5-زﺎﻬﺠﻟا ﺔﺠﻣﺮﺑ ﺓدﺎﻋإ
6- ﺔﻴﻣﺎﻣﻷا ﺔﻬﺟاﻮﻟا ﻒﺋﺎﻇﻭ
7- ﻲﺳﺎﺳﻷا ﻞﻴﻐﺸﺘﻟا
8- ﺔﻴﻣﺎﻣﻷا ﺔﻬﺟاﻮﻟا ﻞﻴﻐﺸﺗ ﺕﺎﻤﻴﻠﻌﺗ
8-1 ﺔﻴﺴﻴﺋﺮﻟا ﺔﻬﺟاﻮﻟا ﻞﻴﻐﺸﺗ
8-2 ﻮﻳداﺮﻟا ﻞﻴﻐﺸﺗ
8-3 ﻱد ﻲﻓ ﻱﺪﻟا ﻞﻐﺸﺗ
8-4 ﺔﺣﻼﻤﻟا مﺎﻈﻧ ﻞﻴﻐﺸﺗ
8-5 ﺓﺭﻮﺼﻟاﻭ ﺕﻮﺼﻟا ﻞﺧﺪﻣ ﻞﻴﻐﺸﺗ
8-6 اﺮﻴﻣﺎﻜﻟاﻭ ﺕﺎﻧاﻮﻄﺳﻷا ﻝﺪﺒﻣ ﻞﻴﻐﺸﺗ
8-7 ﺙﻮﺗﻮﻠﺒﻟا ﻞﻴﻐﺸﺗ
8-8 ﺙﻮﺗﻮﻠﺒﻟا ﻰﻘﻴﺳﻮﻣ ﻞﻴﻐﺸﺗ
8-9 USB/SD/IPOD/CDCﻞﻴﻐﺸﺗ
9- مﺎﻈﻨﻟا ﺔﺌﻴﻬﺗ
9-1 ﺕﻮﺼﻟا ﺕاﺮﻴﺛﺄﺗ ﺔﺌﻴﻬﺗ
9-2 ﺔﺷﺎﺸﻟا ﺔﺌﻴﻬﺗ
9-3 ﺔﻋﺎﺴﻟا ﺔﺌﻴﻬﺗ
9-4 مﺎﻈﻨﻟا ﺔﺌﻴﻬﺗ
10- ﺔﺣﻼﻤﻟا مﺎﻈﻧ ﻞﻴﺻﺎﻔﺗ ﺡﺮﺷ
10-1 ﻢﻜﺤﺘﻟا ﺔﻬﺟاﻭ
ﺔﺣﻼﻤﻟا
ﻲﻧﻭﺮﺘﻜﻟﻹا بﺎﺘﻜﻟا
ﻰﻘﻴﺳﻮﻤﻟا
ﺓﺭﻮﺼﻟا
ﻢﻠﻔﻟا
10-2 مﺎﻈﻨﻟا ﺔﺌﻴﻬﺗ
ﺔﺣﻼﻤﻟا مﺎﻈﻧ ﺔﺌﻴﻬﺗ
ﺔﻴﺳﺎﺳﻷا ﺔﺌﻴﻬﺘﻟا
ﺔﺣﻼﻤﻟا مﺎﻈﻨﺑ ﻢﻜﺤﺘﻟا
ﺲﻤﻠﻟا ﺔﺷﺎﺷ
زﺎﻬﺠﻟا ﺔﺷﺎﺷ
ﺖﻗﻮﻟا
ﻲﺟﺭﺎﺨﻟا ﺮﻬﻈﻤﻟا
مﺎﻈﻨﻟا
11- ﺔﺣﻼﻤﻟا مﺎﻈﻧ ﺕﺎﺳﺎﻴﻗ
12- ﻝﻭﺮﺘﻨﻛ ﺕﻮﻤﻳﺮﻟا ﺕﺎﻤﻴﻠﻌﺗ
13- ﺔﻴﺋﺎﺑﺮﻬﻜﻟا ﺓﺮﺋاﺪﻟا ﻞﻴﺻﻮﺗ
14- ﺓدﺎﻴﻘﻟا ﺔﻠﺠﻋ ﺔﻔﻴﻇﻭ ﺔﺌﻴﻬﺗ ﺕﺎﻤﻴﻠﻌﺗ
15- ﺔﻘﻓﺮﻤﻟا ﺔﻤﺋﺎﻘﻟا
16- ﺔﻴﺴﻴﺋﺮﻟا ﺔﻔﻴﻇﻮﻟا
17- ﻞﻴﻐﺸﺘﻟا ﻞﻛﺎﺸﻣ
18- ﺕﻮﺼﻟا ﻦﻋ ﺕﺎﻣﻮﻠﻌﻣ
- ﺕﻮﺼﻟا ﻦﻋ ﺕﺎﻣﻮﻠﻌﻣ
2
2
3
4
4
5
6
9
9
13
12
23
24
25
27
28
29
30
30
31
35
35
37
37
38
39
39
39
40
40
41
41
42
42
43
46
47
47
48
49
51
2 2
The AV unit provides DVD, RADIO, GPS (optional), external IPOD,AV (output/input),
BLUETOOTH, HD TFT, BACKUP VIEW and the standard POWER OUTPUT (50 wx4)
of function integrated.
Its internal DVD player adopts the high quality DVD deck, which can play DVD、DVD-9、
VCD、DVCD、CD、MP3、CD-R/RW etc.
It has internal Bluetooth function, which can answer and dial the phone conveniently
to make your driving safe. At another hand, if mobile phone has A2DP function, it can
play music when Bluetooth is on.
It supports external IPOD playing (optional).
It adopts HDTFT 16:9 that is drove with the advanced microprocessor, solution of
800 × 480,and possesses floweriness color, lower power dissipation and reliable
performance.
It has an automatic detection backup function to make your backup safe.
It has two video output lines , four audio output lines; two video input lines, one audio
input line, so it can connect with external device conveniently.
It's operation system is intelligent and humanistic. It has graphic OSD, not only be op-
erated on panel function buttons but also on TFT touching icons, even using TX to
control.
It supports external steering-wheel control without damaging the original car's function
to make driver more convenient.
It has manual brake close screen function. When the manual brake close screen line
connects to ground, the unit may turn on TFT, otherwise to turn off TFT.
In order to install and use the unit correctly, please read the manual carefully. Because
our productions are improving all the time, the packing may has some difference with
the actual unit, please make the actual unit as real one. If you have any question, you
can contact with our agent or factory.
SETUP BEFORE USAGE
Before usage, unit needs to set up following two items:
1.Navigation path set up: see P13.
2.Touch screen calibration: see P20.
FEATURE INSTRUCTION
47 43 3
1. The unit only support the format of MP3/WMA/JPEG/MPEG which recorded in
DVD-R, CD-R, CD-RW, SD and USB .
2. When you want to format the media device to delete the file, you should use
common format, not use fast format, avoiding damage the devices such as USB
and SD etc.
3. The setting for MP3/WMA/JPEG/MPEG encoder and CD/DVD recorder.
Using MP3/WMA encoder to compress the audio data into MP3/WMA format ,
please set the parameters as following:
MP3/WMA:
The Bit Rate of transmitting is: MP3:32-320KBPS
WMA:48-192KBPS
The frequency of sampling is: MP3:32,441,48KHZ
WMA:32,441,48KHZ
Using JPEG/MPEG encoder to compress the AV data into JPEG/MPEG format ,
please set the parameters as following:
JPEG/MPEG :
JPEG display zone dimension:
Baseline format: 1024(W) X768(H) pixel (MAX)
Continuous format: 1024(W) X768(H) pixel (MAX)
MPEG
Video format: MPEG1, MPEG2
Display zone dimension:
MPEG1: 320X240,352X240(NISC),352X288(PAL)
MPEG2: 40X480,740X480(NTSC),704X576(PAL)
Audio format: MPEG1, MPEG2
The Bit Rate of transmitting is:2-384KBPSCBR
The frequency of sampling is:32,44,1.48 KHZ
WMA:32,44,1.48 KHZ
4.When you use disc recorder to record the multimedia file of
MP3/WMA/JPGE/MPEG, if the quantity of the multimedia file is too large, you can't
record in one disc fully, please add a disc.
5.If you use part of function of Windows Media player 9.0 edition above, may not
be able to play the detailed information of compatible format normally at some
time.
USAGE CAUTIONS
4 4
If the size of the picture exceed the limit, part of the picture will not display.
When you record the MPEG2 data using DVD media, you must set the Recording
Format to one time using only.
6.The order of playing MP3/WMA/JPEG/MPEG
The unit seeks the multimedia files or folder in natural number. So it plays in natural
number from small to big. If your multimedia file is recorded, and its file name is not
named as per Arabic numbers (eg: 1.XXX, 2.XXX), the unit will not seek and play in
order, and it will enter the status of seeking and playing random automatically.
SAFETY ATTENTION
Before installation, please read all the instruction, and suggest you‘d better let the
AV professional install the unit.
Cozy Hint:
In order not to avoid short circuit, please cut off car and the
connection of ACC and B+ before installing.
The unit adopts 12V car power system which must connect to ground.
Please don't install it on truck or bus with 24V directly, or will be damaged.
You'd better use legal disc, rather than nonstandard disc or bad quality
disc; otherwise, it may cause trouble-shoot and reduce using life of the
unit.
Without professional guidance, you mustn't exchange the power fuse or
use some unsuitible fuse, otherwise, it will cause the unit damaged even
fired.
Avoiding violate the traffic rule, the driver can't enjoy program and operate
the unit when driving.
For safety and the normal using of the unit, please ask the professional to
install and repair it, at the same time to avoid damaging unit and the
accident at the same time. Needing detailed information to consult the
local professional retailer of AV products.
Don't place the unit in the wet environment or water, avoiding electric
shock as the result of short circuit, or other unnecessary damage and fired.
RESET THE UNIT
1.Must reset the unit before you use it at the first time or you change car
battery.
2.Must reset the unit when the unit is confused.
3.Press RST button to reset the unit using a tip.
the
5 5
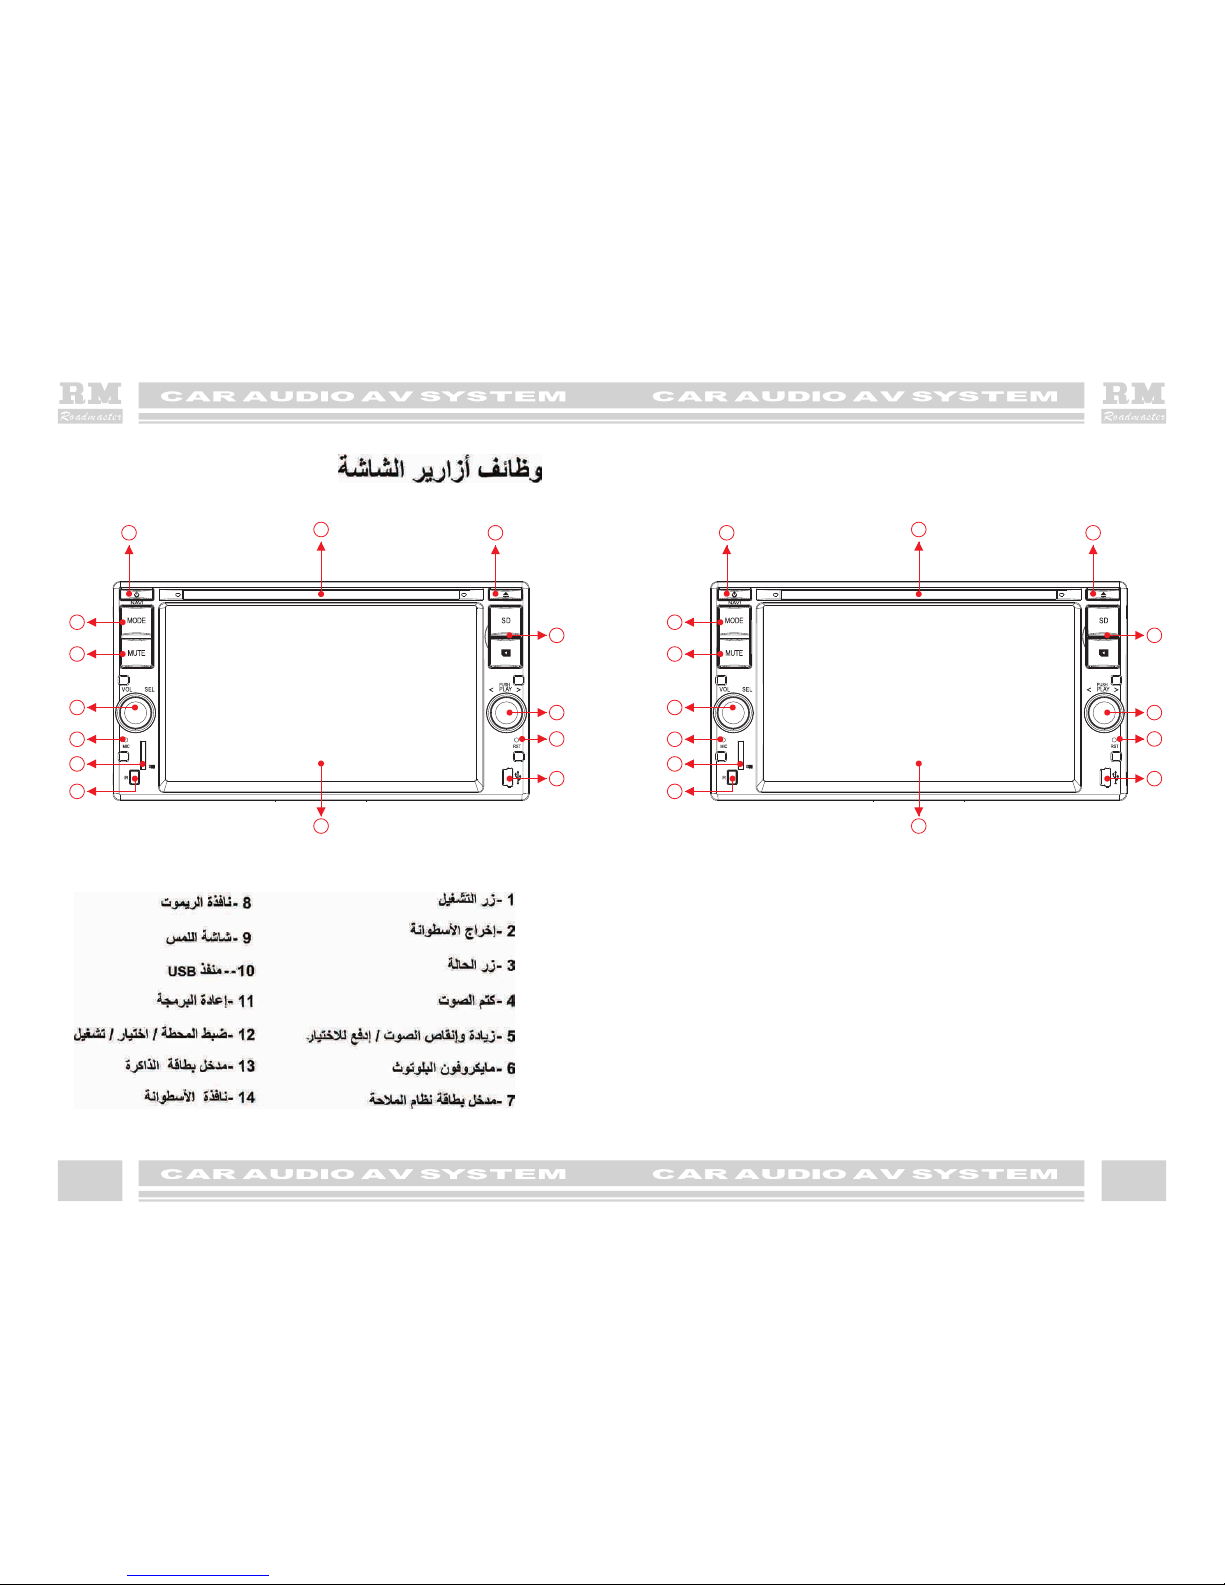
1.Power button
11.Reset button
2.Eject button
12. -tun+/push pause/play
3.Mode button
13. SD Card port
4.Mute button
14. Disc window
5. -Vol+ / push SEL
6. Bluetooth mic
7. GPS Card portn
8. Remote control window
9.Touch screen
10. USB port
PANEL FUNCTION DEFINITION
GPS CARD
12
3
4
5
8
6
7
10
9
11
12
13
14
GPS CARD
12
3
4
5
8
6
7
10
9
11
12
13
14

66
Power button ( )
When the unit is connected with power supply, press any button to turn on it. When it is
turned on, press this button short to switch to GPS interface. But current state still is
broadcasting, the loudspeaker outputs the current state's sound, and the unit outputs
external audio and video still. When GPS has voice hint, the output of loudspeaker will
switch to GPS sound, but the external video output won't switch.. Press this button short
again to switch to video screen of current playing. If you press this button long, it will turn
off the unit.
Volume / Setup button
In normal playing state, rotate it left or right to adjust current volume. Press it continuously
to select sound effect ( bass, treble, right and left, rear and front) and screen display ( br-
ightness, contrast, color). Rotate it left or right to set up above parameters. Progress bar
will disappear if user doesn't do any operation in 3 s after he press this button.
Mute button
Press it short to turn off the mute function, press it short again or press Volume button to
turn on it.
Press it long to turn off display screen. Press any button or touch screen to turn on display
screen.
Mode button
Press this button short to switch to work mode. Press it long to enter into external GPS
video interface, but the output of loudspeaker is still of current broadcasting state, just let
the external GPS video switch to TFT display screen. The external output is still the audio
and video output in the current broadcasting state. In this state, press each function button
can realize the relevant operation, and the display screen switches to current video screen
automatically, making the user's operation convenient. If there is not any operation
in 5 seconds, it will switch to external GPS video screen. When pressing this button long
again, it will turn off the external GPS video screen, and then turn back to the current state.
BASIC OPERATION
7 7
When inserting SD Card, please note its pros and cons.If it can not be inserted into port,
please overturn it instead of force.
SD Card port
Touch screen
The TFT screen is touch screen. Touch each icon to play or enter into relevant function op-
eration interface in relevant OSD interface.
Fast rewind/ fast forward/ play /pause button ( DIAL/ENT )
This button is valid in following modes
In radio mode
Rotate it left or right to fast rewind or fast forward of radio frequency.
In TV mode
Rotate it left or right to select last one or next one channel.
In DVD mode
Rotate it left or right to select last song or next song,while press it to play or pause.
8 8
Eject button ( )
Press this button to eject disc automatically, the disc will insert automatically but not play
if it isn't taken away in 10 seconds.
Reset button
Press it to resume the state of that when unit is in factory,but system will delete all memory.
Disc window
Unit read deck adopts inspiration type.When put disc into disc window gently,disc will
be suck in and read automatically. Before putting disc,please check and confirm there
is no disc in it.
NOTICE:
1.Please use standard original disc,and maintain it to be clean,forms good habit to safe-
guard unit's normal service life.
2.The unit only accepts disc with diameter of 12 CM, please not putting one with diameter
of 8 CM as well as irregular shape disc.If inserted them forcefully, it will not read disc e-
ven damage deck structure.
3.Put the side with words upwards when putting disc into disc window.

9 9
INTERFACE OPERATION INSTRUCTION
MAIN INTERFACE OPERATION
There are 12 icons in main interface,and click each icon to enter into relevant interface( When the
words under icon is black, it means unit doesn't have this function) .
Click this icon to enter into setup interface ( in following chapter, this icon's function is same, and
we will not instruction again)
Home page icon ( It is invalid in main interface)
Main interface
RADIO INTERFACE OPERATION
Click this icon to enter into radio interface in main interface, as following picture shows:
Click this icon to enter into setup interface ( in following chapter, this icon's function is same, and
we will not instruction again)
Home page icon ( It is invalid in main interface)
Main interface

1 0
1 0
Mute button( )
Press it short to turn off the mute function, press it short again or press VOL+/VOL button
to turn on the mute function.
Press it long to turn off the screen. Press any button or touch screen to turn on the screen.
Band button ( )
Press it lightly to choose among FM1,FM2,FM3,AM1 and AM2.
APS button ( )
Press it short to browse memoried radio stations,and each one play 5 s.
Press it long ( more than 2 s) to search radio stations automatically in all frequency range
and storage them to M1-M6. After searching, turn back to first station and play it. ( When
searching ,unit is in mute state. In radio, each group of AM/FM can storage 6 stations.So
it can totally storage 18 stations of FM1,FM2,FM3;while 12 stations of AM1,AM2)
Radio Auto seek or manual tuning downwards button( )
Press it short to Auto seek radio stations downwards until find, then stop and play it. When
playing, press any button of M1—M6 to storage the station in that button. Press it long to
fine adjust radio stations downwards by manual. In manual mode, press it lightly to fine
adjust and select station downwards by step, while press it long to fine adjust and select
station downwards continuously.
Radio Auto seek or manual tuning upwards button( )
Press it short to Auto seek radio stations upwards until find, then stop and play it. When
playing, press any button of M1—M6 to storage the station in that button. Press it long to
fine adjust radio stations upwards by manual. In manual mode, press it lightly to fine adjust
and select station upwards by step, while press it long to fine adjust and select station
upwards continuously.
Loud button( )
Press it to open or close loud button, meanwhile, there is prompt on screen.
Stereo / Monophony switch button ( )
In FM band, press it to select stereo or monophony of channel. Especially when signal is
weak, monophony can help reduce interference.
Local-distant control button( )
Press it to select local-distant control.
Number buttons for station memory ( 1~6 )
Press any number buttons of 1-6 short to play radio station which is memorized on that
number button. While press it long to memory the current station which is playing now.
1 0

1 1 1 1
DVD INTERFACE OPERATION
When there is DVD in disc window, click DVD icon to enter into DVD interface in main interface, as
following shows:
Click this icon to enter into
next button interface.
Click this icon again to enter into
next button interface.
Click this icon to enter into
next button interface.
Click this icon again to enter into
next button interface.

1 2 1 2
Circle button
Press it to display next page's buttons. Press it all the time to repeat display button in menu
circularly.
Mute button ( )
Press it short to turn off the mute function, press it short again or press Volume button to
turn on the mute function.
Press it long to turn off the screen. Press any button or touch screen to turn on the screen.
Up-selection / fast rewind button ( )
When playing disc, press it short to select songs upwards. Press it long circularly to select
the rate (X2/X4/X8/X20) of fast rewind. When it fast rewind, press play button to play
normally.
Down-selection / fast forward button ( )
When playing disc, press it short to select songs downwards. Press it long circularly to sel-
ect the rate (X2/X4/X8/X20)of fast forward. When it fast forward, press play button
to play normally.
Play / pause button ( )
When playing DVD, press it to pause, while press it again to play DVD again.
Stop button ( )
When playing DVD, press it to stop playing DVD.
Loud button ( )
Press it to open or close loud button, meanwhile, there is prompt on screen.
Repeat play button ( )
Press it lightly to select repeat playing chapter,title, repeat playing or closing repeat play-
ing.
Random play button ( )
Press it lightly to turn on or turn off random playing . When it is turned on, unit will play w-
ithout order.
Track switch button ( )
When playing CD, press it to switch between left and right track. When playing DVD, if disc
has many information of sound track or language, press it to select sound track and lang-
uage. If disc has only one sound track, it will display invalid when press this icon.
EQ button ( )
Press it to setup audio effect among pop, classic, rock and jass.
Time display button ( )
Press it lightly and circularly to display time of playing/ remaining/ closing.
Subtitles switch button ( )
When playing DVD, if there are several kinds of subtitles information in disc, touch it lightly
to switch subtitles. If there is only one kind of subtitle, it will display invalid when press this
icon.
( )

1 3 1 3
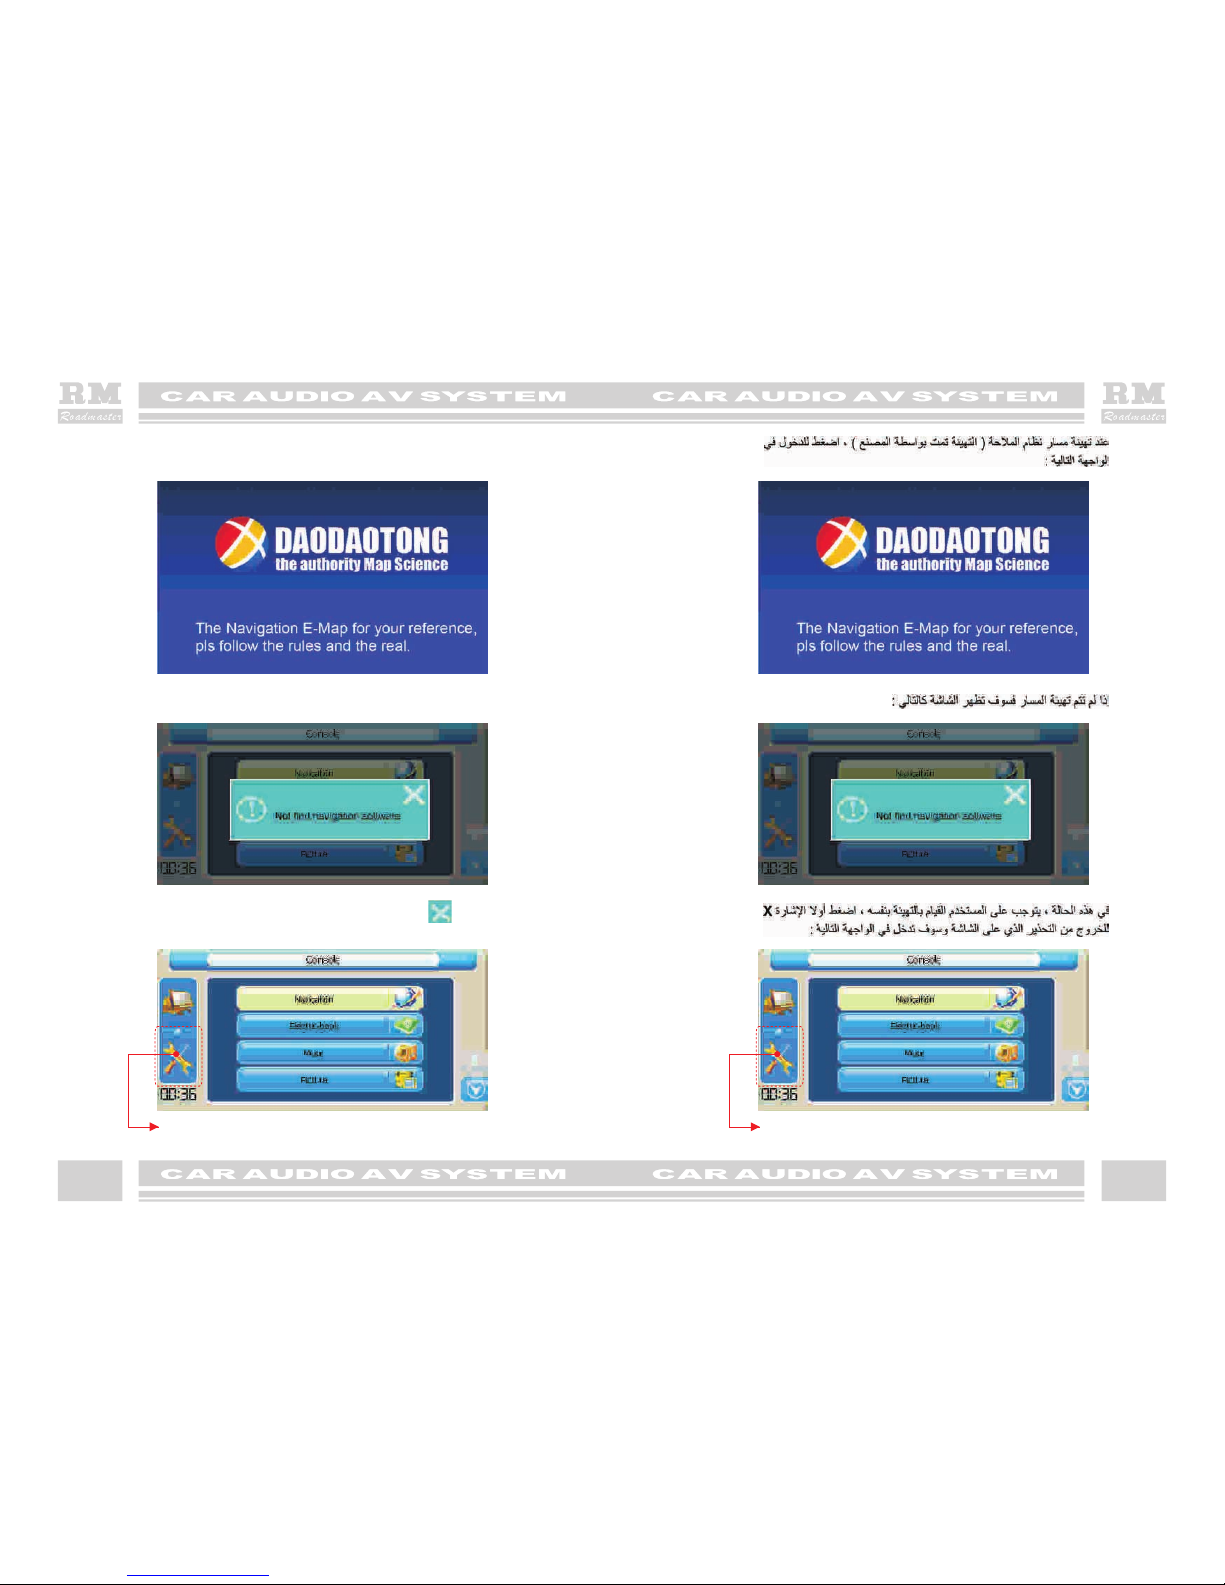
GPS NAVIGATION INTERFACE OPERATION
This function can only be realized on the condition that there is navigation map on
SD Card which is inserted. Taking “Dao Dao Tong” map for example to instruct
GPS function ( Other map just follows operation instruction)
In main menu state: Click this icon to enter into GPS interface
Menu button ( )
When playing DVD, press it to display song list, then let user choose which one to play
(needs support from disc).
Up-selection button ( )
Click it to choose menu upwards, then click “OK” to confirm.
Down-selection button ( )
Click it to choose menu downwards, then click “OK” to confirm.
Left-selection button ( )
Click it to choose menu leftwards, then click “OK” to confirm.
Right-selection button ( )
Click it to choose menu rightwards, then click “OK” to confirm.
Confirmation button ( )
This icon is valid only after user select goal by pressing Up-selection button/ Down-
selection button/ Left-selection button/ Right-selection button.
Click this icon to enter into GPS interface
1 4 1 4
When navigation path has been set up (it is set up when leaving factory), click it to enter
into following interface(see P17):
If navigation path doesn't set up, it will display as follows:
In this case, user needs to set up by himself. At first, click “ ” to exit warning,
and enter into following interface:
Click this icon to enter into system setup interface. Click this icon to enter into system setup interface.

1 5 1 5
System operation interface as follows:
Step 1,click here to enter into next picture.
Step 2,click here to enter into next picture.
Step 3,click here to enter into next picture.
Step 1,click here to enter into next picture.
Step 2,click here to enter into next picture.
Step 3,click here to enter into next picture.

1 6 1 6
Step 4, click icon which marked with circle in last picture to enter into next picture.
Step 5, click here to enter into next picture.
Step 6, click here with " " to enter into next picture.
Step 7,click turn back icon to finish navigation path setup.

1 7 1 7
After setup, let's operate navigation function as follows:
In main interface
After clicking , it will enter into next interface:
After clicking, it will enter into map starting interface as follows
Click navigation bar
Click GPS icon
Click navigation bar
Click GPS icon

1 8 1 8
ACC
NO REJ
A minute later, it will display as follows:
Click “ Acc”
After clicking, it will display as follows:
Touch "Real Navigation"button
Come into “desination ADD”interface,
as the following page
After clicking, it will display as follows:
ACC
NO REJ
Click “ Acc”
Touch "Real Navigation"button
Come into “desination ADD”interface,
as the following page
Table of contents
Other Roadmaster Car Video System manuals


