Roadmaster B-783 TC User manual
R泣

11
1. Precautions.......................................................................................02
2. Basic Operations..............................................................................03
3.Radio Operations..............................................................................04
4.EQ Operations...................................................................................05
5.DVD Operations...............................................................................06
6.SD / USB Playback...........................................................................09
7.Qibla Operations...............................................................................10
8. Bluetooth Operations......................................................................11
9. Mirror Link.....................................................................................14
11.System Setting................................................................................18
CONTENT
Car Multimedia System
10. SWC Operations............................................................................17

Car Multimedia System
Precautions
2
Thank you for purchasing this product. Please read carefully the instruction manual for proper operation and
maintenance.
1. This unit is designed to be used in a vehicle with a 12-volt battery.
2. Never install this unit where the operation & condition for safety driving is restrained.
3. Do not disassemble the device and refer servicing to qualied personnel.
4. In the case of moisture forming on the optical parts due to low temperature, please turn on heating and stop
using the unit until condensation disappears. If moisture forms on the Disc, wipe it off with a soft cloth.
5. Driving on extremely bumpy roads which causes severe vibration may result in sound skipping.
6. The unit will be a shorter service if Disc operating long time or volume too loud. Please change to radio
mode after playing Disc for long period of time, with medium volume level.
7. Please adjust volume to proper level for safety reason.
8. The device will operate properly in a temperature range from -20 C to +60 C.
9. Never insert an irregularly shaped CD. The unit may not be able to eject it, resulting in a malfunction.
10. The surface is easily scratched, so do not rub it with hard objects.
11. Use a soft, dry cloth and gently wipe off the dirt when the machine panel or screen is dirty.
12. Please follow the instructions to use the unit; the losses caused by illegal operation will not be covered
under warranty.
13. In case of dusty environment, please regularly clean optical lens with cleaning Disc, and wipe off dirt
around Disc slot.
14. At least 10s after device booting, can the reset button be pressed in order not to cause damage to the system.
15. Please cut off the B+ power supply after system off for more than 20s, in order to avoid system damage.
Notice:
Please take out GPS card only after the navigation system is off. Otherwise any damage caused by
misuse will not be taken care of !
3
Basic Operations
1. Power On/off
Power on
If the unit turned off last time by stopping the engine, when you start the engine again, the unit will power on
automatically.
Power off
After pull out the vehicle’s key, the unit will power off automatically.
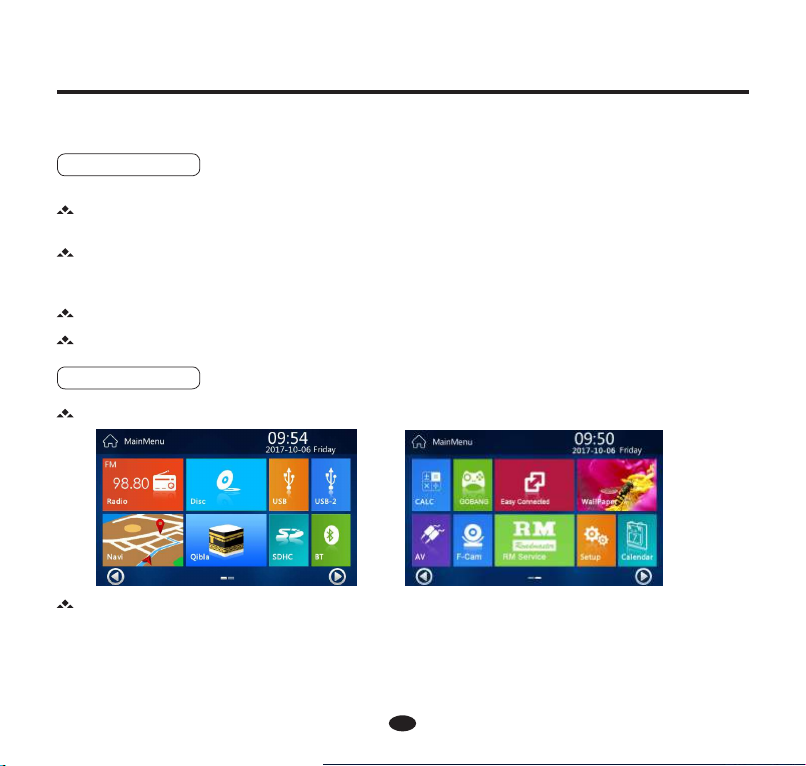
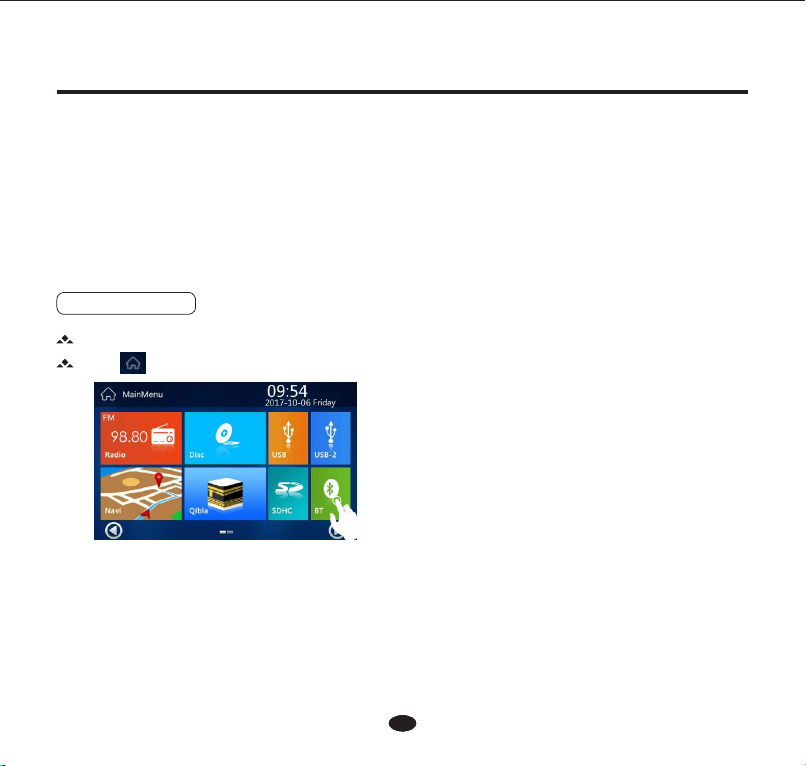
2. Main Menu
Enter main menu as below for rst power on device.
After sliding the host screen, can enter the next main menu interface.
Car Multimedia System
If the unit turned off last time by pressing the power button on the front panel, press the power button again, the unit
will power on.
Press and hold the power button more than 2 seconds, the unit will turn off.
4
Radio Operations
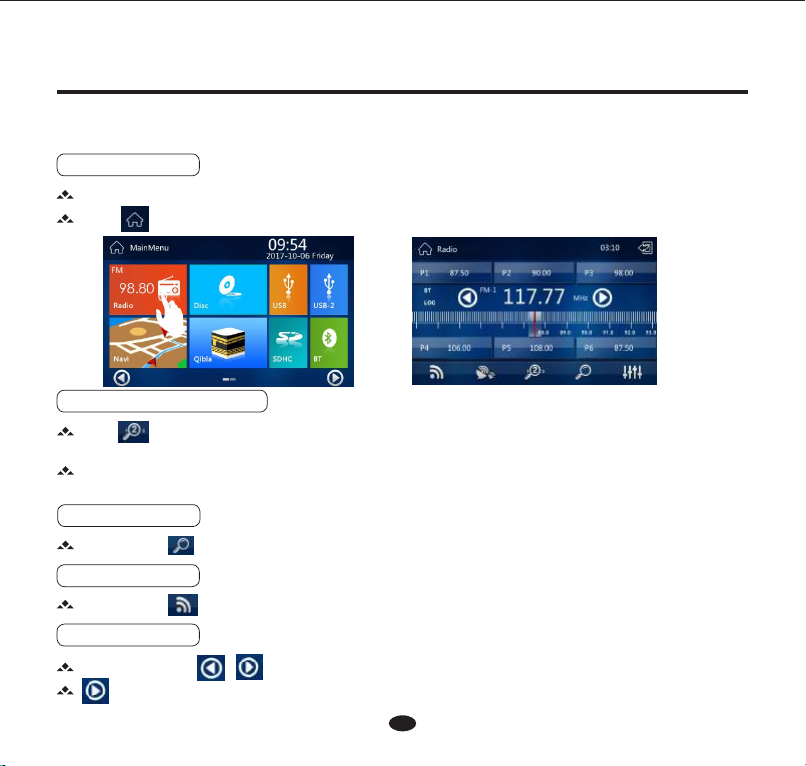
1. Enter / Exit
Touch Radio on the main menu to enter radio mode.
Touch icon to exit the radio.
4. Band Selecting
Touch the icon to switch the radio band among FM1, FM2, FM3, AM1, AM2.
3. Radio Preview
Touch the icon to preview radio broadcast.
Car Multimedia System
5. Manual Tuning
2. Automatic Tuning
Touch on the UI to enter automatic tuning, and radio stations with strong signal will be stored automatically.
Touch again to stop tuning, and play the current station.
The unit has 5 bands, such as FM1, FM2, FM3, AM1, and AM2. Each band can store 6 stations, hence the unit can
store 18 stations in FM bands and 6stations in AM bands.
Short press the icon / to seek and play the previous or next available station.
Move down one step to set radio station.

Car Multimedia SystemCar Multimedia SystemCar Multimedia System
5
Car Multimedia System
6.Sound On/off
Touch the icon to open or close the sound.
7.EQ Setting
Move up one step to set radio station.
In the Radio, DVD, Bluetooth audio and other modes, you can nd the , touch this key to enter EQ setting.
In the Radio menu, touch icon or press the key on the front panel to enter EQ setting menu.
In the EQ setting menu, touch the / icon to set your desired effect.
In the EQ setting menu, move on the control bar or touch the / / / icon to set your desired character.
For example, in Radio menu
DVD Operations
The unit can playback DVD/VCD/CD/MP3/WMA/JPEG/MPEG4/CD-R/CD-RW/DVD±RW/DVD±R/DVD-5/9/10/ 18/
DIVX3.0-6.0/SVI and other discs (only 12cm standard discs are compatible); The unit can't playback 3GP/WMA Discs (the
AVI discs can display can not playback).
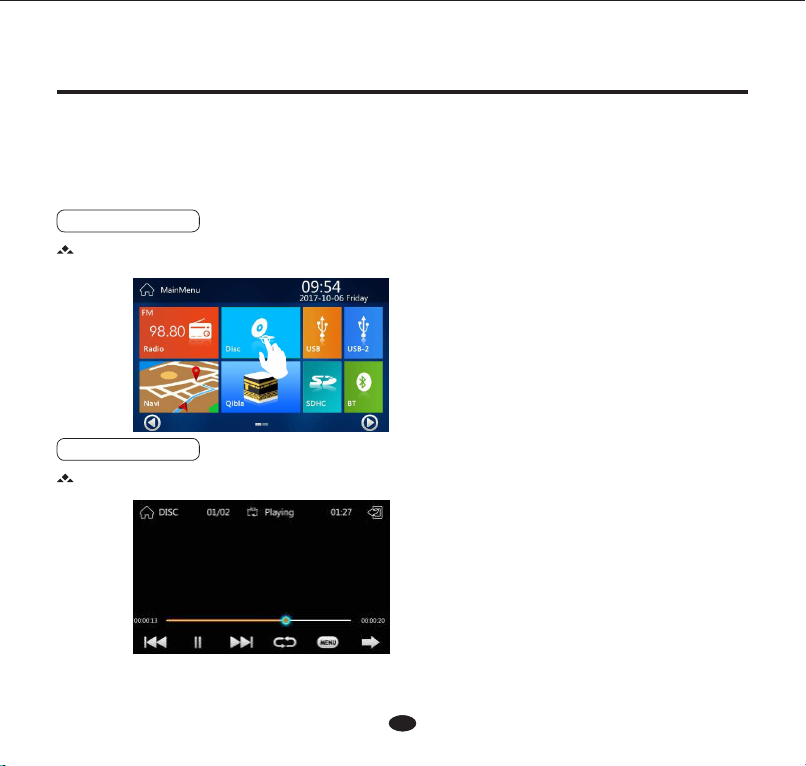
1. Mode Selecting
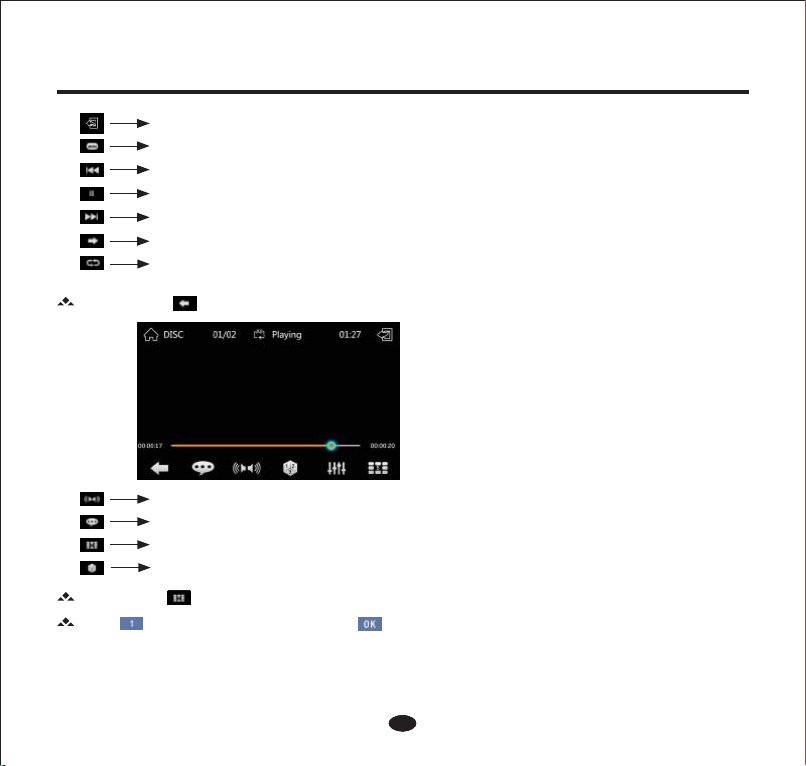
2. Menu Operating
When Disc in, then touch Disc icon on the main menu to enter DVD mode.
Touch anywhere on the screen, the control bar will appear, see as below.
Car Multimedia System
6
Car Multimedia System
Car Multimedia SystemCar Multimedia SystemCar Multimedia System
7
Car Multimedia System
icon to conrm and play.
Touch the icon to enter track selecting menu.
Touch the numeric key to select, then touch
Return
Play/Pause
Next track
Shift pages
Previous track
Return contents
Touch the icon to enter next control bar, see as below.
Switch audio channel
Subtitle Language
Track selecting (Chapter, Title, or Time)
Repeat
Angle
Car Multimedia SystemCar Multimedia SystemCar Multimedia System
8
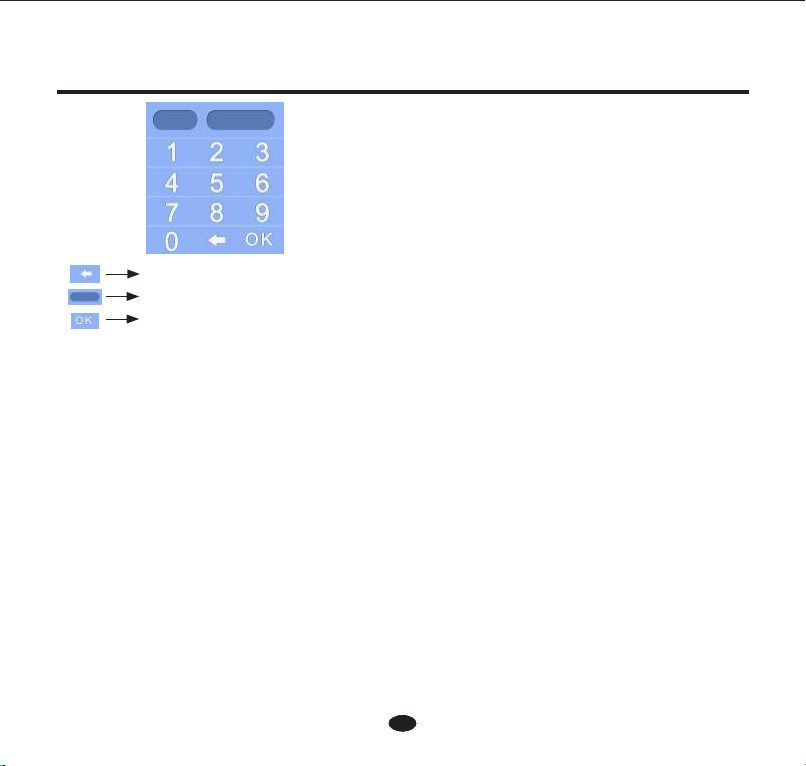
Car Multimedia System
Enter Chapter No./Title No./Play Time to Change.
Conrm
Delete

1. SD Slot
2. Insert / Pull Out SD Card / USB
3. Enter Playing Mode
SD / USB Playback(Optional)
This operation is available when the unit has the SD / USB slot.(Reading Capacity: 32G)
It will play SD/USB automatically after inserting SD / USB.
To take out SD card, please exit SD mode to unlock it and then press SD card and it will automatically pop up.
To take out USB sticker, please exit USB mode to avoid data lose, then pull out USB sticker.
Insert
Pull Out
Enter the main menu, touch SD icon to enter SD card mode, shown as below.
Car Multimedia System
9
Car Multimedia System
Enter the main menu, touch USB icon to enter USB mode, shown as below.

Note :
1. 32G SDHC card/USB is compatible.
2. During playback, the operations of SD card are as same as the operations of MP3.
3. Before the SD card/USB taken out, stop the le playing to avoid data damaged.
4. For different standard of different factory, not all kinds of USB stickers are compatible with the unit. If the USB
sticker can not be used, please contact the manufacturer.
Car Multimedia System
10
Car Multimedia System
1. Input / Output
Touch the Qibla icon on the main menu, and it will enter the Qibla mode.
Qibla Operations
Notice: Pls. see the practicality device according to detail model for this function.
Car Multimedia SystemCar Multimedia SystemCar Multimedia System
11
Car Multimedia System
1. Bluetooth Mode
Enter the main menu, touch Bluetooth icon to enter Bluetooth mode.
Touch to exit the Bluetooth mode.
Bluetooth Operations
The Bluetooth allows you to utilize your car built-in audio system for wireless mobile phone or music handsfree
communication. Some Bluetooth mobile phones have the audio features. The car stereo with Bluetooth installed will be
able to retrieve phonebook contacts, received call, dialed call, missed call, incoming calls, outgoing call and listen to
music.
Note:
This system will not operate or may operate improperly with some Bluetooth audio players and cannot guarantee the
compatibility of all mobile phones.

h
f
2. Bluetooth Menu
3. Pairing / Connection
When you need to use handsfree operations, you should establish a connection between the unit and your mobile
phone.Turn on Bluetooth function of your mobile phone, and turn on the Bluetooth device searching. When pairing,
the mobile phone will display the Bluetooth device name , you should enter [0000] as the password. After pairing
successfully, the unit will enter Bluetooth mode automatically, and mobile phone Bluetooth name will appear on the
screen.
1. Pair&Connect
2. Dial&Talking
3. History Record
4. Phone book
5. BT Music
6. Making a call
7. Delete
8. Backspace
ae
b c d
12
Car Multimedia SystemCar Multimedia System
4. Direct Number Call
to delete one by
You can press numeric icons of mobile phone or the touch keys to select dial numbers.
The selected numbers will be displayed on the screen. If there is a wrong number, please touch
one.
when numbers ready, touch icon to dial.
g
Car Multimedia System
13
Car Multimedia System
5. Answering a Call
6. Direct Number Call
When there is an incoming call, the unit will switch to Bluetooth mode automatically.
Touch on the screen or press the key on the front panel or on the remote control, to terminate a call.
In the Bluetooth menu, touch icon to enter phone book menu.
Touch the logo on control bar you can enter other interface.
On the phonebook state, you can choose the telephone number by sliding on left or search by letter on right.
Car Multimedia SystemCar Multimedia System
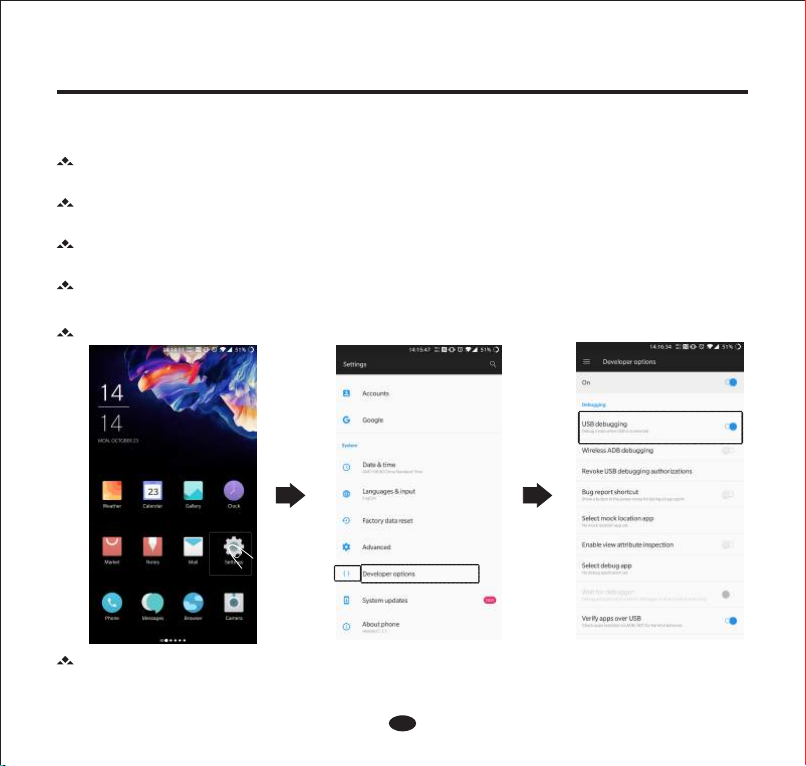
Mirror Link
In the case that 'Developer Options' cannot be found, enter 'About phone' and click 8 times on 'Version' or 'Software
version', then 'Developer options' will appear in the previous menu.
This function is to allow mobile phone's interface be projected on car infotainment device's screen, and car device is
able to control mobile phone's interface by touching its own screen.
Use mobile phone's data line to connect mobile phone and car device. After connected, mobile phone will be charged
no matter 'Mirror Link' is on or not.
Those mobile phones which cannot run Android system smoothly or android version is below 4.0 may not support
Mirror Link or may have poor experience when using this function.
Mirror Link supports video only. Please connect mobile phone with car device through Bluetooth if audio is needed.
Step 1: Mobile phone setting
Activate USB debugging (one-time setting only).
Car Multimedia System
14
Car Multimedia System
15
Car Multimedia System
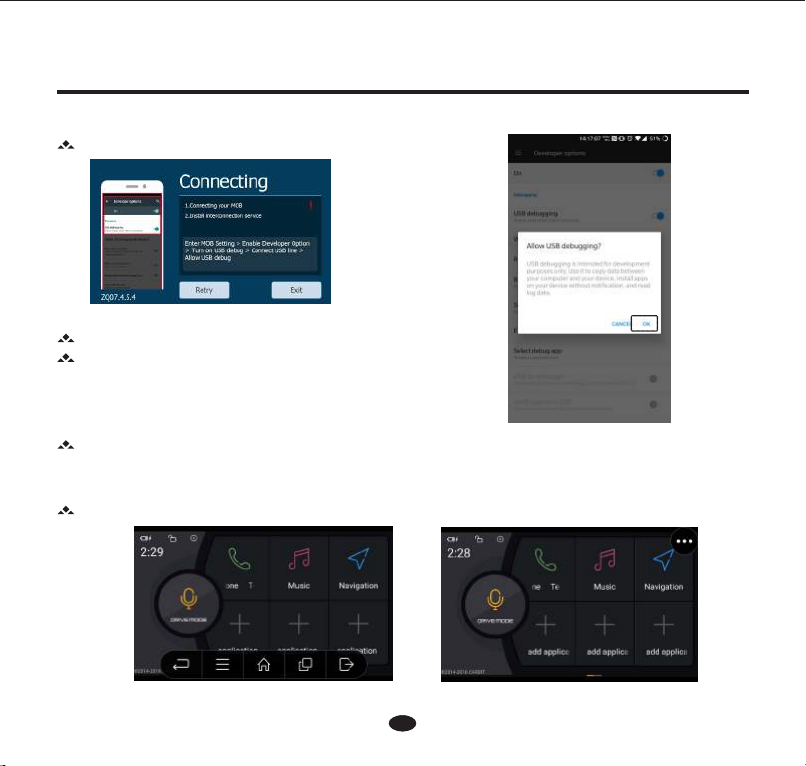
Click on 'Mirror Link' icon to enter Mirror Link interface as below.
Use mobile phone's data line to connect mobile phone and car device.
Car device may display icon of waiting after connection. Some
mobile phone may ask for approval for connection, please click 'OK'
to proceed.
Step 2: Activate 'Mirror Link'
Operation Explanations
When the connection is successful , car device will display mobile phone's interface, and at that moment,
operation on car device or mobile phone is workable for Mirror Link.
Assistant Button
Click on it and you will see 4 common operations as below.
Step 3: Connect

Car Multimedia SystemCar Multimedia System
16
Mirror Link function has two ways for horizontal screen mode:
1. Mandatory
2. Automatic
Mandatory mode will enforce mobile phone to be horizontal screen display for any interface. Some apps may not be
designed for horizontal display, in this case, mandatory mode will have poor performance.
Automatic mode follows mobile phone's natural portrait or horizontal status.
Troubleshooting
Mobile phone connected but no reaction when touching Mirror Link
Slow movement
It shows 'Has the mobile phone been ROOT? Please use original software or this function cannot be used'
NO Horizontal screen
Re-plug USB cable. If the setting is right and still no response, the mobile phone might be not supporting Mirror Link
function.
Most probably the mobile phone processor fails to support Mirror Link.
To use Mirror Link, please ensure the mobile phone has not been ROOT. It's recommended to use original mobile
phone software for Mirror Link function.
Pleas remain at least 50M or above free memory for Mirror Link.
* Due to software discrepancies, some mobile phones might not support Mirror Link or not run smoothly. User manual is for reference
only and please regard the object as standard when difference comes.
Assistant button
Car device-back to home page
Mobile phone-Mandatory/automatic horizontal screen switch
Mobile phone-back
Mobile phone-back to home page

CarCar Multimedia SystemMultimedia System
SWC Operations
Steering wheel control setting as following (the function maybe not available for different vehicles).
If you need to redene, press , and operate according to the indication, shown.
1. Touch SWC icon to switch to SWC mode.
2. Enter steering wheel control setting.
3. Start to pair all the keys in the same way. Afer all keys are dened, exit the setting menu, and the denitions will be
stored.
17
Car Multimedia SystemCar Multimedia System
Touch General icon to enter general setting.
Touch the associated icon on the screen to adjust the general setting.
3. General Setting
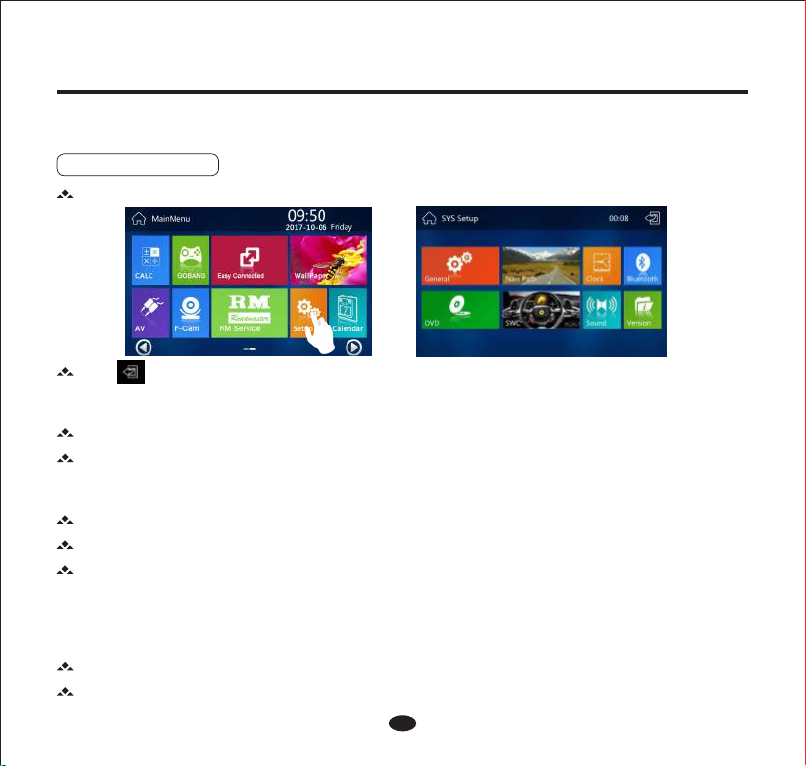
System Setting
1. Setting Mode
Enter the main menu, touch Settings icon to enter Setting Mode, as below .
Touch icon to exit.
Touch Time icon to enter time setting.
Touch the associated icon on the screen to adjust the time setting.
Time Mode:
12 HOUR MODE: The clock displays in the type of 12 hours such as 11:18 AM.
24 HOUR MODE: The clock displays in the type of 24 hours such as 20:18.
In the setting menu, touch WallPaper icon to enter background picture menu.
Under wallpaper setting, set user-dened BMP photos by use “custom” from SD card.
1. Background Picture
2. Time Setting
18

Auto Answer: The built-in bluetooth will put through the call automatically, whereas you should put through the call
manually.
Touch ON / OFF icon, the ON means the auto connection is on, and the OFF means the function is off.
Touch Navigation icon to enter Navigation setting menu.
5. Navigation
Pairing Code: The default pin code is 0000 . If you want to set a new pin code, please input the desired 4-digit
password.
Navigation Gain:Touch the volume bar to adjust the volume. Move left to reduce and right to increase.
File Address:Touch the address to open the navigation programme, and the unit will display the address list in the map
card.
Background Music: Touch ON / OFF icon,the ON means the background music is on, and the means the function
is off.
Car Multimedia SystemCar Multimedia System
19
Touch BT icon to enter Bluetooth setting menu.
Change other items, and adjust associated setting. For example, if you set the waiting time to 30 seconds, when there is
no any operation of the unit more than 30 seconds, the unit will enter screen saver menu automatically.
Auto Connect: After disconnecting with your mobile phone, the built-in Bluetooth will send connection order
automatically.
Change other items, and adjust associated setting.
Beep: Touch ON / OFF icon, the ON means the beep is on, and the OFF means the beep is off.
Lighting Detect: Touch ON / OFF icon, the ON means the function is on, and the OFF means the function is off.
Language:Touch OSD icon to enter language setting, and select different language to switch the OSD language.
Screen Saver:Touch ScreenSaver iconto enter screen saver setting menu.
4. Bluetooth
Touch ON / OFF icon, the ON means the auto connection is on, and the OFF means the function is off.
Table of contents
Other Roadmaster Car Video System manuals


