manuals.online logo
Brands
  1. Home
  2. •
  3. Brands
  4. •
  5. ROBINHOOD
  6. •
  7. Ventilation Hood
  8. •
  9. ROBINHOOD RICDW9 User manual

ROBINHOOD RICDW9 User manual

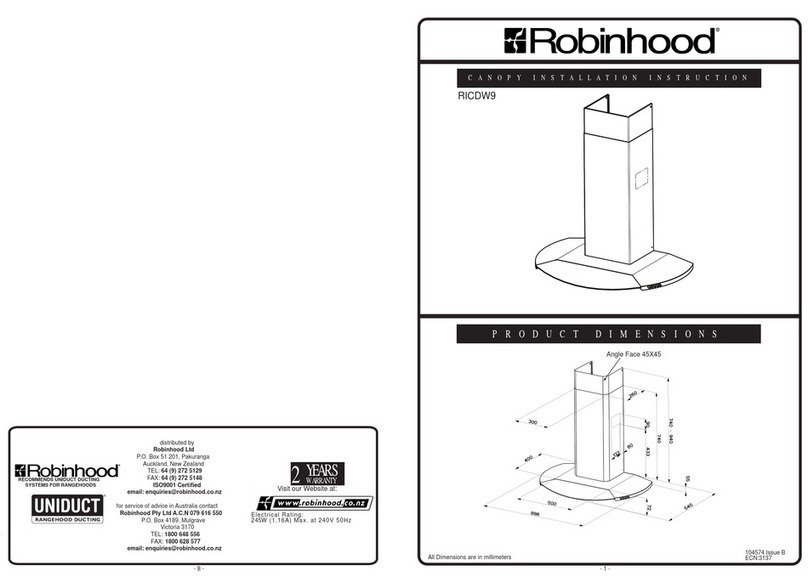
Angle Face 45X45
104574 Issue D
ECN: 07 007
RICDW9
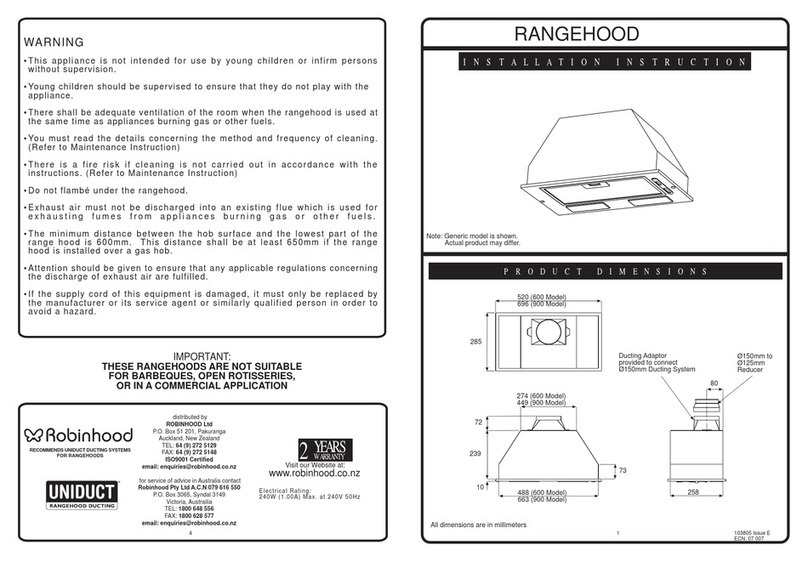
PRODUCT DIMENSIONS
CANOPY INSTALLATION INSTRUCTION
All Dimensions are in millimeters
Visit our Website at:
Electrical Rating:
245W (1.16A) Max. at 240V 50Hz
YEARS
WARRANTY
2
distributed by
Robinhood Ltd
P.O. Box 51 201, Pakuranga
Auckland, New Zealand
TEL: 64 (9) 272 5129
FAX: 64 (9) 272 5148
ISO9001 Certified
email: [email protected]
for service of advice in Australia contact
Robinhood Pty Ltd A.C.N 079 616 550
P.O. Box 4189, Mulgrave
Victoria 3170
TEL: 1800 648 556
FAX: 1800 628 577
email: [email protected]
RECOMMENDS UNIDUCT DUCTING
SYSTEMS FOR RANGEHOODS
- 1 -- 8 -
104574 Issue D
ECN: 07 007
CANOPY OPERATION
Thank you for purchasing a quality stainless steel canopy rangehood. We have a high
standard of quality control and each rangehood is tested and approved before it
leaves the factory.
IMPORTANT: Please read prior to installation or operation
 Always switch power off prior to installing, servicing or cleaning the appliance.
 Never use the appliance without filters.
 Please read the notes on general cleaning, especially the filters.
 Exhaust air must not be discharged into a heating flue or wall cavity. Unless the
cavity is designed for that purpose.
 Areas where the rangehood is installed that also have gas oil or coal fired heaters,
must be well ventilated to prevent a partial vacuum in the room. This includes gas
hobs. (A partial vacuum in the room could result in too high a concentration of gas
in the atmosphere).
 The appliance is supplied with an approved power cable which must not be
changed. If the supply cord of this equipment is damaged, it must only be replaced
by the manufacturer or its service agent or similarly qualified person in order to
avoid hazard.
CONTROL PANEL
- 2 - - 7 -
Key T1 = Turns the lighting system on and off .
Key T2 = Turns the motor on and off.
Key T3 = Decreases the working speed.
Key T4 = Increases the working speed.
Key T5 = Intensive speed with timed stoppage. Suitable to deal with maximum
vapour emission, this turns off automatically ten minutes after starting
operation. It can be disabled by pressing the key.
INSTALLATION OF UNIT
(Read in conjunction with the following diagrams)
The unit is designed for 2.4 to 2.7 metre high ceiling.
Note: Ducting accessories are not supplied. The air outlet from the ducting flange
requires Ø150mm round ducting.
Before starting assembly, read the instructions carefully and remove the filters from
canopy to allow access to wall mounting holes. To remove the filters, push the
relative catch inward and tilting it downwards until it disengages from the supports.
Reverse these instructions when refitting the filters.
NOTE: Stainless steel is very easily damaged during installation if abraided or
knocked by tools.
WARNING
This hood has been designed to be wall-mounted above a cooking hob with the
back side resting against a wall. Because of the complexity and weight of the hood,
its installation should be carried out by qualified staff, taking care to respect all local
regulations on air discharge. The supplier cannot be found liable for any
damage due to improper installation.
 This appliance is not intended for use by young children or infirm persons
without supervision.
 Young children should be supervised to ensure that they do not play with
the appliance.
 There shall be adequate ventilation of the room when the rangehood is
used at the same time as appliances burning gas or other fuels.
 You must read the details concerning the method and frequency of
cleaning.
 There is a fire risk if cleaning is not carried out in accordance with the
instructions.
 Do not flambé under the rangehood.
 Exhaust air must not be discharged into an existing flue which is used for
exhausting fumes from appliances burning gas or other fuels.
 The minimum distance between the hob surface and the lowest part of the
rangehood is 600mm. This distance shall be at least 650mm (recommended
700mm) if the rangehood is installed over a gas hob.
Attention should be given to ensure that any applicable regulations concerning
the discharge of exhaust air is fulfilled.
If the supply cord of this equipment is damaged, it must only be replaced by
the manufacturer or its service agent or similarly qualified person in order
to avoid a hazard.
WARNING
FC
T1 T2 T3 T4 T5
Fig. 13
- 6 - - 3 -
104574 Issue D
ECN: 07 007
For easy installation, proceed as follows:
 Fix the wall brackets
 Fix the canopy
 Electrical connection and working test
 Ducting or Recirculation fitting
 Fix the telescopic chimney
Fitting the wall brackets
Please refer to (fig.2):
Ensure the correct vertical alignment of the
various parts.
 Fixing the wall brackets item 2:
a) Place one of the brackets 2against the
wall approximately 1 or 2mm from the
ceiling or from the top limit, aligning its
centre (slot) with the vertical line.
b) Mark the centres of two slots in the
bracket on the wall.
c) Rest the other bracket 2against the
wall, aligning it with the vertical line, with
the centres of the holes 180mm apart.
d) Mark the centres of the slot in the
bracket on the wall.
 Drilling fixing holes item 1:
a) Mark a point on the vertical line at a
distance of 982mm (min) from the
cooking appliances.
b) At the point marked, draw a horizontal
line parallel to the cooking appliances.
c) Drill two holes in the wall 1using an 8 mm
drill bit (fig.2), and insert the rawl plugs and
screws into the holes (4.2 x 44.4 screws).
Fix the screws, leaving a space of 5-6mm
required to hook up the canopy. Small
adjustments can be made using the hood
adjustment screws(see Fitting the canopy).
The hood should have a maximum excursion
of 20mm.
(Note: it may be neccesary to change the type
fixing elements depending on wall construction)
Active carbon filter
Operation
The activated charcoal filter when fitted
will retain odours until it becomes saturated.
It cannot be washed or regenerated and
must be replaced when the Intensive Speed
LED T5 starts to flash,or at least once every
four months of use.
WARNING: In recirculation type hoods the T2
Motor LED may start to flash as well as the
T5 LED. This indicates that as well as
replacing the activated charcoal filter,it is
also necessary to perform maintenance
operations on the metal grease filters
(see paragraph Metal grease Filter ).
Replacing
Take off the metal grease filters (fig.11) and
remove the activated charcoal filter from its
housing by turning the clips provided ( fig.12). Fit
the new activated charcoal filter and replace the
metal grease filters.
Enabling the alarm signal In recirculation type hoods
the saturated filters alarm must be enabled as indicated
below:
Turn off the lights T1 and the Suction Motor T2 ;
Press and hold the button T4 for at least 10 seconds,
until the Leds start to flash.Note the number of flashes:
Two flashes of the LED Activated charcoal filter
saturation alarm ENABLED
One flash of the LED Activated charcoal filter
saturation alarm DISABLED
Resetting the alarm signal To turn the alarm signal off,
proceed as follows:
Press the button T4 and hold for at least 3 seconds,
until the Led flashes to confirm. Note: the saturated
filters alarm will only come into operation when the
suction motor is turned on.
WARNING - There could be a possible fire hazard if the filters are not
replaced according to these instructions.
Fig. 12
Lighting
Halogen spotlights:
two 20w halogen spotlights.
To replace (fig.13)
Remove the two screws fixing the metal ring, extract
the spotlight from the lamp holder by pulling gently.
When replacing the spotlight, make sure that the two
pins are correctly inserted in the housing on the lamp
holder.
Cleaning
When cleaning the hood:
Never use a wet cloth or sponge, or running water.
Never use thinners or products containing alcohol,
as they might damage any printing.
Never use abrasive cleaning materials, in particular
when cleaning stainless steel surfaces.
It is recommended to use a damp cloth and mild
liquid household cleaner.
Components
The hood comprises the following
(fig.1):
 1 canopy Ccomplete with controls,
lighting and ventilator unit
 1 telescopic chimney, comprising:
1 upper chimney element S
1 lower chimney element I
 2 directional grills G
 1 reduction flange Ø150-120 A
 1 recirculation spigotR
 2 additional side recirculation
spigots P1
 1 additional recirculation spigot P
 1 bag containing:
2 brackets 2to fix the chimney,
screws, rawl plugs.
Fig. 1
2A
R
P1
D
G
VS
I
C
P
Fig. 2
232
260
11
2
260
11
232
260
11
2
260
11
20
X
d = 982 min
180
104574 Issue D
ECN: 07 007
- 5 -
- 4 -
Ducting or Recirculation fitting
Ducting fitting
The hood can be ducted to the outside using either rigid
or flexible ducting Ø150mm .
Recirculation fitting
The filtered air is returned to the room through
the two plastic side grills Gon the lower
chimney element I.
Connect the additional spigot Pto the round
fan outlet, pushing it downwards, and fit spigot
Rto additional spigot in a similar manner (make
sure that the two additional side recirculation
spigots are fitted to spigot R). Cut the
additional spigot Pto correspond with
outlets 1and 2 , which must be formed directly
on the piece. Make sure that the height of the
assembly R+ Pcorresponds to the height of
the chimney outlet. (fig.7).
Fit the activated charcoal filters inside the
canopy (see paragraph on Maintenance ).
Do not fit the venting grilles until after the chimney
has been installed.
Fitting the telescopic chimney
To fit the upper section Sfirst expand the two side
pieces slightly, hook them behind the brackets 2and
close them together again until they touch. Fix the
upper section Sto the brackets 2using four of
the screws provided in the bag of accessories
(fig. 8).
Fit the lower section I as above, between the
upper section Sand the canopy Cusing two of
the screws provided in the bag of accessories.
Fig. 8
Fig. 7
R
P1P1
P
G
G
S
I
2
C
2
Fixing the canopy
Before starting to fix the canopy it will be necessary to
adjust the support brackets S1 by turning the
adjustment screws in a clockwise direction until their
reach their limit (Fig.3):
a) Hook the canopy onto the two size
4.2 x 44.4 screws 1fitted as described
above (Fig.4 ).
b) Level the hood by turning the adjustment
screws and then locking them.
Electrical connection and working test
Before connecting to the mains supply ensure that the
mains voltage corresponds with the voltage on the rating
plate inside the hood.
Connect the canopy hood to the suitable mains connector.
The appliance must be earthed.
Once the electrical connection has been completed, check that
worktop illumination, motor and speed work properly.
Fig. 4
1
1
1
Fig. 3
S1
S1
Constant maintenance guarantees proper operation and long-term reliability.
Particular attention should be paid to the metal grease filters and, for recirculation
hoods only, to the activated charcoal filters. The appliance is equipped with a
system that indicates automatically when it is time to carry out maintenance
operations.
Metal grease filters
Cleaning
These filters must be washed when LED
Motor T2 starts to flash,or at least once
every two months,using a normal household
detergent; their compact size also enables
them to be washed in a dishwasher.
Replacement
Remove the filters one at a time, pushing
the handle towards the rear of the hood (fig. 11).
When replacing, ensure that the handle faces
outwards.
Enabling the alarm signal
The hood is already set up to trigger an alarm
indicating saturation of the metal grease
filters,so this function does not need to be
enabled.
Resetting the alarm signal
To turn the alarm signal off,proceed as follows:
Turn off the Lights T1 and the Suction Motor T2 ;
Press the Speed T4 and hold for at least
three seconds, until the Led flashes to confirm.
Note: the saturated filters alarm will only come into
operation when the suction motor is turned on.
WARNING - There could be a possible fire hazard
if the filters are not replaced according to these
instructions.
MAINTENANCE
Fig. 11
Fig. 9
Chimney with venting grilles: Snap the venting
grilles into position in the apertures located
on the chimney section, so that the symbol
is turned upwards and the symbol faces
forwards. Also, when the hood is used in
recirculation mode, ensure that the grilles are
properly secured to the inside of the recirculation
spigot R( fig.9).

Other ROBINHOOD Ventilation Hood manuals

ROBINHOOD RHCVI9G - Vetro Island User manual

ROBINHOOD

ROBINHOOD RHCVI9G - Vetro Island User manual

ROBINHOOD RGT6WH User manual

ROBINHOOD

ROBINHOOD RGT6WH User manual

ROBINHOOD RLES61SS/WH User manual

ROBINHOOD

ROBINHOOD RLES61SS/WH User manual

ROBINHOOD RWV3CL6G User manual

ROBINHOOD

ROBINHOOD RWV3CL6G User manual

ROBINHOOD RWD3CL6SS User manual

ROBINHOOD

ROBINHOOD RWD3CL6SS User manual

ROBINHOOD RWC3CH6SS User manual

ROBINHOOD

ROBINHOOD RWC3CH6SS User manual

ROBINHOOD RWG3CH9SS User manual

ROBINHOOD

ROBINHOOD RWG3CH9SS User manual

ROBINHOOD RI6SS User manual

ROBINHOOD

ROBINHOOD RI6SS User manual

ROBINHOOD RIJ3CL9BK User manual

ROBINHOOD

ROBINHOOD RIJ3CL9BK User manual

ROBINHOOD RCR1201 User manual

ROBINHOOD

ROBINHOOD RCR1201 User manual

ROBINHOOD RWC3CL6WHT User manual

ROBINHOOD

ROBINHOOD RWC3CL6WHT User manual

ROBINHOOD RWA3CL9SS User manual

ROBINHOOD

ROBINHOOD RWA3CL9SS User manual

ROBINHOOD RIE3CL9SS Owner's manual

ROBINHOOD

ROBINHOOD RIE3CL9SS Owner's manual

ROBINHOOD RCB2AH6WH User manual

ROBINHOOD

ROBINHOOD RCB2AH6WH User manual

ROBINHOOD RWC60XCOM User manual

ROBINHOOD

ROBINHOOD RWC60XCOM User manual

ROBINHOOD RWC3CL6SS User manual

ROBINHOOD

ROBINHOOD RWC3CL6SS User manual

ROBINHOOD RWF3CH9G User manual

ROBINHOOD

ROBINHOOD RWF3CH9G User manual

ROBINHOOD RIIC9G User manual

ROBINHOOD

ROBINHOOD RIIC9G User manual

ROBINHOOD RTA3CI6WH User manual

ROBINHOOD

ROBINHOOD RTA3CI6WH User manual

ROBINHOOD RWE3CL6SS User manual

ROBINHOOD

ROBINHOOD RWE3CL6SS User manual

ROBINHOOD RWE3CH6SS User manual

ROBINHOOD

ROBINHOOD RWE3CH6SS User manual

ROBINHOOD RUM52XCOM User manual

ROBINHOOD

ROBINHOOD RUM52XCOM User manual

ROBINHOOD RWD3CL6SSDC User manual

ROBINHOOD

ROBINHOOD RWD3CL6SSDC User manual

ROBINHOOD RWH3CH6SS User manual

ROBINHOOD

ROBINHOOD RWH3CH6SS User manual

Popular Ventilation Hood manuals by other brands

Gorenje S3 IHGC963S4X manual

Gorenje

Gorenje S3 IHGC963S4X manual

KOBE ISX2136SQB-1 Installation instructions and operation manual

KOBE

KOBE ISX2136SQB-1 Installation instructions and operation manual

U.S. Products ADVANTAGE-100H Information & operating instructions

U.S. Products

U.S. Products ADVANTAGE-100H Information & operating instructions

Kuppersberg DUDL 4 LX Technical Passport

Kuppersberg

Kuppersberg DUDL 4 LX Technical Passport

Framtid HW280 manual

Framtid

Framtid HW280 manual

Thermador HGEW 36 FS installation manual

Thermador

Thermador HGEW 36 FS installation manual

Electrolux LFT769X user manual

Electrolux

Electrolux LFT769X user manual

AEG X69453MVO UK user manual

AEG

AEG X69453MVO UK user manual

Broan B5836SS manual

Broan

Broan B5836SS manual

Heinner HDCH-6060RGBK quick start guide

Heinner

Heinner HDCH-6060RGBK quick start guide

Baumatic AS35SS instruction manual

Baumatic

Baumatic AS35SS instruction manual

Franke FTF 604 XS V2 Instructions for use and installation

Franke

Franke FTF 604 XS V2 Instructions for use and installation

Best UCB3I30SBW installation instructions

Best

Best UCB3I30SBW installation instructions

Gram EFU 503-90 X instruction manual

Gram

Gram EFU 503-90 X instruction manual

CIARRA CBCS6803 Installation and user manual

CIARRA

CIARRA CBCS6803 Installation and user manual

sauter SHG501 Instructions for installation and use

sauter

sauter SHG501 Instructions for installation and use

Franke 392-17 User instructions

Franke

Franke 392-17 User instructions

FALMEC Polar Black 35 Instruction booklet

FALMEC

FALMEC Polar Black 35 Instruction booklet

manuals.online logo
manuals.online logoBrands
  • About & Mission
  • Contact us
  • Privacy Policy
  • Terms and Conditions

Copyright 2025 Manuals.Online. All Rights Reserved.