Rock River 3000 PSI User manual

Owner’s Manual
3000 PSI
Pressure Washer
Warning To Reduce The Risk Of Injury, User Must
Read And Understand Instruction Manual.
0229515

SPECIFICATIONS
Maximum Pressure 3000 PSI
Maximum Water Volume 3.0 GPM
Minimum Inlet Pressure 20 PSI
Maximum Inlet Pressure 90 PSI
Pump Type Heavy-duty maintenance-free axial cam
Thermal Relief Valve Included
Detergent Tank (Volume) Double,0.2Gallon(US)
Maximum Temperature of Pumped Fluid 60°C
Engine Power (OHV) 7.0 HP
No Load Speed 3,600 RPM
High Pressure Hose Length 30’
Inlet & Discharge Ports 3/4” standard garden hose connector
Displacement 208(cc)
Wheels 10” (25.4 cm) pneumatic wheels
Net Weight 81.6 lbs (37 Kg)
Oil Specification SAE 10W-30
Oil Capacity (L) 0.6 L
Fuel Unleaded Gasoline
Fuel Tank (L) 3.8 L
SAFETY INSTRUCTIONS
•WARNING
To reduce the risk of serious injury, read all instructions and precautions before operating this
machine.
SYMBOL MEANINGS:
TOXIC
This symbol warns you of possible toxic gases which can
be harmful to your health or deadly if you are exposed to
them.
FLAMMABLE AND
COMBUSTABLE MATERIALS
This symbol warns of materials/gases which are present
and extremely flammable. When you see this symbol, be
very cautious not to ignite the material/gases.
VERY POISONOUS
This symbol warns of materials, gases, etc. which are very
poisonous and would cause serious bodily harm or death.
When you see this symbol, please take proper
precautions.

HOT SURFACE
This symbol warns of a hot surface which could cause
damage to material and/or damage to human skin if
touched. Please take proper precautions when you see
this symbol.
GENERAL WARNING
This symbol indicates that serious bodily injury or death
could occur if proper precautions are not taken. These are
warning statements which do not fall into the above
categories
EXHAUST FUMES ARE DANGEROUS
•Never operate unit in enclosed areas such as garages, basements, storage, sheds, or in any
location occupied by humans or animals. Never operate the engine in a closed area or it may cause
unconsciousness and death within a short time. Operate pressure washer in clean, dry, well
ventilated area.
•Keep children, pets and others away from area of operating unit. Breathing exhaust fumes will
cause serious injury or death.
•WARNING Gasoline engines produce toxic carbon monoxide exhaust fumes.
INADEQUATE VENTILATION
•Materials placed against or near the pressure washer or operating in areas where the temperature
exceeds 40°C ambient (such as storage rooms or garages) can interfere with its proper ventilation
features causing overheating and possible ignition of the materials or buildings.
•Operate pressure washer in a clean, dry, well-ventilated area a minimum of 4’ (1.2 m) from any
building, object or wall. DO NOT OPERATE UNIT INDOORS OR IN ANY CONFINED AREA.
FUEL IS HIGHLY FLAMMABLE AND POISONOUS
•Always turn off the engine when refuelling.
•Never refuel while smoking or in the vicinity of an open flame.
•When operating or manoeuvring this pressure washer, be sure to keep it upright. If it tilts, fuel may
leak from the carburettor or fuel tank.
DO NOT ATTEMPT TO FILL GASOLINE TANK WHILE ENGINE IS RUNNING.
•Gasoline and gasoline vapours can become ignited by coming into contact with hot components
such as the muffler, engine exhaust gases, or from an electrical spark.
•Turn engine off and allow it to cool before adding fuel to the tank. Equip the area of operation with a

fire extinguisher certified to handle gasoline or fuel fires.
SPARKS, FIRE, HOT OBJECTS
•Cigarettes, sparks, fires, or other hot objects can cause gasoline or gasoline vapours to ignite.
ENGINE AND MUFFLER MAY BE HOT
•Place the pressure washer in an appropriate location, away from children and pedestrians.
•Avoid placing any flammable materials near the exhaust outlet during operation or shortly thereafter.
•Keep a 4’ (1.2 m) clearance from buildings or other equipment around the pressure washer to
prevent overheating.
•WARNING The engine muffler will be very hot during and after use, avoid touching the
engine or muffler while they are still hot.
HOT MUFFLER & HIGH PRESSURE HOSE
•Muffler will become very hot during operation. DO NOT TOUCH MUFFLER WHILE IN USE OR
SHORTLY THEREAFTER.
•Keep hose away from the hot muffler or it may damage the hose. Do not use a damaged high
pressure hose. Do not kink the high pressure hose.
APPLICATION
•This equipment is designed for specific residential applications. Do not modify or use for any
application other than which it is designed. This equipment is not designed for industrial use. Please
refer to icons above for suggested uses.
NEVER OPERATE UNDER THE FOLLOWING CONDITIONS
•When a noticeable change in engine speed occurs.
•Engine misfires.
•Loss of water pressure.
•Smoke or flames in the area.
•Excessive vibration.
WATER SPRAY
•Never direct the water spray towards ANY person, animal, electrical wiring or the pressure washer
itself.
•DO NOT spray too close to the surface or damage could occur.
•The vendor is not responsible for damage caused by improper use.

PREVENT ACCIDENTAL WATER SPRAY
•To prevent accidental water spray, the wand trigger should be placed in the locked position when
not in use.
KEEP HANDS AWAY
•Keep hands and other body parts away from high pressure water stream as water pressure will
cause severe bodily harm.
SAFETY GLASSES
•Always wear safety glasses while operating.
DETERGENTS
•Only use recommended detergents for pressure washers. Using detergents not specifically
recommended for use with pressure washers can cause damage to pump and other pressure
washer components.
•DAMAGE CAUSED TO PRESSURE WASHER UNIT BY USING NON-RECOMMENDED
DETERGENT IS NOT COVERED UNDER WARRANTY.
COLD WEATHER STARTS
•Do not operate this pressure washer in temperatures below 5°C. Operating pressure washer under
the temperature of 5°C may cause damage to pump and other pressure washer parts.
•DAMAGE TO PRESSURE WASHER UNIT BY USER MISUSE IS NOT COVERED UNDER
WARRANTY.
SAFETY FEATURES
•Thermal Relief Valve
Protects the pump from overheating in case nozzle becomes clogged. This system should not be
abused. Make every effort to prevent the pump from overheating.
•Low-Oil Auto Shut-Off
This pressure washer is equipped with a low oil shut-off system. If the engine oil level goes below
the recommended oil level, the pressure washer will automatically shut-off. This protects your
engine and prevents operating without proper lubrication.
STORAGE
•Store the pressure washer in a well ventilated area with the fuel tank empty. Fuel should never be
stored or placed near the pressure washer.
•When storing pressure washer for winter, ensure that the pressure washer is stored indoors (at
room temperature) in a dry location away from any heat sources.
•If unused gas will not be used for alternative purposes immediately, ensure you use fuel stabilizer to
keep the gas from breaking down.
•To protect and extend the life of your pressure washer when storing, use pump antifreeze which can
be found at your local Canadian Tire store.
PREVENT PUMP DAMAGE

•Do not run the pressure washer engine for more than 5 minutes without pressing the wand trigger
or damage to the pump may result.
•Never let the machine run unless connected to the water supply. Ensure water supply is running
water through the pressure washer before attempting to start engine.
•Never run caustic fluids or acid through this machine.
PRESSURE WASHER FEATURES
A– Trigger Locking Latch –Will prevent from mis-
operating or spraying accidentally.
B– Wand –Will extend your reach for easier cleaning.
C– Spray Nozzles – 0°, 15°, 25°, 40°, soap tip; Use
to apply the right pressure for each specific project
D– Muffler – Ensure you avoid contact as this will be
hot during and shortly after use. Avoid resting the
pressure hose on muffler.
E– Air Filter – Filter should be replaced annually to
ensure optimal performance
F– Choke Lever –Will control incoming air.
G– Fuel Valve – Regulates the flow of fuel to the
engine. Must be fully open before starting engine
J– Fuel Cap – Ensure cap is on tight during use.
K– Fuel Tank – Has a 4 L capacity.
L– Throttle Lever – This will adjust the engine speed
M–On/Off Switch – Ensure this is set to ‘ON’
N– Oil Dipstick – Ensure the unit has the proper
level of oil before starting engine. Use
only SAE 10W-30 oil.
O– Recoil Starter – This will start the engine
before attempting to start engine.
P– Pressure Hose – Attach to pump and gun.
30’ (9 m).
Q– Pump Inlet – Using included quick-connect
coupling, attach your garden hose here.

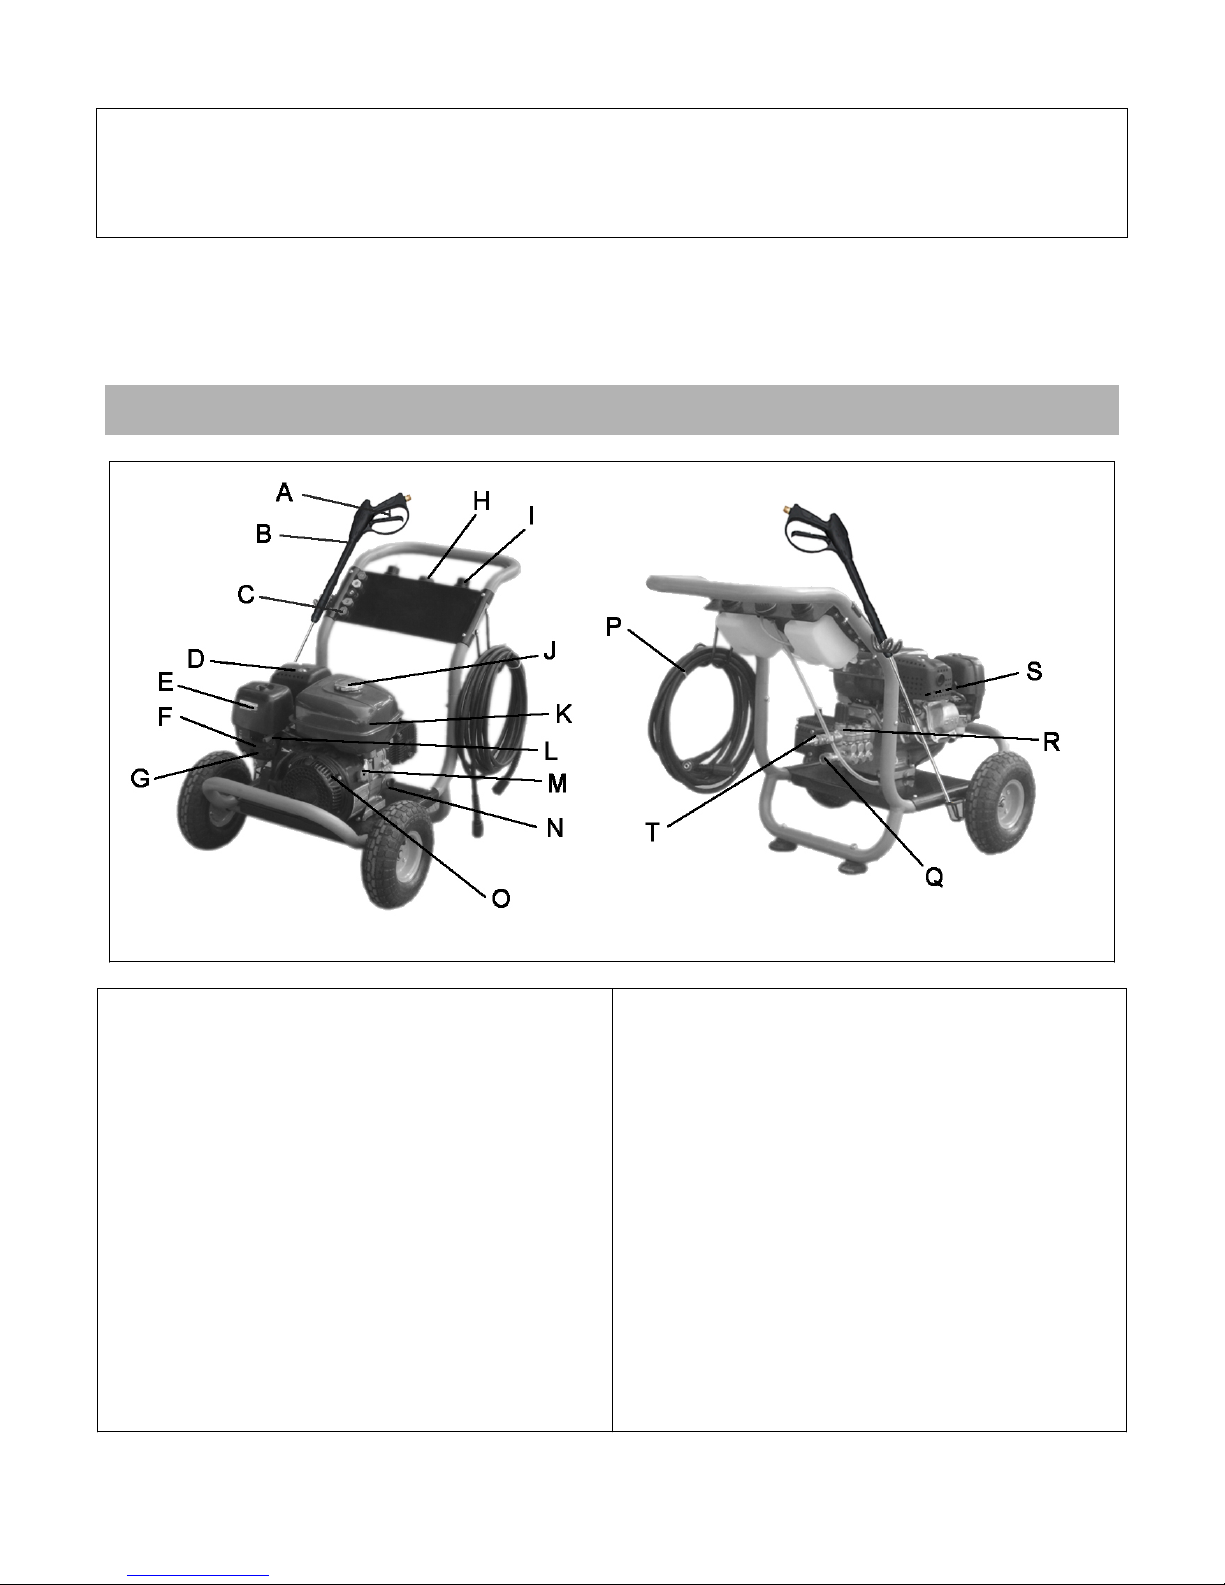
H– Detergent Dial – Allows you to switch between
different detergents without stopping.
I– Detergent Tank Caps – Take these caps off to fill
either detergent tank with pressure washer
approved detergent.
R– Pump – Increases the water pressure.
S– Spark Plug –Should be checked every 100 hours
of operation.
T– Pump outlet – Attach your pressure hose here.
ASSEMBLY & PRE-START CHECK
Before assembling or starting pressure
washer, ensure entire manual has been read.
UNPACK BOX: Remove all parts from box and
remove all bubble wrap and other packaging
materials.
CONTENTS OF BOX:
REF Part Description
Quantity
A Wheel with axle
2
B Metal pressure gun and Metal
wand
1
C 30 ft pressure hose
1
D Main body of pressure washer
1
E Pressure washer handle with
5pcs Spray nozzles.
1
F Gun supporter, Hose
supporter
1
G Bolts_2(M6_40), Nuts_2(M6) ,
Washers_4 (_6) , Manual_1 ,
Spray tip cleaner_1 , Spark
plug wrench_1 , Screw
driver_1 , Pump Breather_1 ,
O-ring (2 for high pressure
hose, 1 for tip quick connector)
1
WARNING! Before attempting to start
pressure washer, ensure you complete the
following important steps.
1) Fill gasoline tank with Unleaded Gasoline. This
is a 4-cycle engine with separate reservoirs for
gas and oil. DO NOT use pre-mixed gas! DO
NOT use old gas! Fuel must be purchased
separately.
2) Fill oil tank with SAE 10W-30 oil. Running
pressure washer without oil will severely
damage engine which is not covered by
warranty! Oil must be purchased separately.
3) Ensure both the pressure hose and garden
hose have been correctly attached to the
pressure washer pump. Ensure the water tap is
on and water is running through the hose before
attempting to start engine. Not doing this will
damage the pump!
ASSEMBLY INSTRUCTIONS:
1. Install the wheels to the frame by first pressing
its spring loaded pin on wheel axle, then insert
wheel shaft into frame and align spring loaded pin
with hole in frame until the pin snaps. Repeat for
the other wheel.

2. Attach panel to handle and secure with bolts,
nut, and washers x 4 sets. Tighten with wrench
and screw driver.
3. Install the handle to the frame by sliding the top
handle posts into the frame posts and secure
them together using 2 bolts(M6x40), 4 washers
(_6) and 2 nuts(M6).
4. Assemble the hose support (A) to the right side
of the frame using bolts x 2, nut x 2, washers x 4
(already attached).
5. Assemble the wand support(A) to the left side
of the frame using bolts x 1, nut x 2, washers x 2
(already attached).
6. Insert water inlet filter(A) at pump inlet. Attach
garden hose to pump inlet(B). See illustration
below.
7. Assemble the steel (A) wand and the metal
gun (B). Pull back the rubber piece(C) to expose
the threaded fitting and screw the 2 pieces
together, re-position the rubber piece.
8. Next install the pressure hose to the wand(A)
and install the other end of the pressure hose to
the pump outlet(B) as shown below.
9. Then install the detergent injector tube over the
detergent siphon fitting(A).

PRE-START CHECK OIL LEVEL
WARNING! Pressure washer has no oil currently in crankcase! Operating the unit without the
correct amount of oil will damage the engine. Oil crankcase capacity: 0.6 L.
Always check the oil level before starting the engine, make sure the pressure washer is on a
level surface before checking oil level. Always use SAE 10W-30 oil.
To Check Oil Level;
1) Turn the oil gauge dipstick(A)
counter clockwise; remove it and clean it with a
clean cloth.
2) Fully reinsert the oil gauge dipstick and pull it
out to check the oil level.
3) If the oil level is halfway up the dipstick or
below, refill with SAE 10W-30 oil through the
dipstick hole until the oil level reaches 3/4 up
the dipstick or until it reaches the bottom lip of
the dipstick hole as shown in illustration to the
right.
4) Re-position the oil gauge dipstick and tighten it
by turning clockwise.
PRE-START CHECK FUEL LEVEL
WARNING! Make sure there is enough fuel in the fuel tank before operating.
1) If it is necessary to add fuel, first make sure
the engine is OFF, and then remove the fuel
cap(A) by turning it counter clockwise.
2) When refuelling, make sure the fuel filter(B)
is in place and keep in mind all safety
precautions.
3) Use clean unleaded gasoline with a minimum of
87 octane. DO NOT use old gas. DO NOT mix
oil with gasoline. Fuel tank capacity: 3.8 Litres.
*** This is a 4-cycle engine and does not require a
gas/oil mixture. There is a separate reservoir
for gas and a separate reservoir for oil.
PRE-START CHECK AIR FILTER
A

WARNING! The air filter should be checked after prolonged storage, the following steps
should be done when checking the air filter. It is recommended to replace the air filter once
every Spring.
1) Snap the top and bottom clips(A) backwards
and remove the air filter cover(B).
2) Remove the air filter(C), wash filter in kerosene,
squeeze kerosene out, soak filter in engine oil
and squeeze engine oil out.
3) Replace filter and replace the air filter cover.
START-UP PROCEDURES & OPERATION
START-UP PROCEDURES
Follow these instructions to safely start your pressure washer:

OPERATION: SPRAY NOZZLE USAGE
•This pressure washer comes with a stainless
steel wand, its tip has a quick connect coupler
(A) to fit different nozzles.
•The spray pattern is adjusted by installing the
appropriate spray pattern nozzle to the quick
connect coupler. Five nozzles are included, 0°,
15°, 25°, 40° and a detergent nozzle.
1) Check engine oil level; fill to recommended
level if necessary. Check gasoline level fill if
necessary. Fig. A
2) This pressure washer comes with a pump quick
connect coupling. It allows you to quickly
connect or disconnect the garden hose from
the pump. Pulling the mid ring will disconnect
the quick connect coupling. Connect garden
hose to the pump quick connect coupling and
TURN WATER ON. The water supply must
provide a minimum of 4 GPM at 20 PSI or the
pump may be damaged. Fig. B
3) Squeeze gun trigger. This will allow air to
escape from the hose in order to prime the
pump. Squeeze trigger until there is a steady
flow of water. Fig. C
4) Turn engine switch to the “On” position. Fig. D
5) Open fuel valve (“On” position). Fig. E
6) Close the Choke lever by moving the lever to
the “CLOSE” position. Also move the throttle
lever to its maximum setting (towards the left).
Fig.F
7) Locate recoil cord and pull slowly until
resistance is felt. At this point, pull rapidly to
start engine. Repeat if necessary. Fig.G
8) Once engine starts, moving the lever to the “Open”
position. Fig.H
9) If motor fails to start, repeat steps 3-8. Fig.I

•To install a nozzle to the quick connect
coupler, pull the coupler ring(B) backwards
and insert the desired nozzle, release the
coupler ring to lock it in place.
NOZZLE USAGE:
•0° (red) - Thin and powerful stream of water for
difficult stains and debris removal.
•15° (yellow) - Thin angled spray for focused
cleaning.
•25° (green) - Medium angled spray for focused
cleaning.
•40° (white) - Large fan pattern for wider
cleaning applications.
•Detergent (black) - This nozzle must be used
in conjunction with a cleaning detergent at low
pressure. Only use this nozzle when using a
detergent or cleaning solution.
ADJUSTING WATER PRESSURE:
•The water pressure is regulated by the throttle
lever.(A)
•Moving the throttle lever towards the left will
increase the engine speed thus increasing the
water pressure.
•Moving the throttle lever towards the right will
decrease the engine speed thus decreasing
the water pressure.
DETERGENT INJECTOR (LOW PRESSURE):
•This pressure washer is intended for use with
pressure washer detergents only.
•Do not use powdered soaps which clog the
injection system.
•Follow the detergent manufacturer’s
directions or call the Simoniz toll-free number
if you have any questions or concerns.
HOW TO USE DETERGENT WITH PRESSURE WASHER:

1) Ensure
detergent
siphon tubes
are set up
correctly.
You may want
to refer to
assembly
instruction
#9 on page 10
to verify that
siphon
tubes are
set up properly.
2) Pour the two
kinds of
detergents into
the
detergent
tanks. It is
recommend to
have one
detergent
tank filled with
All-Purpose
detergent,
and the
other filled with
a more specific
cleaning
detergent.
3) The
indicator on the
detergent dial
shows the
amount and
the
consumption of
detergent.Fig.A
4) When using
a detergent,
the stainless
steel
wand must
be fitted with
the detergent
nozzle
(black). See
‘OPERATION
SPRAY

SPRAY
NOZZLE
USAGE’ on
page 14 for
instructions on
how to
connect
detergent
nozzle to
wand. Fig.B
5) If the throttle
lever is not in
the fast
position, the
injection of
the detergent
may be
decreased or
stopped
completely, in
this case,
move the
throttle
lever towards
the left to
increase
engine
speed and
pressure.
Important Note: When you have finished using the detergent injector system, remove the
injector filter from the detergent container and place it in a different larger container containing
only clean water and let the pressure washer run until you no longer notice detergent coming
out of the wand. This will prevent detergent from gumming up the wand and reducing pressure
for next use.
USING THE PRESSURE WASHER TO CLEAN:
•Some cleaning jobs can be completed by
using only water, but for most, it is
advantageous to use a detergent to penetrate
and remove the dirt more effectively. When
using pressure washer approved detergent,
make sure the surface to clean is dry. Wetting
the surface first is not recommended; it will
dilute the detergent and will reduce the
cleaning effectiveness.
•Avoid hot surfaces or direct sunlight; this will
minimize the chances of the detergent
damaging the painted surface.
•DO NOT let the detergent dry or it may
damage the painted surface. Allow the

damage the painted surface. Allow the
detergent to remain on the surface for a short
time before rinsing with clean water under
high pressure.
•Position the tip of the wand 6-8” (15-20 cm)
away from the surface to clean at a 45°angle.
TROUBLESHOOTING
PROBLEM
CAUSE
CORRECTION
Engine will not start (or stops
while operating)
1. Low-oil shutdown
2. Engine switch not in “ON”
position.
3. Pressure built up in the hose
1. Fill engine with SAE 10W-30 oil
2. Turn switch “ON”
3. Squeeze trigger while starting
If engine sounds abnormally, it
could be overloaded.
1. Nozzle partially blocked
2. Excessive pressure
1. Clean nozzle using nozzle cleaning
tool or paper clip
2. Shorten the spring coil of the reflux
valve
Engine is running but pump
won’t build maximum pressure or
has irregular pressure
1. Faucet closed
2. Unit has been stored in freezing
temperatures
3. Inadequate water supply
4. Water inlet screen clogged
5. Kink in garden hose
6. Wand tip worn or damaged
7. Air in pump
8. Engine speed not set to
maximum position
1. Open faucet
2. Thaw out unit completely including
hose, gun and wand, if the machine
still doesn’t work, call the Simoniz
toll-free number.
3. Provide a minimum of 4 GPM at 20
PSI
4. Clean screen
5. Straighten garden hose
6. Replace wand
7. Let it run with gun open and wand
removed until steady stream of water
is released
8. Set throttle to maximum position

No intake of chemicals
1. Injection tube not securely
inserted into unit
2. Tube cracked or split
3. Wrong nozzle
4. Injector dial turned off
5. Injection tube strainer clogged
6. Nozzle blocked
7. Clogged chemicals injector
1. Push firmly into injector fitting
2. Replace tube
3. Switch to low pressure nozzle
4. Turn collar counter-clockwise
5. Clean strainer
6. Clean nozzle
7. Dissolve by running warm water
Trigger will not move
1. Gun safety lock engaged
1. Release safety lock
Water in crankcase
1. High humidity
2. Worn seals
1. Change oil more frequently
2. Change the oil seals
Noisy operation
1. Worn bearings
2. Air mixed with water
1. Change the bearing
2. Check inlet lines for restrictions
and/or proper sizing
High crankcase temperatures
1. Wrong grade of oil
2. Improper amount of oil in
crankcase
1. Use SAE 10W-30 oil
2. Adjust oil level to proper amount
Rough/pulsating operating with
pressure drop
1. Inlet restriction
2. Air mixed with water
1. Check system for stoppages, air
leaks, correctly sized inlet, plumbing
to pump
2.Check inlet lines for restrictions
and/or proper sizing
MAINTENANCE
WATER INLET FILTER:
•This pressure washer is equipped with a
water inlet filter(A).
•This water filter must be kept clean at all
times or else it will restrict the water flow to
the pressure washer and may damage the
pump.
•Remove the quick connect coupling from the
water inlet, then remove and clean water filter.
•DO NOT operate this pressure washer
without the water inlet filter in place as
deposits could build up internally and affect
the functioning of the unit.
*** See in-store for replacement filters.
A

ENGINE MAINTENACE:
Engine Oil Replacement
•Engine oil should be replaced after the first
20 hours of operation or after the first month
of use.
•It should be replaced every 100 hours or
6 months.
•To replace engine oil; Loosen the oil gauge
dipstick(A). Place an oil pan underneath drain
hex bolt(B), remove hex bolt and drain oil.
Once all the oil has completely drained,
retighten the hex bolt.
Recommended Engine Oil
•It is recommended to use SAE10W-30
4-stroke gasoline engine oil.
•Fill with clean engine oil through the oil gauge
dipstick hole to recommended level.
Inspecting, Replacing or Cleaning Spark Plug
•The spark plug should be checked every 100
hours of operation or every 6 months.
To replace or clean spark plug:
1) Dismantle the spark plug wire(A) by pulling it off
the spark plug(B). Using the supplied spark plug
wrench, undo the spark plug by turning counter
clockwise.
2) Check to see if there is carbon sediment
build-up, if so, remove it. If the carbon sediment
is excessive, replace the spark plug.
3) Measure the electrodes clearance using a
feeler gauge. The spark plug electrode
clearance should be between 0.7-0.8 mm. If the
clearance exceeds 0.8 mm, replace the spark
plug. The original spark plug supplied is an
LG F7RTC, you can replace it with an NGK
BP6ES spark plug or equivalent.
4) Reinstall spark plug in the reverse order.
PRESSURE WASHER STORAGE:

-If you plan on storing your pressure washer
for an extended period of time, the following
steps should be followed:
1) Add fuel stabilizer to fuel tank to minimize the
formation of fuel gum deposits during storage.
2) Run engine at least 5 minutes after adding
stabilizer to allow it to enter the fuel system.
NOTE: If a fuel stabilizer is not used, all
gasoline must be drained from the tank and
carburettor to prevent gum deposits from
forming on these parts and causing possible
malfunction of the engine (see instructions on
draining fuel below).
3) Drain engine oil from engine as described in
“Engine Oil Replacement.”
4) Pour approximately one teaspoon of engine oil
through the spark plug hole and pull the recoil
starter slowly until you feel increased pressure
which indicates the piston is on its compression
stroke and leave it in this position. This closes
both the intake and exhaust valves to prevent
the inside of the cylinder from rusting.
5) Use pressure washer antifreeze to ensure that
your pump will not freeze during the winter and
to keep components lubricated for maximum
efficiency. See instructions below on
“Preventing Freezing Damage”.
6) Cover the pressure washer and store it in a
clean, well ventilated and dry place. Ensure
storage area is at room temperature.
*** See in-store to purchase fuel stabilizer or
pressure washer antifreeze.
-If you wish to drain the fuel instead of adding
fuel stabilizer, please follow these steps:
1) Turn fuel shut-off valve to the “OFF” position,
remove drain hex. bolt(A) from the
carburettor(B).
2) Now turn fuel shut-off valve to the “ON” position
and drain the fuel from the tank, carburettor and
hose.
3) Reposition the carburetor drain hex bolt once
the fuel is completely drained.
PREVENTING FREEZING DAMAGE:

18 | P a g e
•If your pressure washer is subjected to
freezing temperatures, damage could occur.
This type of damage is not covered under
warranty. To avoid possible damage, a small
amount of antifreeze can be used.
•Place the unit on its side with the water inlet
facing upwards, pour 1/4 cup of antifreeze
into the water inlet.
•Disconnect spark plug wire, and then pull
recoil starter several times to circulate the
antifreeze in the pump system. Reconnect
spark plug wire.
•It is also important to make sure the wand and
all hoses are disconnected and drained of all
water or they may burst.
•When taking pressure washer out of storage,
run water through the system until it runs
clear.
DIAGRAM AND PARTS LIST

Ref No DESCRIPTION QTY Ref No DESCRIPTION QTY
1 Hose hook 1 24 Clip 2
2 Bolt M5*45 6 25 Spring wire 2
3 Washer 5 8 26 Wheel shaft 2
4 Handle 1 27 10" (25.4 cm) wheel 2
5 Detergent bottle cap 2 28 Washer 16 2
6 Detergent bottle gasket 2 29 Circlip 2
7 Detergent bottle switch 1 30 Washer 6 10
8 Spring Lock 5 31 Locknut M6 8
9 Detergent bottle switch nut 1 32 Gun tip holder 1
10 Panel 1 33 Inner hex bolt M8*40 4
11 Nozzle grommet 5 34 Rubber foot 2
12-1 0° nozzle (red) 1 35 Inner hex bolt M8*45 2
12-2 15° nozzle (yellow) 1 36 Drain pipe 1
12-3 25° nozzle (green) 1 37 Spring gasket 8 4
12-4 40° nozzle (white) 1 38 Inner hex bolt M8*25 4
12-5 Detergent nozzle (black) 1 39 Bolt M6*40 2
13 Gun 1 40 Inlet tie-in 1
14 Locknut M5 6 41 High pressure pump 1
15 Gun holder 1 42 Thermal relief cap 1
16 Bolt M6*55 1 43 Injection hose _short_2
17 Gasoline engine 1 44 Bolt M5*16 2
18 Locknut M8 6 45 Detergent bottle 2
19 Washer 8 14 46 Injection hose _long_1
20 Engine rubber isolator 1 47 30’ high pressure hose 1
21 Frame 1 48 Customize washer 2
22 Bolt M6*45 4 # Owner’s Manual
23 Baseboard 1
“#” Indicates a non-illustrated part.
Table of contents
Other Rock River Pressure Washer manuals