Rockford Fosgate RFX4000-SX User manual

OPERATION
MANUAL
M0 DEL :RFX4000-SX
((<Siriusxm>))
READY
RFX4000-SX RFX-MR5BB
+
DIGITALAUDIO/VIDEO
PLAYER
+ SiriusXM-Ready™
+AM/FM
STEREO RADIO
+USB/SO
MUSIC PLAY
+ BLUETOOTH STREAM

CONTENTS
CONTENTS
..........................................................
1
CONTROL
PANEL ILLUSTRATION
.........................
2
WIRE DIAGRAM
...................................................
3
INSTALLATION....................................................
4
BASIC OPERATION
..............................................
5
SiriusXM®
OPERATION.........................................
6
RADIO OPERATION
..............................................
10
AUX/USB/SD
OPERATION
.....................................
11
CDC OPERATION
..................................................
13
BLUETOOTH
OPERATION
.....................................
14
SPECIFICATION
....................................................
15
TROUBLESHOOTING
............................................
16
P1

CONTROL
PANEL
ILLUSTRATION
(/) @
®@@
@
-t----Hf-
®
,-
'"'
'
,--
'' '
@ RFX-MR5B MEDIA
PLAYER
4X
OWATTS
AlPS
BAND SCAN
2 RPT 3
ROM
@
(OPTION)
G).
POWER
ON/OFF
(2).
FUNCTION
SELECT
BUTTON
@.VOLUME
UP/DOWN
@.
MODE
BUTTON
@.DISPLAY
BUTTON
@.AUTOMATIC
OR
MANUAL
TUNING
(FREQ
UP~
OR
FREQ
DOWN~
)
(/).AUTO
STORE
AND
PRESET
SCAN/MENU(A/PS)
/SELECT
TRACK/CHANNEL
SWITCH
@.BAND/CDC
DISC
UP/
-10
TRACKS
®.AUTOMATIC
TUNING
CONTROL(SCAN)
/CDC
DISC
DOWN/
+10
TRACKS
@.PRESET
1,
PLAY/PAUSE
GJ).
PRESET
2,
REPEAT
PLAY
@.PRESET
3,RANDOM
PLAY
@.PRESET
4/LEFT
@.PRESET
5/DOWN(ENTER)
@.
PRESET
6/RIGHT
@.MENU/DIMMER
SETTING
BUTTON/UP
@.LCD
DISPLAY
@.MUTE
P2
•
MENU
++--------->liir---\--@
~==~~~d--L
®
@
@
~'t--
(2)
"-.~-----F7L---~~~---~-
@
@
(
RFX-MR6.5)
@
OPTION

1-
z
<(
WIRE DIAGRAM
*IMPORTANT
NOTE:
When
using
cables
RFX10,
RFX16
and
RFX
30
for
runs
longer
than
50
feet,
use
RRAMP1
to
increase
signal
quality.
Maximum
distance
is
150
feet.
Install
RRAMP1
inline
before
cable
extensions.
(Unit
side)
>-
~tclo
g
__.
g
__.
g
2:
~
g_o~
a
LU
a
LU
a
LU
~
(!)
LU
I-
LU
I-
LU
I-
~g
r::o
c.o
...--.
r::o...--.
0...--.
<I>...--.
c.o
co...--.
--OM
0::
I
0::
I
0::
I
r:::t:l..-0
U)o
U)o
-I-
~~0
O>r::o
.Q>a.
X
LJ LJ LJ
<I>
CN
L.OXM
:JU)
U)
5(1:
~~('I)
~
o-u..
c
Cl
~u..x
('I) ('I)
I I
X
0
....;~
c
o>
~~u..
('I) ('I)
xxu..
0
~-
0
ox
x-~
X X
0~
u..u..~
;=
(.)
~~
u.. u..
:E....;
~~-
.0
u..o-
~
~
::I
<( <(
~
x-
~..-
.88"
--c.o
en
a.
X
a a
('I)
1.()
..-
U)
(.)
(.)
:::::~0
u..
cv-
~·X
~
~
X
·.::......_.
~
Q. Q.
::I
~~u..
c
ro
-:;:::)
U5li>
05
><~::
<(
a.
e
<I>
c 0
u..>(o
~
::I
u..
1-
~
~u....-
o::::X
u..
-~
POWER BLACK
ANTENNA
GROUND(-)
MEMORY YELLOW RED
BACK
UP
IGNITION SWITCH (B+)
FRONT
+WHITE
GREY+
FRONT
LEFT RIGHT
SPEAKER
-WHITE/BLACK
SPEAKER
REAR
+GREEN
VIOLET+
REAR
LEFT RIGHT
SPEAKER
-GREEN/BLACK
VIOLET/BLACK-
SPEAKER
Fuse
replacement
Ifthere
is
an
issue with the fuse, be sure to check all power connections and replace
the fuse with same type and rating. If a fuse blows after replacement, you may have
an
internal malfunction with the unit. Please consult with your nearest repair center.
Warning:
When replacing the fuse,
be
sure to use the same type and rating
of
the
existing fuse. The use of a varying type or rating may cause serious
damage to the unit.
Be sure your wire remote(RFX-MR8/RFX-MR6.5)
is
installed correctly,
wrong connection will cause serious damage to the wire remote.
P3
~
w
<.9
z
<(
I
(.)
0
(.)

INSTALLATION
1 Precautions
Carefully choose a mounting location so that the unit will not interfere with normal
driving functions
of
the vehicle.
Avoid installing the unit where it will be subjected to excessive vibration, dirt and
high temperatures, including direct sunlight, engine compartment heat and engine
exhaust.
Use only the supplied mounting hardware for a safe and secure installation.
2 Mounting illstration
Correct
mounting
positions
Better:
45
facing
upward
Incorrect
mounting
positions
3 Installation Note
Do not mount the black box
in
either
position shown. Doing so will allow
water to travel inside the unit causing
damage.
Best:
90
facing
upward
Use the enclosed nylon wire tie-downs (wire clamps) for additional support. Using the
wire tie-downs to hold down the wire harness will aid
in
preventing water from migrating
along the wires and into the unit.
P4

BASIC OPERATION
Power -ON/OFF
(1)
Press this button to turn unit
ON
or OFF.
SEL -Function Select Button
(2)
Press the "SEL" button repeatedly to scroll through the functions
BAS>
TRE
>FAD
> SUB > DSP > ID3 > VOL. Once desired function
is
selected, use the VOL buttons
to change the setting value.
Press and hold the SEL button to enter zone selections. Short press the SEL button
repeatedly to scroll through the
Zone: America/China/Europe
Beep: Activates Beep On/Off
Clock: 12/24 hour format
TRI
1: Activates Trigger 1 On/Off (Switched 12V). This trigger is set to "ON" by default.
TRI2:
Activates Trigger 2 On/Off (Switched 12V). This trigger will need to be
reactivated if unit is disconnected from power source.
VOL -Volume Up/Down
(3)
Press the UP arrow button to turn the volume up to the desired listening level.
Press the DOWN arrow button to turn the volume down to the desired listening level.
MODE button
(4)
Short press the "MODE" button to switch through modes: FM/AM > AUX1 > AUX2 >
SIRIUS > BT > USB > SD > CDC
DISP-
Display Button
(5)
Press the "DISP" button to toggle the system time On/Off on the LCD.
Adjusting Time (Clock)
Press and hold the "DISP" button until the hour digit starts to blink, use the
~~~I~~~
to adjust hour. Once hour
is
set, press "DISP" again to adjust minute using the
~
....
~I
~~~
buttons.
Adjusting
backlight-
MENU
(16)
Press the "MENU" button for more the 2 seconds to adjust the backlight brightness
on the LCD.
(25°/o,
1
00°/o)
Low
Voltage Warning
When the vehicle's power supply drops below 10 volts, the LCD will display
"BATTERY LOW" and the system will beep for 1 minute. The black box will turn off
automatically after the 1 minute period.
Locking the Control Panel
To lock the RFX-MR5BB control panel, press and hold "SEL" and "DISP" buttons
simultaneously for 3 seconds. The black box will not respond when button are pressed
on the control panel. Press and hold "SEL" and "DISP" buttons for 3 seconds to unlock
the control panel.
PS

SiriusXM®
OPERATION
Only SiriusXM® brings you more
of
what you love to listen to, all in one place. Get over
150
channels,
including commercial-free music plus the best sports, news, talk,comedy and entertainment.
Welcome
to
the world
of
satellite radio. A SiriusXM Vehicle Tuner and Subscription are required. For
more information, visit www.siriusxm.com."
Activating
your
SiriusXM subscription:
After installing
your
SiriusXM Connect Vehicle Tuner and antenna, power on
your
RFX6000
and
select SiriusXM mode. You should
be
able to hear the SiriusXM preview channel on Channel1.
If
you
cannot hear the preview channels, please check the installation instructions to make sure
your
SiriusXM Connect tuner is properly installed.
After you can hear the Preview channel, tune
to
Channel 0 to find the Radio
ID
of
your tuner. You will
need this number
to
activate your subscription. Write the number down
for
reference.
Note: the SiriusXM Radio
ID
does
not
include the letters
I,
0,
S
or
F.
In the USA, you can activate online
or
by calling SiriusXM Listener care:
e
Visit www.siriusxm.com/activatenow
e
Call SiriusXM Listener Care at 1-866-635-2349
For Canadian Subscriptions, please contact:
e
Visit www.siriusxm.ca/activatexm
e
Call
XM
customer Care at 1-877-438-9677
Note, the activation process usually takes
10
to
15
minutes, but may take up to
an
hour. Your radio
will need
to
be
powered on and receiving the SiriusXM signal
to
receive the activation message.
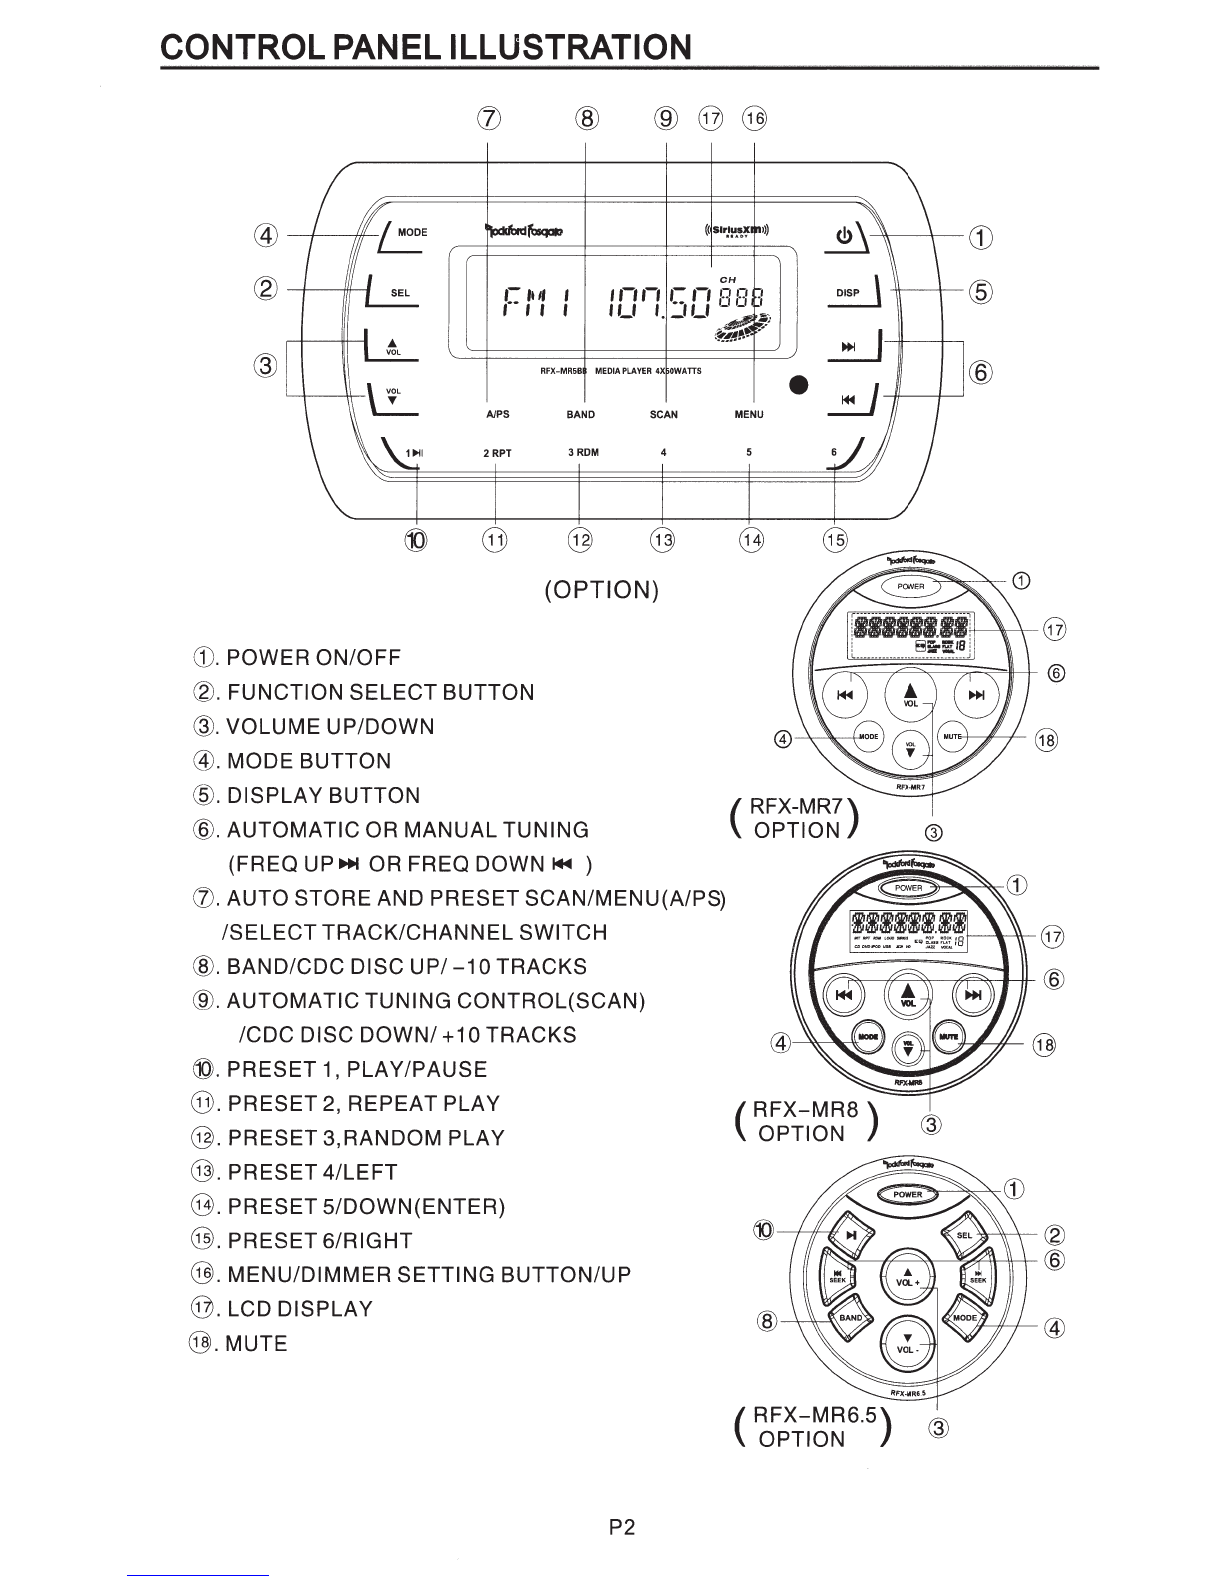
MODE (4)
• Mode Selection
Short press MODE button to select SiriusXM mode.
Note:
If
there is no SiriusXM TUNER connected this mode will be skipped. Please
connect
your
SiriusXM Tuner to the SiriusXM port located at the back
of
the unit.
Then press MODE button to change to SiriusXM mode.
DISP(5)
• Display Mode Selection
Short press DISP button repeatedly to switch different
display
mode.
You
can choose
between-
Channel
Number-
CH/
Channel
Name-
CHANNEL/
Category
Name-
CATEGORY/
Artist
Name-
ARTIST/
Song
Title-
SONG/
Content
Info-
INFO/
&(repeat)-
SEEK+ /SEEK- (6)
e Channel Browsing
When the Category Browsing mode is off, short press the buttons to start browsing
all channels. Press the SEEK+/SEEK- key to browsing next/previous channels,
Press the SEL key to select the channel showed on LCD and play it.
If
there is no key
pressed in 5s, the LCD will change back to display current playing channel
information again.
P6

SiriusXM OPERATION
• Category Browsing
In
the Category Browsing mode, short press the buttons to
start
browsing channels
in
current
category. Press the
SEEK+/SEEK-
key to browsing next/previous channels,
Press the SEL key to select the channel showed on LCD and play it. Ifthere is no key
pressed in 5s, the LCD will change back to
display
current playing channel
information again.
e Rapid Channel Browsing
When the
Category
Browsing mode is off, press and hold the buttons goes into rapid
channel browsing mode, you can browsing all channels in
higher
speed,
if
you release
the touch key, the LCD will show the information
of
the last browsed channel. Press
the SEL key to
select
the channel showed on LCD and play it. Ifthere is no key
pressed in 5s, the LCD will change back to
display
current playing channel
information again.
• Category Selection
In
the Category Browsing mode, long press and hold the buttons over 2S to select
previous/next
category
without
press SEL key.
AS.PS (7)
e Direct Channel Tuning
Short press this button, the
first
character
of
the channel
number
will flash. Press
the Volume up and down buttons to select
number
0-9 and press SEL key to enter
then the second
character
flash. Use the same operation to select third character.
After
select
the last number, press SEL key to
enter
and play the selected channel.
BAND (8)
• Banks Selection
In
SiriusXM mode, short press this button to change the bands. The current bands
will change
in
the following order:
SXM1-SXM2-
SXM3
PRESET 1-6
(1
0/11/12/13/14/15)
• Store Preset Channel
Long press a PRESETS button, the
current
channel will be stored, and the
corresponding preset numberwill
appear
in
the display. The PRESETS buttons can
be used to store 6 channels
in
each bands(SXM1, SXM2, and SXM3)
for
convenient
access to
your
favorite channels.
e Recall Preset Channel
To
recall a preset channel,
select
a band
of
channels
(if
needed).Short
press a
Presets button and the unit will turn to the corresponding stored channel.
P7

SiriusXM OPERATION
SCAN(9)/MENU (16)
• Channel Scanning
Short press SCAN button to scan all the channels. The unit will keep on scanning
every 5 seconds per channel until you press the SCAN button again to stop scan
function.
• Channel
Category
Mode
Short press MENU button to
enter
category mode while "CAT ON" will
show
in the
screen field, when short press again, the
category
setting will be off, and "CAT OFF"
will show.
PARENTAL CONTROL
You can lock any SiriusXM channels you do not
want
others to have access
without
your
permission. The
default
code is "5220".
In
case you forget
your
code please
execute the
default
reset operation or
disconnect
the unit
completely
from the battery
to resume the
default
code.
e GUIDE ON HOWTO ENTERTHE CODE USING THE VOLUME BUTTON
When the first character is flashing, Press the Volume up and down buttons to
select
5 and press SEL key to
enter
then the second
character
flash. The same operation to
select the rest
character
"2","2","0".
When done, press
SEL
key
to confirm.
e TO
LOCKA
CHANNEL
Select a channel that you wish to lock then long press SCAN button
-"CH
LOCKED"
will show on the display. Enterthe code then press
SEL
key
to confirm
-"Channel
Locked" will
show
on the
display
e
TO ACCESS A LOCKED CHANNEL
You can access a locked channel by channel browsing method
or
direct tunning method, you are
requested to
enter
the passcode before access the locked channel. The content metadata(Artist
Nme/Song Title/Content Info) would not allow
to
be
displayed when you browse
to
a locked channel
without enter the passcode.
e TO
UNLOCKACHANNEL
Select the locked channel that you wish to unlock then long press SCAN
button-
"UNLOCK CH" will show on the display. Enterthe code then press
SEL
key
to confirm
-"Channel Unlocked" will show on the
display
e TO CHANGE THE CODE
Press and hold MENU Button
-"OLD
CODE" will show on the display. Enterthe old
code then press SEL to confirm
-"NEW
CODE" will
show
on the display. Enter
your
new code then press SEL again to confirm
-"SETCODE
OK" will show on the display.
e
LOCKEDCHANNELMANAGEMENT
When you
want
to browse all the locked channels, press and hold "MODE" button
and "1" button
simultaneously
to
enter
the locked channel browsing mode.
You
can
browse the entire locked channel by pressing the Volume up and down buttons
after
entering the correct passcode.
Select
a locked channel and press SEL key
if
you
want to
clear
that locked channel.
To
clear all the locked channels except the enable
Mature channels ,
just
press the Volume up and down buttons until the advisory
"CLEARALL LOCKED" display, then P8

SiriusXM OPERATION
press the Enter button to execute.
If
you want to change the enable/disable status
of
the mature channels, you
just
press the Volume up and down buttons until
the advisory "LOCK/UNLOCK MATURE"display, press the SEL key to switch.
MODE(4)
+
BAND(8)
• Default Reset
In
SiriusXM mode, press and hold BAND and MODE button to reset the SiriusXM
mode to the factory default setting. When finished the reset operation, the locked
channels will be unlocked, the mature channels will be unrestrained, the presets
storing will be cleared, the parental control passcode will be resumed to default
passcode, etc.
TROUBLESHOOTING
PROBLEM CAUSE CORRECTIVE ACTION
SiriusXM
mode
can
not
be
Make
sure
to
choose
the
selected
USA
AREA
in
tuner
region
setting
Check
Tuner
C
Display
Check
the
SiriusXM
tuner
message
in
SiriusXM
mode)
connection
on
the
back
ofthe
unit to
ensure
that it's
correctly
connected.
Check
Antenna
C
Display
Ensure
the
SiriusXM
antenna
message
in
SiriusXM
mode)
cable
is
connected
to the
SiriusXM
tuner
correctly.
Check
the
SiriusXM
antenna
wire
for
breaks
or
sharp
bends.
Replace
the
antenna
if
necessary.
If
the
message
remains,
the
antenna
may
have
been
damaged.
No
Signal
C
Display
message
The
vehicle
must
be
outside,
in
SiriusXM
mode)
and
the
antenna
must
have
a
clear
view
ofthe
southern
sky.
The
magnetic
antenna
must
be
mounted
on
the
outside
ofthe
vehicle
for the
best
reception.
Channel
Not
Subscribed
Current
channel
not
included
in
C
Display
message
in
your
subscription
package.
Call
SiriusXM
mode)
SiriusXM
to
subscribe:
-
In
the
USA
call
1-866-635-2349
-
In
Canada
call
1-877-438-9677
pg

SiriusXM OPERATION
TROUBLESHOOTING
Channel
Not
Available
C
Display
message
in
SiriusXM
mode)
Channel
Locked
C
Display
message
in
SiriusXM
mode)
Subscription
Updated(
Display
message
in
SiriusXM
mode)
This
channel
is
not
a
valid
SiriusXM
channel.
The
channel
number
has
been
entered
incorrectly,
or
the
channel
was
removed
from
the
SiriusXM
channel
lineup.
The
selected
channel
has
been
locked
by
the
parental
controls,
or
a
mature
channel
has
been
selected.
A
prompt
to
enter
the
unlock
code
will
appear.
Enter
the
unlock
code
as
described
on
page
9.
An
update
to
your
SiriusXM
subscription
has
been
received
by
the
SiriusXM
tuner.
Press
any
button
to
continue.
Sirius, XM and all related marks and logos are trademarks
of
Sirius XM Radio inc. All
rights reserved.
RADIO
OPERA
TION/AUX
Listening to the radio
To select the radio mode, press the "MODE" button and select FM/AM. Once selected the
radio frequency will be displayed. To change the frequency band, press the "BAND" button
to scroll through the band selections FM1 > FM2 > FM3 > AM1 > AM2
Tuning
There are three options
of
tuning available: SEEK, MANUAL and PRESET stations
SEEK {Auto seek a station)
When the radio is on the desired band, the tuner will automatically select the next available
radio station as you press
..,....,..1
or
I<~~~~<~~~~
buttons.
MANUAL tuning
When the radio is on the desired band, pressing the
..,....,..1
or
1<1111<1111
for longer than 2 seconds will
allow for manual tuning
of
the radio.
PRESET {Storing a station)
When the radio is on the desired band and station, press and hold "PRESET" buttons 1
-6
to
store the radio station.
SCAN-
Automatic Tuning Control
{9)
While
in
radio mode, press the "SCAN" button to scan through radio stations. The radio will
pause for 5 seconds at each detected radio station. Pressing the "SCAN" button again will
stop the scan feature on the current station.
P10

RADIO OPERATION/AUX
AlPS-
{7)
To scan preset stations on the current band, short press the "AlPS" button. The radio will pause
for 5 seconds at each preset station.
To automatically search and store radio stations, long press the "AlPS" button. The tuner will
seek six stations and store them on the 1-6 preset buttons.
AUX-IN Port
This port
is
available for portable media players using a 3.5mm (1/8") audio jack.
P11

USB/SO OPERATION
USB
When a USB device is plugged in, the unit will begin to switch to USB mode and play
audio files that are stored on the device.
Use the "Preset 1" button to "Play/Pause" audio files
For fast searching, press the "SCAN" and "BAND" buttons. The "SCAN" button is for
"10+" and the "SCAN" button is for "10-".
The unit can support playing music by inputting the song's sequence number directly.
This is helpful ifyou know the sequence number
of
the song
in
which you want to play.
While the unit is playing, press "AlPS" on the front panel. This will bring up
"SCHOOOO"
on the LCD display. The four digits represent the song's sequence number. To set the four
digits
of
the song you want to play, press the "Preset 1-4" buttons to change the sequence
number. Press "SEL" to confirm the input and the desired song will begin to play.
so
When using a SD card with a card, the unit will automatically turn to "SD" mode and begin
playing audio files from the card. "SD" mode operates and functions the same as "USB"
mode.
Important Notice
Due to varying product specifications
in
regards to USB/SO manufacturing specific
functions, we cannot guarantee that all devices will be recognized and work as intended.
Some USB/SO devices may take more than 45 seconds to initiate after being plugged in.
P12

CDC OPERATION
CDC
Operation
1.
Press the
<!>
button
On
2.
Connect the CDC to the black box. Once plugged
in
press "MODE" to scroll through
display until you fined CDC mode.
3.
The LCD will display "Disc Style", "Item Number", "Playing Time"
4.
Press
"111-il
" button to pause playback
5.
Press the Preset 2 (11) button to activate REPEAT playing mode
6.
Press the Preset 3 (12) button to activate RANDOM playing mode
7.
Follow the function key instruction to do the operation.
8.
Pressing the "SCAN" button will function as the "Next Disc" button and pressing
"BAND" will function as the "Previous Disc" button for changing discs
in
the changer.
Notes
for
CD
1.
Keep discs clean and undamaged.
2.
Do not play discs that are damaged or warped.
3.
Do not expose discs to direct sunlight or store
in
a high temperature environment.
4.
Store discs
in
their case after use.
5.
Fingerprints and scratches will affect the quality of disc playback. Use a soft cloth
to gently clean disc. If necessary, the use of a diluted natural solvent can
be
used to
help clean the disc. Record cleaner or
an
antistatic solvent can not
be
used to clean
discs.
P13

BLUETOOTH OPERATION
(BLUETOOTH DONGLE)
Model:
RFX-BTD2
Installation Note
for
Bluetooth Dongle
For optimum signal, the Bluetooth Dongle should be installed near the surface and
should avoid metal surfaces. Installation behind or under metal surfaces will create a
weak Bluetooth signal.
Bluetooth Mode
Press the "MODE" (4) button repeatedly to scroll through available sources and select the
BTD2 mode.
To Pair with a Bluetooth device
The unit
is
ready to pair with the BT mode
is
selected and make sure you are
in
close proximity
tothe dongle.
1 .Open the Bluetooth settings
on
your device.
2.
Select "RFX4000-SX" from the list of available Bluetooth devices
3.
Enter "0000" as the password for pairing
To Play
music
from a Bluetooth device
Once the device
is
paired, the unit
is
ready to play music from the device.
• Pressing the
~~
button will start and stop the audio playback from the BT device
• To change the track being played, press the .-.lor
1
..
buttons
To disconnect the current Bluetooth device from the unit, simply press and hold the "AlPS"
button. This will disconnect the device but it will not erase the pairing from the memory.
To erase all Bluetooth pairings stored
in
the unit's memory, press and hold the "SCAN" button.
Play the Bluetooth music
When
you
succeed
in
pairing
the
Bluetooth
device,you
can
play
the
Bluetotth
music
on
your
device.
a.
Press
the
previous/next
key
to
change
the
track.
b.
Press
the
play/pause
key
to
start
or
pause
the
audio.
c.
Press
and hold
A/PS
key to
disconnect
the
current
Bluetooth
device
from
the
unit,
but
this
will
not
erase
the
pairing
from
unit
memory.
d.
Press
and hold
SCAN
key
to
erase
all
Bluetooth
pairings
stored
in
the
uint
memory.
P14

SPECIFICATION
,
..
,.,
...............
,
......
,
...........
,
TUNER(FM)
Frequency
Range
.....................................................
87.5-107.9
MHz
Channel Step
..........................................................
200KHz
Sensitivity
............................................................
8dB
Stereo
Separation
....................................................
30dB
Signal to Noise Radio
................................................
60dB
TUNER(AM)
Frequency
Range
....................................................
530-171 0 KHz
Usable
Sensitivity
....................................................
32
dBuV
Channel Step
..........................................................
1OKHz
Signal to Noise Radio
...............................................
50dB
LINE-OUT
Output..................................................................
3 Volt
(max)
lmpedance...........................................................33 Ohm
GENERAL
Power
Supply
..........................................................
13.8V
DC
(1
0-15.6V
allowable)
Speaker
Impedance
.................................................
4
or
8 ohm
Output
Power
...........................................................
50W
x 4CH
Fuse
........................................................................
1
OA
Note: Specifications and the design are subject to possible modification
without
notice due to improvement.
P15

TROUBLESHOOTING
Unable
to
read some USB devices
The unit
is
not compatible with all USB devises. Try formatting the USB device
in
FAT
16/32 standard.
Cannot play certain song formats downloaded from websites
The unit does not currently support file
in
DRM (Digital Right Management) format.
Takes
60
seconds
for
unit
to
recognize USB device.
This
is
normal operation for the unit. Some USB devices take longer than others
depending on file size and quantity loaded.
LCD Cannot
display
the
MP3
song name correctly
The audio files are not tagged properly with
103
format or they are
in
a foreign
language.
Power does
not
turn on (no sound)
Check wiring and connections along with the fuse
in
the unit. If the fuse is blown,
replace. If this happens again, consult your nearest dealer.
No
sound
output
when operation the
unit
with
amplifiers
or
power antenna
attached
The power antenna lead could
be
shorted to the ground or there may be excessive
current that
is
required for the amplifiers or power antenna to operate.
Buttons are
not
responsive
or
the LCD display is
wrong
The connections for the front panel may be loose or dirty. Tighten connections and use a
soft cloth to clean. Ifthis doesn't solve the problem, consult with your nearest dealer.
The
unit
picks
up
engine noise
Check the ground wire connection.
After
unit
powers on, the
unit
immediately powers
off
The battery voltage may be too low. Operating voltage should be between
11
v to 16V. If
the unit still cannot power on, consult with your nearest dealer.
RFX-MR5BB button fail
to
respond
Check if the unit has been locked. Press and hold "DISP" and "SEL" buttons to unlock.
WARRANTY INFORMATION:
Should this product require service, you may obtain specific information by contacting the
dealerfrom whom this product was purchased.
For any service related questions, please call
our
technical service team.
Technical Support Phone Number:574-293-1521
P16


DIGI PORTOPERATION
Connecting
the
compatible
digital
MP3
players
A special digi port
adaptor
is needed to connect the compatible digital MP3 players.
Users need purchase this
adaptor
separately
and connectthis
adaptor
to the digi
port at the rear
of
the unit.
Please contact the dealers
for
the list
of
compatible digital Mp3 players.
Playing songs
in
digital MP3 player
1.
Press MODE repeatedly until the digi port mode is displayed in the LCD.
2.
Press~~
to pause the playing, press again to resume.
3.
Press menu to
enter
menu selection ,you can press
~I..,.
to switch between
folders(PLAYLIST,ALBUM,ARTIST etc.)and press SEL to
select
the
folder
or
play the songs. When you are selecting between the menus,
simply
press this
key to return to up one level menu.
4. Press and
hold~
I..,.,
it will
fast
forward /rewind the song in playing.
5.
Fast search(A/PS)
The marine unit can support playing the music in players by inputting the song
sequence number directly: when the
unit
is playing songs, press
A/PS
button
on the front panel, it will
display
"SCH 00000" on the LCD, the five
digits
indicates
the sequence
number
that
you
want
to listen to. You can use
preset
key 1,2,3,4,5 to set the five
digits
by pressing them repeatedly and press
SEL
to
confirm input, the unit will
start
playing the new song automatically.
6.
Playing mode switch
The RFX4000-SX/RFX6000-SX unit will control and play the music
in
the digital
MP3
players when the digital MP3 players are connected to the RFX4000-SX/RFX6000-SX
Press and Hold "SEL" and "SCAN" buttons
together
for
3 seconds to change
current
playing mode to the
direct
mode, in this mode users can control and play
the music by the digital MP3 player, press and hold the two buttons again to switch
back to the
default
playing mode.
Please Note:
RFX6000-SX gets 2 DIGI PORT wires DIGI PORT1 and DIGI PORT2, but only support 1 DIGI
-Device for playing and charging, 2 DIGI-Devices plugged at the same time is not allowed.
Table of contents
Other Rockford Fosgate Media Player manuals
Popular Media Player manuals by other brands

Argosy
Argosy HV358T user manual

Stratacache
Stratacache X2O Media Player-L Setup guide

Strong
Strong SRT AN4M user manual

Sony
Sony DMXWL1 - BRAVIA Wireless HD Link Supplement

American Audio
American Audio VMS2 User guide and reference manual

Blackmagicdesign
Blackmagicdesign HyperDeck Shuttle Installation and operation manual