Rocks OK-03.0021 User manual

PL |EN
INSTRUKCJA OBSŁUGI - MANUAL
OK-03.0021
Prostownik elektroniczny, inteligentny
SMART 12/24V - 8 A - 230 AH, LCD, MULTI-CABLE
Electronic, intelligent charger
SMART 12 / 24V - 8 A - 230 AH, LCD, MULTI-CABLE

3
2
PL OK-03.0021 Prostownik elektroniczny,
inteligentny SMART 12/24V - 8 A - 230 AH, LCD,
MULTI-CABLE
WAŻNE
Proszę zachować tą instrukcję. Instrukcja zawiera
ważne wskazówki dotyczące bezpieczeństwa
i obsługi. Przeczytaj wszystkie instrukcje i
postępuj zgodnie z nimi przy każdym użyciu
tego produktu. Instrukcja powinna być
przechowywana w bezpiecznym miejscu wraz z
produktem.
Zawsze używaj wiedzy i zdrowego rozsądku
podczas pracy z akumulatorem, w szczególności
w niestandardowych warunkach pracy. Przede
wszystkim dbaj o własne bezpieczeństwo oraz
bezpieczeństwo osób postronnych.
Mimo zastosowania konstrukcji bezpiecznej
z samego założenia, stosowania środków
zabezpieczających i dodatkowych środków
ochronnych, zawsze istnieje ryzyko szczątkowe
doznania urazów lub uszkodzeń sprzętu podczas
pracy.
PRZEZNACZENIE
Prostownik automatyczny jest przeznaczony do
komercyjnego oraz indywidualnego ładowania
akumulatorów w samochodach, motocyklach,
łodziach, skuterach o napięciu znamionowym
12V oraz 24V
Urządzenie może być używane w domu, garażu
lub serwisie. Prostownik służy do ładowania
akumulatorów o następującej konstrukcji: WET /
GEL / AGM / MF / EFB / CA. Prostownik działa w
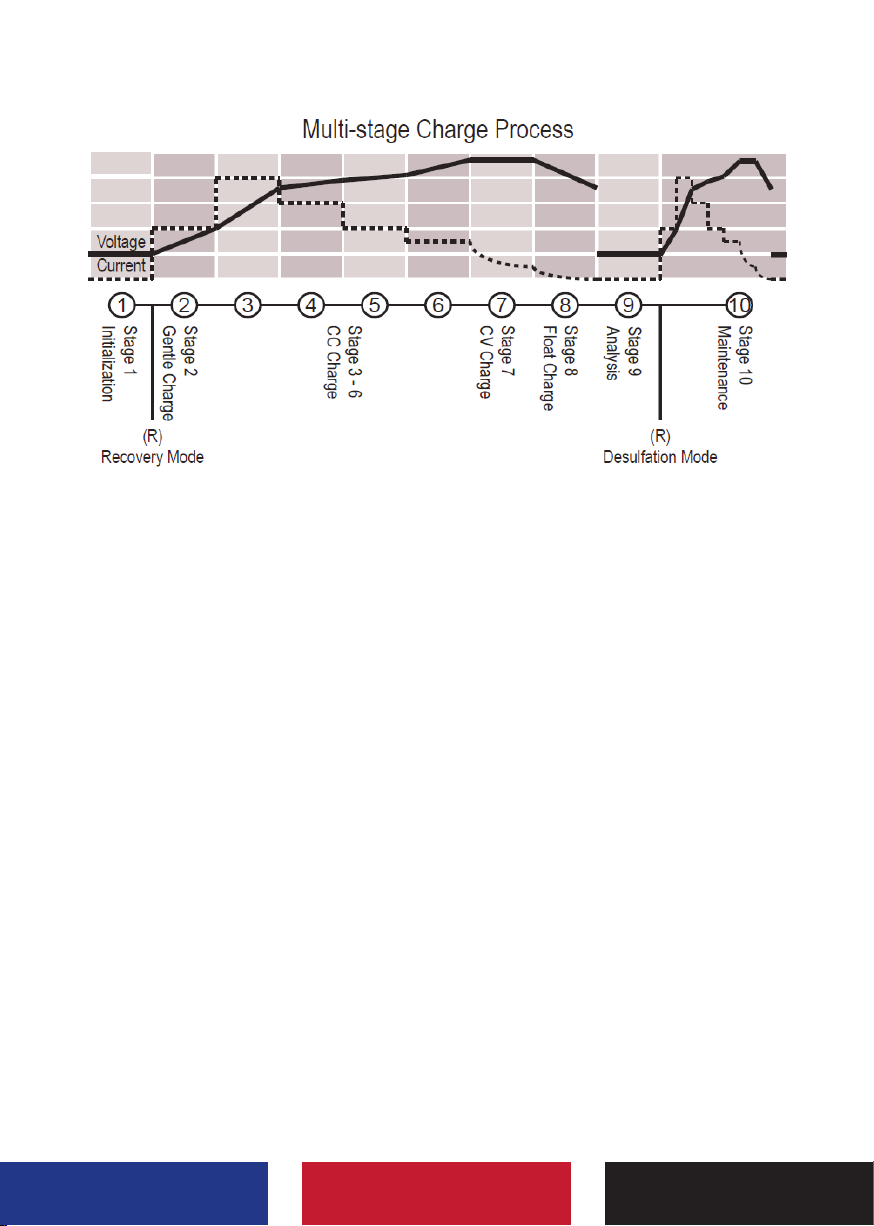
10-stopniowym procesie ładowania oraz posiada
funkcję podtrzymania napięcia akumulatora,
w długim okresie czasu. Prostownik obsługuje
akumulatory o pojemności: od 12 V / 2,2
Ah do 230 Ah oraz 24V / 14 Ah do 120 Ah.
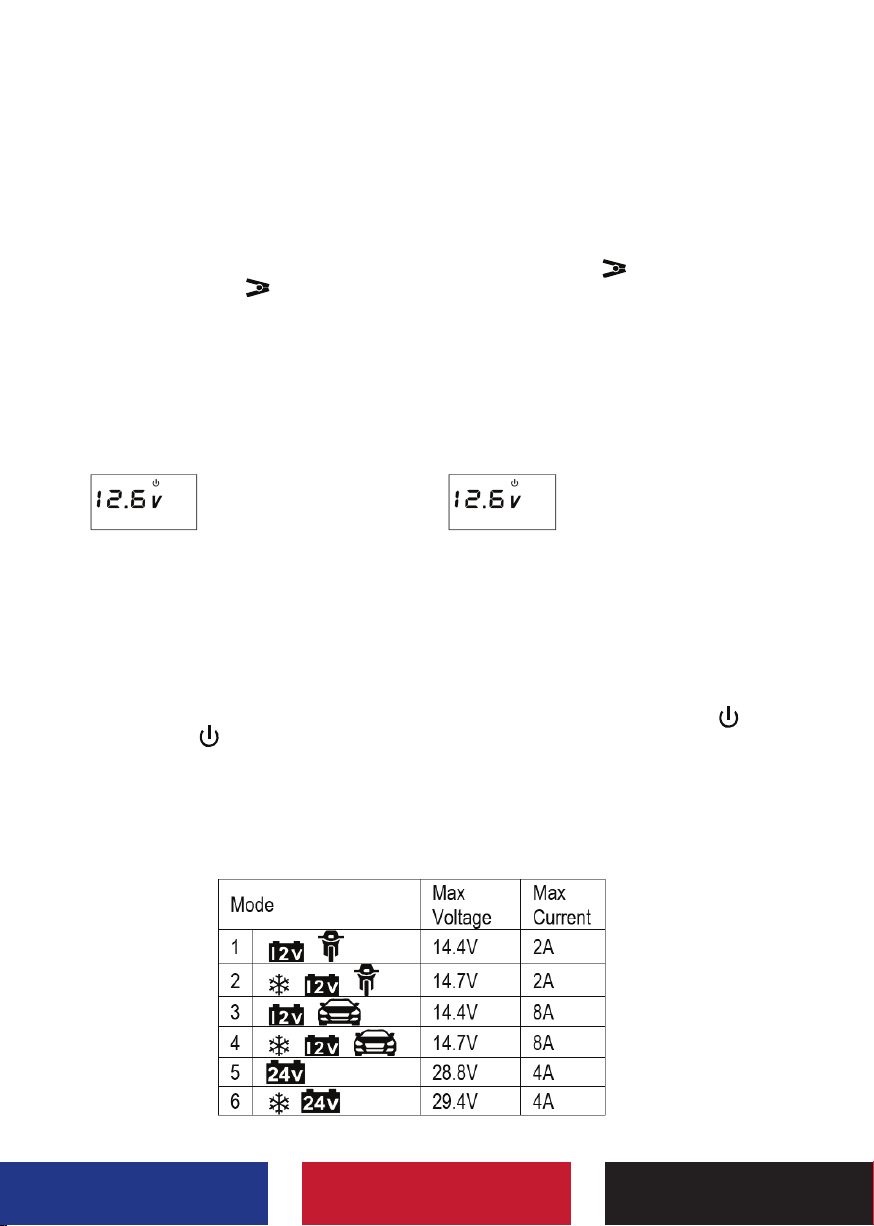
Prostownik posiada 6 trybów ładowania do
różnych akumulatorów, dzięki temu umożliwia
naładowanie akumulatora niemal w 100%.
Prostownik jest wyposażony w mikrokomputer
(MCA) i po wyborze odpowiedniego trybu
ładowania, sam rozpozna stan i napięcie
akumulatora i dostosuje odpowiednie parametry
ładowania (napięcie, natężenie i czas). W
przypadku wyboru nieprawidłowego trybu
ładowania lub jeśli akumulator jest uszkodzony,
ładowanie nie rozpocznie się. Wyświetli się błąd
ładowania.
EN OK-03.0021 Electronic, intelligent charger
SMART 12 / 24V - 8 A - 230 AH, LCD, MULTI-
CABLE
IMPORTANT
Please keep these instructions. The manual
contains important safety and operating
instructions. Read and follow all instructions
each time you use this product. The manual
should be kept in a safe place with the product.
Always use knowledge and common sense when
working with a battery, especially in abnormal
operating conditions. First of all, take care of
your own safety and the safety of outsiders.
Despite the inherently safe construction, the use
of safety measures and additional protective
measures, there is always a residual risk of injury
or damage to the equipment during operation.
APPLICATION
The automatic charger is designed for
commercial and individual charging of batteries
in cars, motorcycles, boats, scooters with a rated
voltage of 12V and 6V. The device can be used
at home, garage or service. The charger is used
to charge batteries with the following structure:
WET / GEL / AGM / MF / EFB / CA. The charger
operates in a 10-step charging process and
has the function of maintaining the battery
voltage over a long period of time. The charger
supports batteries with a capacity: from 12 V
/ 2,2 Ah to 230 Ah and 24V / 14 Ah to 120 Ah.
The charger has 6 charging modes for dierent
batteries, thanks to which it can charge the
battery in almost 100%. The charger is equipped
with a microprocessor and after selecting the
appropriate charging mode, it will recognize the
battery condition and voltage itself and adjust
the appropriate charging parameters (voltage,
current and time). If the wrong charging mode is
selected or the battery is damaged, charging will
not start. A charging error will be displayed.

3
2
Prostownik SMART posiada 10-cio etapowy
proces ładowania. Poszczególne etapy
odpowiadają za przywracanie sprawności
akumulatorowi. Proces ładowania może trwać
długo, nawet kilka dni.
1. Badanie akumulatora. Jeśli akumulator jest
głęboko rozładowany, uruchomi się funkcja
ładowania pulsacyjnego PULSE
2. Ładowanie łagodne. Prostownik rozpoczyna
ładowanie o natężeniu połowy prądu
w wybranym trybie.
3-6 Ładowanie stałe na 4 wielkościach prądu.
Przywraca 85% pojemności akumulatora.
7. Ładowanie przy stałym napięciu.
Maksymalne napięcie i minimalne natężenie
prądu przywraca 95% sprawności
akumulatora.
8. Konserwacja płynna. Kończy proces
ładowania na niemal 100% sprawności.
Następuje przejście do ładowania
podtrzymującego (tylko 12V).
9. Analiza. Następuje odtlenienie i badanie
akumaultora czy utrzymuje swoją
pojemność. Może wejść w tryb
REGENERACJI
10. Konserwacja. W dłuższym okresie czasu
zapewnia właściwe napięcie i kondycję
akumulatora.
The SMART charger has a 10-step charging
process. The individual stages are responsible for
restoring the battery’s eciency. The charging
process can take a long time, even several days.
1. Battery testing. If the battery is deeply
discharged, the PULSE function will activate
2. Gentle loading. The charger starts charging
with half the current in the selected mode.
3-6 Continuous charging with 4 currents.
Restores 85% of battery capacity.
7. Constant voltage charging. Maximum
voltage and minimum current restore 95%
eciency of the battery. 8. Float charge.
It completes the charging process with
almost 100% eciency. Transition to trickle
charge (only 12V).
9. Analysis. Deoxygenation takes place and
the battery is tested to see if it maintains its
capacity. It can enter the REGENERATION
mode
10. Maintenance. In the long term, it ensures
proper voltage and condition of the battery.

5
4
Funkcja PULSE-MATIC
Inteligentne ładowanie impulsowe (PULSE-
MATIC) to funkcja automatyczna. Włącza się
sama, kiedy akumulator ma mniej niż 10,5V
oraz 21V (w zalwżności od typu). Czas pracy w
tej funkcji to 60 minut, następnie prostownik
przełącza się na kolejny etap ładowania.
Funkcja PULSE powinna przywrócić do
sprawności większość rozładowanych i zużytych
akumulatorów. Akumulatory, które pomimo
działania funkcji PULSE i ładowania przez 60
minut nie przekroczyły napięcia 9V lub 18V
należy uznać za zużyte i wymienić lub oddać do
specjalistycznego serwisu
Funkcja REGENERACJI
Funkcja REGENERACJI jest automatyczna.
Uruchamia się sama kiedy napięcie
naładowanego akumulatora spadnie w szybkim
tempie: 3 minut po naładowaniu do 12V lub
24V (w zależności od rodzaju akumulatora).
REGENERACJA trwa około 2 godziny a
napięcie w tym czasie osiąga do 16V lub 32V
(w zależności od rodzaju akumulatora). Wzrost
napięcia ma za zadanie odsiarczyć akumulator.
Akumulator należy uznać za uszkodzony,
jeżeli pommo tej funkcji napięcie nadal szybko
spada poniżej znamionowego 12V lub 24V. Taki
akumulator należy wymienić na nowy.
Funkcja REGENERACJI RĘCZNEJ
jest przeznaczona dla użytkowników
profesjonalnych.
Uruchamia się ją poprzez przycisnięcie przez
3 sekundy MODE aż wybrany symbol lub
zacznie migać.
Najpierw akumulator zostanie w pełni
naładowany prądem 2A. Następnie proces
REGENERACJI trwa około 2 godziny a napięcie
w tym czasie osiąga do 16V lub 32V (w
zależności od rodzaju akumulatora). Wzrost
napięcia ma za zadanie odsiarczyć akumulator.
Nie zawsze jest to możlwliwe i wówczas taki
akumulator należy wymienić na nowy.
Zawsze wyłącz funkcję REGENERACJI RĘCZNEJ
po jej zakończeniu, przyciskając MODE przez
3 sekundy. Jeśli tego nie zrobisz, prostownik
podczas ponownego uruchomienia wejdzie w tą
funkcję, korzystając z pamięci.
PULSE-MATIC function
Intelligent pulse charging (PULSE-MATIC) is an
automatic function. It turns on by itself when
the battery is below 10.5V and 21V (depending
on type of batteries). The operating time in
this function is 60 minutes, then the charger
switches to the next stage of charging. The
PULSE function should restore most discharged
and used batteries to working order. Batteries
which, despite the PULSE function and charging
for 60 minutes, have not exceeded 9V or 18V,
should be considered worn out and replaced or
returned to a specialized service.
REGENERATION function
The REGENERATION function is automatic. It
starts by itself when the voltage of the charged
battery drops rapidly: 3 minutes after charging
to 12V or 24V (depending on the type of
battery). REGENERATION takes about 2 hours
and the voltage during this time reaches 16V
or 32V (depending on the type of battery). The
increase in voltage is to desulfate the battery.
The battery should be considered faulty if,
under this function, the voltage continues to
drop rapidly below the rated 12V or 24V. Such a
battery should be replaced with a new one.
MANUAL REGENERATION function
The MANUAL REGENERATION function is
intended for professional users. It is activated by
pressing MODE for 3 seconds until the selected
symbol or starts blinking. First,
the battery is fully charged with 2A. Then the
REGENERATION process takes about 2 hours
and the voltage during this time reaches 16V
or 32V (depending on the type of battery). The
increase in voltage is to desulfate the battery. It
is not always possible and then such a battery
should be replaced with a new one. Always
turn o the MANUAL REGENERATION function
when finished by pressing MODE for 3 seconds.
If you do not do this, the charger will enter this
function during a restart using memory.

5
4
Funkcje OCHRONY
Prostownik przejdzie w funkcje ochrony
i rozłączy ładowanie akumulatora jeśli pojawią
się błędy ładowania. Wówczas wyświetlacz
zacznie migać i wyświetli symbole błędu:
Błąd odwrotnej polaryzacji, zwarcia lub
przepięcia. Różnica w napięciach pomiędzy
biegunami jest większa niż 0,5V lub napięcie
przekracza 16V lub 32V.
Akumulator uszkodzony
!
Przekroczony maksymalny czas ładowania
Ochrona przed PRZEGRZANIEM
Prostownik zmniejszy natężenie lub nawet
rozłączy ładowanie, jeśłi temperatura pracy
przekroczy dozwoloną wartość. Po ostygnięciu
automatycznie poowróci do ładowania.
Wyświetlacz sygnalizuje błąd
!
i dodatkowo
miga.
ZASADY BEZPIECZEŃSTWA
Utrzymuj obszar w czystości i dobrze oświetlony.
Nie ładuj akumulatorów prostownikami w
środowisku zagrożonym wybuchem, np. w
obecności łatwopalnych cieczy, gazów lub pyłu.
Akumulator podczas ładowania wydziela gaz:
wodór i tlen, pamiętaj, że iskry mogą zapalić
opary. Podczas korzystania z urządzenia trzymaj
z daleka dzieci i osoby postronne. Używaj
prostownika tylko w pomieszczeniu bardzo
dobrze wentylowanym.
Zawsze stosuj prostownik z oryginalną osłoną,
nie modyfikuj wtyczek i połączeń elektrycznych.
Nie narażaj prostowników na działanie deszczu.
Używaj tylko sprawnego kabla do ładowarki,
kabel nie może być przecięty.
Nie używaj prostowników, gdy jesteś zmęczony
lub pod wpływem używek. Używaj artykułów
ochrony osobistej, w szczególności: okularów
ochronnych i rękawic ochronnych.
Nie spiesz się. Utrzymuj właściwą postawę i
równowagę przez cały czas. Używaj odzieży
ochronnej. Nie noś luźnej odzieży ani biżuterii.
Proces ładowania jest długotrwały, może
powodować rozgrzanie akumulatora. Nie
dopuszczaj do przegrzania powyżej 50˚C oraz
do wrzenia elektrolitu.
PROTECTION functions
The charger will enter the protection function
and disconnect the battery charging if there
are charging errors. Then the display will start
blinking and show the error symbols:
Reverse polarity, short circuit or
overvoltage error. The voltage dierence
between the poles is greater than 0.5V or the
voltage is greater than 16V or 32V.
Battery damaged
!
Maximum charging time exceeded
Overheating protection
The charger will reduce the current or even
cut o charging if the operating temperature
exceeds the permitted value. When it cools
down, it will automatically go back to charging.
The display indicates an error
!
and also
flashes.
SAFETY RULES
Keep the area clean and well lit. Do not charge
the batteries with chargers in an explosive
atmosphere, e.g. in the presence of flammable
liquids, gases or dust. The battery gives o
gas during charging: hydrogen and oxygen,
remember that sparks can ignite the fumes.
Keep children and bystanders away when using
the device. Only use the charger in a well-
ventilated area.
Always use the charger with the original
cover, do not modify the plugs and electrical
connections. Do not expose the chargers to rain.
Use only a working charger cable, the cable
must not be cut.
Do not use extenders while you are tired or
under the influence of stimulants. Use personal
protective equipment, in particular: safety
glasses and protective gloves. Do not rush.
Maintain proper posture and balance at all times.
Use protective clothing. Do not wear loose
clothing or jewelry.
The charging process takes a long time and may
heat up the battery. Do not allow it to overheat
above 50˚C and prevent the electrolyte from
boiling.

7
6
Zawsze podłącz najpierw zaciski prostownika do
akumulatora a następnie włącz prostownik do
sieci. Podczas wyłączania prostownika, najpierw
odłącz go od sieci a następnie ściągnij zaciski
z akumulatora.
Nigdy nie ładuj akumulatora zniszczonego,
ze zwarciem wewnętrznym oraz głęboko
rozładowanego. W szczególnych przypadkach
zaleca się wcześniejsze badanie gęstości
elektrolitu, aby sprawdzić stopień jego
rozładowania. Nie ładować akumulatorów nie
nadających się do ładowania.
Klemy na akumulatorze muszą być pozbawione
zanieczyszczeń zwiększających opór.
3 RODZAJE ZACISKÓW POŁĄCZENIOWYCH
Always connect the charger clamps to the
battery first and then connect the charger to
the mains. When switching o the charger, first
disconnect it from the mains and then remove
the terminals from the battery.
Never charge a battery that is damaged,
internally shorted or deeply discharged. In
special cases, it is recommended to test the
electrolyte density in advance to check the
degree of its discharge. Do not charge non-
rechargeable batteries.
The terminals on the battery must be free from
impurities that increase resistance.
3 TYPES OF CONNECTION CLAMPS
Niebezpieczeństwo wybuchu Danger of explosion
Niebezpieczeństwo ogólne General danger
Niebezpieczeństwo wydzielania
substancji żrących
Danger of release of caustic sub-
stances
Nie utylizować z odpadami zmiesza-
nymi. Utylizacja tylko jako aparatura
elektryczna i elektroniczna
Do not dispose of with mixed waste.
Disposal only as electric and electro-
nic apparatus
Zaciski krokodylkowe crocodile clips
Wtyczka do gniazda zapalniczki cigarette lighter connector
Zaciski oczkowe eyelet connectors

7
6
BUDOWA URZĄDZENIA DEVICE CONSTRUCTION
1 Prostownik Charger
2 Przewód zasilający 230V Power cord 230V
3 Przewód do ładowania z zaciskami
czerwonym i czarnym Charging cable with red & black clamps
4 Otwór montażowy Mounting holes
5 Wyświetlacz LCD LCD display
6Akumulator uszkodzony, symbol błędu Defective battery error symbol
7Podłączenie akumulatora, symbol błędu Clamp-related error symbol
8Błąd ogólny Special error symbol
9Symbol gotowości Standby symbol
10 Tryb ładowania w zimnie oraz
la akumulatorów 12V AGM
6V charging mode in cold state, also
for many 12V AGM battery
11 12V tryb ładowania 12V charging mode
12 12V 2A tryb ładowania 12V 2A charging mode
13 2V 8A tryb ładowania 12V 8A charging mode
14 24V 4A tryb ładowania 24V 4A charging mode
15 Tryb ładowania w zimnie oraz dla akumulatorów
12V AGM
12V charging mode in cold state, also for 12V
AGM battery
16 Wskaźnik naładowania akumulatora Battery charge status display
17 Wskaźnik napięcia akumulatora Battery voltage display
18 Przycisk wyboru trybów pracy Mode selection button
2 3
1
4 5
6 7 8 9 10 18
17 16 15 14 13
11 12

9
8
DANE TECHNICZNE TECHNICAL DATA
Napięcie znamionowe na wejściu Rated input voltage 220 - 240VAC, 50Hz
Moc urządzenia Power 140W MAX
Napięcie znamionowe na wyjściu Rated output voltage 12V / 24V DC
Napięcie ładowania Charging voltage 14,4/14,7 VDC ±0.25V DC
28,8/29,4 VDC ±0.25V DC
Prąd znamionowy na wyjściu Rated output current 12V: 2A/8A ±10%
24V: 4A ±10%
Typ prostownika Charger type 10-Stage, Fully Automatic
Typ akumulatora Battery type 12V & 24V Lead-Acid
(Wet, MF, GEL, AGM, EFB, CA)
Pojemność akumulatora Battery capacity 12V: 2,2 – 230 Ah
24V: 14 - 120Ah
Temperatura pracy Ambient temperaturę -10 to +40°C
Ochrona obudowy Housing protection IP65
Klasa ochrony Protection class
CLASS II
INSTRUKCJA UŻYTKOWANIA
Upewnij się że prostownik jest właściwy do
rodzaju i wielkości akumulatora. Upewnij się, że
akumulator nadaje się do ładowania i czy nie jest
zepsuty a klemy są czyste.
PODŁĄCZENIE
• Połącz zacisk bieguna dodatniego
(czerwony) z biegunem dodatnim
akumulatora.
• Podłączyć zacisk bieguna ujemnego
(czarny) do bieguna ujemnego
akumulatora lub do karoserii (z dala od
przewodów paliwowych)
• Przy prawidłowym podłączeniu na
wyświetlaczu LCD widoczne jest
napięcie akumulatora a wyświetlacz jest
podświetlony
• Podłączyć kabel sieciowy ładowarki do
gniazda sieciowego.
• Jeśli połączenie jest prawidłowe, na
wyświetlaczu LCD pojawi się napięcie
akumulatora i symbol gotowości
• Wskaźnik naładowania (16) pokazuje
aktualny stan akumulatora, przy pełnym
naładowaniu zapełni się wszystkie 6
słupków (zakres 1-6 słupków)
USER MANUAL
Make sure the charger is correct for the type
and size of the battery. Make sure the battery is
rechargeable, not broken and that the terminals
are clean.
CONNECTION
• Connect the positive pole (red) to the
positive pole of the battery.
• Connect the negative terminal (black) to
the negative terminal of the battery or to
the chassis (away from the fuel lines)
• When properly connected, the LCD shows
the battery voltage and the display is
backlit
• Connect the mains cable of the charger to
the mains socket.
• If the connection is correct, the battery
voltage and the ready symbol will
appear on the LCD
• The charge indicator (16) shows the current
battery status, when fully charged, all 6
bars will be full (range 1-6 bars)

9
8
UWAGA:
• Upewnij się, że symbol błędu nie jest
wyświetlany na wyświetlaczu LCD, jeśli jest,
sprawdź podłączenie.
• Jeśli napięcie akumulatora jest mniejsze niż
8V prostownik nie będzie działał i napięcie
na LCD nie będzie wyświetlane.
• Jeśli napięcie akumulatora jest wyższe
niż 32V, na wyświetlaczu LCD pojawia
się symbol błędu a podświetlenie
wyświetlacza LCD miga, co oznacza, że
prostownik NIE jest odpowiedni dla tego
akumulatora.
• Podczas normalnej pracy podświetlenie
wyświetlacza wyłącza się w celu
oszczędzania energii po 1 minucie
bezczynności. Aby włączyć podświetlenie,
naciśnij przycisk wyboru trybu TYLKO RAZ.
ROZŁĄCZENIE
• Najpierw wyciągnij wtyczkę z sieci
• Zdejmij przewód ujemny (czarny) z klemy
akumulatora
• Następnie zdejmij przewód dodatni
(czerwony)
UWAGA:
• Po rozpoczęciu ładowania znika symbol
gotowości z wyświetlacza LCD
• Aby przerwać ładowanie, naciśnij przycisk
MODE
WYBÓR TRYBU ŁADOWANIA
CAUTION:
• Make sure an error symbol is not
displayed on the LCD, if there is, check the
connection.
• If the battery voltage is less than 8V, the
charger will not work and the voltage on
the LCD will not be displayed.
• If the battery voltage is higher than 32V,
the error symbol appears on the LCD
display and the LCD backlight blinks, which
means the charger is NOT suitable for this
battery.
• During normal operation, the display
backlight turns o to save power after
1 minute of inactivity. To turn on the
backlight, press the mode selection button
ONLY ONCE.
DISCONNECT
• First, remove the plug from the mains
• Remove the negative cable (black) from
the flame clamp
• Then remove the positive cable from the
plant (red)
CAUTION:
• When charging starts, the symbol with
the LCD option disappears
• To stop charging, press the MODE button
CHARGE MODE SELECTION

11
10
TRYB 1 Akumulatory 12V: WET, MF,GEL,
EFB o pojemności 2,2-20 Ah
Naciśnij przycisk MODE (18)
aby wybrać symbol .
Po 3 sekundach prostownik
zacznie pracę w trybie nr 1
12V batteries: WET, MF, GEL,
EFB with a capacity of 2.2-20
Ah
Press the MODE button (18) to
select the symbol .
After 3 seconds, the rectifier
will start working in the No. 1
mode
TRYB 2 Akumulatory 12V: WET, MF,
GEL, EFB w zimnym otoczeniu
oraz akumulatory AGM, CA
o pojemności 2,2-20 Ah
Naciśnij przycisk MODE (18)
aby wybrać symbol
.
Po 3 sekundach prostownik
zacznie pracę w trybie nr 2
12V batteries: WET, MF, GEL,
EFB in a cold environment and
AGM, CA batteries with a capa-
city of 2.2-20 Ah
Press the MODE button (18) to
select the symbol .
After 3 seconds, the rectifier
will start working in mode no.2
TRYB 3 Akumulatory 12V: WET, MF,
GEL, EFB o pojemności 20-
230 Ah
Naciśnij przycisk MODE (18)
aby wybrać symbol .
Po 3 sekundach prostownik
zacznie pracę w trybie nr 3
12V batteries: WET, MF, GEL,
EFB with a capacity of 20-230
Ah
Press the MODE button (18) to
select the symbol .
After 3 seconds, the rectifier
will start working in mode no.3
TRYB 4 Akumulatory 12V: WET, MF,
GEL, EFB w zimnym otoczeniu
oraz akumulatory AGM, CA o
pojemności 20-230 Ah
Naciśnij przycisk MODE (18)
aby wybrać symbol
.
Po 3 sekundach prostownik
zacznie pracę w trybie nr 4
12V batteries: WET, MF, GEL,
EFB in a cold environment and
AGM, CA batteries with a capa-
city of 20-230 Ah
Press the MODE button (18)
to select the symbol
.
After 3 seconds, the rectifier
will start working in mode 4

11
10
TRYB 5 Akumulatory 24V: WET, MF,
GEL, EFB o pojemności 14-120
Ah
Naciśnij przycisk MODE (18)
aby wybrać symbol
.
Po 3 sekundach prostownik
zacznie pracę w trybie nr 6
24V batteries: WET, MF, GEL,
EFB with a capacity of 14-120
Ah
Press the MODE button (18)
to select the symbol
.
After 3 seconds, the rectifier
will start working in mode no.6
TRYB 6 Akumulatory 12V: WET, MF,
GEL, EFB w zimnym otoczeniu
oraz akumulatory AGM, CA o
pojemności
14-120 Ah
Naciśnij przycisk MODE (18)
aby wybrać symbol
.
Po 3 sekundach prostownik
zacznie pracę w trybie nr 6
12V batteries: WET, MF, GEL,
EFB in a cold environment and
AGM, CA batteries with a capa-
city of 14-120 Ah
Press the MODE button (18) to
select the symbol
.
After 3 seconds, the rectifier
will start working in mode no.6
Zimne otoczenie – poniżej 5˚C Cold environment - below 5˚C
MEMORY Prostownik ma funkcję pamięci
MEMORY, która zapamiętuje
ostatnie ustawienie i po włą-
czeniu do sieci przechodzi do
tego ustawienia.
Jeżeli wystąpi przerwa w zasi-
laniu podczas pracy, prostow-
nik automatycznie powróci do
przerwanego trybu pracy, po
odzyskaniu zasilania.
The charger has memory
function MEMORY, which re-
members the last setting and
after switching to the mains, it
goes to this setting. If a power
interruption occurs during ope-
ration, the charger will automa-
tically revert to the interrupted
operation mode when power is
restored.

12
CERTYFIKAT / CERTYFICATE
DEKLARACJA ZGODNOŚCI
DECLARATION OF CONFORMITY
My / We: Auto Partner SA
ul. Ekonomiczna 20, 43-150 Bieruń, Polska
We declare with full responsibility that the devices/oświadczamy z pełną
odpowiedzialnością, że urządzenia:
Battery chargers / Prostowniki
Models:
OK-03.0020, OK-03.0021
to which this declaration applies, complys with the following normative documents
/ których dotyczy niniejsza deklaracja, są zgodne z poniższymi dokumentami
normatywnymi:
Low Voltage Directive / Dyrektywa niskonapięciowa: 2014/35/EU
And it is compliant with EN standards / I jest zgodny ze standardami EN:
• EN 60335-2-29:2014+A2:2010+A11:2018
• EN 60335-1:2012+A13:2017+A1+A2+A14:2019
• EN 62233:2008
Responsible person / osoba odpowiedzialna:
Name, Surname / Imię i nazwisko: Szymon Zawada
Position / Stanowidko: ROOKS Development Director / Dyrektor rozwoju ROOKS
Note: This declaration loses its validity if technical or operational modifications
are made without the manufacturer’s consent.
Uwaga: Niniejsza deklaracja traci ważność, jeśli bez zgody producenta
wprowadzone zostaną modyfikacje techniczne lub operacyjne
Signature:
Podpis:
Date and place:
Data i miejsce:
Domasław 10.04.2021
Table of contents
Other Rocks Batteries Charger manuals