Rollei Pro Radio Transmitter 2.4 G User manual

35
www.rollei.com
Content
Safety instructions............................36
Function List ................................37
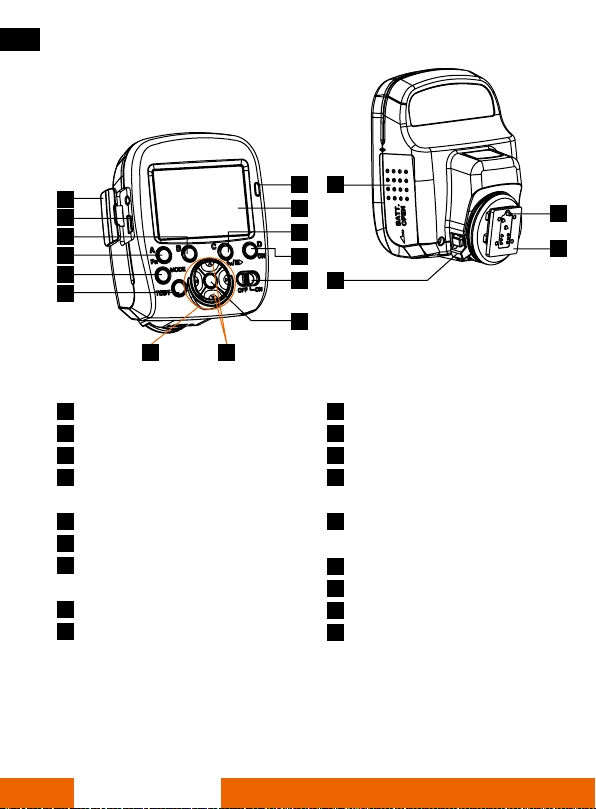
Components ................................38
LCD screen ................................39
Power switch ..............................40
Preparation .................................41
Functions ..................................41
Customized function ..........................44
Sync mode setting ..........................44
Wireless channel setting .....................44
Assisted focusing light .......................45
Hot Shoe .................................45
6 Modes..................................45
Canon mixed mode...........................46
Canon master control TTL mode .................49
Canon master control M mode ..................53
Canon master control Multi mode ...............58
Nikon master control mixed mode ...............61
Nikon master control Multi mode ................63
Compatible Devices ..........................65
Technical Features............................65
Disposal | CE Conformity.......................66
Français....................................67
Español ....................................99
Italiano ...................................131
Português .................................163

ENGLISH
36 Safety instructions
Please read this manual carefully before using the device.
1. Please turn of the trigger, the flash light as well as the camera while
connecting them with each other.
2. Do not let the product fall down and do not shake it as this might cause
damage to the product.
3. Please turn off the trigger and remove the batteries if the device is not
used for a long time.
4. Only use proper batteries. Please be aware that reversed batteries might
cause battery leaking or explosion.
5. Do not put the device in high temperature environment such as direct sunlight,
dashboards and other.
6. Please keep it dry and do not use it with wet hands nor immerse it in water
or rain as this can lead to product damage.
7. Do not use the device in flammable and explosive situations, as this might
cause explosion or fire.
8. This product involves batteries. Regarding the use of batteries please
follow strict relevant regulations. Otherwise it might cause property damage or
personla injury.

37
Function List
1. Available flash modes: E-TTL, E-TTL (II), iTTL, M and Multi
2. Front curtain sync / rear curtain sync / high speed sync (up to 1/8000s)
3. Exposure compensation (FEC)
4. Surrounded exposure (FEB)
5. Exposure Locked (FE Lock)
6. Focusing assist (can be disabled)
7. Mixed flash modes: TTL, M, Multi and lighting mode
8. Auto save function
9. 4 groups with different power for each flash light output
10. Can controll multiple receivers
11. E-TTL flash ratio settings via Canon camera menu available
(Canon series A camera wireless flash)
12. Group setting in M or Multi (Canon series A camera wireless flash)

38
ENGLISH
Components
Rubber cap
Micro USB
Group B
Group A / Customized function
setting
Mode
Test
Parameter settings
(up, down, left, right)
Indicator light
LCD
Group C / Sync mode button
Group D / Channel Setting
Power switch: ON / OFF
Flash ratio setting
(in master control mode)
Settings / OK button /
restore to factory setting
Battery bin
Rotary lock
Mounting pin
Mounting holder
12
4
6
5
3
2
1
10
11
9
8
7
1314
17
18
15
16
11
12
13
14
15
16
17
18
4
6
5
7
3
10
2
9
1
8

39
Automatic focusing assist
Rear curtain sync
High speed sync
Manual / Multi Mode
Wireless channel
Flash parameter setting for A
Flash parameter setting for B
Flash parameter setting for C
Flash parameter setting for D
Flash ratio
Master control TTL mode
Focal distance
Aperture
Strobe flash
FEB logo
Times
Master control camera series
Components
LCD screen
14
15
16
13
4
617
5
7
3
12
11
10
2
9
1
8
4
6
5
7
3
2
1
8
12
13
15
11
10
9
14
16
17

40
ENGLISH
Component instruction
Power switch:
• Slide to ON to turn
the device on.
• Slide to OFF to turn
the device off again.
Hot Shoe Use it to connect the device with your camera.
This is compatible with Nikon and Canon cameras.
Mode Transmitter mode
Test Push the button to test whether all flash units will
flash. Note: Please note that the test
button will only work if the transmitter
is not attached to the camera.
A:B:C:D Enter/exit the flash parameter settings
for each group
Indicator light This light indicates the wireless
communication and the command.
Indicator light status 1. Standby: The red light is flashing
2. Camera connected:
The green light is flashing
3. Test: The green and red light
are always on.
Micro USB System update
Battery bin 2 AA batteries 3
1
2

41
Preparation
Inserting the batteries
Open the battery compartment and install two AA
batteries according to the positive and negative
direction shown in the battery compartment. After-
wards close the battery compartment again.
• If you don‘t use the product for a long time,
please remove the batteries.
• If the batteries need to be replaced, please
always replace both of them together.
Functions
Install the trigger to the camera
1. Open the rotary lock by sliding it to the left side.
2. Insert the trigger into the camera‘s hot shoe
completely.
3. Then lock the rotary lock again by sliding it to
the right side. Make sure that the trigger is well
positioned on the camera.

42
ENGLISH
Functions
Mode options
Turn the trigger on and press the mode button repeatedly to switch between the
different modes. You can select the universal mode, Canon mixed mode, Canon
master control TTL mode, Canon master control M mode, Canone master control
Multi mode, Nikon master control mixed mode, Nikon master control Multi mode.
Test
Press the test button to check whether the flash units with the same channel will
flash with the desired mode and parameters.
LCD
Press any button to turn on the LCD backlight. If the trigger is not used for about
10 seconds the LCD light will automatically turn off.
Restore Factory settings
Press the OK button for about 3 seconds and the trigger will restore the factory
settings.

43
Customized
function serial
number
Functions Status setting Instruction
Flash surrounding
exposure automatically
cancel
Enable
Disable
Flash surround exposure
order
Automatical focusing
assist
On
Off
Customized function
Press the Group A button for about 2 seconds and the trigger
will go into the customized settings. Press the up and down
buttons to select the desired function and change the value
from on to off by using the left and right buttons.
Note:
FFn number 1-3 option, in the Canon online state, you can access the customized
settings of the „external flash“ by the camera menu.

44
ENGLISH
Customized function
Sync mode setting
In the universal mixed mode press the group C button for about 2 seconds and
the sync mode will change between high speed sync , rear curtain sync and
front curtain (no sign on the LCD). In the Canon master TTL or M mode press the
button for 2 seconds and the sync mode will change between high speed
sync and front curtain sync (no sign on the LCD).
Wireless channel setting
Press the channel button for about 2 seconds until the channel number is flashing.
Press the left and right button to set the channel from 1 to 16. Press the OK button
to confirm the channel number.

45
Customized function
Assisted focusing light
If the assist focusing light is turned on in the
custom settings, the light will automatically help to
focus in low light situations.
To use the focusing light correctly, you need to
set the camera in the automatic mode. Turn on
the auto focus function on the camera lens. Turn
on “focusing assist” (you can enable it in C.Fn8
(Canon camera) or transmitter customized (C.Fn3)
function.
Hot Shoe
Connect the trigger with the camera (Canon / Nikon). Press the shutter half way
down and the trigger will automatically identify the camera. The trigger will then
send the setting status to the other flashes that are not directly connected
with the camera.
6 Modes
A: Canon mixed mode (TTL and M manual mode together)
B: Canon master control TTL mode
C: Canone master control M mode
D: Canon master control Multi mode
E: Nikon master control mixed mode
F: Nikon master control Multi mode

46
ENGLISH
Canon mixed mode
1. Group mode and parameter setting
1) Press the mode button to select the
transmitter mode universal mixed mode
(as shown on the picture).
2) Press A, B, C, D shortly to select or exit the
flash group setting. The arrow on the LCD
screen indicates in which group settings
your are.
3) After you have selected the group press the mode button to set the flash
mode for this group. The mode parameters are as follows:
TTL: The exposure compensation can be set from -3,0EV to +3,0EV. In total
you have 22 levels. Press the left and right button to change the exposure
compensation. Press the up and down button to adjust the zoom settings
(focal distance).
M: In the manual mode the flash output can be set from 1/128 to 1/1.With
the left and right buttons the values can be increased or decreased by 0,3 EV
(in total 22 levels). Press the up and down button to adjust the zoom settings
(focal distance).
OFF: If the group is turned off, it will not flash.
4) After the group parameters are finished, press again the corresponding group
button (A, B, C, D) to exit the settings and set the flash units all to the same
channel as the trigger. The group power can be adjusted individually for each
group. But if the flashes of all three groups should fire at the same time, they
need to be in the same channel.

47
Canon mixed mode
• In this mode you can set different flash groups in different flash modes and
power. Flash groups that are in TTL mode can do ETTL if a Canon camera is
used and iTTL if a Nikon camera is used.
• If a Canon camera of the A series is used, the manual mode cannot be set
while the wireless mode is turned off. TTL and M (manual) can only be set by
the transmitter setting.
• This mode should be used if the rear curtain sync is chosen.
2. Only available for Canon Cameras of the series A
(camera exposure mode needs to be P/AV/TV/M)
1) Enter the menu of your camera to select the external flash control function
setting.
2) In this mode the camera shows the information as shown below.

48
ENGLISH
Canon mixed mode
3) You can set the sync speed for the shutter and the group setting FEB exposure
in the internal menu setting of your camera. Press the test button so that the
transmitter is passing over all the settings to the flash lights. After that the
flash units should display the reveiving information on the LCD (modes and
parameters).

49
Canon master control TTL mode
1. Parameter setting for groups
1) Press the mode button to select the transmitter mode Canon master control
TTL mode (as shown on the picture below).
High speed sync
Wireless channels
Automatic focus assist
Main light flash compensation
Group C flash compensation
Canon master control mode
Focal distance
Aperture
TTL
A:B
4
6
5
7
3
10
2
9
1
8
4
6
5
7
3
10
2
9
1
8
2) If the mode is selected press the left and right button to set the exposure
compensation from -3,0E V to +3,0 EV. Press the up and down button to set
the flash ratio between Flash Ratio Off, A:B and A:B:C.

50
ENGLISH
Canon master control TTL mode
Iftheashratioisdisabled(ALL)thismeansthatallashunitsofthethree
groupswillhavethesameoutputinbrightness,exposurecompensationand
surroundedexposure.IftheashratioA:Bisselectedthatmeansthattheashes
ofgroupAandBwillashinthesamepoweroutput.AndiftheratioA:B:Cis
selectedthatmeansthatallashesofthethreegroupswillash,thegroupsA
andBwillhavetheoutputbrightnessandgroupCisthepowerexposure.
3)PresstheOKbuttonrepeatedlyuntiltheashrationumberisindicatedwith
anarrow.Presstheleftandrightbuttontosettheashratio.
4)IftheashratioisA:B:CpresstheOKbuttonrepeatedlyuntilthegroupCis
indicatedwiththearrow.Presstheleftandrightbuttontosettheexposure
compensation.
• IftheashratioA:BisselectedtheashunitsofgroupCwon‘tash.
• IftheashunitsofgroupCarepositionedtowardsthesubject,thesubject
willbeoverexposed.

51
Canon master control TTL mode
2. Canon camera internal menu setting
This is only available for Canon cameras of the series A and the camera exposure
mode needs to be P/AV/TC/M.
Enter the menu of your camera and select the flash control. Then select the
external flash function setting to set the strobe flash parameter options.
1) Enable the wireless flash function on the external flash menu.
2) Channel setting (by wireless flash menu)
After the wireless flash is enabled the
transmitter‘s channel can be set by the
camera menu (only from1 to 4 channels)
and the changed channel will be shown
on the transmitter. You can also use the
channel button on the transmitter to set
the channels from 1 to 16.
3) Flash transmitting groups
(by wireless flash menu)
Set the flash groups through the wireless
flash while the trigger is transmitting
the signal. The light of the groups and
channels will always be on and the status
light will flicker. The light status for each
group would represent flash groups which
are selectable.

52
ENGLISH
Canon master control TTL mode
4) Flash ratio setting
1. ALL (A+B+C)
If the flash ratio off is chosen that means
that all flash groups have the same power
output.
2. A:B
Here you can set the flash ratio (8:1–1:8 in
1/2 steps) and the flash exposure compen-
sation for both groups A and B. Group C is
disabled.
3. A:B C
With this flash ratio the ratio and the flash
exposure compensation will be set for
group A and B. For group C you can do a
separate flash exposure compensation,
which is suitable to highlight backgrounds,
as the subject might be overexposed
otherwise.

53
Automatic focus assist
High speed sync
Wireless channel
Master control M mode
Flash ratio
ALL (nothing shown on the display)
A:B logo
A:B:C logo
Cannon master control mode
Focal distance
Aperture
Group A manual output power
Group B manual output power
Group C manual output power
9
10
11
8
4
5
3
7
2
16
4
5
3
2
1
6
9
10
11
8
7
Canon master control M mode
1. Parameter setting for groups
1) Press the mode button repeatedly to select the transmitter mode as Canon
master control M mode (as shown on the picture below).

54
ENGLISH
Canon master control M mode
2) After the mode has been selected and nothing else has been changed so far,
press the left and right button to set the power output for group A. Press the
up and down button to set the flash ratio between Off, A:B and A:B:C.
If the flash ratio off is chosen that means that all flash groups have the same
power output. If the ratio A:B is selected the groups A and B are enabled and
the power of both groups can be set individually. If the ratio A:B:C is selected
all groups are enabled and the power of each group can be set individually.
3) Group B flash power output (A:B or A:B:C)
Press the OK button repeatedly until the arrow is indicating the group B. Press
the left and right button to set the output power of group B.
A:B A:B C
Other manuals for Pro Radio Transmitter 2.4 G
1
Table of contents
Other Rollei Transmitter manuals