Roma Medical 2320 User manual

Rollators
USER MANUAL
Please ensure this manual is read and understood before
using the product.
Nov 2017

Contents Page
Introduction 3
Intended Use 3
Technical Specification 3
Feature Guide 4 - 7
Safety Advice 8
Assembly 9 - 11
Folding
Opening
Adjustment
Brake Operation & Adjustment 12 & 13
Maintenance 13
Cleaning 13
Warranty

INTRODUCTION
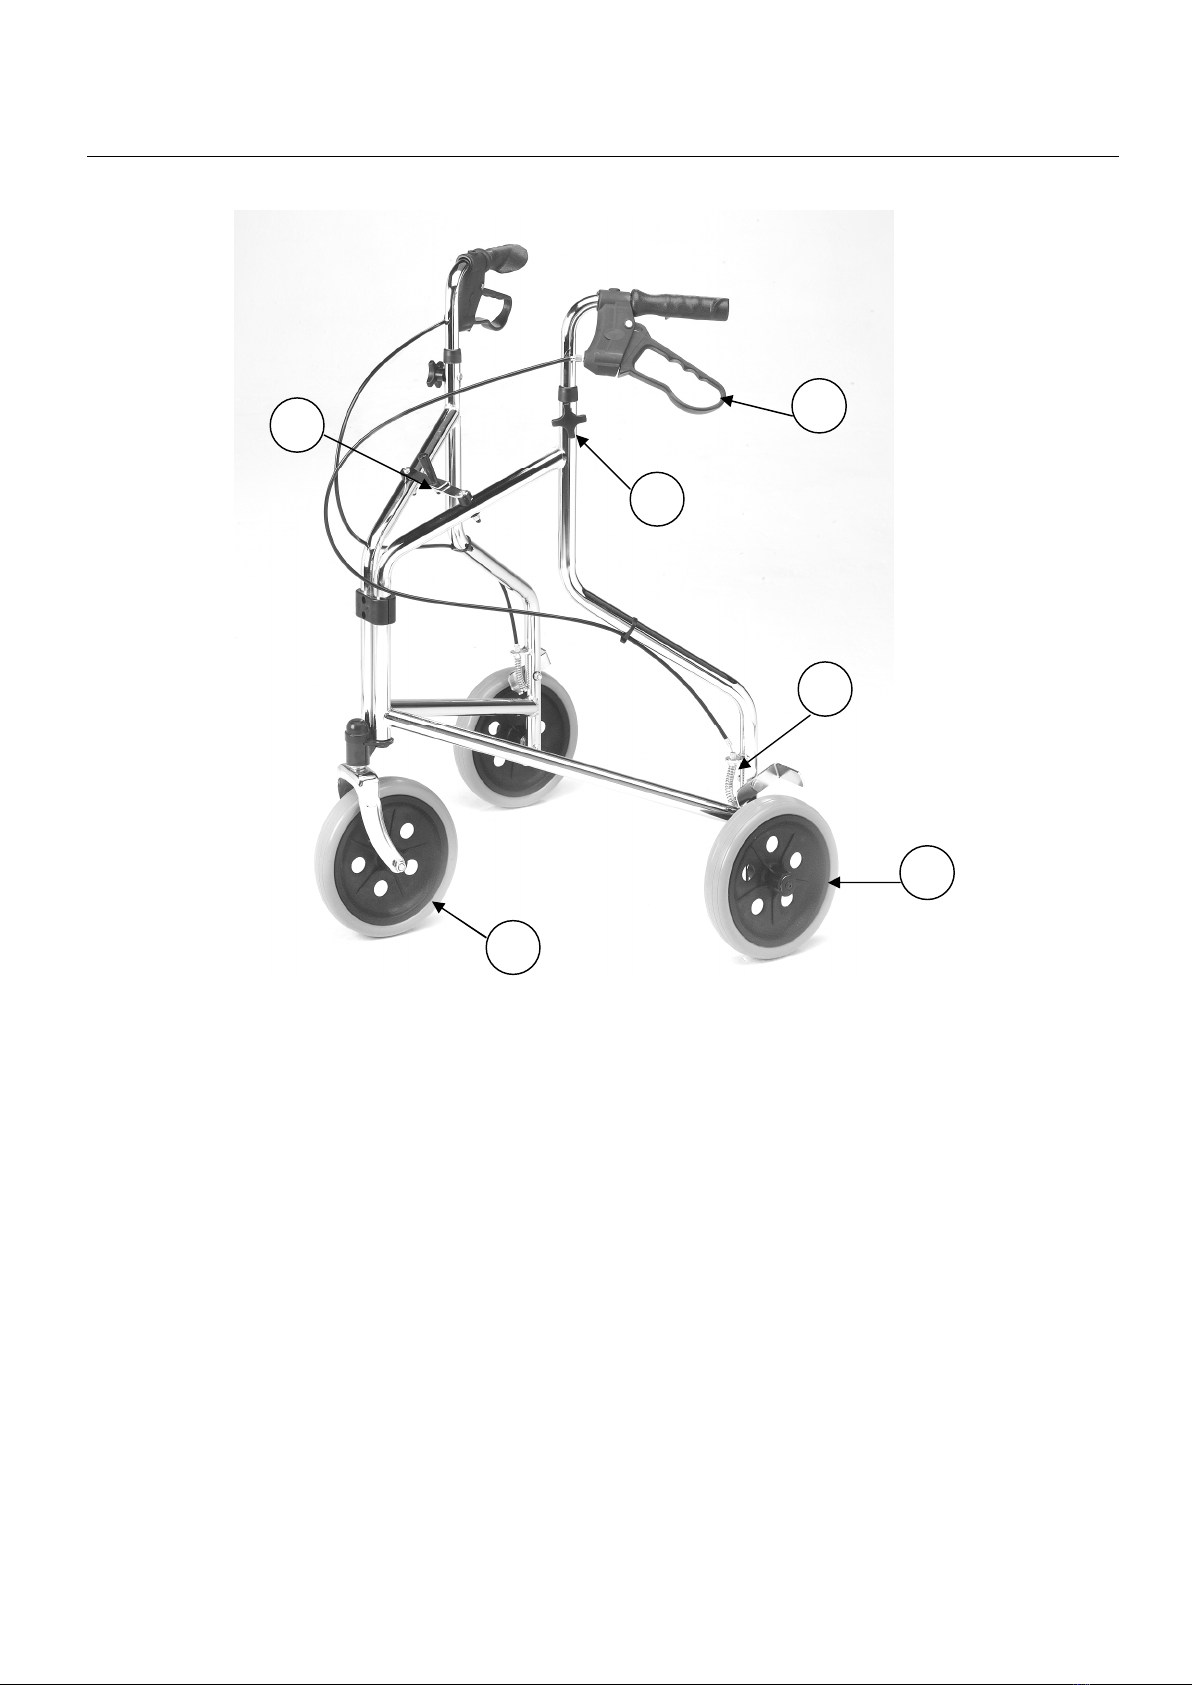
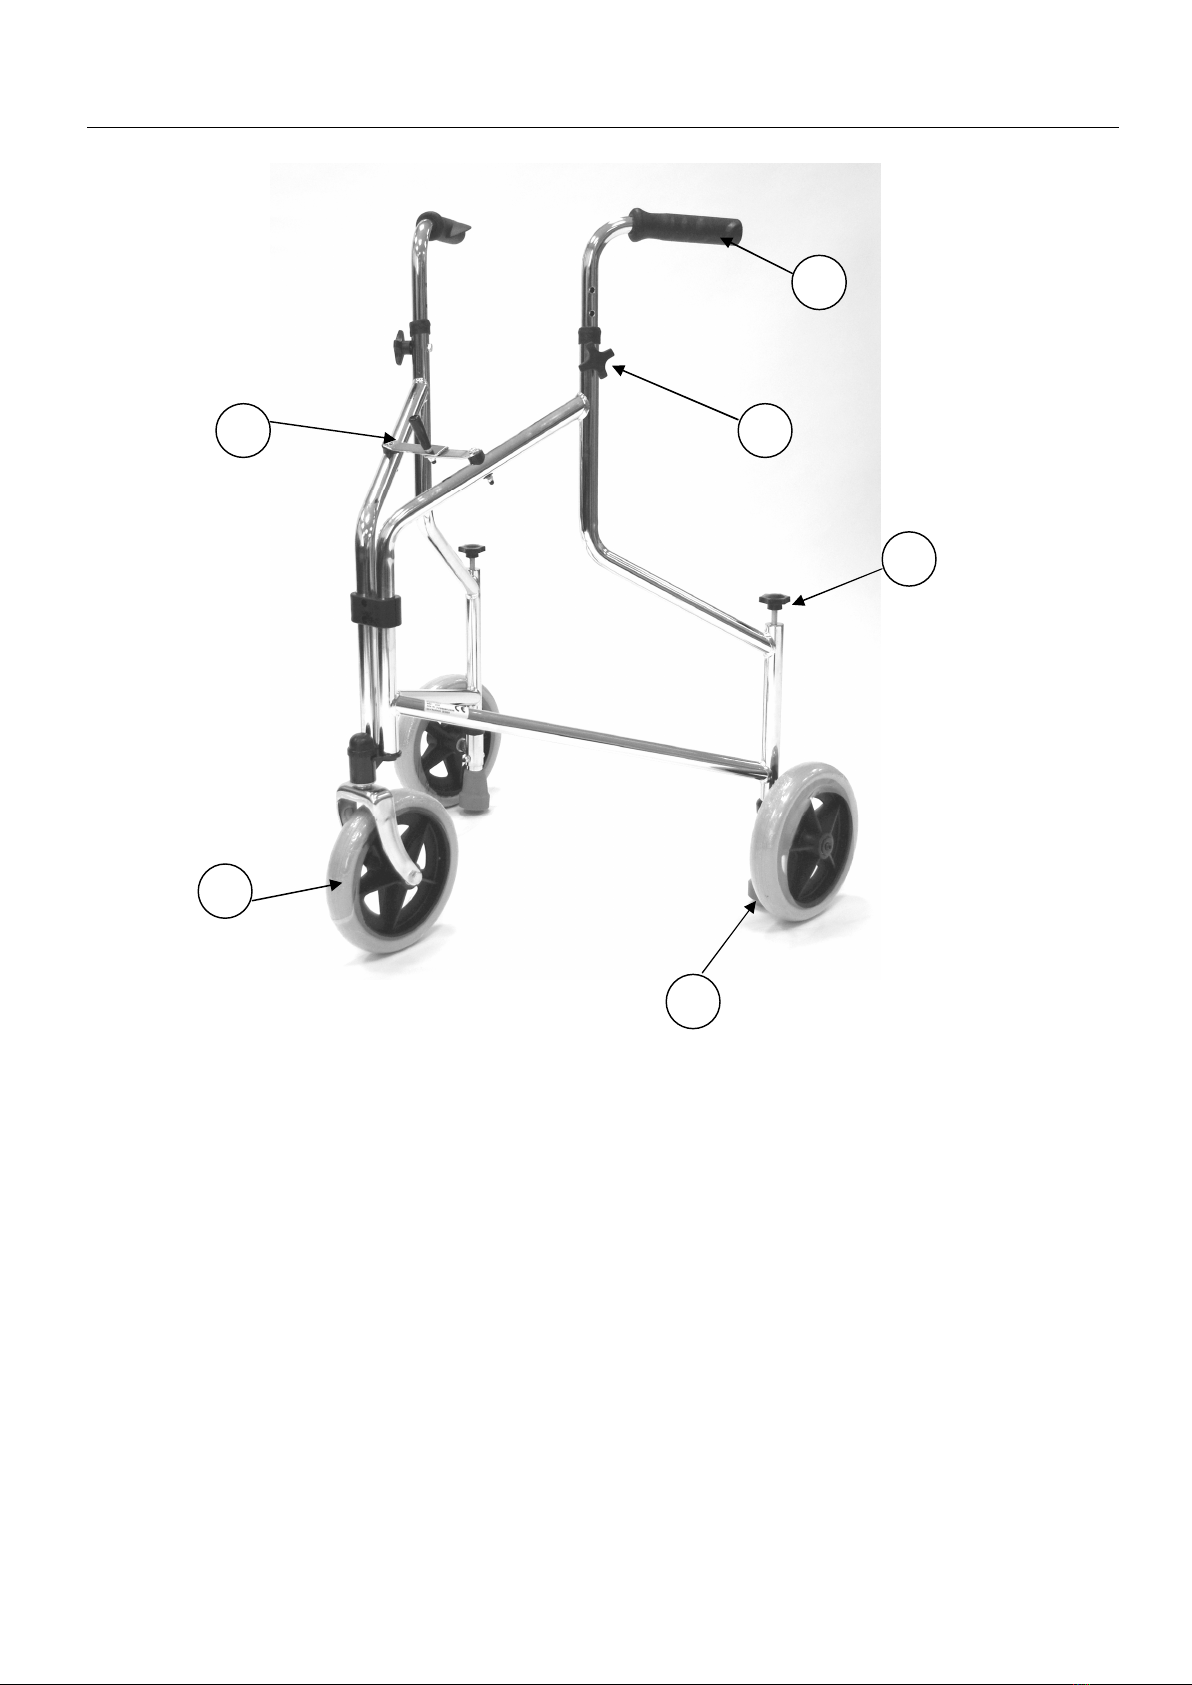
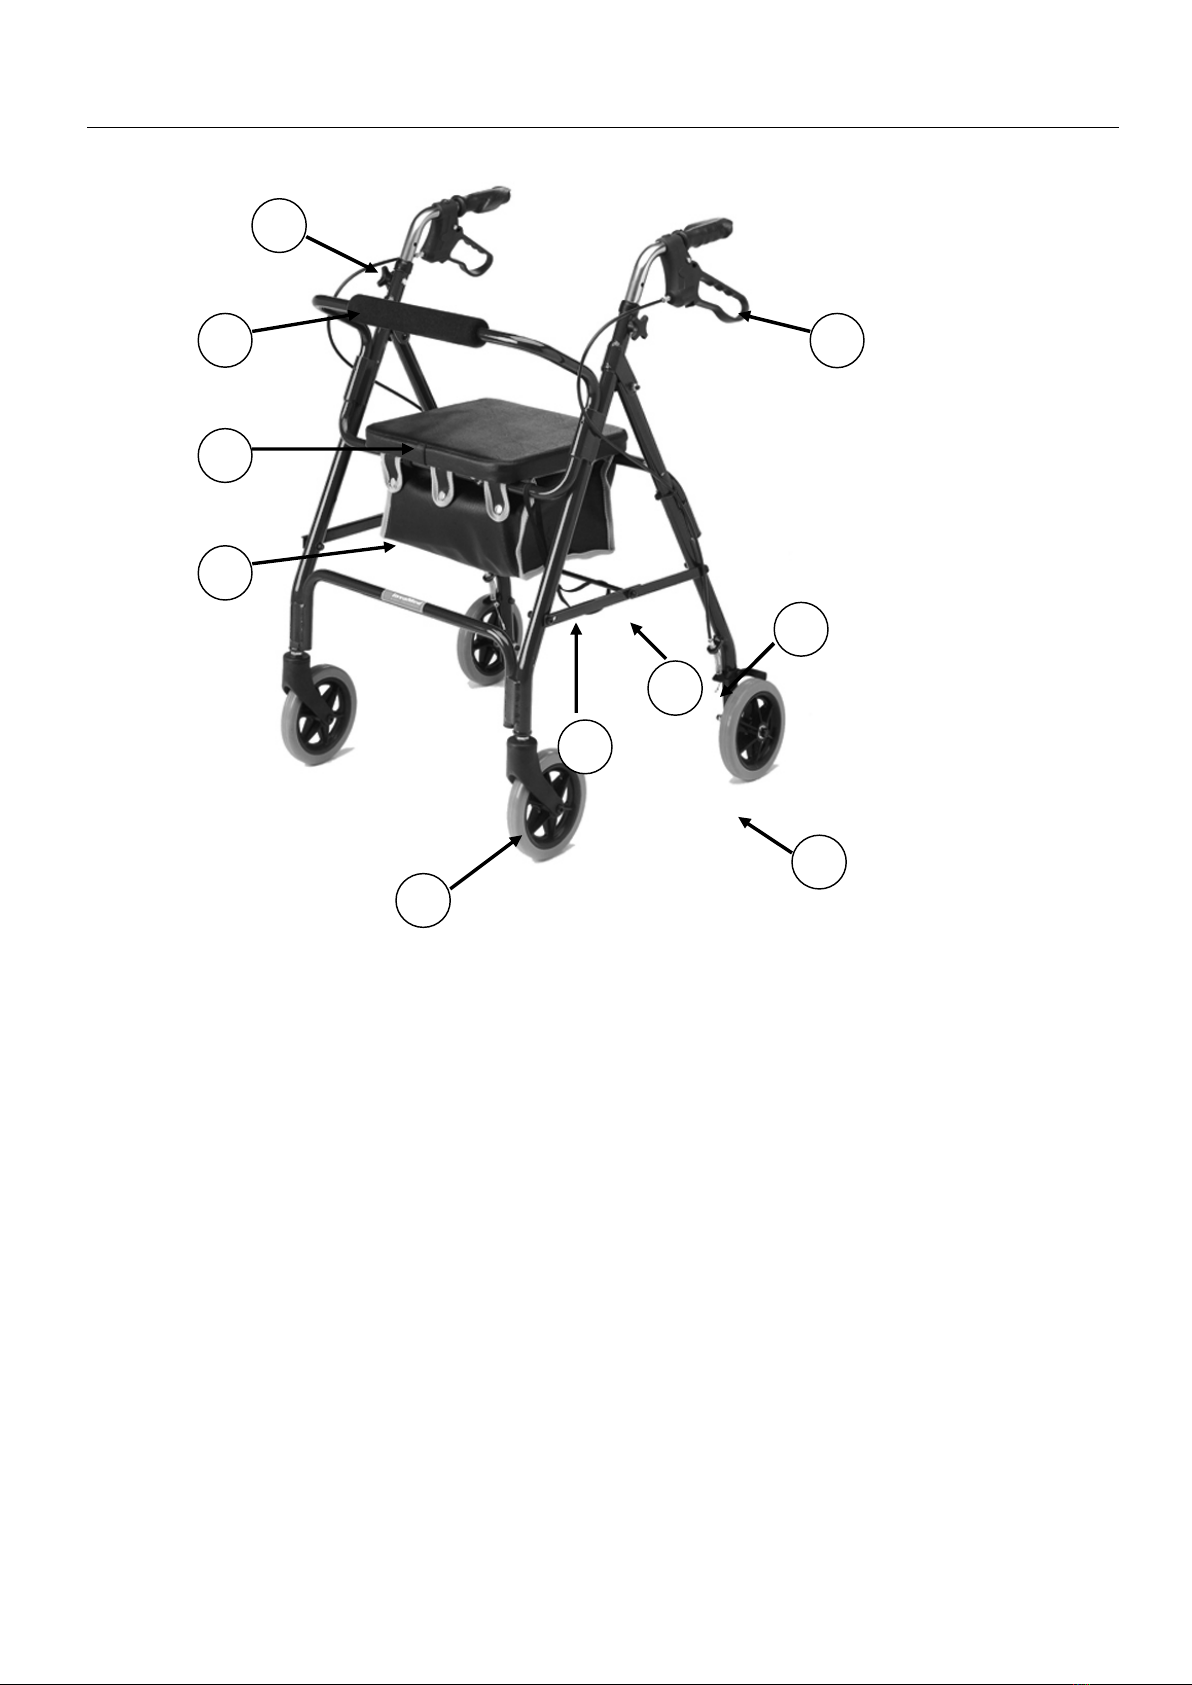
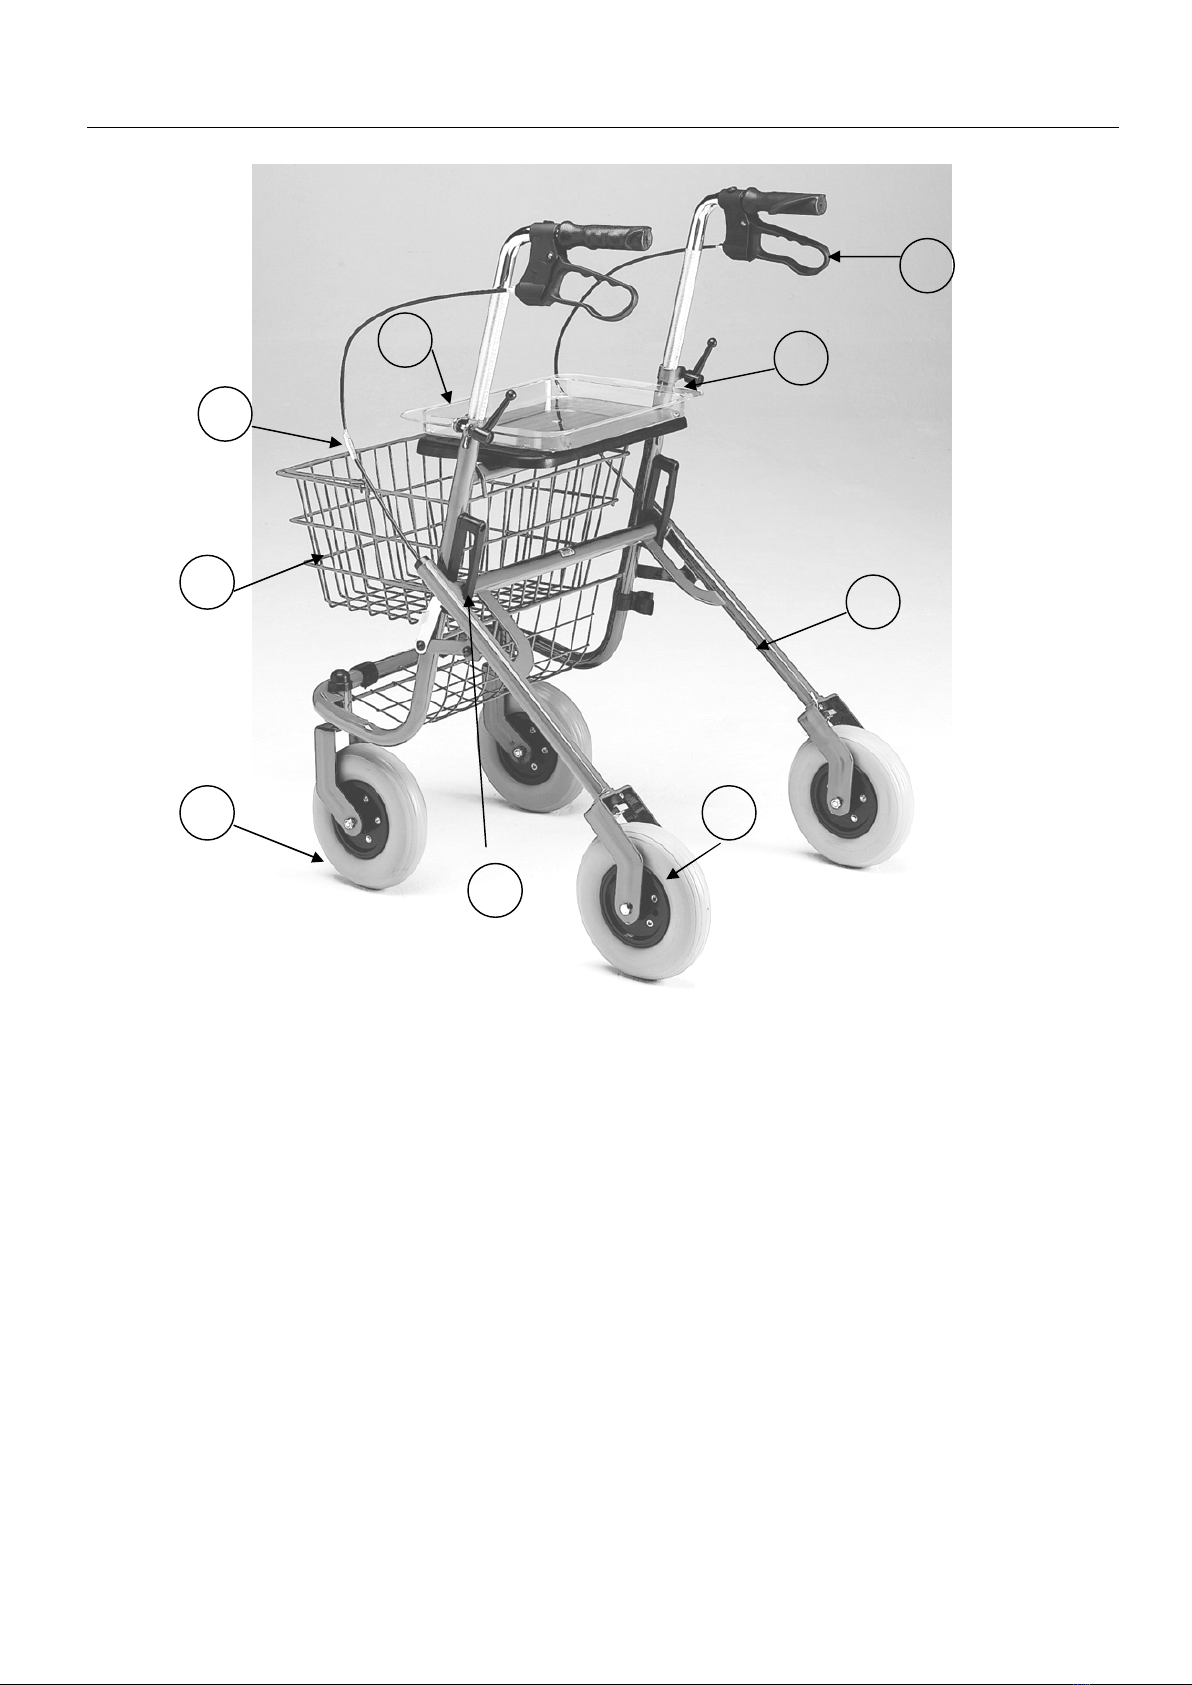
Congratulations on your purchase of the Roma medical three or four
wheeled rollator. These range of walkers are manufactured from high
quality materials and may include a seat, small bag and locking brakes.
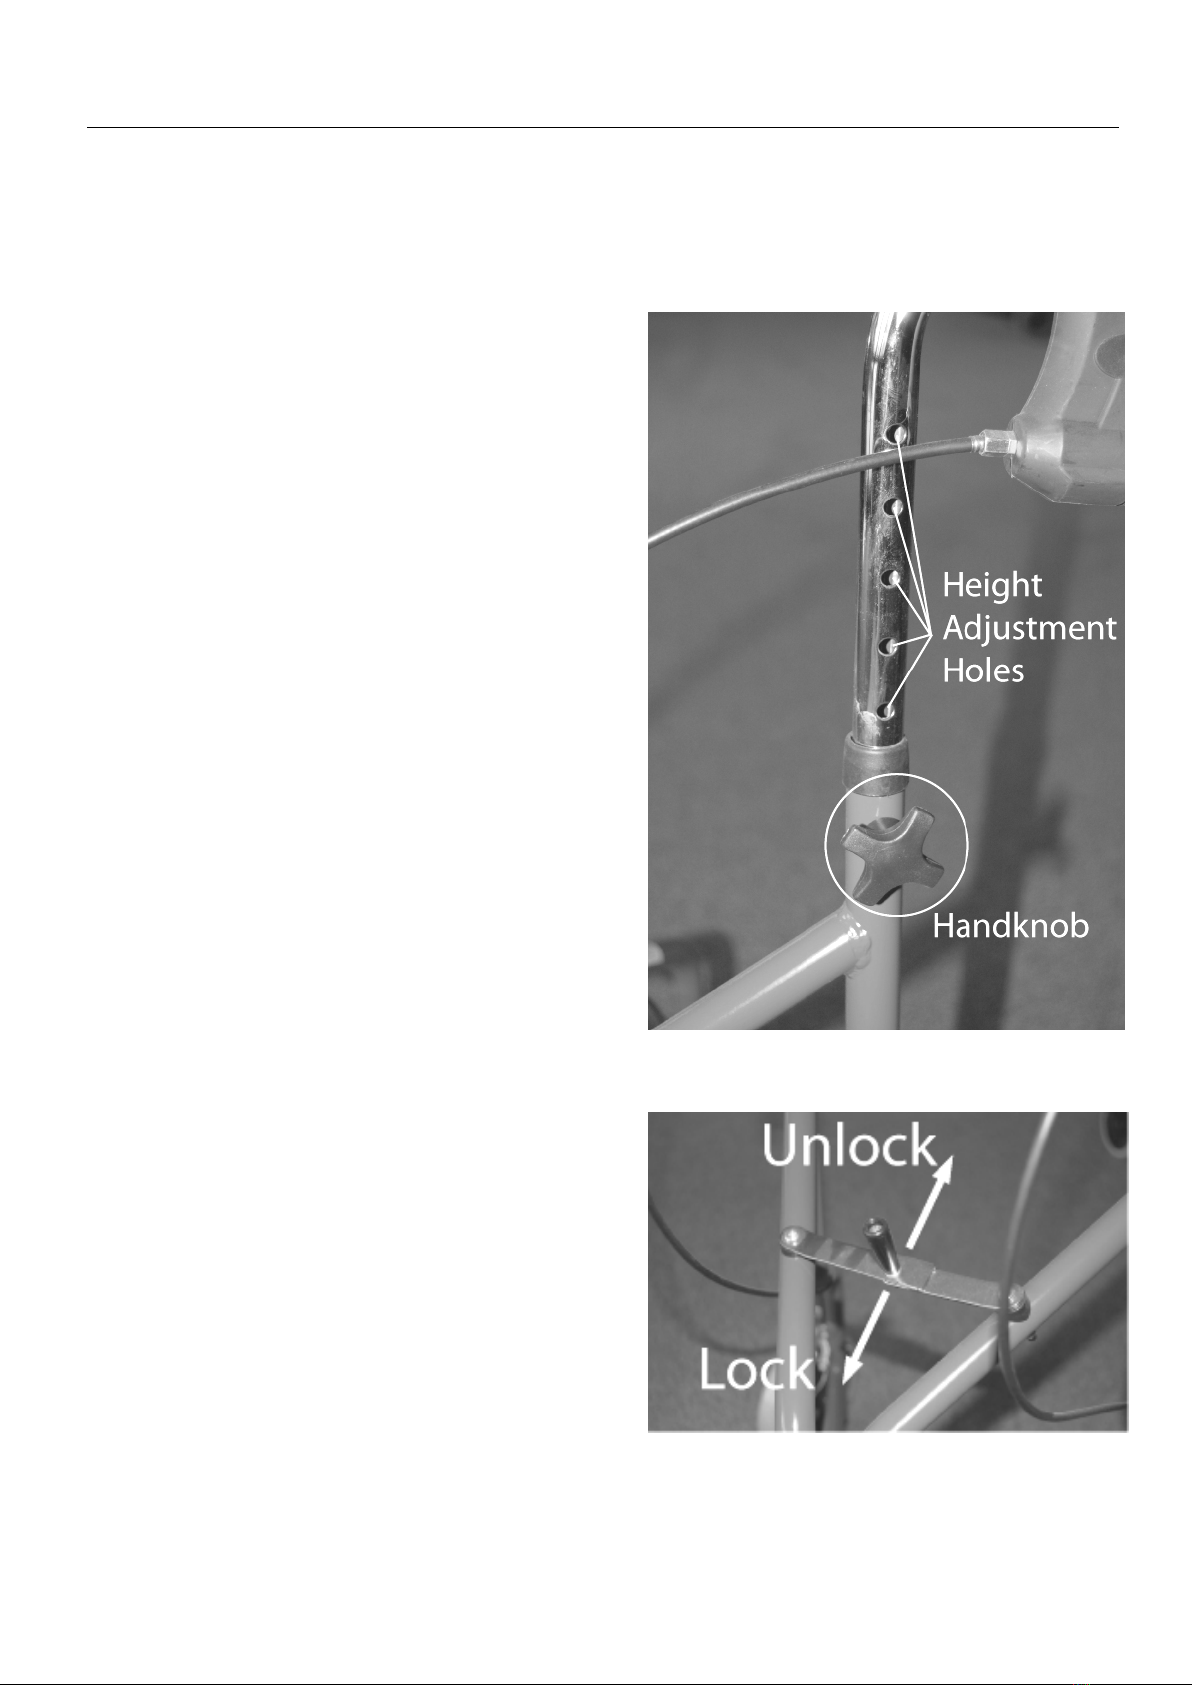
The handles are adjustable in height and the rollator folds easily for
transport or storage.
INTENDED USE
Designed to assist the user to walk, rest (certain models) and carry small
items of shopping for both indoor and outdoor use on flat surfaces by a
single individual with limited mobility with a maximum weight as shown
below.
The intended user should possess the necessary physical, visual and
cognitive skills to operate the rollator safely. If you have any doubt, please
consult your dealer/prescriber.
It is important that the user reads and understands the safety advice given
within this manual before attempting to operate the product to avoid
possible injury to the user or bystanders and avoid damage to the rollator
or surrounding property.
Technical Specifications
Class 1 Medical Device
Model No.
Wheels
Handle
Height Width Depth Weight Max. User
Weight
Seat
Height
Seat
Width
Seat
Depth
2320 3 86-99cm 66cm 60cm 5kgs 127kgs NA NA NA
2330 3 86-99cm 66cm 58cm 5.7kgs 127kgs NA NA NA
2340 3 86-99cm 64cm 59cm 4kgs 127kgs NA NA NA
2462 4 81-92cm 60cm 60cm 6.5kgs 120kgs 55cm 31cm 32cm
2463 4 81-92cm 63cm 64cm 7kgs 120kgs 55cm 31cm 32cm
2410 4 79-98cm 58cm 70cm 9kgs 130kgs 61cm 38cm 21cm
2470 4 76-81cm 60cm 60cm 8kgs 127kgs 52cm 30cm 31cm
2467 4 78-91cm 67cm 71cm 16kgs 182kgs 53cm 52cm 28cm

FEATURE GUIDE (3 Wheel Model – 2320)
1. Loop brake lever
2. Brake cable adjustment
3. 20cm / 8” wheels
4. Swivel front castor
5. Folding hinge assembly
6. Handle height adjustment hand knob
1
2
3
4
5
6

FEATURE GUIDE (3 Wheel Model – 2330)
1. Adjustable height push handles
2. Handle height adjustment hand knob
3. Brake tension adjustment
4. 20cm / 8” wheels
5. Swivel front castor
6. Folding hinge assembly
1
2
5
3
4
6

FEATURE GUIDE (4 Wheel Model – 2462 / 3 / 7 / 2470)
1. Loop brake lever
2. Brake cable adjustment
3. 20cm / 8” wheels
4. Swivel front castors
5. Folding hinge assembly
6. Folding ‘pull’ strap
7. Handy storage bag
8. Padded seat
9. Backrest
10. Handle height adjustment hand knob
1
2
3
4
5
6
7
8
9
10

FEATURE GUIDE (4 Wheel Model – 2410)
1. Loop brake lever
2. Handle height adjustment handknob
3. Rear frame assembly
4. 20cm / 8” wheels
5. Release / unlock lever
6. Swivel front castors
7. Removeable basket
8. Brake cable adjustment
9. Detachable plastic tray
1
2
3
6
5
4
7
8
9

SAFETY ADVICE
This rollator is designed to be used as a mobility aid, creating a natural gate
as the user walks securely with their primary weight between the
handlebars with the unit in front of the user.
DO:
Read this manual carefully before using your rollator
Always ensure the brakes are in the locked position if the rollator is left
unattended
Check all castors and wheels are secure before use
Check the brakes are functioning properly
Check handle height adjustment hand knobs are secure before use
Check the rollator is fully unfolded
Take care when carrying the rollator when folded. Keep your hands
away from the folding mechanism to prevent any risk of pinching.
DO NOT:
Use the rollator as an aid to transport persons, it is not designed as a
wheelchair
Sit on the rollator if the brakes are not locked, this could cause the
rollator to move resulting in injury to the user or other persons
‘Drop’ into the seat of the rollator. Always sit into the rollator in a
smooth, controlled motion. Seek assistance if necessary
Hang objects on the brake levers or handgrips. This could affect brake
operation and/or stability of the rollator
Every care has been taken to ensure that your rollator will give you safe,
reliable service provided you adhere to the advice given above.

ASSEMBLY (3 Wheel Models)
Remove all packaging, ensuring wheels and tyres are free from the
protective wrapping.
Fit handles as described below ensuring they are at the same height.
Remove all outer packing from
handles.
Insert the handles in the down tubes of
the main frame to the height required.
The brake handle should be the same
side as the brake it operates.
Fit the height setting screw through the
hole in the handle and the down tube
frame.
Screw head should be located on the
inside of the frame and located in the
formed section of the tube.
The hand knobs can be screwed up,
tightening the handle in place. (Hand
knobs are packed in the seat)
Fully tighten the hand knob, which
should be located on the outside of the
frame.
Repeat the process for the other side.
Note: Both handles should be set at the
same height.
Use the push handles to open the
rollator and push the locking lever fully
forward to lock it open.

ASSEMBLY (4 Wheel Models – not 2410)
Remove all packaging, ensuring wheels and tyres are free from the
protective wrapping.
Fit handles as described previously ensuring they are at the same height.
Fit the backrest by
depressing the spring
release buttons and
push the tubes of the
backrest into the
locating holes on the
frame.
The spring buttons will
locate as shown
opposite, showing the
backrest tube is
correctly located.
OPENING & FOLDING
Push the folding hinge
until straight to secure
the unit in the proper
open position.
To fold the rollator
simply pull up the
folding ‘pull’ strap as
in the feature guide
image. The bag stays
in position and does
not have to be
removed.

MODEL 2410 ASSEMBLY, OPENING & FOLDING
Remove all packaging and take care not to discard the handknobs and
bolts for the push handles. It is easier to fit the handles after the rollator has
been opened.
Open the rollator by
holding the seat pad and
gently pulling the rear
frame backwards. The rear
frame should locate behind
the locking lever as shown
in the image.
Insert the push handles into
the frame and fit the coach
bolt, washer and handknob
as shown in the image.
Tighten the handknob to fix
the push handle at the
desired height. Repeat this
process for the other side
ensuring the handles are at
the same height.
To close the rollator press
the lever ‘1’ as shown
opposite and gently lift the
top of the rear frame. The
rollator should now easily
fold together. Take care not
to pinch fingers in the
folding mechanism.

BRAKE OPERATION & ADJUSTMENT
1 - Pull up on brake handle lever to slow the rollator.
2 - Push down on brake handle lever to lock the rear wheels, pull up on the
brake lever handle to release the lock.
Brakes must be applied in the lock position when the seat is going to be
used, pre check the lock by pushing forward on the rollator.
Brake adjustment is carried out as follows:-
All models can be adjusted
at the brake handle itself
(NOT 2330). Turn the
adjuster screw anti-
clockwise to increase the
tension then lock the
adjustment by turning the
locking nut clockwise whilst
holding the adjuster screw
stationary.
Models 2320, 2340, 2462 & 2463
These models have further
adjustment at the brake as
shown opposite. Turn the
adjuster screw anti-
clockwise to increase the
tension in the cable then
lock the adjustment by
turning the locking nut
clockwise whilst holding
the adjuster screw
stationary.

Continued…..
To achieve the
correct setting the
brake shoe should be
set at a gap of
approximately 2-3mm
from the wheel (a 10p
coin can be used as
shown in the image).
Model 2330
Rollator model 2330 uses a push down
type brake where the user physically
pushes down the rear of the frame to stop
the rollator.
The force required to push down the rear
frame can be adjusted by the brake
tension adjuster as shown opposite.
Turning this clockwise will increase the
force required, turning anti-clockwise will
decrease the force required.
Model 2467
This model also has further
adjustment at the brake as
shown opposite. Turn the
adjuster screw anti-
clockwise to increase the
tension in the cable then
lock the adjustment by
turning the locking nut
clockwise whilst holding
the adjuster screw
staionary.
Brake adjustment reduced to allow light pressure may be ineffective on the
brake in the locked position.

MAINTENANCE
Over a period of time the brake cables may stretch, and if no further
adjustments can be made the cables should be replaced. Seek the help of
your dealer when replacing brake cables.
The castors should be checked that they are secure each time before using
the rollator. Also, check the brakes operate correctly and the handles and
hand knobs are secure.
All visible nuts, bolts and screws should be regularly checked to ensure
tightness.
Should any part of the rollator appear loose or insecure discontinue use
until it is inspected by an authorised dealer.
CLEANING
Your rollator can be cleaned with a damp cloth or sponge and warm soapy
water. Domestic anti-bacterial surface cleaners may be used if required.
Care should be taken not to leave any cleaning residues on the handgrips
or seat (where fitted) which may leave them slippery when used.
Do not use scouring pads or scrapers as this may damage surface
coatings.

Notes

WARRANTY TERMS AND CONDITIONS
Standard Terms
This is to certify that your RMA product is guaranteed for a period of one year from the
date of purchase. The warranty is not transferable.
Service / Warranty is the responsibility of the Dealer from where the product was
originally purchased.
The manufacturer will not accept liability for damage caused by any misuse,
unauthorised alterations or non-observance of the instructions set out in this user
manual.
The guarantee excludes parts, which have been subjected to natural wear and tear
during this period (Tyres and plastic parts).
Model No:……………………………
Serial No:…………………………….
Purchase Date:……………………..
Roma Medical Aids Ltd.
York Road,
Bridgend Industrial Estate,
Bridgend.
CF31 3TB
Tel: 01656 674488 Fax: 01656 674499
Email: sales@romamedical.co.uk
www.romamedical.co.uk
KB&S17230
Dealer’s Stamp
This manual suits for next models
7
Table of contents
Other Roma Medical Mobility Aid manuals