manuals.online logo
Brands
  1. Home
  2. •
  3. Brands
  4. •
  5. Romina
  6. •
  7. Indoor Furnishing
  8. •
  9. Romina 315 TF User manual

Romina 315 TF User manual

ASSEMBLY INSTRUCTIONS
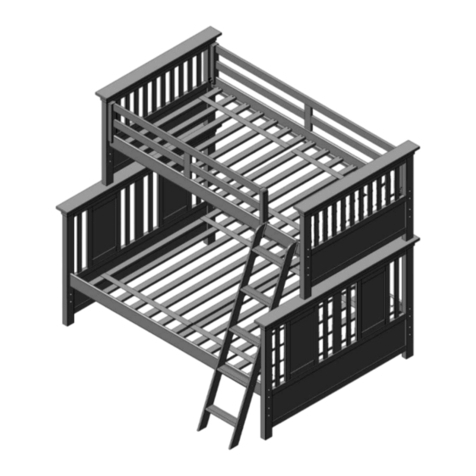
FOR 315 TF & 315 TT BELLAIR BUNK BEDS
NOTE: THE STYLE OF
YOUR BEDS OR OF YOUR
GUARDRAILS MAY VARY
FROM WHAT IS PICTURED
IN THE INSTRUCTION
SHEET. UNDER
BED TRUNDLE IS SOLD
SEPARATELY.
20 Corporation Row, Edison, NJ 088 7
Phone
1
(718) 478 5100, Fax (718) 478 5117
www.rominafurniture.com
Furniture
IMPORTANT:
PLEASE, READ ALL INSTRUCTIONS BEFORE ASSEMBLING!
PLEASE, SAVE INSTRUCTIONS FOR FUTURE USE
WARNING!
TO HELP PREVENT SERIOUS OR FATAL INJURIES FROM ENTRAPMENT OR FALLS:
§
§
§
§
§
§
§
§
§
§
§
§
§
§
§
§
§
§
USE ONLY A TWIN SIZE MATTRESS ON UPPER BUNK, WITH A THICKNESS NOT EXCEEDING 8
1/4 IN.
ALWAYS USE GUARDRAILS ON BOTH LONG SIDES OF UPPER BUNK.
ALWAYS USE LADDER FOR ENTERING AND LEAVING UPPER BUNK.
NEVER ALLOW A CHILD UNDER 6 YEARS ON UPPER BUNK.
PROHIBIT HORSEPLAY AND JUMPING ON OR UNDER BED(S).
PROHIBIT MORE THAN ONE PERSON ON UPPER BUNK.
PERIODICALLY CHECK AND ENSURE THAT THE GUARDRAILS, LADDER AND OTHER
COMPONENTS ARE IN THEIR PROPER POSITION, FREE FROM DAMAGE, AND THAT ALL
CONNECTIONS ARE TIGHT.
DO NOT SUBSTITUTE PARTS. PLEASE, CONTACT ROMINA FURNITURE DEALERS FOR
REPLACEMENT PARTS.
THE USE OF A NIGHT-LIGHT MAY PROVIDE ADDED SAFETY PRECAUTION FOR A CHILD
USING THE UPPER BUNK.
THE USE OF WATER OR SLEEP FLOTATION MATTRESSES IS PROHIBITED.
PACKAGING MATERIAL, SMALL PARTS & PLASTIC BAGS ARE HAZARDOUS TO SMALL
CHILDREN. PLEASE DISPOSE OF THEM IMMEDIATELY!
SURFACE OF MATTRESS MUST BE AT LEAST 5 IN. (127MM) BELOW THE UPPER EDGE OF
GUARDRAILS.
DO NOT USE THE UPPER BUNK IF THE GUARDRAILS AND THE LADDER ARE NOT PROPERLY
ATTACHED AND FIXED IN THEIR PLACES.
IF THE BUNK BED WILL BE PLACED NEXT TO A WALL, THE GUARDRAIL THAT RUNS THE FULL
LENGHT OF THE BED SHOULD BE PLACED AGAINST THE WALL TO PREVENT ENTRAPMENT
BETWEEN THE BED AND THE WALL.
REPLACEMENT PARTS, INCLUDING ADDITIONAL GUARDRAILS, MAY BE OBTAINED FROM ANY
OF ROMINA FURNITURE DEALERS (SEE WWW.ROMINAFURNITURE.COM FOR DEALERS LIST)
FOLLOW THE INFORMATION ON THE WARNINGS APPEARING ON THE UPPER BUNK END
STRUCTURE AND ON THE CARTON. DO NOT REMOVE WARNING LABEL FROM BED.
ALWAYS USE THE RECOMMENDED SIZE MATTRESS TO HELP PREVENT THE LIKELIHOOD OF
ENTRAPMENT OR FALLS.
- NEVER ATTACH OR HANG ITEMS TO ANY PART OF THE BUNK BED
THAT ARE NOT DESIGNED FOR USE WITH THE BED; FOR EXAMPLE, BUT NOT LIMITED TO,
HOOKS, BELTS AND JUMP ROPES.
STRANGULATION HAZARD
KEEP THESE INSTRUCTIONS FOR FUTURE REFERENCE!
Please locate and confirm
you have the following parts:
A. larger end panels = 2
B. smaller end panels = 2
C. long bed rails = 4
D. group of 7 support slats assembled with 2 textile
ribbons = 4
E. short guard rail = 1
F. long guard rail = 1
G. ladder stairs = 5
H. ladder rails = 2
One bag of hardware with the following:
1. Allen bolts (70mm - 2 3/4") = 16
2. barrel nuts = 16
3. wooden plugs = 32
4. wood screw (35mm - 1 3/8") = 16
5. steel pins = 4
6. ladder hooks = 2
7. wood screw (20mm - 3/4") = 6
8. wood screw (25mm - 1") = 8
9. Allen bolts (40mm - 1 9/16") = 10
10. Allen wrench = 1
Required tools:
CAUTION:
Allen wrench (supplied), Phillips
screwdriver, flat screwdriver, hammer
Do not use a power screwdriver which
can cause screws to break or strip
Place of the ( )
onto the wood brackets attached to the long
bed rails.
Make sure you firmly attach the support slats
to the wood brackets with of the longer
wood screws ( ) provided.
STEP 3
2D
8
4
groups of 7 support slats
Use a Phillips
screwdriver to firmly tighten the screws.
Make sure the slats are spaced
between the bed ends!
EVENLY
STEP 1
Assemble the bottom bed first using larger
end panels ( ) and long bed rails ( ).
Attach the long bed rails to the end pieces
using long Allen bolts ( ) and barrel nuts
().
You must use the two upper holes on each
side of the larger panels.
2
A2 C
818
2
STEP 2
Align the straight slots in the head of the
barrel nuts horizontally, so the threads in the
bolt will insert in the barrel nut. You can
adjust the position of the barrel nut with a
flat head screwdriver (not supplied) or a
coin.
Push the Alen bolt through the end panel
and into the long bed rail. Start the threads
by hand to assure you don't strip the
threads.
Tighten all bolts with the supplied Allen
wrench.
8
Gently tap of the wooden plugs
( ) in the holes to hide the screw heads.
16
3
Fasteners shown
in full size
A
A
C
C
D
1
1
1
2
2
4
4
4
4
4
1
2
3
4
5
6
8
9
10
7
IF THE BUNK BED WILL BE PLACED
NEXT TO A WALL, THE LONGER
GUARDRAIL SHOULD BE PLACED
AGAINST THE WALL TO PREVENT
ENTRAPMENT BETWEEN THE BED AND
THE WALL.
SAFETY WARNING!
STEP 4
45Place the steel pins ( ) in the holes
provided in the top of each larger end panel.
Stack the smaller end panels on the top of
larger end panels by inserting the pins into
the holes on the bottom of the smaller end
panel (use hammer if required).
STEP 5
1 2 3
1 2
3
Assemble the upper bunk using the long bed
rails, hardware and groups of 7
support slats as in steps , and
above.
If you have a helper, it may be easier to
preassemble the upper bunk as in steps ,
and above. Then stack the entire upper
bunk assembly on the lower bunk making
sure the pins insert completely and the end
pieces contact each other.
2
D
of the
()
described
STEP 6
EVENLY
8
8
Install the guardrails on the upper bunk side
rails. Make sure the longer guardrail is
spaced between the bed ends and
the shorter guardrail is fixed against one of
the upper bunk end panels, leaving room for
the ladder in the desired side of the bed.
Secure the guardrails with wood screws
( ). Use a Phillips screwdriver to firmly
tighten the screws.
B
5
B
5
STEP 9
WARNING!
8 1/4"
5"
Place your mattress on the slats.
For maximum occupant safety
on the upper bed use only a twin size
mattress. Ensure thickness of mattress does
not exceed . Make sure the surface of
the upper bed mattress is at least below
the upper edge of the guardrails.
STEP 8
26
C2 7
Attach the ladder at the desired end of the
bed. Fasten the ladder hooks ( ) to the
upper bed rail ( ) with wood screws ( ).
Completely tighten with a Phillips
screwdriver.
STEP 7
9
10
6
47
Assemble the ladder stairs with ladder rails
using the shorter Allen bolts ( ) and Allen
wrench ( ). The rounded side of the ladder
stair must be outside.
Fasten the two ladder hooks ( ) to the
ladder using wood screws ( ). Completely
tighten with a Phillips screwdriver.
HH
G
9
9
9
9
9
7
9
rounded side outside
Regular cleaning with mild soap on a soft cloth, followed by a clean damp
cloth, then a dry cloth, will preserve the original luster and beauty of the
fine finish of your Romina Furniture product.
Visit
for updates, special offers and more new designs.
www.rominafurniture.com
Team
Thank you for being one of our distinguished clients.

This manual suits for next models

1

Other Romina Indoor Furnishing manuals
Romina 2501 CONVERTIBLE CRIB User manual

Romina

Romina 2501 CONVERTIBLE CRIB User manual

Romina 7515 User manual

Romina

Romina 7515 User manual

Romina CHANGING TABLE User manual

Romina

Romina CHANGING TABLE User manual

Romina 5019 User manual

Romina

Romina 5019 User manual

Romina TUFTED PANEL 4000 User manual

Romina

Romina TUFTED PANEL 4000 User manual

Romina 6530 User manual

Romina

Romina 6530 User manual

Romina 4019 User manual

Romina

Romina 4019 User manual

Romina 15503 UPTOWN User manual

Romina

Romina 15503 UPTOWN User manual

Romina 3530 User manual

Romina

Romina 3530 User manual

Romina KARISMA 5501 User manual

Romina

Romina KARISMA 5501 User manual

Romina 4515 User manual

Romina

Romina 4515 User manual

Romina 6515 User manual

Romina

Romina 6515 User manual

Romina 6019 User manual

Romina

Romina 6019 User manual

Romina 2515 User manual

Romina

Romina 2515 User manual

Romina 8515 User manual

Romina

Romina 8515 User manual

Romina DB 9510 User manual

Romina

Romina DB 9510 User manual

Romina 3515 User manual

Romina

Romina 3515 User manual

Romina 5515 TT User manual

Romina

Romina 5515 TT User manual

Romina 11515 User manual

Romina

Romina 11515 User manual

Popular Indoor Furnishing manuals by other brands

J.Burrows JBDRAFFABK Assembly instructions

J.Burrows

J.Burrows JBDRAFFABK Assembly instructions

Living Spaces SEDONA 7030-00395 KIT manual

Living Spaces

Living Spaces SEDONA 7030-00395 KIT manual

RSI Estate CLCRK27SW Assembly/installation instructions

RSI

RSI Estate CLCRK27SW Assembly/installation instructions

Costway CB10185 user manual

Costway

Costway CB10185 user manual

Sauder Harvest Mill 404962 Assembly instructions

Sauder

Sauder Harvest Mill 404962 Assembly instructions

DHP 2079009W manual

DHP

DHP 2079009W manual

FREEWAY Agile installation guide

FREEWAY

FREEWAY Agile installation guide

Wholesale Interiors BBT 1050 TALLBOY Assembly instructions

Wholesale Interiors

Wholesale Interiors BBT 1050 TALLBOY Assembly instructions

Lefroy Brooks FLEETWOOD M2-5470 installation instructions

Lefroy Brooks

Lefroy Brooks FLEETWOOD M2-5470 installation instructions

Multistore MAXI ULTRA-315C Assembly instructions

Multistore

Multistore MAXI ULTRA-315C Assembly instructions

StyleWell 1004123174 Use and care guide

StyleWell

StyleWell 1004123174 Use and care guide

Article JORRING Assembly instructions

Article

Article JORRING Assembly instructions

Martha Stewart CALIFORNIA CLOSETS SHOE SHELF 14" DEEP installation manual

Martha Stewart

Martha Stewart CALIFORNIA CLOSETS SHOE SHELF 14" DEEP installation manual

Cherryman ZET106 Assembly instructions

Cherryman

Cherryman ZET106 Assembly instructions

Seville Classics AIRLIFT XL OFF65800 manual

Seville Classics

Seville Classics AIRLIFT XL OFF65800 manual

Middle Atlantic Products C5 SERIES CREDENZA RACK instruction sheet

Middle Atlantic Products

Middle Atlantic Products C5 SERIES CREDENZA RACK instruction sheet

Demco Whitney Brothers WB0899 quick start guide

Demco

Demco Whitney Brothers WB0899 quick start guide

Artesano 24801 Assembling instructions

Artesano

Artesano 24801 Assembling instructions

manuals.online logo
manuals.online logoBrands
  • About & Mission
  • Contact us
  • Privacy Policy
  • Terms and Conditions

Copyright 2025 Manuals.Online. All Rights Reserved.