manuals.online logo
Brands
  1. Home
  2. •
  3. Brands
  4. •
  5. Roper Rhodes
  6. •
  7. Accessories
  8. •
  9. Roper Rhodes TR9016 Installation instructions

Roper Rhodes TR9016 Installation instructions

TR9016
Touch Sensor Dual Flush Plate
Please read completely before commencing. Retain for future reference
Installation & Operation Instructions
Introduction
Battery Installation (Batteries not included)
Installation
This sensor flush plate is compatible with wall hung frame cisterns and In-wall cisterns from Roper Rhodes
Group.
For In-wall installation the front of frame to front of finished wall minimum depth should be 15.5mm.
If used with a furniture concealed cistern ensure a clearance of 105mm is left between the cistern and the
front of the furniture fascia surface to allow adequate installation.
1. Cut the protective casing of the in-wall cistern in-line with the
finished wall surface.
3. Remove the front fascia panel completely. Push the glass front to
the top and tilt the top towards you. Un-clip the glass fascia by
expanding the clip links and keep aside until installation is
completed. Remove the battery holder also to avoid damage.
Open the glass plate by pushing it towards the top and then tilting it
forwards. The clip chain will allow it to hang, make sure it’s secured
before dropping it.
2. Screw the fixing arms (supplied in the box) onto the cistern.
The rods may need cutting down depending on the thickness of the
finished wall/surface.
Good quality Alkaline batteries will last for approximately one year in
normal domestic conditions.
Once batteries are due to be replaced, a continuous alarm will be
heard for 10s, indicating that battery power is low and that they are
due to be changed. The LED lights will also flash.
Batteries are totally exhausted when the LED lights are continuously
flashing (twice per second). Please replace the batteries immediately.
A manual over-ride button is available if batteries are totally
exhausted.
Remove the battery holder and insert 4x AA batteries into the battery
compartment, noting the polarity on the battery holder. Slide back
into place and replace the glass fascia. The LEDs will Illuminate,
indicating that the flush plate is ready to be used.
minimum
15.5mm
Fixing Arms
Battery
Holder
Clip links
1
2
1
2
Specification
Operation
Full / Reduced Flush
Manual over-ride
TR9016
Touch Sensor Dual Flush Plate
Please read completely before commencing. Retain for future reference
Installation & Operation Instructions
Batteries: 4x AA (LR6) Alkaline Batteries (Not supplied)
Ingress Protection: IPX4
At the end of life, please dispose of batteries and unit where munici-
pal recycling facilities exist. Do not dispose of in the regular waste.
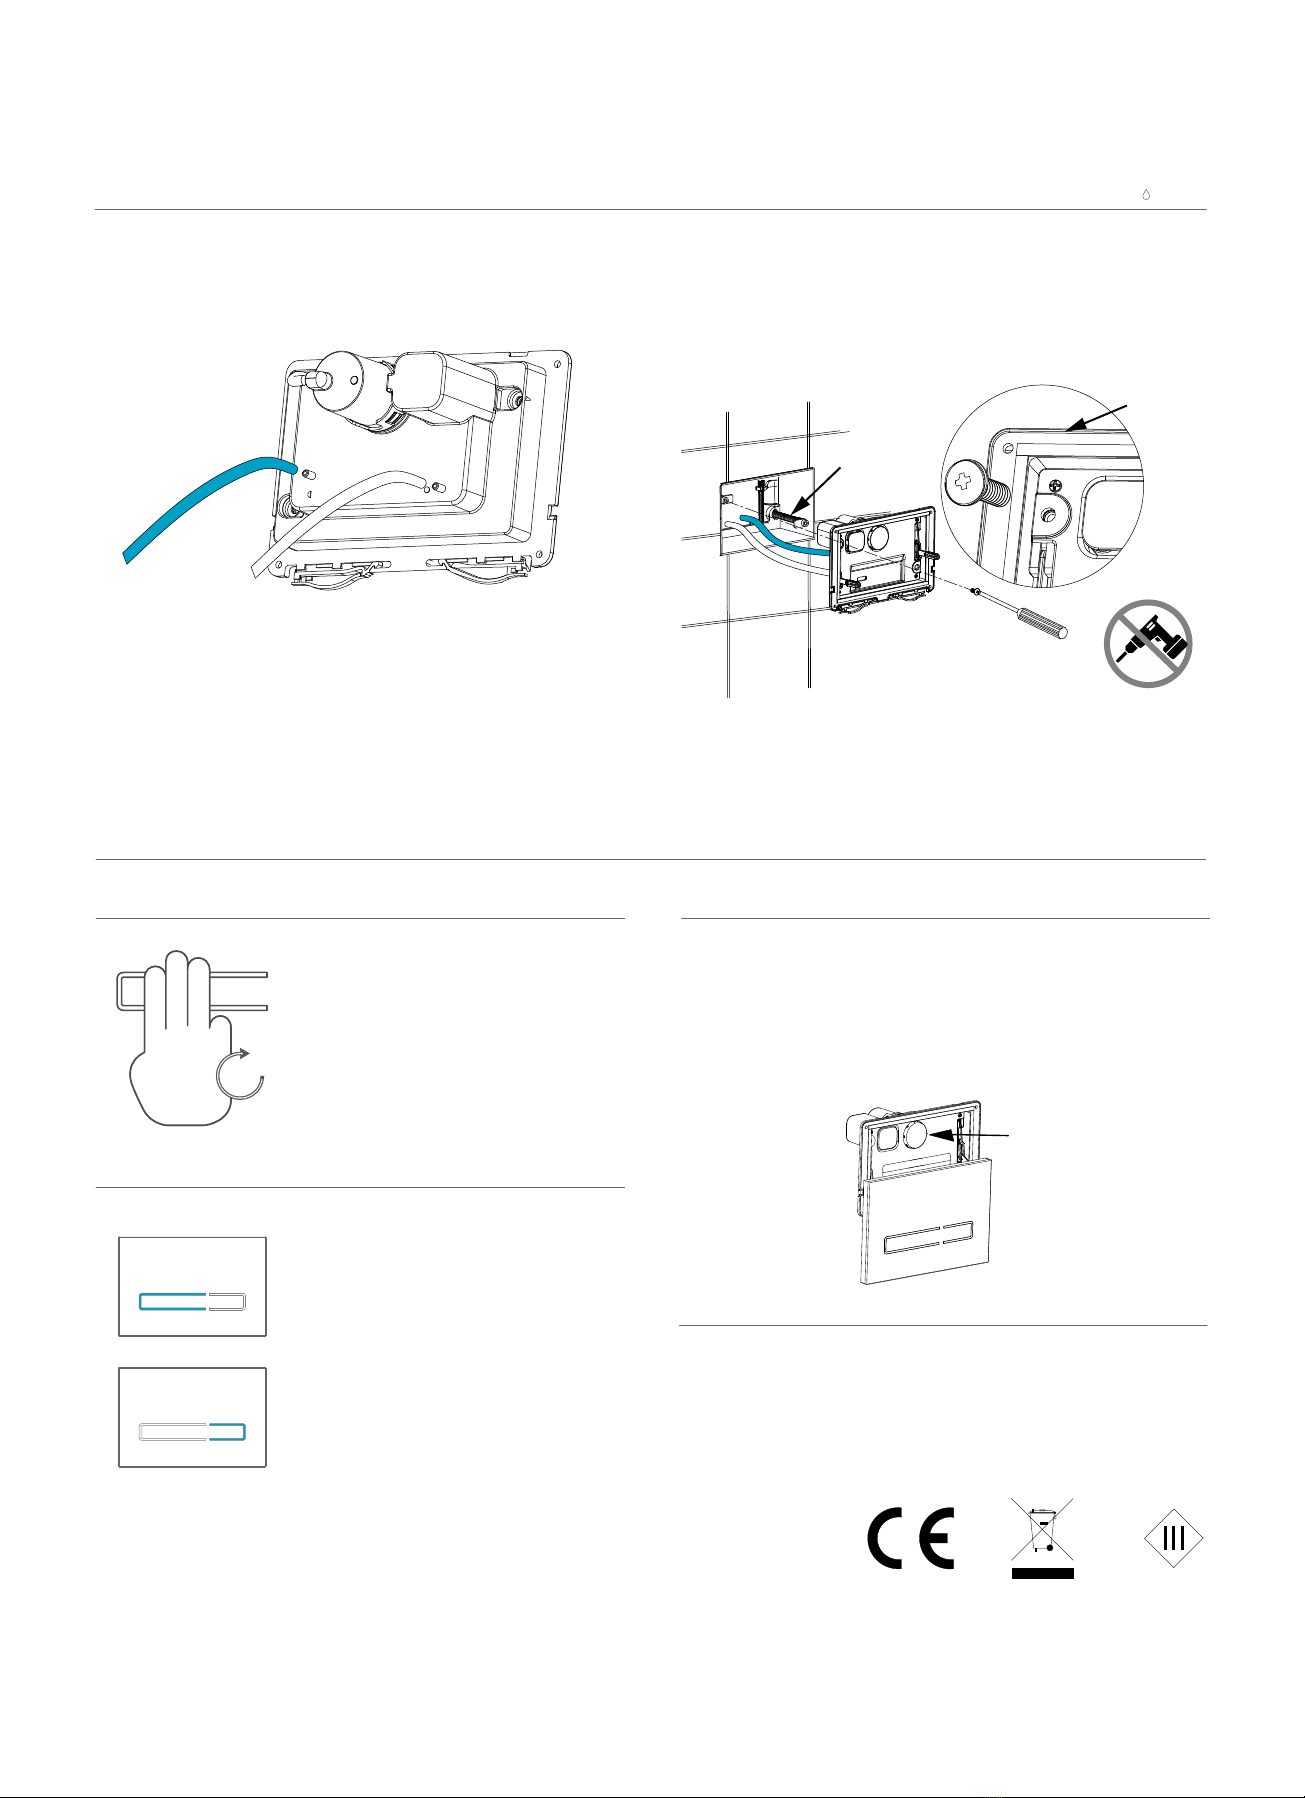
4. Connect the air hoses from the cistern to the flush plate as shown.
Attach the blue hose to the half moon symbol and the transparent
hose to the full moon symbol.
Full Flush: Touch the longer decal side
with three fingers for two seconds to
activate the flush. The LED lights will
Illuminate.
Reduced Flush: Touch the shorter decal
side with three fingers for two seconds to
activate the flush. The LED lights will
Illuminate.
Three Finger Activation: Use a minimum
of three fingers touching the sensor for
two seconds to activate.
If batteries are exhausted completely, the glass fascia can be
removed to reveal the manual flush button.
The manual over-ride is not intended as a long term solution. When
using the manual push button, un-plug the cable ribbon and take the
front glass fascia off the chain links. Keep safe to prevent damage.
Brought to you by the Roper Rhodes Group
Brassmill Lane Trading Estate
Bath
BA1 3JF
t: 01225 303900
5. Make sure the cistern is fully commissioned before mounting the
bracket in place.
Locate the mounting bracket onto the fixing arms and secure the top
left and bottom right corners with the screws provided and tighten
with a screwdriver. Be careful not to overtighten.
Re-connect the clip links and cable ribbon to the glass fascia and
insert the battery holder. Place the front glass plate and remove the
protective film prior to testing its functioning. Once correctly
attached the flush plate will illuminate for a couple of seconds.
Manual Flush
v4. 09.18
Fixing Arms
If the flush plate is touched for more than 5 seconds and still won’t
flush, please refer to the ‘Troubleshoot’ documnent.
2s
Mounting
bracket

Other Roper Rhodes Accessories manuals

Roper Rhodes TR9016 Installation instructions

Roper Rhodes

Roper Rhodes TR9016 Installation instructions

Roper Rhodes TR9016 Instruction Manual

Roper Rhodes

Roper Rhodes TR9016 Instruction Manual

Popular Accessories manuals by other brands

Leuze electronic LA-78M manual

Leuze electronic

Leuze electronic LA-78M manual

Bamboo Omni quick start guide

Bamboo

Bamboo Omni quick start guide

Metz Connect 1501103102-E quick start guide

Metz Connect

Metz Connect 1501103102-E quick start guide

Thermos Stainless King Big Boss Care and use guide

Thermos

Thermos Stainless King Big Boss Care and use guide

YOKOGAWA ISC40FF user manual

YOKOGAWA

YOKOGAWA ISC40FF user manual

Vuly Basketball hoop Assembly manual

Vuly

Vuly Basketball hoop Assembly manual

Omega Engineering DMD-480-S2 Series user manual

Omega Engineering

Omega Engineering DMD-480-S2 Series user manual

Dometic ACX3 Series Short Operating Manual

Dometic

Dometic ACX3 Series Short Operating Manual

SCS 8104-3600W quick start guide

SCS

SCS 8104-3600W quick start guide

Orno OR-CR-218 quick guide

Orno

Orno OR-CR-218 quick guide

Swegon Cooler Series Installation and maintenance instructions

Swegon

Swegon Cooler Series Installation and maintenance instructions

Walchem WDSW100 instruction manual

Walchem

Walchem WDSW100 instruction manual

Bartington Mag-13 Operation manual

Bartington

Bartington Mag-13 Operation manual

GP SafeGuard RF2.1 manual

GP

GP SafeGuard RF2.1 manual

Pepperl+Fuchs SU18 Series manual

Pepperl+Fuchs

Pepperl+Fuchs SU18 Series manual

Furuno PG-1000 Operator's manual

Furuno

Furuno PG-1000 Operator's manual

Fluigent NIFS user manual

Fluigent

Fluigent NIFS user manual

NeuLog NUL-214 Guide

NeuLog

NeuLog NUL-214 Guide

manuals.online logo
manuals.online logoBrands
  • About & Mission
  • Contact us
  • Privacy Policy
  • Terms and Conditions

Copyright 2025 Manuals.Online. All Rights Reserved.