manuals.online logo
Brands
  1. Home
  2. •
  3. Brands
  4. •
  5. Roper Rhodes
  6. •
  7. Accessories
  8. •
  9. Roper Rhodes TR9016 Installation instructions

Roper Rhodes TR9016 Installation instructions

TR9016
Dual Flush Sensor Flush Plate
Please read completely before commencing. Retain for future reference
Installation & Operation Instructions - For Domestic Use Only
Introduction
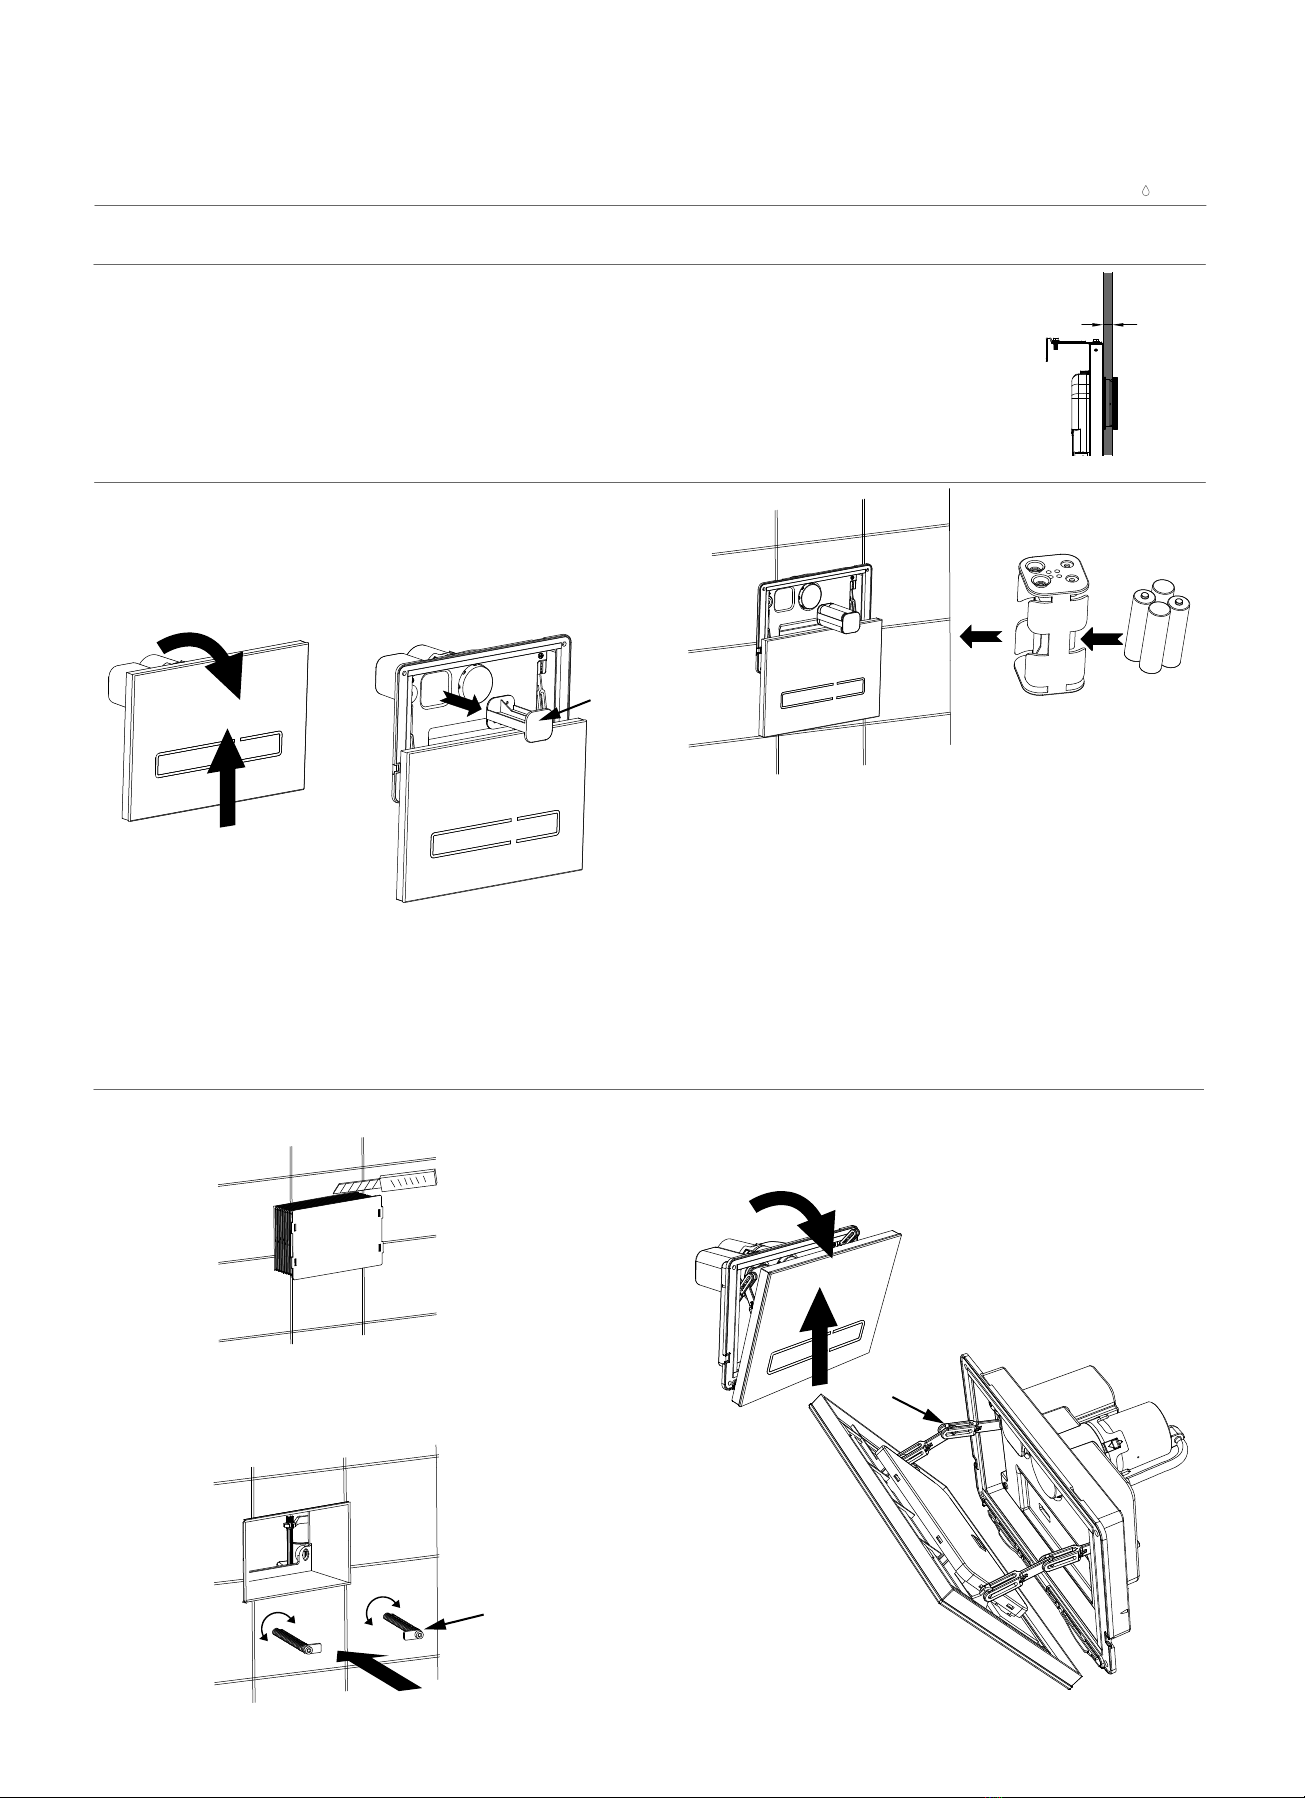
Battery Installation (Batteries not included)
Installation
This sensor ush plate is compatible with wall hung frame cisterns and In-wall cisterns from Roper Rhodes
Group.
For In-wall installation the front of frame to front of nished wall minimum depth should be 15.5mm.
If used with a furniture concealed cistern ensure a clearance of 105mm is left between the cistern and the front
of the furniture fascia surface to allow adequate installation.
1. Cut the protective casing of the in-wall cistern in-line with the
nished wall surface.
3. Remove the front fascia panel completely. Push the glass front to the
top and tilt the top towards you. Un-clip the glass fascia by expanding
the clip links and keep aside until installation is completed. Remove
the battery holder also to avoid damage.
Open the glass plate by pushing it towards the top and then tilting it
forwards. The clip chain will allow it to hang, make sure it’s secured
before dropping it.
2. Screw the xing arms (supplied in the box) onto the cistern.
The rods may need cutting down depending on the thickness of the
nished wall/surface.
Good quality Alkaline batteries will last for approximately one year in
normal domestic conditions.
Once batteries are due to be replaced, a continuous alarm will be heard
for 10s, indicating that battery power is low and that they are due to be
changed. The LED lights will also ash.
Batteries are totally exhausted when the LED lights are continuously
ashing (twice per second). Please replace the batteries immediately.
A manual over-ride button is available if batteries are totally exhausted.
Remove the battery holder and insert 4x AA batteries into the battery
compartment, noting the polarity on the battery holder. Slide back into
place and replace the glass fascia. The LEDs will Illuminate, indicating
that the ush plate is ready to be used.
minimum
15.5mm
Fixing Arms
Battery
Holder
Clip links
1
2
1
2
Specication
Operation
Manual over-ride
TR9016
Dual Flush Sensor Flush Plate
Please read completely before commencing. Retain for future reference
Installation & Operation Instructions - For Domestic Use Only
Batteries: 4x AA (LR6) Alkaline Batteries (Not supplied)
Ingress Protection: IPX4
At the end of life, please dispose of batteries and unit where municipal
recycling facilities exist. Do not dispose of in the regular waste.
This product is only suitable for domestic use.
4. Connect the air hoses from the cistern to the ush plate as shown.
Attach the blue hose to the half moon symbol and the transparent hose
to the full moon symbol.
Reduced Flush: Touch the shorter decal side with your hand to activate
the ush. The LED lights will Illuminate.
Full Flush: Touch the longer decal side with your hand to activate the
ush. The LED lights will Illuminate.
If the ush plate is touched for more than 5 seconds it won’t ush.
If batteries are exhausted completely, the glass fascia can be removed
to reveal the manual ush button.
The manual over-ride is not intended as a long term solution. When
using the manual push button, un-plug the cable ribbon and take the
front glass fascia o the chain links. Keep safe to prevent damage.
Brought to you by the Roper Rhodes Group
Brassmill Lane Trading Estate
Bath
BA1 3JF
t: 01225 303900
5. Make sure the cistern is fully commissioned before mounting the
bracket in place.
Locate the mounting bracket onto the xing arms and secure the top
left and bottom right corners with the screws provided and tighten
with a screwdriver. Be careful not to overtighten.
Re-connect the clip links and cable ribbon to the glass fascia and insert
the battery holder. Place the front glass plate and remove the protec-
tive lm prior to testing its functioning. Once correctly attached the
ush plate will illuminate for a couple of seconds.
Manual Flush
v3. 02.18
Fixing Arms
Mounting
bracket

Other Roper Rhodes Accessories manuals

Roper Rhodes TR9016 Installation instructions

Roper Rhodes

Roper Rhodes TR9016 Installation instructions

Roper Rhodes TR9016 Instruction Manual

Roper Rhodes

Roper Rhodes TR9016 Instruction Manual

Popular Accessories manuals by other brands

SICK TMS88 Series operating instructions

SICK

SICK TMS88 Series operating instructions

SPIETH Melbourne User and assembly instructions

SPIETH

SPIETH Melbourne User and assembly instructions

EK LGA-4189 user guide

EK

EK LGA-4189 user guide

Anslut 420-056 operating instructions

Anslut

Anslut 420-056 operating instructions

LAMPTAN SMART WIFI SOCKET user guide

LAMPTAN

LAMPTAN SMART WIFI SOCKET user guide

Califone 1216-USB owner's manual

Califone

Califone 1216-USB owner's manual

Pil Sensoren P41-80-U-CM12 manual

Pil Sensoren

Pil Sensoren P41-80-U-CM12 manual

Pepperl+Fuchs UC4000-L2-E5-V15-Y70120089 manual

Pepperl+Fuchs

Pepperl+Fuchs UC4000-L2-E5-V15-Y70120089 manual

Onvis SMS2 user manual

Onvis

Onvis SMS2 user manual

Pepperl+Fuchs UC2000-L2-E5-V15 manual

Pepperl+Fuchs

Pepperl+Fuchs UC2000-L2-E5-V15 manual

B&C Speakers HF Compression Drivers DE750 Specification sheet

B&C Speakers

B&C Speakers HF Compression Drivers DE750 Specification sheet

ELSYS.se LoRaWAN ERS Desk operating manual

ELSYS.se

ELSYS.se LoRaWAN ERS Desk operating manual

Equip 125772 Installing Instruction

Equip

Equip 125772 Installing Instruction

Peavey MPT-XC manual

Peavey

Peavey MPT-XC manual

Vaisala WINDCAP WMT700 Series user guide

Vaisala

Vaisala WINDCAP WMT700 Series user guide

Axis F9114 user manual

Axis

Axis F9114 user manual

Bamboo Omni quick start guide

Bamboo

Bamboo Omni quick start guide

INNOLIVING INN-761 user manual

INNOLIVING

INNOLIVING INN-761 user manual

manuals.online logo
manuals.online logoBrands
  • About & Mission
  • Contact us
  • Privacy Policy
  • Terms and Conditions

Copyright 2025 Manuals.Online. All Rights Reserved.