ELECTRICAL REQUIREMENTS
We recommend you have the electrical wiring and hookupof
your range done by a qualified electrician. After installation,
have the electrician show you where your main range
disconnect is located.
Check with your local utilities for electrical codes which apply
in your area. Failure to wire you range according to govern-
ing codes could result in a hazardous condition. If there are
no local codes, you range must be wired and fused to meet
the requirements of the National Electrical Code, ANSI/
NFPA No. 70-1987. You can get a copy by writing:
National Fire Protection Association
Batterymarch Park
Quincy, MA 02269
You must use a three-wire, single-phase A.C. 208Y/120Volt
or 120/240 Volt, 60 Hertz electrical system. If you connect
to aluminum wiring, properly installed connections approved
for use with aluminum wiring must be used.
In the absence of local codes, we recommend that a mini-
mum wire size of No. 8 copper wire and a 40 amp fuse or
circuit breaker be used, on both 208Y/120 Volt and 1201240
Volt systems.
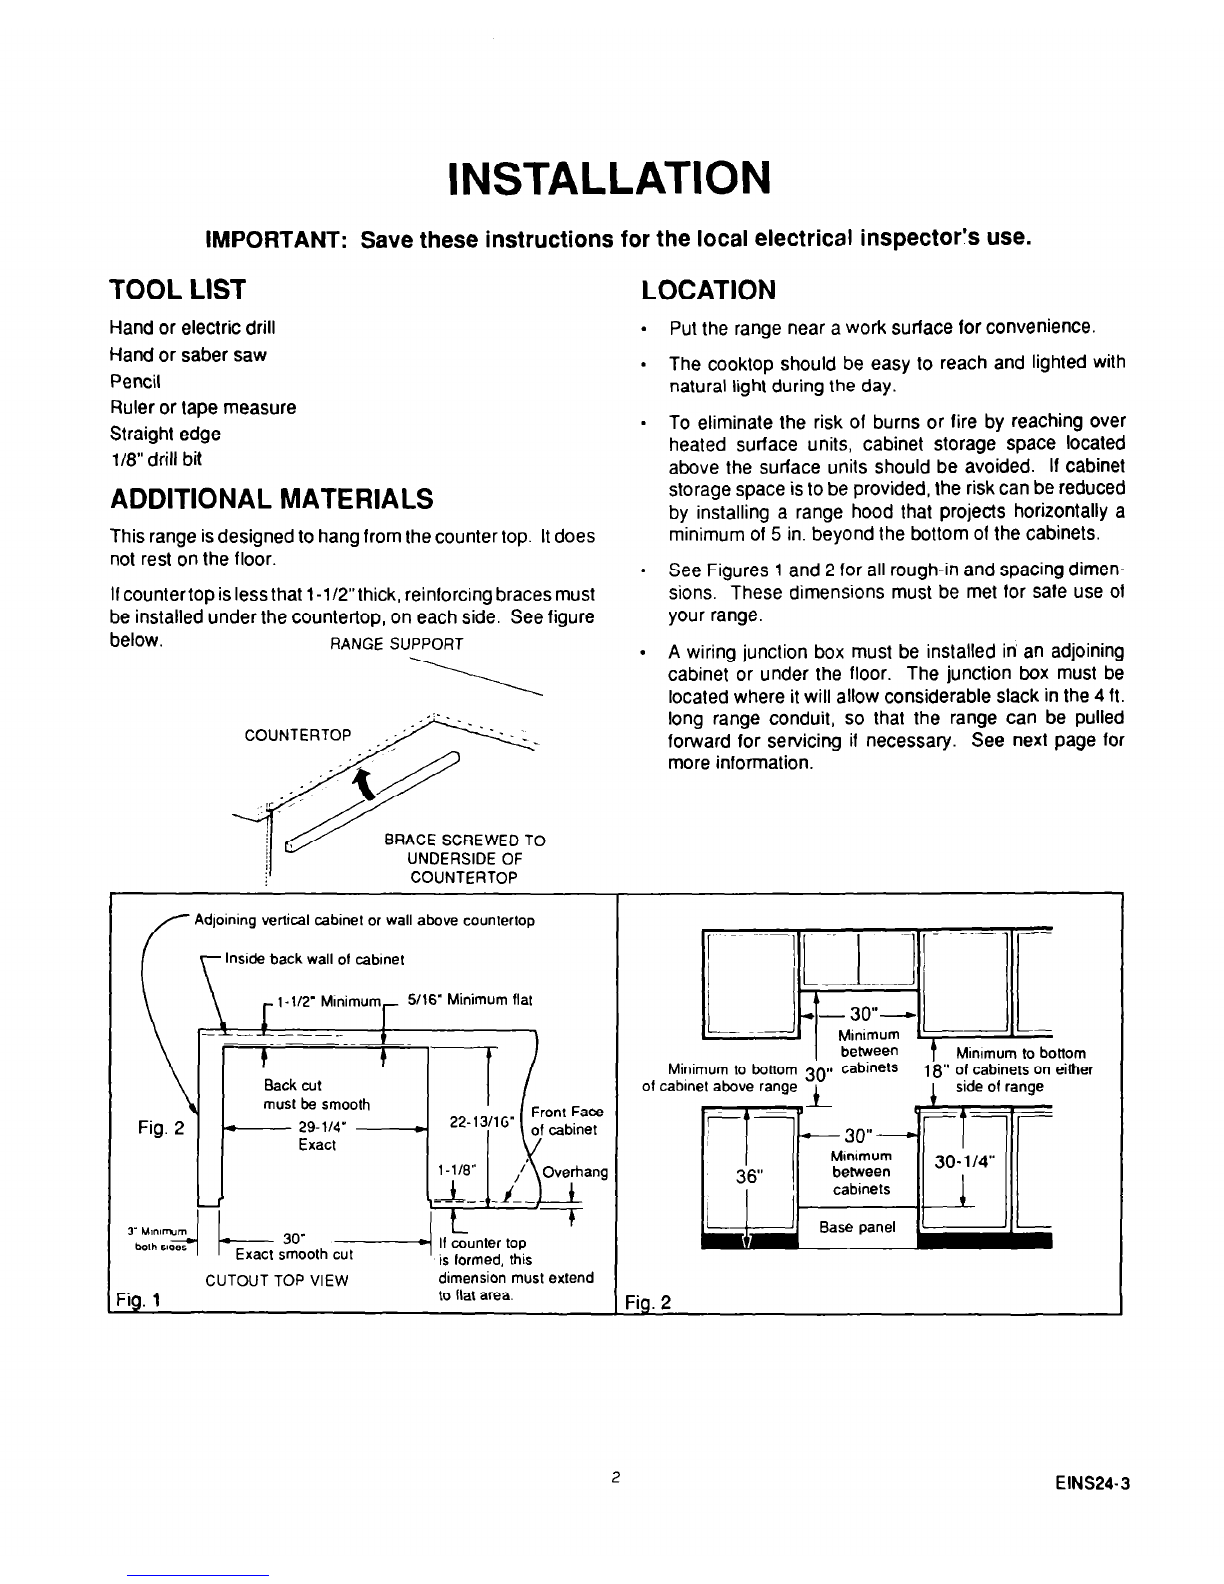
PREPARE THE COUNTER
Install base cabinets 30” apart, and be sure they are
plumb and level before attaching the countertop.
Lay out the cutout opening on the countertop per Fig. 1.
(Countertopcutout shown in Fig. 1. assumes a standard
installation in a 25” deep counter with a standard 1-l/4”
overhang.) If theoverhang is less than 1-l/4”, the range
front side trims and control panel end caps will extend
into the 30” cutout. If the overhang is greater than
l-1/4”, a gap between the cabinet face and the range
front side trims will exist. A moulding may be fitted to
provide a more custom appearance. Before cutting,
check for dimension marked min. (Fig. 1). If these
dimensions are not met, the product can be moved
forward on the countertop until minimum dimensions are
met. (Decreasethecutoutdimensions22-13/16”&1-l/
8” by the amount of the forward movement.) This will
make the end caps extend forward in front of the
countertop and may create a gap between the range
front trims and the cabinet face. If this occurs, fit
mouldingas above. If it is not flat at the backof the notch,
the raised area must be filed or cut away to fit.
Make cutout. If the countertop is not 1-l/2” thick, install
reinforcing braces under the countertop as shown on
page 1.
Install the wiring junction box in an adjoining cabinet or
underthefloor. Cut 1-1/2”dia. hole to bringthe electrical
cable from the range to the junction box. The junction
box must be located so that there will be enough slack
in the connected cable to allow the range to be pulled
forward several inches for service if necessary.
MAKE ELECTRICAL CONNECTION
1. De-energize range branch circuit.
2. With range in front of opening, push flexible electrical
cable through hole in floor or adjacent base cabinet and
attach it to the junction box. Do not shorten this cable.
The flexible cable connector must be securely attached
to the junction box and the flexible cable must be
securely attached to the connector. If the flexible cable
will not fit within the connector, do not install the range
until a connector of the proper size is obtained.
When connecting to a 3-conductor branch circuit, if
local codes permit, connect the white and bare
ground connector leads of the range to the branch
circuit neutral (white or gray in color), the range red
lead to the branch circuit red lead and the range black
lead to the branch circuit black lead in accordance
with local codes.
Special Grounding Instructions
.
.
.
1.
2.
3.
When connecting to a 4-conductor branch circuit.
When installing range in a mobile home.
When local codes do not permit grounding through
neutral.
Attach the appliance grounding lead (green or bare
copper) to the residence grounding conductor (green or
bare) in accordance with local codes. If the residence
grounding conductor is aluminum, see “WARNING”
note below.
Connect the range neutral (white) lead to the branch
circuit neutral (white or gray) in accordance with local
codes.
Connect the range red lead to the branch circuit red lead
and the range black lead to the branch circuit black lead
in accordance with local codes. If the residence red and
black leads are aluminum conductors, see “WARNING”
note below.
NOTE TO ELECTRICIAN: The three power leads supplied
with this appliance are U-L. recognized for connection to
larger gauge household wiring. The insulation of these three
leads is rated at temperatures much higher than the tem-
perature rating of household wiring. The current carrying
capacity of a conductor is governed by the temperature
rating of the insulation around the wire rather than the wire
gauge alone.
WARNING: IMPROPER CONNECTION OF ALUMINUM
HOUSE WIRING TO THESE COPPER LEADS CAN RE-
SULT IN A SERIOUS PROBLEM. USE ONLY CONNEC-
TORS DESIGNED FOR JOINING COPPER TO ALUMI-
NUM AND FOLLOW THE MANUFACTURER’S RECOM-
MENDED PROCEDURE CLOSELY.
3 EINS29-1