Ross TES9 Instructions for use

TES9
Multi-Function HD/SD-SDI VANC Processor
Hardware User Manual

Thank you for choosing Ross
You've made a great choice. We expect you will be very happy with your purchase of Ross Technology.
Our mission is to:
1. Provide a Superior Customer Experience
• offer the best product quality and support
2. Make Cool Practical Technology
• develop great products that customers love
Ross has become well known for the Ross Video Code of Ethics. It guides our interactions and
empowers our employees. I hope you enjoy reading it below.
If anything at all with your Ross experience does not live up to your expectations be sure to reach out to
David Ross
CEO, Ross Video
Ross Video Code of Ethics
Any company is the sum total of the people that make things happen. At Ross, our employees are a
special group. Our employees truly care about doing a great job and delivering a high quality customer
experience every day. This code of ethics hangs on the wall of all Ross Video locations to guide our
behavior:
1. We will always act in our customers’ best interest.
2. We will do our best to understand our customers’ requirements.
3. We will not ship crap.
4. We will be great to work with.
5. We will do something extra for our customers, as an apology, when something big goes wrong and
it's our fault.
6. We will keep our promises.
7. We will treat the competition with respect.
8. We will cooperate with and help other friendly companies.
9. We will go above and beyond in times of crisis. If there's no one to authorize the required action in
times of company or customer crisis - do what you know in your heart is right. (You may rent
helicopters if necessary.)

TES9 Hardware User Manual
• Ross Part Number: TES9DR-004A-04
• Release Date: January 27, 2015.
Copyright
© 2015 Ross Video Limited. Ross®, openGear®, and any related marks are trademarks or
registered trademarks of Ross Video Ltd. All other trademarks are the property of their respective
companies. PATENTS ISSUED and PENDING. All rights reserved. No part of this publication
may be reproduced, stored in a retrieval system, or transmitted in any form or by any means,
mechanical, photocopying, recording or otherwise, without the prior written permission of Ross
Video. While every precaution has been taken in the preparation of this document, Ross Video
assumes no responsibility for errors or omissions. Neither is any liability assumed for damages
resulting from the use of the information contained herein.
Patents
Patent numbers US 7,034,886; US 7,508,455; US 7,602,446; US 7,802,802 B2; US 7,834,886;
US 7,914,332; US 8,307,284; US 8,407,374 B2; US 8,499,019 B2; US 8,519,949 B2; US
8,743,292 B2; GB 2,419,119 B; GB 2,447,380 B; and other patents pending.

Information to User
The following warning is provided in compliance with the regulations of the United States
Federal Communication Commission (FCC):
This equipment has been tested and found to comply with the limits for a Class A digital device,
pursuant to Part 15 of the FCC Rules. These limits are designed to provide reasonable protection
against harmful interference when the equipment operates in a commercial environment. This
equipment generates, uses and can radiate radio frequency energy and, if not installed and used in
accordance with the instruction manual, may cause harmful interference in which case the user
will be required to correct the interference at his own expense.
Any changes or modifications not expressly approved by Ross Video could void the user’s
authority to operate the equipment.

Important Safety Notices to Service Personnel
Before using this product and nay associated equipment, refer to the section “Important Safety
Instructions” listed below to avoid personnel injury and to prevent product damage.
Symbol Meanings
Important Safety Instructions
Read these instructions and heed all warnings.
Use only power cords specified for this product and certified for the country of use. Refer to the
section “Product Power Cord Requirements” that follows.
Do not defeat safety purpose of the ground-type plug. A grounding type plug has two blades and
a third grounding prong. The third prong is provided for your safety. If the provided plug does not
fit in to your outlet, consult an electrician for replacement of the obsolete outlet.
Protect the power cord from being walked on or pinching particularly at plugs, convenience
receptacles, and point where they exit from the apparatus.
Do not block any ventilation openings. Install in accordance with manufacturer’s instructions.
This symbol identifies a Protective Earth (PE) terminal, which is provided for connection of the
supply system’s protective earth (green or green/yellow) conductor.
This symbol on the equipment refers you to important operating and maintenance (servicing)
instructions within the Product Manual Documentation. Failure to heed this information may
present a major risk of damage to persons or equipment.
Warning — The symbol with the word “Warning” within the equipment manual indicates a
potentially hazardous situation, which, if not avoided, could result in death or serious injury.
Caution — The symbol with the word “Caution” within the equipment manual indicates a
potentially hazardous situation, which, if not avoided, may result in minor or moderate injury. It
may also be used to alert against unsafe practices.
Warning Hazardous Voltages — The symbol is intended to alert the user to the
presence of uninsulated “dangerous voltage” within the product enclosure that may be of
sufficient magnitude to constitute a risk of shock to persons.
ESD Susceptibility — This symbol is used to alert the user that an electrical or electronic
device or assembly is susceptible to damage from an ESD event.
Warning — The safe operation of this product requires that a protective earth connection be
provided. A grounding connector in the equipment’s supply cord provides this protective earth.
To reduce the risk of shock to the operator and service personnel, this ground conductor must
be connected to an earthed ground.
Indoor Use: “WARNING — TO REDUCE THE RISK OF FIRE OR ELECTRICRIC SHOCK, DO
NOT EXPOSE THIS APPARATUS TO RAIN OR MOISTURE”.

Only use attachments/accessories specified by the manufacturer.
Product Power Cord Requirements
Warning — Refer all servicing to qualified personnel. Servicing is required when the
apparatus has been damaged in any way, such as power-supply cord or plug damage, liquid
has been spilled or objects have fallen into the apparatus, the apparatus has been exposed to
rain or moisture, does not operate normally, or has been dropped.
Caution — To reduce the risk of fire, replacement fuses must be the same type and rating.
Warning — This product contains safety critical parts, which if incorrectly replaced may
present a risk of fire or electrical shock. Components contained within the product’s power
supplies and power supply area, are not intended to be customer serviced and should be
returned to the factory for repair.
Warning — This product includes an “Ethernet Port” which allows this product to be
connected to a local area network (LAN). Only connect to networks that remain inside the
building. Do not connect to networks that go outside the building.
Warning North American Line Voltages 100-120 Volt
This product is supplied with certified 10A/125V SVT type supply cords.
Conductors are color coded white (neutral), black (line) and green or green/yellow
(ground).
Operation of this equipment at line voltages exceeding 130V requires that alternative
supply cords with appropriate voltage and current ratings be used.
Warning International Line Voltages 200-240 Volt
This product has been designed for use with certified IEC 320-C13 10A/250V - H03
VV-F3G 1.00mm2 type line cord.
International product orders are supplied with a certified 10A/250V line cord, utilizing
a molded 3-pin IEC 320-C13 type connector at one end and stripped conductors on the
other. One line cord is provided. Conductors are CEE color coded; blue (neutral),
brown (line), and green/yellow (ground).
Installation by a qualified Electrician, of an appropriately approved A/C wall plug
certified for the country of use, is required.
Alternatively, other IEC 320 C-13 type power cords may be used, provided that they
meet the necessary safety certification requirements for the country in which they are
to be used. Refer to the correctly specified line cord above.

Environmental Information
The equipment that you purchased required the extraction and use of natural
resources for its production. It may contain hazardous substances that could
impact health and the environment.
To avoid the potential release of those substances into the environment and to diminish the need
for the extraction of natural resources, Ross Video encourages you to use the appropriate
take-back systems. These systems will reuse or recycle most of the materials from your
end-of-life equipment in an environmentally friendly and health conscious manner.
The crossed out wheelie bin symbol invites you to use these systems.
If you need more information on the collection, reuse, and recycling systems, please contact your
local or regional waste administration.
You can also contact Ross Video for more information on the environmental performance of our
products.

Company Address
Ross Video Limited Ross Video Incorporated
8 John Street P.O. Box 880
Iroquois, Ontario, K0E 1K0 Ogdensburg, New York
Canada USA 13669-0880
General Business Office: (+1) 613 • 652 • 4886
Fax: (+1) 613 • 652 • 4425
Technical Support: (+1) 613 • 652 • 4886
After Hours Emergency: (+1) 613 • 349 • 0006
E-mail (Technical Support): techsupport@rossvideo.com
E-mail (General Information): solutions@rossvideo.com
Website: http://www.rossvideo.com

TES9 Hardware User Manual (Iss. 04) Contents • i
Contents
Introduction 1
Overview.............................................................................................................................. 1-2
Features.................................................................................................................. 1-2
Documentation Terms and Conventions.............................................................................. 1-4
Hardware Overview 2
Before You Begin ................................................................................................................2-2
Static Discharge..................................................................................................... 2-2
Unpacking.............................................................................................................. 2-2
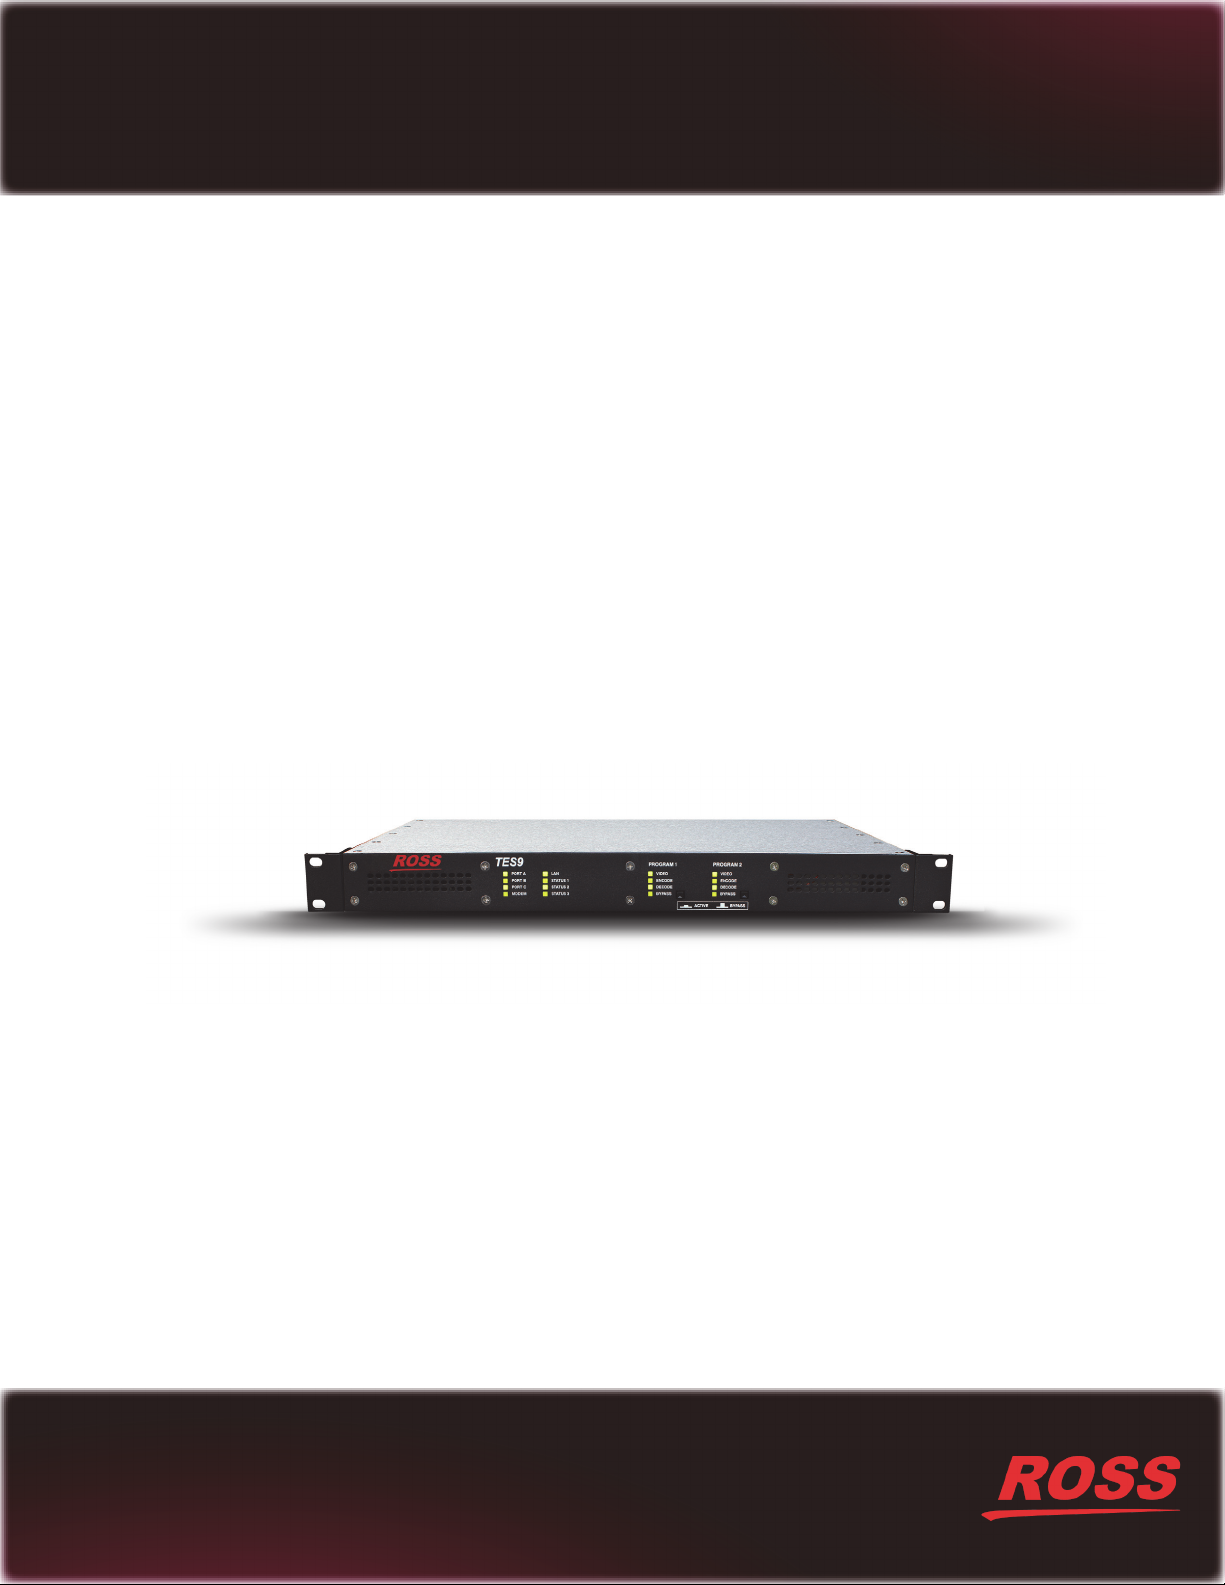
Front Panel........................................................................................................................... 2-3
Port LEDs .............................................................................................................. 2-3
Status LEDs........................................................................................................... 2-3
PROGRAM 1 and 2 Video LEDs and Switches ................................................... 2-4
Rear Panel ............................................................................................................................ 2-7
Power Connection ................................................................................................. 2-7
PROGRAM 1 and PROGRAM 2 VIDEO ............................................................ 2-7
Data Ports .............................................................................................................. 2-8
GPIO Connections................................................................................................. 2-8
LOAD Button ........................................................................................................ 2-8
Installation 3
Unpacking the TES9............................................................................................................ 3-2
Mounting the TES9 in a Rack.............................................................................................. 3-3
Before You Begin.................................................................................................. 3-3
Installing the TES9 in the Rack............................................................................. 3-3
Basic Connections................................................................................................................ 3-5
Video Connections ................................................................................................ 3-5
Connecting a PC for Setup .................................................................................... 3-6
Data Connections................................................................................................... 3-6
Specifications 4
Technical Specifications ...................................................................................................... 4-2
Electrical Specifications ........................................................................................ 4-2
Mechanical Specifications..................................................................................... 4-2
Environmental Specifications................................................................................ 4-2
Cabling Information.............................................................................................................4-4
RS-232 Ports.......................................................................................................... 4-4
GPIO...................................................................................................................... 4-5
Troubleshooting 5
Replacing a Fuse.................................................................................................................. 5-2
Fails to Start ......................................................................................................................... 5-3
Stays in Bypass .................................................................................................................... 5-4
Cannot Decode TES9 Encoded Data ................................................................................... 5-5

ii • Contents TES9 Hardware User Manual (Iss. 04)

TES9 Hardware User Manual (Iss. 04) Introduction • 1–1
Introduction
In This Chapter
This chapter contains the following sections:
• Overview
• Documentation Terms and Conventions
A Word of Thanks
Congratulations on choosing an TES9 Multi-function HD/SD-SDI VANC Processor. Your TES9
is part the Ross Terminal Equipment family of products, backed by Ross Video’s experience in
engineering and design expertise since 1974.
You will be pleased at how easily your new TES9 fits into your overall working environment.
Equally pleasing is the product quality, reliability and functionality. Thank you for joining the
group of worldwide satisfied Ross Video customers!
Should you have a question pertaining to the installation or operation of your TES9, please
contact us at the numbers listed on the back cover of this manual. Our technical support staff is
always available for consultation, training, or service.

1–2 • Introduction TES9 Hardware User Manual (Iss. 04)
Overview
The TES9 is a broadcast-quality ancillary data encoder for uncompressed digital video signals. It
operates with high-definition signals that comply with SMPTE standard 292M and
standard-definition signals that comply with SMPTE 259M. Depending on the model, it can
process either one or two video signals.
The TES9 inserts data having various formats and purposes into the vertical ancillary (VANC)
portion of its video input signal(s). These VANC data streams comply with SMPTE standards
291M and 334M.
The TES9 is also capable of extracting VANC data from its video input signal(s). This allows it to
forward the data to other systems, combine locally generated data with that already carried in the
input, and bridge data from one video signal to the other.
Features
This section describes capabilities that are available in the TES9 hardware platform. It is
important to note that the various software products that can operate in the TES9 may make use
of different subsets of these features.
The following are the principal features of the TES9:
• One or two complete video paths, depending on the model.
• The two video paths allow the TES9 to support several interesting applications, which
include the following:
› Bridging data from one video signal to another: for example, CEA-608 captions can
be extracted from a 259M signal on one input, converted to CEA-708 DTV captions
and inserted into a 292M signal on the other input.
› Processing VANC data in two independent 292M video channels.
› Inserting data into one 259M and one 292M signal: for example, CEA-608 captions
in 259M and CEA-708 captions in 292M.
• Compact 1 rack-unit enclosure.
• Universal AC power input: 90-250 VAC, 47-63Hz.
• Accepts 259M and 292M signals in all the major formats.
• High-quality 75ohm BNC connectors and video processing.
• Video bypass via a high-quality 75ohm RF relay when the unit is powered off or when
certain malfunctions are detected.
• Front-panel push-button to force relay bypass.
• Monitor outputs for both video paths, to allow the output signals to be observed and
analyzed even when the unit is in bypass.
• VANC insertion and extraction, per SMPTE 334M.
• Can process multiple different data streams carried in any combination of the scan lines
that are available for VANC data.
• Can add a data service to others that are already present in a line, without delaying the
existing services. This is a major improvement over earlier equipment that would extract
existing data services, add the locally generated data to them and re-insert the combined
data one frame later. The TES9 eliminates the accumulation of delay in the data resulting
from multiple processing passes. This is crucial for data services such as closed
captioning and metadata which must maintain tight synchronization with the video
program.
• LAN (100baseT), V.34 modem, and three RS-232 ports are standard on all TES9’s.

TES9 Hardware User Manual (Iss. 04) Introduction • 1–3
• A 15-pin terminal block on the rear panel provides remote bypass control and indication
for both video paths, as well as 7 general-purpose input-output (GPIO) signals.
• An unbalanced LTC input is provided for applications that require time-code input.
• The TES9 software is stored in internal “flash” memory, which allows the software to be
updated through a data port, such as the LAN.
Scope of this Manual
This manual covers the following topics:
• TES9 connections, controls and indicators
• Installing the TES9 in a rack
• Connecting to other equipment
• TES9 specifications
• Basic troubleshooting
The TES9 accepts various software modules that can be installed at the factory or downloaded
subsequently. Its versatility is such that the detailed operation of the unit needs to be described in
documentation supplied with the software.

1–4 • Introduction TES9 Hardware User Manual (Iss. 04)
Documentation Terms and Conventions
The following terms and conventions are used throughout this manual.
Terms
The following terms are used:
•“Operator” and “User” refer to the person who uses TES9.
•“System” and “Video system” refer to the mix of interconnected production and terminal
equipment in your environment.
•“TES9” also refers all versions unless otherwise indicated.
•“Video” by itself is a synonym for “259M or 292M”; that is, when either video type is
appropriate. For features that apply to one video format only, the manual names the
format explicitly.
Conventions
The following conventions are used:
• The “Operating Tips” and “Note” boxes are used to provide additional user information.

2–2 • Hardware Overview TES9 Hardware User Manual (Iss. 04)
Before You Begin
Before proceeding with the instructions in this manual, review the following notes.
Static Discharge
Throughout this manual, please heed the following cautionary note:
Unpacking
Unpack each TES9 you received from the shipping container and ensure that all items are
included. If any items are missing or damaged, contact your sales representative or Ross Video
directly.
ESD Susceptibility — Static discharge can cause serious damage to sensitive
semiconductor devices. Avoid handling circuit boards in high static environments such as
carpeted areas and when synthetic fiber clothing is worn. Always exercise proper grounding
precautions when working on circuit boards and related equipment.

TES9 Hardware User Manual (Iss. 04) Hardware Overview • 2–3
Front Panel
The front panel of the TES9 is shown in Figure 2.1.The indicators and controls on the front panel
of the TES9 are described in the following sections.
Figure 2.1 TES9 Front Panel Controls and Indicators
In general, the LED indicators have the meanings shown in Ta ble 2 .1 on page 2-3. Exceptions to
these definitions are noted where appropriate.
Port LEDs
There is one LED for each of the data ports on the rear panel.
The green PORT A, PORT B and PORT C LEDs follow the data on the RS-232 ports. If the
transmitted and/or received data is constant, the green LED will be on continuously; if the data is
intermittent, it will blink accordingly.
The MODEM and LAN LEDs are green when data is being transmitted or received through the
corresponding port, and off otherwise. If the software detects a problem with one of these ports, it
illuminates the corresponding red LED.
Status LEDs
The STATUS 1, STATUS 2 and STATUS 3 LEDs are used to indicate the status of TES9
functions that do not have their own dedicated front-panel LEDs.
When the TES9’s power is first turned on, the three STATUS LEDs will all be illuminated red.
Once the TES9 is operating normally, STATUS 1 should be green, and STATUS 2 and STATUS
3should be off.
1) Port LEDs 3) Program 1 Video LEDs and Switch
2) Status LEDs 4) Program 2 Video LEDs and Switch
Table 2.1 LED Indicators
LED Color Description
Off Not used or not selected.
Green Normal operation.
Red Disabled, due to an error.
Yellow In use, but an error is detected.
Flashing Yellow and Red Warning to user. On STATUS 1, this means do not turn power off
while data is being saved to flash memory.
PORT A
PORT B
PORT C
MODEM
LAN
STATUS 1
STATUS 2
STATUS 3
TES9
ACTIVE BYPASS
VIDEO
ENCODE
DECODE
BYPASS
PROGRAM 1
VIDEO
ENCODE
DECODE
BYPASS
PROGRAM 2
421 3

2–4 • Hardware Overview TES9 Hardware User Manual (Iss. 04)
STATUS 1 LED
The STATUS 1 LED indicates conditions that are common to all TES9 models, as shown in
Tab le 2.2. There may be additional combinations that depend on the operating software.
STATUS 2 LED
The STATUS 2 LED is off when the TES9 is operating normally. Once the TES9 has started up,
the presence of any red on this LED indicates an application error that can probably be corrected
by changing settings or inputs. Refer to the TES9 Software User Manual for details on this LED.
STATUS 3 LED
The STATUS 3 LED is off when the TES9 is operating normally. Once the TES9 has started up,
the presence of any red on this LED indicates a major error. If this occurs, please note the flashing
pattern (if any) before calling Ross Video Technical Support.
PROGRAM 1 and 2 Video LEDs and Switches
The front panel provides a bypass push-button switch and four LEDs for each of the video paths
(PROGRAM 1 and 2) through the TES9. These are installed for all models of TES9. This
includes models that do not have a PROGRAM 2 video section; in this case, the PROGRAM 2
LEDs are always off and the PROGRAM 2 bypass switch has no effect. The following discussion
applies to either channel.
Table 2.2 STATUS 1 LED
Color Description
Red Powering up. If the LED stays red for more than 45 seconds, this
indicates a system failure.
Green Normal operation
Yellow The TES9 is reconfiguring, due to a change in video type from
259M to 292M or vice versa. This state should last a few seconds.
Flashing Yellow and Green
The TES9 is in Setup mode (reached by pressing the LOAD
switch for 2 seconds), ready to communicate with a Microsoft®
Windows® PC to allow you to adjust its setup.
Flashing Yellow
The TES9 is in Load mode (reached by powering on with the
LOAD switch pressed), ready to communicate with a Windows®
PC to allow you to update its software.
Flashing Yellow and Red
Configuration changes or software updates are being saved in the
TES9. Never turn off power to the TES9 in this situation, as
this could result in a loss of software that will require the unit
to be returned to the factory for repairs.
Note — On some models of TES9, the two video channels may be labeled
“PROGRAM” and “AUXILIARY”, instead of “PROGRAM 1” and “PROGRAM 2”. Their
functions are nevertheless identical.

TES9 Hardware User Manual (Iss. 04) Hardware Overview • 2–5
BYPASS LED
The BYPASS LED and BYPASS switch operate together, as follows:
• The BYPASS LED is illuminated red whenever the video is bypassed by the internal
relay; the LED is on in all bypass situations, except when the power is off.
• The BYPASS switch is one of several devices that can force the corresponding video path
into bypass.
If the switch is in the BYPASS position (out), the internal relay connects the video input directly
to the output, regardless of any other operational conditions. As discussed, the LED is illuminated
red in this case.
When the switch is in the ACTIVE position (in), the bypass relay for the corresponding video
channel should normally be switched to the active position and the LED should go off. However,
there are other conditions that can hold the video in bypass, even though the switch is in the
ACTIVE position. These include the following:
• No video input, or unrecognized video format.
• A contact closure on the bypass pins of the rear-panel GPIO connector.
• A command from a remote computer. For example, while starting up new software that
has been loaded into the TES9, the software may bypass the video to avoid “glitching” it.
• An internal fault condition, such as a power-supply failure.
When any of these conditions occurs or the front-panel switch is in the BYPASS position, the
video path is bypassed and the BYPASS LED is illuminated red. Otherwise, the BYPASS LED is
off and the video LED should be green.
VIDEO LED
The VIDEO LED is illuminated green when there is a usable 292M or 259M video signal
connected to the input jack for the corresponding channel. Ta ble 2.3 describes the operation of
the VIDEO LED in detail.
Table 2.3 VIDEO LED
Color Description
Green Normal: video is connected and used
Yellow Video is connected, but the channel is not enabled: that is, no
suitable data streams are defined for the video type
Red No video input on a channel that is enabled
Off No video input on a channel that is not enabled
Green, with one yellow
flash per second
EDH or CRC error in input. Continues for 5 seconds after the last
error is detected.

2–6 • Hardware Overview TES9 Hardware User Manual (Iss. 04)
ENCODE LED
The ENCODE LED is illuminated green when the TES9 is inserting data into the corresponding
video signal. The TES9 can be configured to append VANC data to a line that already contains
VANC packets. In this case, there is a possibility that some of the data will not fit in the available
space in the line. When this occurs, the ENCODE LED will flash yellow to indicate that the user
needs to adjust some settings. This is described in Table 2.4.
DECODE LED
The DECODE LED is illuminated green when the TES9 is extracting data from its video input.
The LED will be green when the software has set up the hardware to extract incoming data, and
the data is present. If the software does not need to extract incoming data for its current operating
mode, or if the data is absent from the video input, the LED is off.
Table 2.4 ENCODE LED
Color Description
Green Normal: data is inserted into the video.
Off No encoding
Green, with one Yellow
flash per second
Too much data for an insertion line. The user has given priority to
incoming data, so local data is lost.
Green, with five Yellow
flashes per second
Too much data for an insertion line. The user has given priority to
local data, so incoming data is lost
Other manuals for TES9
1
Table of contents
Other Ross Computer Hardware manuals