Rotec GEMINI 300 User manual

GEMINI 300
Owner’s Manual
Adjustable Bed Base
ROTEC INTERNATIONAL
123, RUE DE L'ÉGLISE, BAIE-DU-FÈVRE
QUEBEC, CANADA J0G 1A
All Rights Reserved Rev 2.0 09/2021

CONTENTS
Safety & Warranty Warning 1
Parts List 2
Base Installation Guide 3
Electronics Quick Reference Guide 5
Synchronizing Twin XL Beds 6
Remote Control Pairing 6
Backlight Remote Control Guide 7
Device in Case of Power Failure 8
APP Control Guide (iPhone & Tablet) 8
Troubleshooting 9
Warranty 10
Read BEFORE using this product
IMPORTANT SAFETY INSTRUCTIONS
When using electric equipment, basic precautions should
always
be followed, including the following:
DANGER –To reduce the risk of electric shock
Always unplug this adjustable bed base (base) from the
electrical outlet before
cleaning or servicing.
WARNING –To reduce the risk of burns, fire,
electricshock,or injury:
1.
Unplug
from
outlet before putting on or taking off
parts.
2.
Close
supervision is necessary when this base is
used by, or near children, invalids, or disabled
persons.
3.
Use this base only for its intended use as
described in these instructions. Do not use
attachments not recommended by the manufacturer.
4.
Never operate this base if it has a damaged cord
or plug, if it is not working properly, if it has been
dropped or damaged, or dropped in water. Return the
base to a service center for examination and repair.
5.
Keep the cord away from heated surfaces.
6.
Do not use this base outdoors.
7.
Do not use this base near explosives.
8.
Using the base with oxygen administering
equipment other than the nasal masked type creates
a possible fire hazard.
9.
Do not operate where aerosol (spray) products
are being used or where oxygen is being
administered.
10.
To disconnect, turn all controls to the off position,
then remove plug from outlet.
11.
Use caution when there are liquids in or around the
base to ensure no spilling occurs. In case of spillage,
stand in a dry, clean area of the floor and unplug the
bed immediately. Clean up the spill and allow the
area around bed to dry thoroughly before using the
electric controls again. Do not eat or drink hot liquids
while operating the bed.
12.
Do not allow any person or pet under the base at
any time.
13.
During base operation, make sure body is well
positioned within the confines of the bed. Do not
place extremities over the sides of the bed when
operating base functions.
14.
Only
for household and similar location use.
15.
Never operate the
base
with the ventilation openings
blocked.Keep
theventilationopeningsfreeoflint,hair,
and the like.
16. Never drop or insert any object into any opening.
SAVE THESE INSTRUCTIONS
WEIGHT LIMITS
Weight Restrictions: The recommended weight limit
on this baseis750pounds. Thebasewillstructurally
support this weight, provided it is evenly distributed
acrossthebase. The power base is not designed to
support or lift the total weight in the head or foot
sections alone. Exceeding this weight restriction
could damage the base and/or cause injury and will
void the warranty.
WARRANTY WARNINGS
Anyopeningortamperingwiththecontrolbox,motors,
or hand controls (with the exception of the battery
compartment if equipped) will result in a void of the
warranty.
PRODUCT RATING
The motors are notdesignedtooperate continuously
formore than2minutesina 20 minute-time period or
approximately 10% duty cycle. Attempting to
circumvent or exceed this rating will shorten the life
expectancyofthe baseandmayvoid the warranty.
OPERATING INFORMATION
1. After base assembly is completed, operate remote
control to ensure proper functions.
2. Keep moving parts free of obstruction during bed
operation (including sheets, clothing, tubing, wiring,
and products using electric power cords).
3. Do not place entire weight on head or foot sections
of the bed, during repositioning and entering or
exiting bed.
HOSPITALDISCLAIMER
This base is NOT designed for hospital use and is
NOTdesigned tomeet hospital standards.
FCC COMPLIANCE
ThisdevicecomplieswithPart15oftheFCCRules.Operationissubjecttothefollowingtwoconditions:(1)Thisdevice may
notcauseharmfulinterference; (2)thisdevicemustacceptanyinterferencereceived,includinginterferencethat may cause
undesiredoperation.
TocomplywiththeFCCRFexposurerequirements,nochangetotheantennaorthe deviceispermitted.Anychangeto the
antennaorthedevicecouldresultinthedeviceexceedingtheRFexposurerequirement andvoiduser’s rightto operate the
device.
FREQUENCY: 2.4 GHz
1

9V 9V
Parts List
Allelectronicsandcomponentsthatneedtobeinstalledareplacedinboxesunderthebaseor
attached
to the frame. Before discarding the packing materials, ensure that all the parts are accounted for.
Remote Control Power Supply AC Power Cord Mattress Retainer Bar Adjustable Legs Device in case of
29V 2.0A Power Failure
Bluetooth Synchronisation Cord
Not Included
3 AAA batteries for remote control 2 9V batteries for the device in case
of power failure
NOTE: To avoid damage to the base, always open the
carton while the base is in the flat position.
Base Installation Guide
Two people are required to set up the base.
x1
x1
x1
x1
x4
x1
3xBattery
9V 9V
3"+6"
x1
1.
x1
x1
x1
x1
x4
3"+6"
Remote Control Power Supply
(29V 2.0A)
AC Power Cord Mattress Retainer Bar Adjustable Legs
x1 x1 x1
Device in case of
Power Failure
Bluetooth
Openthebox,takeoutallthepackingcomponents.
2.
Remove the base from the box. Make sure the floor is clean. Lay the base flat on the floor.
3.
3
2
x1
Synchronisation
Cord
x1
x1
Install legs and tighten byhand.

USB Charger
Foot Massage
AC Power Cord
Under-Bed Lighting
Back Massage
Y-cable
Power Supply
Bluetooth
DC Power Cord
Head Foot
Motor Motor
Neck
Motor
Head Motor
Headboard
For efficiency, cost savings and safety reasons, Rotec recommends that users fix their headboard directly to the
wall (material not included).
Electronics Quick Reference Guide
4.
Mattress Retainer Block
Carefullyturn thebaseoverso it is
resting on itslegs.
5.
Slide the left side of the mattress retainer
bar into the bracket. Pull the retainer bar to
the opposite bracket and secure the right side.
6.
Connect the DC power cord to the power supply, uncoil the AC power cord
and then connect it to the AC power source.
AC Power Source
DC Power Cord
AC Power Cord
Power Supply
Connect the connectors as illustrated.
7.
Insert 3 AAA batteries (not included)
into the remote control.
+
DONE!
Remote Control
Foot Motor
Neck Motor
Control Box
(under the base)
5
4

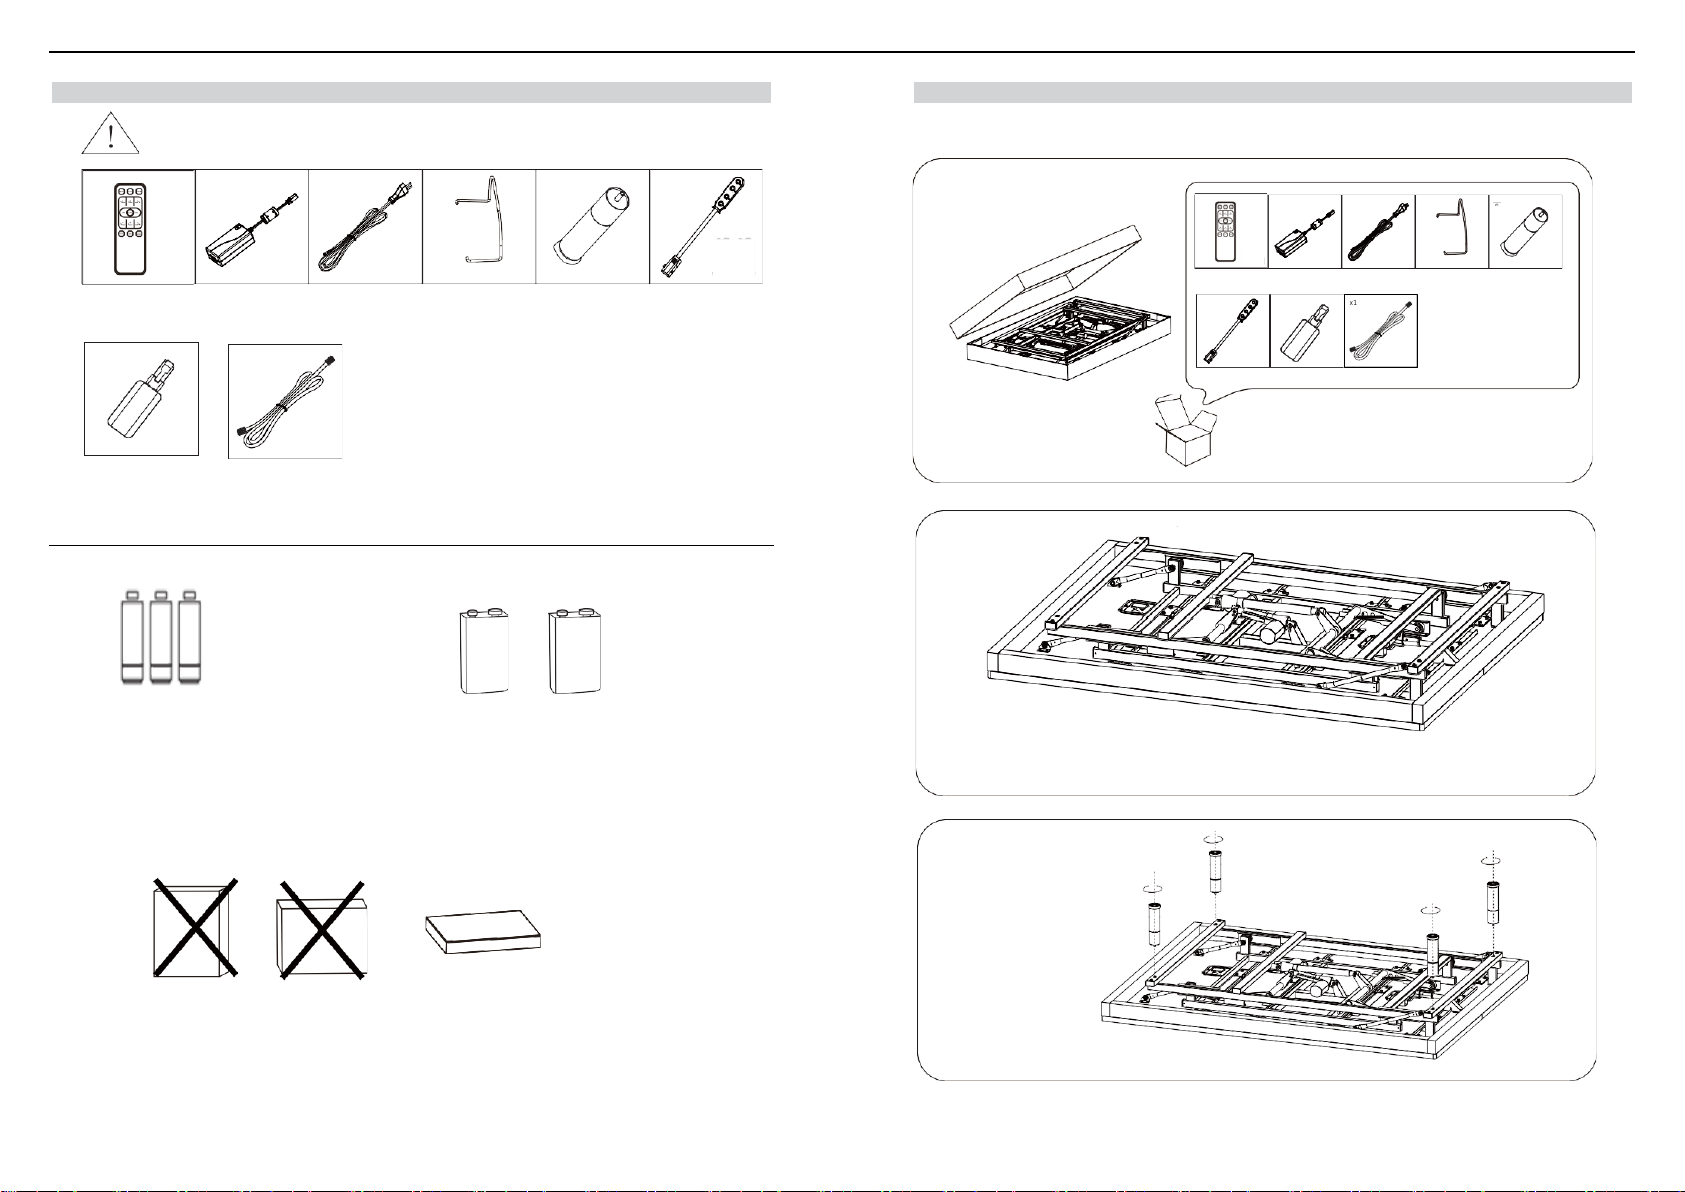
Synchronizing Twin XL Bases
Ifsimultaneousoperationof twotwinXLbasesis desired, use the synchronisation cord toconnect theelectronics of
both bases together.
STEP 1: Unplug bases from the power source.
STEP 2: Connect the male ends of the sync cord to the female sync plugs of the control boxes (Refer to illustration
above).
STEP 3: Plug bases back into the power source.
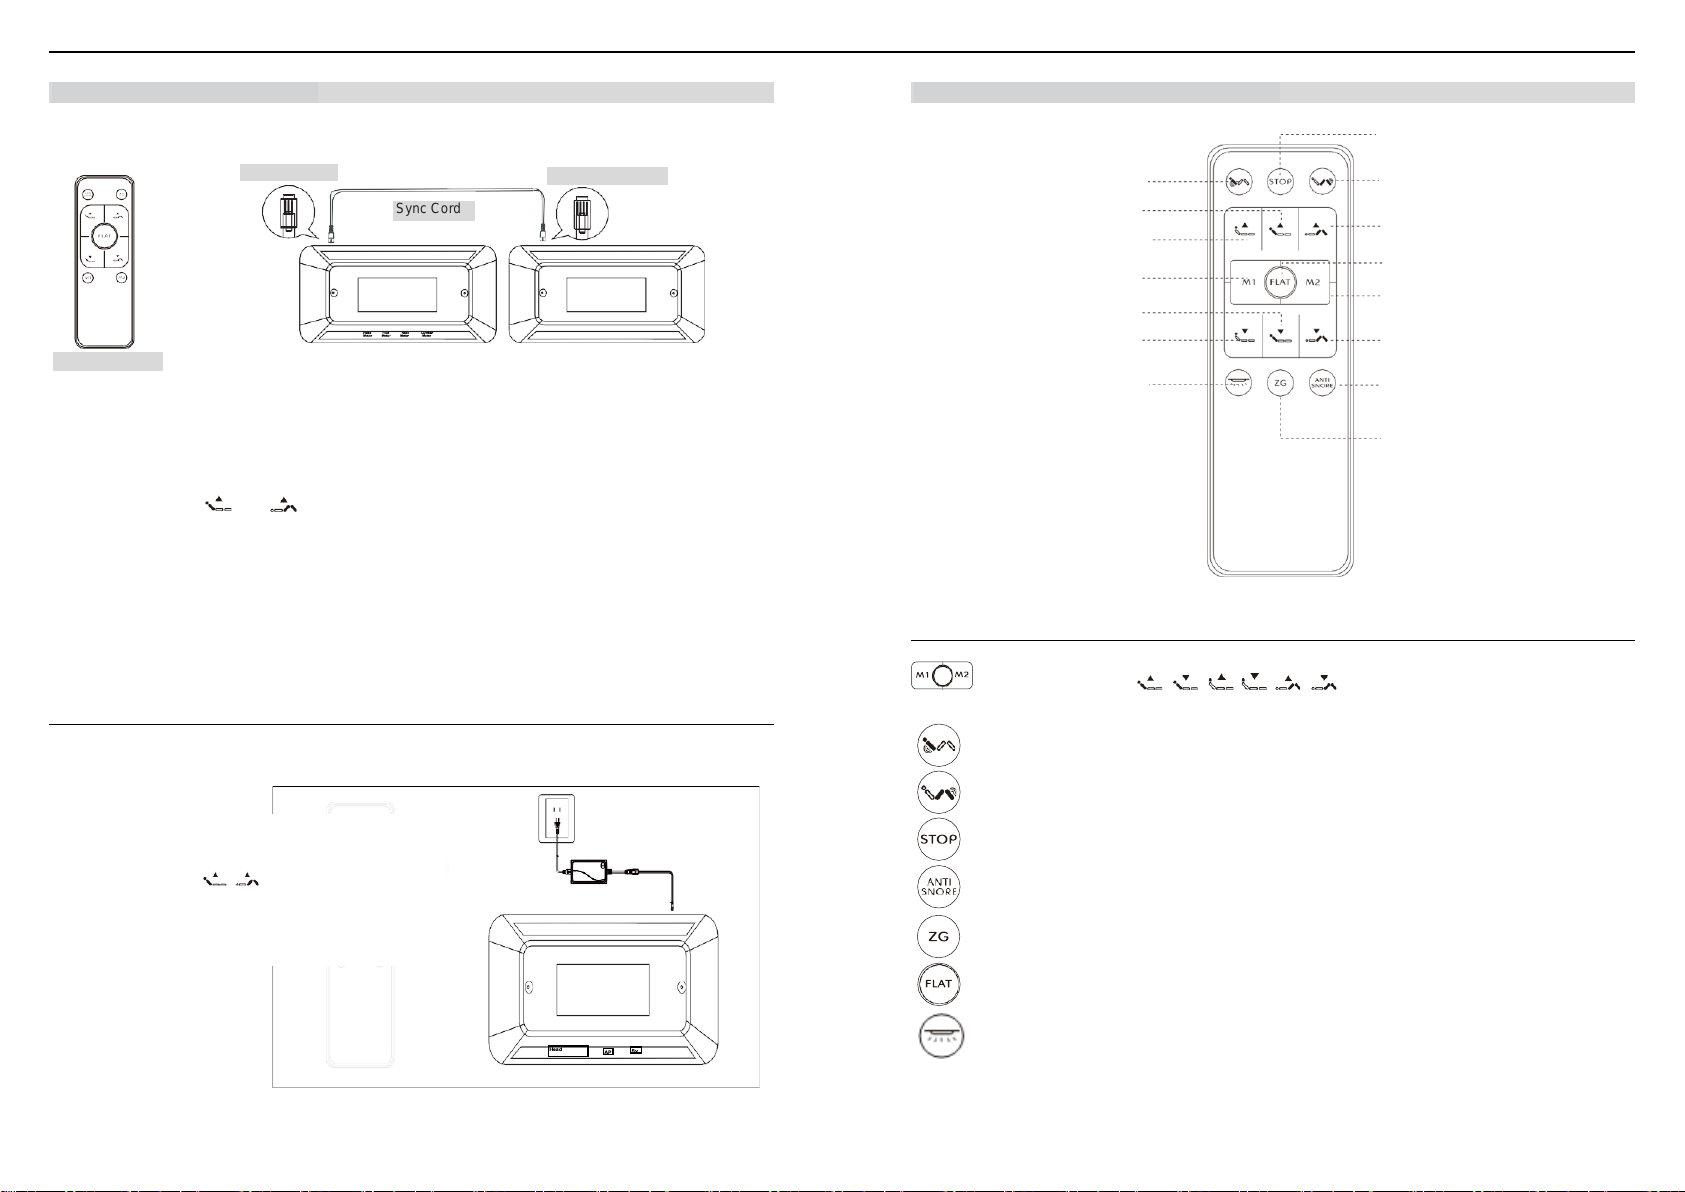
STEP 4: Press and hold and button, a beep of the buzzer will be heard, and the backlight of the remote
control will flash twice. Open the battery box and toggle the switch to “Central” position first, next press and
hold “FLAT” until you hear a beep from each buzzer on the control box, which means the two bases can be
synchronized with one remote control.
NOTE: To control the two bases separately without removing the sync cord, open the control remote battery box
and flip the switch to the “A” or “B” position.
Attention: (1) If you want to toggle from "A" or "B" to "Central" position to realize sync control, please press and
hold "Flat" again until you reach a flat position. (2) The quadruplex cable is in master control when
synchronizing and the Bluetooth must be plugged in the master control box. (3) The interval must be
more than 4 s between plug in and plug out the sync cord.
Remote Control Pairing
The remote control that comes in the box is already paired to the adjustable base. No further action is required.
If the remote control is not paired with the base, follow the steps below:
1. Unplug the base from the power source then power it on,
defaulting to remote pairing within 30 s.
2. Next, press and hold at the same time.
3. You will hear a beep of the buzzer and the backlight of the
remote control will flash twice, which means the pairing is
successful. Release the buttons.
Backlight Wireless Remote Control Guide
One Touch Buttons
Press to adjust the base to "Memory 1" or "Memory 2".
STEP 1: Press and hold to your desired position.
STEP 2: Press and hold "M1" or "M2" for more than 3 s until you hear a beep of the buzzer on the control
box and the backlight of the remote control flashes twice, which means the memory position is saved.
Press to turn on the Head/Foot Massage.
Press the button once to increase one intensity level, there are 3 intensity levels available. When it is in
the 3rd level, press the button again and the massage will turn off. The massage motor will turn off
automatically after 30 min.
Press to turn off the massage.
Press to adjust the base to the pre-programmed anti-snore position that lets you get a restful night.
Press to adjust the base to the programmed reclined position for optimum weight distribution.
Press to adjust the base to the flat position.
Press to turn on the under-bed lighting. The light will turn off if the button is not pressed within 10 min.
Sync Cord
Remote control
6
7
Triplex Cable
Quadruplex Cable
Anti-snore
Neck Lifting
Neck Lowering
Memory 2
Foot Lowering
Flat
Foot Lifting
Memory 1
Back Massage
Foot Massage
Under-bed Lighting
Zero Gravity
Deactivate Massage
Head Lifting
Head Lowering

Adjustment
HEAD UP/DOWN BUTTONS FOOT UP/DOWN BUTTONS
Press and hold to lift or lower the HEAD section. Press and hold to lift or lower the FOOT section.
NECK UP/DOWN BUTTONS
Press and hold to lift or lower the NECK section.
Device in Case of Power Failure
To use if needed
When there is an electric power failure, the included device and two batteries 9V 2.0A (not included) can be used to
flatten the adjustable bed base.
(1) Put the batteries in the device.
(2) Unplug the power cord from the outlet and plug the power cord into the device.
(3) Adjust the base.
1. 2.
Device with 2 9V batteries DC power cord
APP Control Guide (Dream Motion)
Download free to control the bed from a smartphone or a tablet.
IOS
ANDROID
Please follow the instructions for use in the APP.
Troubleshooting
If the adjustable base fails to operate, search for the symptoms and possible solutions below.
Theadjustable basedoes not
respond when the remote
control is used. Remote
control led light is on and
appears to be normal.
•
Make sure the remote control is paired with the base.
•
Checkthatthepowercordispluggedintoaworkingandgrounded electrical
outlet. Unplug the power cord from the outlet. After 30 seconds, plug it
back in. Press any button on the remote control and hold until light on the
remote control turns on.
None of the features or
functions of the base
activates.
•
Make sure the remote control is paired with the base.
•
Checkthatthepowercordispluggedintoaworkingandgrounded electrical
outlet. Unplug the power cord from the outlet. After 30 seconds,plugit back
in.Pressanybutton on theremote control and hold until light on the remote
controlilluminates.
•
Check that the surge protection device or electrical outlet is not defective.
Testtheoutletbyplugginginanotherworkingappliance.
Head or foot lift function works
to lift the base, but it does not
return it to the flat position.
•
Your base may be obstructed preventing smooth operation. Remove
obstructions from around and under the base.
•
Check that the head section is not too close to the wall.
•
If a headboard is installed, check that it is not too close to the edgeofthe
mattress.Makesurethereisenoughdistancebetween the headboard
bracket and themattress.
Head or foot lift function has
minor interference during
operation.
•
Checkthebatteriesintheremote control.Replacewithnew batteries, if
necessary.
•
Make sure that you are following the duty cycle of the motors. Donot
operateformorethantwominutesovera20-minuteperiod or approximately
10% dutycycle.
•
Press the lift buttons firmly andaccurately.
•
The remote control may be experiencing common radio frequency
interferencefromotherradiotransmittingdevices.Wait several seconds and
then try pressing the lift buttons again.
A clicking noise is heard under
the basewhenraisingor
lowering the sections.
•
Thisisnormal.Theliftmotorsclickwhentheyareengaged.No action is
required.
Excessive massage motor
noise.
•
Ifthebaseislocatedonhardsurfaceflooring,placecarpetpieces or rubber
pieces (not included) under each leg.
•
Using the remote control, raise the head, foot or neck sectionslightlyto
realignthelift/lowermechanismswiththe base support platform.
•
Make sure thatyourbaseisnotpositionedagainstawall,nightstand, or
other object that may cause the vibration or noise.
•
Ifthebaseisinstalledoverabaseframe,make surethatthe massage
motorsarenotcausingthebaseframe(orbase frame components) to
vibrate.
•
Make surethattheheadboardattachmenthardwareisproperlytightened (if
used).
Two twin XL bases can't
synchronize.
•
Turn the power off and wait 1minute and then turnthepower and pairing
backonagain.
•
Openthe batterybox andtoggletheswitchto"A"or"B"position,then press
"Memory1",nextpressandhold"Flat"untilyou hearabeepfrom each buzzer
on the controlbox.
9V 9V
Head Foot
Sync
Motor Motor
APP
JCB35H7B1
Power USB LED
Open the APP Store, search for the keyword "Dream Motion" to downloadthe app. Dream Motion
Open the Google Play to search for the keyword "Dream Motion" and downloadthe app. Dream Motion
8
9

Warranty
Congratulations! You have made an excellent choice by purchasing a Rotec electric
adjustable bed base.
To honor the warranty, please keep your proof of purchase (invoice).
For a service call, please provide the information requested on the invoice and the
serial number located under the bed (sequence of 3 letters and multiple numbers under
the bar code).
Full One (1) Year Warranty
Our product is warranted against defects in materials or workmanship for a period of one year
from the date of purchase by the original purchaser. During the first year Rotec or its distributor
will repair or replace, at no cost to the original purchaser, any defective part. This includes all
authorized labor costs incurred with the repair or replacement of any part found to be defective.
Two (2) Year Warranty –Hand Control and Electronic Components
Our product has a two-year, full replacement warranty on parts, labor and authorized
transportation on the hand control and electronic components following the purchase date.
Five (5) Year Warranty –Electric and Massage Motors
Our product has a five-year, full replacement warranty on parts, labor and authorized
transportation on the electric and massage motors following the purchase date.
Twenty-five (25) Year Warranty –Frame
Our product has a twenty-five-year warranty on the steel frame (structural defects) following the
purchase date.
Other terms and conditions
Rotec International reserves the right to substitute equal or superior quality materials during
repairs or replacements. The material replaced and covered by this warranty does not allow one
to benefit from a new warranty. It only benefits from the original warranty. For further information,
contact our technical services.
This warranty does not cover damages caused by negligence or inappropriate use. Rotec
International will not be held responsible for any other warranty offered by any person, firm or
company, to the exclusion of the one stipulated above.
This warranty gives you specific legal use rights and is only valid for the original purchaser or for
anyone who would have received it as a gift. You can also reach us at service@rotecbeds.com
or 1-800-358-6440.
10
Table of contents
Other Rotec Indoor Furnishing manuals
Popular Indoor Furnishing manuals by other brands

Vivo
Vivo DESK-V000C instruction manual

Furniture of America
Furniture of America CM3441CN Assembly instructions

Buffalo Tools
Buffalo Tools AWRCT Assembly instructions

Habitat
Habitat Pippa 4ft manual

COMFORTBABY
COMFORTBABY Sweethome User manual and assembly instructions

Safavieh
Safavieh Ibuki ACH4006 quick start guide