manuals.online logo
Brands
  1. Home
  2. •
  3. Brands
  4. •
  5. Round 2
  6. •
  7. Toy
  8. •
  9. Round 2 The THREE STOOGES POLAR LIGHTS MOE User manual

Round 2 The THREE STOOGES POLAR LIGHTS MOE User manual

The Three Stooges
curly
POL841
The Three Stooges
LARRY
POL839
Contents include: All plastic pieces to complete
model, decal sheets and pictorial instructions
describing assembly. Paint and glue not included.
professional modeler.
round2models.com
The Three Stooges® is a registered trademark of C3 Entertainment, Inc. The Three Stooges® characters, names, and all related
indicia are trademarks of C3 Entertainment, Inc. ©2010 C3 Entertainment, Inc. All Rights Reserved.
FORBIDDEN PLANET and all related characters and elements are trademarks of and © Turner Entertainment Co.
Batman: ™ & © DC Comics.
TM, ® & © 2010 CBS Studios Inc. STAR TREK and related marks are trademarks of CBS Studios Inc. All
rights reserved. © 2010 Paramount Pictures Corporation. POLAR LIGHTS is a registered trademark of
Learning Curve Brands, Inc. used under license to Round 2, LLC. ©2010 Learning Curve Brands, Inc. All
rights reserved. ROUND 2 and design are trademarks of Round 2, LLC.
©2010 Round 2, LLC, South Bend, IN 46628 USA. Product and
packaging designed in the USA. Made in China. All rights reserved.
PAINTING GUIDE
Start with a paint brush, poke Moe in the eyes, twist his nose, call him an
imbecile, hit him with a pie, and pop goes the weasel! Seriously now, the
recommended paint for airbrush application is Badger's Freak Flex or
Testor's Model Master. SOITENLY!
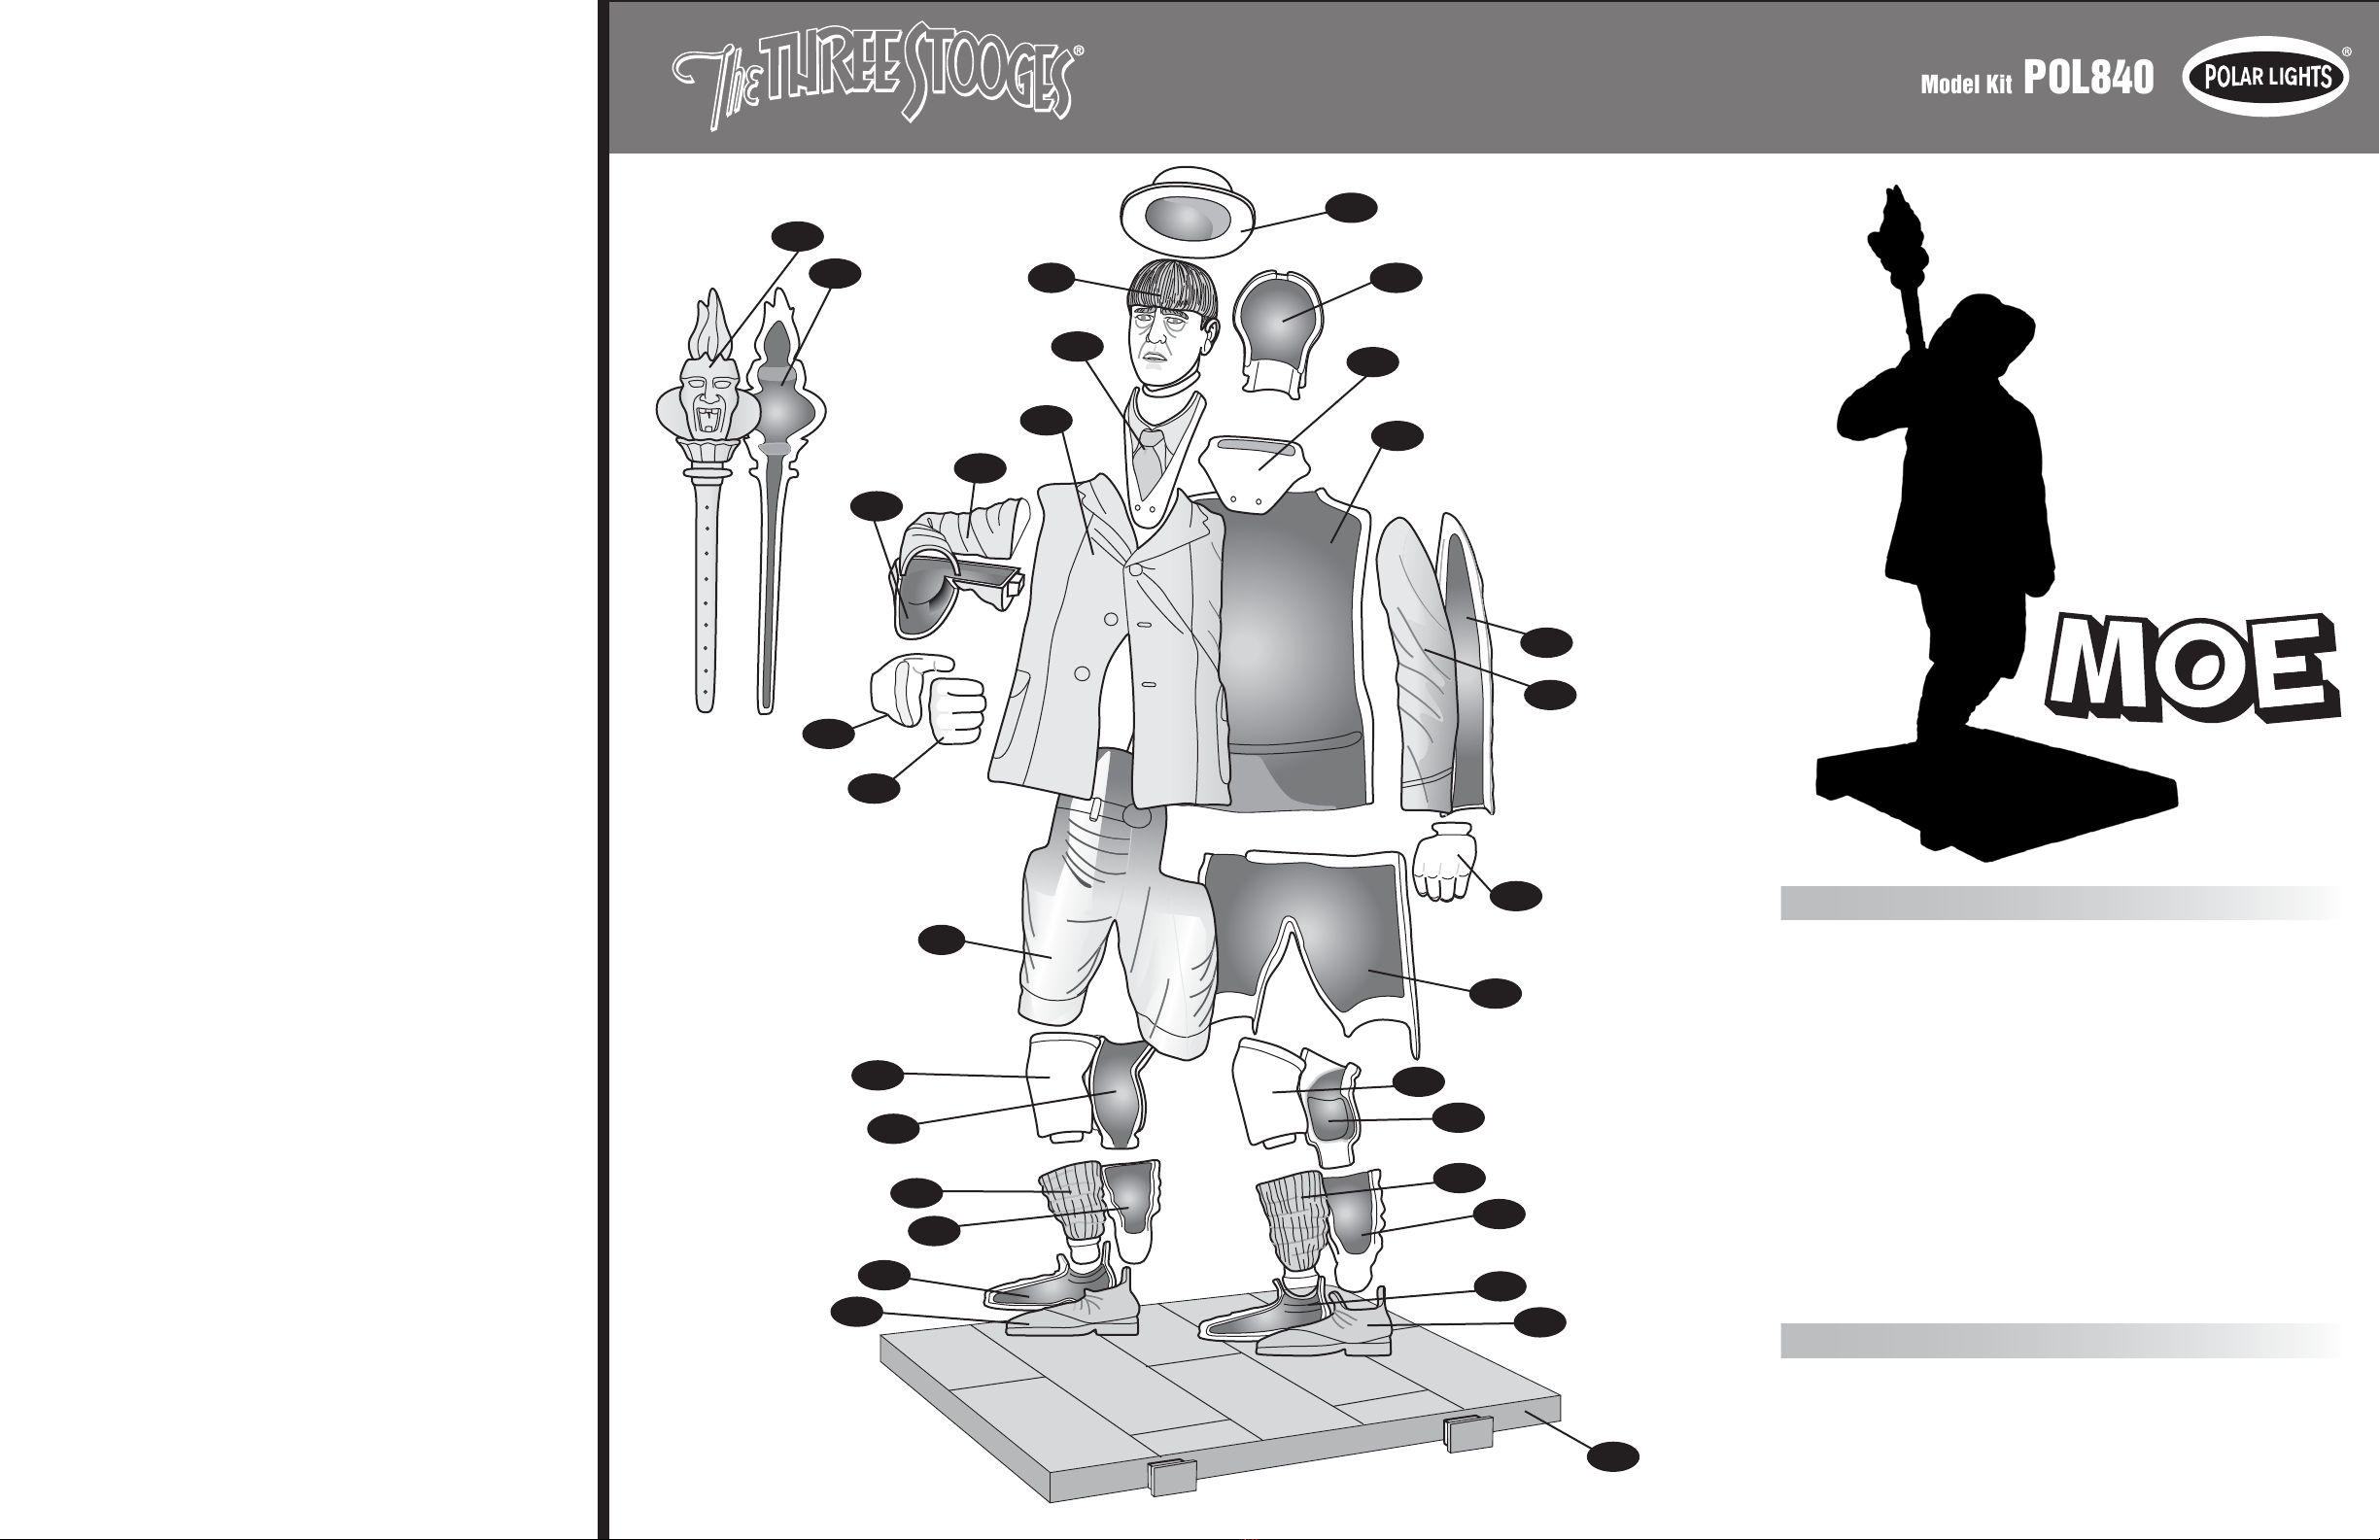
MOE
Hair . . . . . . . . . . . . . . Dark Brown/Black
Face, Hands . . . . . . . Fleshtones
Eyes . . . . . . . . . . . . . Blue
Helmet . . . . . . . . . . . . Khaki w/ Brown Strap; Inside - Dark Green
Jacket . . . . . . . . . . . . Khaki
Shirt . . . . . . . . . . . . . . Light Khaki
Neck Tie . . . . . . . . . . Red/Yellow Stripes
Shorts . . . . . . . . . . . . Light Khaki or Light Tan
Socks. . . . . . . . . . . . . Medium Tan w/Red Pattern - see box art
Shoes . . . . . . . . . . . . Brown
BASE - Sand/Tan colored w/ specks of Khaki or Brown for "aged" look.
TORCH - Gold (metallic) w/ Black wash for details.
FIRE - Mostly Yellow washed over with Yellow/Red mixes to make varying
tones of Orange for a flickering flame effect.
Model Kit POL840
ASSEMBLY INSTRUCTIONS
IMPORTANT – READ THIS FIRST!
•Before assembling model, study diagram carefully.
•Take time to familiarize yourself with all the parts and
their corresponding part numbers.
•Carefully cut the parts from the plastic tree supports
and remove any burrs.
•Apply cement to inside surfaces only. Avoid getting
cement on outer surfaces of model sections.
•Use cement very sparingly and avoid getting cement
on hands, so as not to mar or smear plastic surfaces.
•Do not hurry. Work carefully and patiently.
• Before proceeding to cement parts together, it is
advisable to fit parts together dry (without cement) so
that you may familiarize yourself with the parts and
how they go together, also noting the points where
cement is to be applied.
• For best results, assemble model exactly in the
order indicated.
• This kit is molded of styrene plastic – use only
styrene-compatible glues or cements.
• For best results, use only high quality paints
designed specifically for plastic model kits.
Look for these and other great kits!
The Witch
POL811
Star Trek®
Mr. Spock
AMT625
Star Trek®
U.S.S. Enterprise™
NCC-1701
AMT610
Every effort has been made to insure the completeness of this kit —
however, should any part be missing, go to this web address.
http://www.round2models.com/replacement
Follow the directions shown there and fill out the required
information completely.
Download our entire catalog showcasing more Round 2 model kits at -
http://www.round2models.com/xtras/catalog.php
build all three stooges.
connect their bases to create a
classic scene!
1966 Batmobile™
POL821
Forbidden Planet®
C-57D™
POL812
round2models.com
Forbidden Planet®
Robby the Robot™
POL810
Model Kit POL840
COVER ART: Chris White
Chris White started working professionally while still attending the Maryland
Institute College of Art. Even then he was illustrating classics such as Frank
Herbert's "Dune". Chris's versatility is revealed in his Civil War and "Lord of the
Rings" illustrations, as well as cover art for MAD magazine. While his fine art
prints are distributed internationally, Chris says his cover art for Polar Lights
fulfills a dream he has had since he first started building model kits years ago.
BEGIN ASSEMBLY
Take time to familiarize yourself with all the parts and their
corresponding part numbers. Carefully cut the parts from the
plastic tree supports and remove any burrs. Start with Moe’s
face (#2) and cement it to Moe’s head back (#3).
ASSEMBLE THE ARMS
Cement the right hand halves (#10) and (#11) together.
Cement right arm half (#8) and right arm half (#9) together
with the right hand assembly inserted into position at the
sleeve. Cement left arm half (#12) and left arm half (#13)
together with the left hand (#14) inserted into position at the
sleeve. Set aside to dry.
ASSEMBLE THE LEGS
Cement right leg halves (#17) and (#18) together. Cement
left leg halves (#19) and (#20) together. Set aside to dry.
Cement right sock halves (#21) and (#22) together. Cement
left sock halves (#23) and (#24) together. Set aside to dry.
Take right sock assembly and insert into right shoe half
(#25). Cement right shoe half (#25) and (#26) together
securing the sock assembly. Take left sock assembly and
insert into place of left shoe half (#27). Cement left shoe
halves (#27) and (#28) together securing the sock assembly.
Now cement the right leg assembly into the top of the right
sock/shoe assembly. Cement the left leg assembly into the
top of the left sock/shoe assembly. Set the assembled legs
aside to dry.
Cement the assembled legs into pant leg openings of the
pants back (#16). Cement the pants front (#15) to the pants
back thus securing the legs into place. Set aside to dry.
ASSEMBLE THE TORSO
Cement shirt/tie front (#4) and collar back (#5) to the inside
of the torso front (#6) and to the torso back (#7). Cement
the torso front (#6) to the torso back (#7) around the
pants/legs assembly and the head/collar assembly. Use
cement around the edges of the pants/legs and head/collar
assemblies to secure them to the torso halves. Cement the
arms to the assembled figure taking note of the positioning.
Cement torch halves (#30) and (#31) together. Position the
right arm to ensure the torch will fit into Moe's hand
perpendicular to the base. Cement torch into place.
FINAL ASSEMBLY
Cement completed Moe figure to base (#29). Finally, cement
Moe's hat (#1) onto the head. The base of the Moe model kit
will interlock with the bases of the Larry and Curly model
kits. Look for these model kits at your favorite hobby retailer.
STOOGE FACTS: Moe Howard
Moe was born Moses Horwitz in Bensonhurst, NY on June 19, 1897. Any Three
Stooges fan will tell you Moe was the insult-slinging, eye-poking, face slapping
and pie-throwing leader of the zany trio. The comedy team started in vaudeville.
“Ted Healy and His Stooges”, showcased the talents of brothers, Moe Howard,
and Shemp Howard with Larry Fine as the original third stooge. Curly Howard,
Moe and Shemp's youngest brother would later replace Shemp. The Stooges
soon eclipsed Ted Healy, and citing creative and monetary differences, “The
Three Stooges” were on their own appearing in Columbia pictures short films.
By the late 1930s The Three Stooges were a worldwide sensation. The slapstick
comedy of The Three Stooges spans many generations from short subject two
reelers to television to feature length motion pictures and beyond, now to video.
Moe Howard continued to entertain as a popular speaker on college campuses
and as a television guest. Moe was married to Helen Schonberger in 1925, they
had two children, Joan and Paul. Moe Howard died at the age of seventy-seven
in 1975 while working on his memoirs.
2
27
28
21
29
22
25
26
24
23
20
19
8
9
11
10
6
4
Hat
Face
15
PANTS FRONT
Head Back
SHIRT/Tie FRONT
Torch
Halves
Right
HAND
Halves
Right Arm
Halves
Torso Front
Torso Back
Left Hand
Left Arm Halves
Left Leg Halves
Right Leg
Halves
Right Sock
Halves
Right SHOE
Halves
Left Sock Halves
Left Shoe Halves
Base
17
18
1
3
7
COLLAR Back
5
31
30
13
12
14
PANTS BACK
16

This manual suits for next models

1

Other Round 2 Toy manuals

Round 2 AMT953/12 User manual

Round 2

Round 2 AMT953/12 User manual

Round 2 GHOSTBUSTERS ECTO-1 User manual

Round 2

Round 2 GHOSTBUSTERS ECTO-1 User manual

Popular Toy manuals by other brands

Eduard Mi-24V Hind interior Assembly instructions

Eduard

Eduard Mi-24V Hind interior Assembly instructions

Eduard Lancaster landing flaps quick start guide

Eduard

Eduard Lancaster landing flaps quick start guide

Beyblade DRIGER F instructions

Beyblade

Beyblade DRIGER F instructions

Plum super space rocket Assembly instructions

Plum

Plum super space rocket Assembly instructions

Fisher-Price FFN34 manual

Fisher-Price

Fisher-Price FFN34 manual

Carson Stinger 340 instruction manual

Carson

Carson Stinger 340 instruction manual

GREAT PLANES Giant U-Can-Do 3D instruction manual

GREAT PLANES

GREAT PLANES Giant U-Can-Do 3D instruction manual

Pressman Mr. Bucket manual

Pressman

Pressman Mr. Bucket manual

Zapf Creation BABY born 823583 Instructions for use

Zapf Creation

Zapf Creation BABY born 823583 Instructions for use

Mattel Barbie K6295 instructions

Mattel

Mattel Barbie K6295 instructions

MSH Protos 380 instruction manual

MSH

MSH Protos 380 instruction manual

LGB Lehmann 2070D Service manual

LGB Lehmann

LGB Lehmann 2070D Service manual

Vollmer 45727 Mounting instruction

Vollmer

Vollmer 45727 Mounting instruction

Amewi AMXPLANES A-10 THUNDERBOLT II manual

Amewi

Amewi AMXPLANES A-10 THUNDERBOLT II manual

Eduard BRASSIN AIM-7M Sparrow manual

Eduard

Eduard BRASSIN AIM-7M Sparrow manual

FG Modellsport 10452 Mounting instruction

FG Modellsport

FG Modellsport 10452 Mounting instruction

POLA G 330935 manual

POLA G

POLA G 330935 manual

Seagull Models JUMPER 25 instruction manual

Seagull Models

Seagull Models JUMPER 25 instruction manual

manuals.online logo
manuals.online logoBrands
  • About & Mission
  • Contact us
  • Privacy Policy
  • Terms and Conditions

Copyright 2025 Manuals.Online. All Rights Reserved.